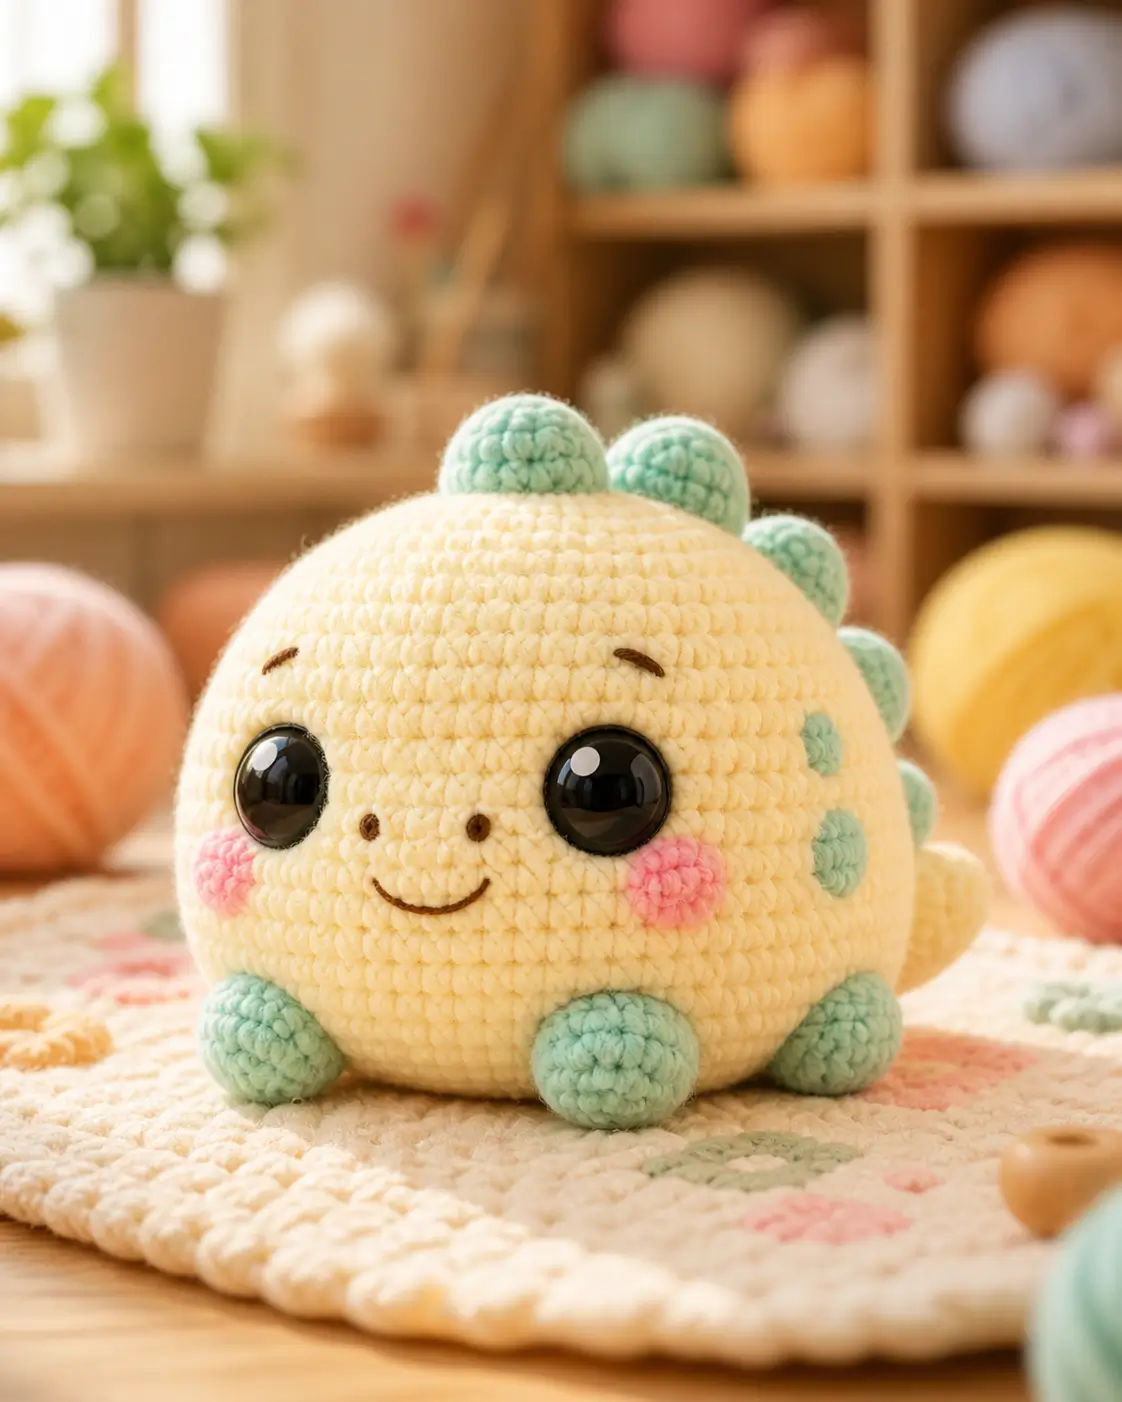
A stegosaurus needs its back plates to read before its tail does. This dinosaur amigurumi crochet pattern uses chunky chenille, 14 mm safety eyes, and a 4.5 mm hook for a 13 cm sitting toy at advanced-beginner level. Make it when you need a stable desk plush with visible facial placement and low part count.
The Design: What Makes Pastel Chubby Dino Different
This baby dinosaur amigurumi is built around a 42-stitch head plateau, then paired with a smaller 36-stitch body so the face stays dominant. A round head matches the photo better than a long reptile head; it gives the eyes enough space and keeps the smile centered. Short feet are placed low, not halfway up the body, because a chubby dino crochet pattern loses balance when the limbs sit too high.
Oversized mint plates replace sharp triangular spikes. The maker then reads the toy as soft stegosaurus amigurumi pattern styling, not a generic monster. Common error: adding the tail before pinning the plates. That pushes the back line off-center and makes the side spots look random.
Project Info at a Glance
| Skill Level | Time | Finished Size | Hook | Best For |
|---|---|---|---|---|
| Advanced beginner | 2–4 hours | 13 cm sitting | 4.5 mm | Plush dinosaur crochet toy with photo-style face placement |
Materials and Tools
Yarn
- Cream / pale yellow — chunky chenille, size 6 — 55–65 g — Premier Parfait Chunky, Hobbii Honey Bunny, or similar plush yarn.
- Mint green — chunky chenille, size 6 — 20–25 g — for feet, plates, and side spots.
- Pink — chunky chenille or worsted held double — 3–5 g — for cheek patches.
- Dark brown — cotton or acrylic thread — 1 m — for brows, nostrils, and smile.
Tools
- Hook 4.5 mm
- 14 mm black safety eyes
- Polyester stuffing
- Yarn needle
- Stitch markers
- Pins
- Embroidery needle
For toys intended for children under 3, replace safety eyes with embroidered eyes because detachable small parts can be a choking, aspiration, or ingestion hazard.
Abbreviations
- MR = magic ring
- sc = single crochet
- inc = increase, 2 sc in one stitch
- dec = decrease
- sl st = slip stitch
- ch = chain
- BLO = back loop only
- FO = fasten off
Work an invisible decrease through the front loops only so the closing rounds do not leave raised cords across the head.
Pattern — Step by Step
Continuous spiral unless noted. Counts appear at the end of every round.
Head — Make 1
Yarn: cream chunky chenille.
R1: 6 sc in MR (6)
R2: inc ×6 (12)
R3: (sc, inc) ×6 (18)
R4: (2 sc, inc) ×6 (24)
R5: (3 sc, inc) ×6 (30)
R6: (4 sc, inc) ×6 (36)
R7: (5 sc, inc) ×6 (42)
R8–R16: sc around (42)
R17: (5 sc, dec) ×6 (36)
R18: (4 sc, dec) ×6 (30)
R19: sc around (30)
R20: (3 sc, dec) ×6 (24)
R21: (2 sc, dec) ×6 (18)
R22: (sc, dec) ×6 (12)
R23: dec ×6 (6)
Insert eyes between R11 and R12, 9 stitches apart. Start stuffing at R18, then pack the lower cheeks firmly before closing.
Fasten off. Leave 15 cm tail for closing.
Body — Make 1
Yarn: cream chunky chenille.
R1: 6 sc in MR (6)
R2: inc ×6 (12)
R3: (sc, inc) ×6 (18)
R4: (2 sc, inc) ×6 (24)
R5: (3 sc, inc) ×6 (30)
R6: (4 sc, inc) ×6 (36)
R7–R12: sc around (36)
R13: (4 sc, dec) ×6 (30)
R14: (3 sc, dec) ×6 (24)
R15: (2 sc, dec) ×6 (18)
R16: (sc, dec) ×6 (12)
R17: dec ×6 (6)
Stuff firmly at the base. The body should sit as a low dome under the head, not as a tall oval.
Fasten off. Leave 35 cm tail for sewing.
Front Feet — Make 2
Yarn: mint chunky chenille.
R1: 6 sc in MR (6)
R2: inc ×6 (12)
R3–R5: sc around (12)
R6: (sc, dec) ×4 (8)
Stuff only the toe end. Flatten the open edge.
Fasten off. Leave 25 cm tail.
Back Feet — Make 2
Yarn: mint chunky chenille.
R1: 6 sc in MR (6)
R2: inc ×6 (12)
R3: (sc, inc) ×6 (18)
R4–R5: sc around (18)
R6: (sc, dec) ×6 (12)
R7: dec ×6 (6)
Stuff lightly so each foot stays round but not tall.
Fasten off. Leave 25 cm tail.
Rounded Dorsal Plates — Large — Make 3
Yarn: mint chunky chenille.
R1: 6 sc in MR (6)
R2: inc ×6 (12)
R3: (sc, inc) ×6 (18)
R4–R5: sc around (18)
R6: (sc, dec) ×6 (12)
Stuff lightly. Do not close; the open edge sews flatter to the head.
Fasten off. Leave 30 cm tail.
Rounded Dorsal Plates — Small — Make 4
Yarn: mint chunky chenille.
R1: 6 sc in MR (6)
R2: inc ×6 (12)
R3–R4: sc around (12)
Leave unstuffed or add one small pinch of stuffing for a raised bump.
Fasten off. Leave 25 cm tail.
Tail — Make 1
Yarn: cream chunky chenille.
R1: 6 sc in MR (6)
R2: sc around (6)
R3: inc ×6 (12)
R4: sc around (12)
R5: (sc, inc) ×6 (18)
R6–R8: sc around (18)
Stuff from the wide end. Angle the tail slightly upward before sewing.
Fasten off. Leave 35 cm tail.
Cheek Patches — Make 2
Yarn: pink chunky chenille.
R1: 6 sc in MR (6)
R2: inc ×6 (12)
Sl st to first stitch (12)
Keep patches flat. Do not stuff.
Fasten off. Leave 20 cm tail.
Side Spots — Make 4
Yarn: mint chunky chenille.
R1: 6 sc in MR (6)
R2: inc ×6 (12)
Sl st to first stitch (12)
Make two spots for each side. Keep the top spot smaller by tightening the final slip stitch.
Fasten off. Leave 18 cm tail.
Face Embroidery
Yarn: dark brown thread.
Place nostrils between R13 and R14, 2 stitches apart. Work each nostril as one short vertical stitch. Place the smile under the nostrils with a shallow curve across 5 stitches. Add brows between R8 and R9, each brow 3 stitches wide, angled one round upward toward the outer side.
Accessories
No separate accessory is visible in the source photo. Add none for a direct photo match.
Assembly
- Sew the body to the lower back of the head, covering the bottom third of the head with the body dome.
- Pin the front feet at the front base, 6 stitches apart, with the toes pointing forward.
- Pin the back feet on the lower side edges so the toy sits without rolling.
- Sew the tail to the back of the body between R9 and R12 of the body, angled up by about 20 degrees.
- Place the three large plates on the top centerline of the head, starting behind the forehead and ending near the crown.
- Add the four small plates down the back line, decreasing visual size toward the tail.
- Sew cheek patches between R13 and R16, one round below the eyes.
- Sew two mint side spots on each side, behind the cheek and before the tail.
- Embroider brows, nostrils, and smile after all soft parts are attached.
- Weave every tail through at least 3 cm of dense fabric before trimming.
The finished plush sits as a 13 cm pastel chubby dinosaur with a stable low base.
7 Technical Tips
- Stitch marker drift: Move the marker at the end of every round from R8 to R23 on the head. A one-stitch shift rotates the smile under one eye.
- Stuffing firmness: Press the forehead at R18; it should rebound within 2 seconds. Under-stuffing creates a dent below the first mint plate.
- Invisible decrease gaps: Use front-loop invisible decreases on R17, R18, R20, R21, R22, and R23 of the head. Standard decreases leave six visible bars around the lower face.
- Eye placement timing: Insert the 14 mm eyes before closing R18. After R20, the opening is too narrow for easy washer placement.
- Velvet tension: Keep the working loop no taller than 4 mm above the hook shaft. Taller loops make the cheek patches flare and expose stuffing.
- Pinning alignment: Pin all seven back plates before sewing the first one. If plate 1 starts more than 2 stitches off center, plate 7 will land beside the tail.
- Tail weaving: Bury each tail for at least 3 cm through the stuffed head or body. A shorter woven tail can slip out when chenille fibers shed.
Conclusion
Block the face layout before sewing the mint plates. The cheeks, eyes, and nostrils carry the toy’s scale, while the plates confirm the dinosaur shape from the side view. Your next step is to make the head first, pin all seven plates, then photograph the side profile before final stitching. Share the finished dino on Pinterest with a vertical process image, and post the front view on Instagram with the hashtag #PastelChubbyDino. This dinosaur amigurumi crochet pattern works best when the head stays round and the feet stay low. How many mint plates will you place before the tail begins?









