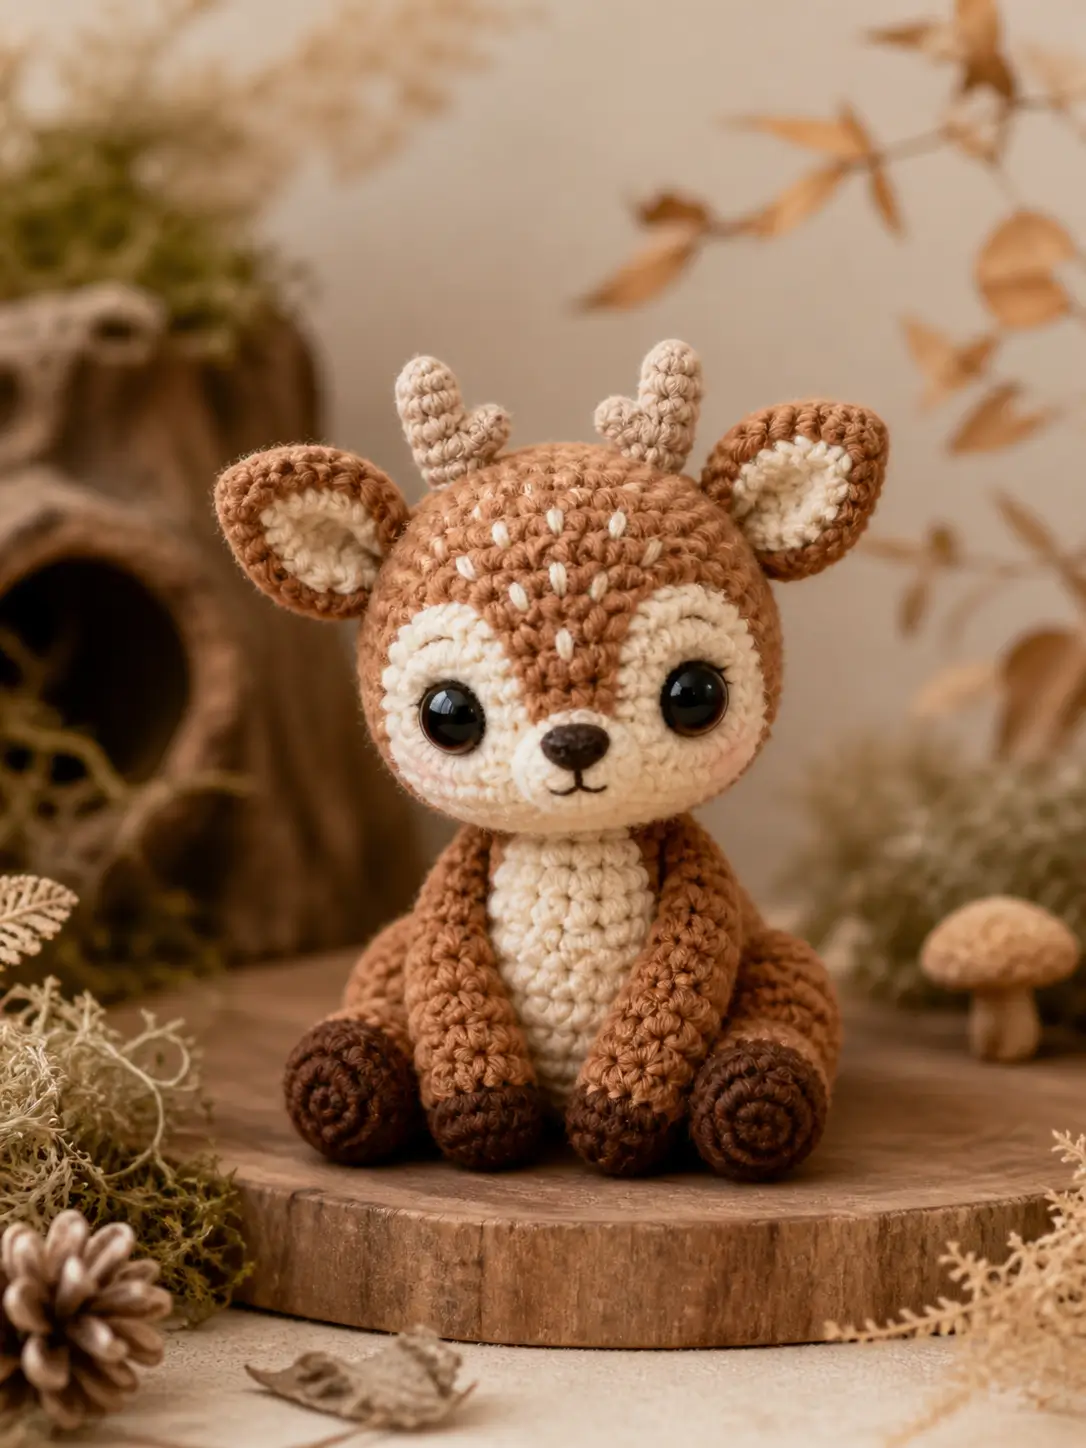
Fawn spots are not decoration; they control the whole face map. This deer amigurumi crochet pattern builds a 14 cm sitting woodland fawn with DK yarn, a 2.5 mm hook, 10 mm safety eyes, and intermediate shaping. Make it when a forest animal needs to sit flat on a shelf without a wire frame.
The Design: What Makes This Fawn Different
This fawn depends on three visible decisions. First, the head uses a 36-stitch plateau so the cream cheek circles have room without crowding the muzzle. Second, the body also reaches 36 stitches, but it is shorter and firmer; that keeps the deer crochet toy seated instead of tipping backward. Third, the antlers stay narrow. Large antlers pull the eye upward and turn a baby deer crochet pattern into a reindeer pattern. The common maker mistake is placing the eyes too low after the muzzle is sewn. The result is a bear-like face. Set the eyes before closing the head, then pin the cheek patches around them. This woodland amigurumi deer reads as a fawn because the face mask, spots, ears, and hooves work as one layout.
Project Info at a Glance
| Skill Level | Time | Finished Size | Hook | Best For |
|---|---|---|---|---|
| Intermediate | 5–7 hours | 14 cm sitting | 2.5 mm | Shelf display, woodland nursery styling, market table sample |
Finished-size and hook choices are benchmarked against published deer patterns using 13–14 cm sizing and 2.5 mm DK/light-worsted yarn builds. Source: Amiguroom deer pattern.
Materials and Tools
Yarn
- Caramel brown — DK / light worsted — 45–50 g — YarnArt Jeans, Paintbox Cotton DK, or similar cotton-acrylic
- Cream — DK / light worsted — 15 g — for face patches, belly, muzzle, inner ears, tail tip
- Dark brown — DK / light worsted — 8 g — for hooves and nose embroidery
- Beige — DK / light worsted — 5 g — for antlers
- White embroidery yarn — small length — for forehead spots
The yarn range follows public deer-pattern material benchmarks: DK/light-worsted deer patterns commonly pair with small hooks, while larger deer listings require much more main yarn. Source: Stella’s Yarn Universe deer pattern.
Tools
- Hook 2.5 mm
- 10 mm black safety eyes, 1 pair
- Polyester stuffing
- Yarn needle
- Embroidery needle
- Stitch markers
- Pins
- Scissors
Safety-eye size is set at 10 mm to match the photo’s large glossy eyes; published deer patterns also list 10 mm eyes in comparable deer builds. Source: StringyDingDing deer pattern. Embroidered eyes are the safer option for toys intended for children under 3.
Abbreviations
MR = magic ring
sc = single crochet
inc = increase, 2 sc in one stitch
dec = invisible decrease over 2 stitches
sl st = slip stitch
ch = chain
BLO = back loop only
Invisible decrease means working through the front loops of the next two stitches before completing one sc, which keeps the fabric flatter on closing rounds.
Pattern — Step by Step
Continuous spiral unless noted. Mark the first stitch of every round.
Head
Yarn: caramel brown — Source: Standard 6-stitch amigurumi math; sizing checked against searched deer pattern benchmarks.
R1: 6 sc in MR (6)
R2: inc ×6 (12)
R3: (sc, inc) ×6 (18)
R4: (2 sc, inc) ×6 (24)
R5: (3 sc, inc) ×6 (30)
R6: (4 sc, inc) ×6 (36)
R7: sc around (36)
R8: sc around (36)
R9: sc around (36)
R10: sc around (36)
R11: sc around (36)
R12: sc around (36)
Place safety eyes between R9 and R10, 7 stitches apart. Do not lock washers until both cheek patches are pinned.
R13: (4 sc, dec) ×6 (30)
R14: (3 sc, dec) ×6 (24)
R15: (2 sc, dec) ×6 (18)
Stuff firmly, keeping the lower face rounded.
R16: (sc, dec) ×6 (12)
R17: dec ×6 (6)
Fasten off. Leave 20 cm tail for closing.
Body
Yarn: caramel brown — Source: Standard amigurumi math.
R1: 6 sc in MR (6)
R2: inc ×6 (12)
R3: (sc, inc) ×6 (18)
R4: (2 sc, inc) ×6 (24)
R5: (3 sc, inc) ×6 (30)
R6: (4 sc, inc) ×6 (36)
R7: sc around (36)
R8: sc around (36)
R9: sc around (36)
R10: sc around (36)
R11: sc around (36)
R12: sc around (36)
R13: (4 sc, dec) ×6 (30)
R14: sc around (30)
R15: (3 sc, dec) ×6 (24)
R16: (2 sc, dec) ×6 (18)
Stuff the lower body firmly and the neck edge lightly.
R17: (sc, dec) ×6 (12)
R18: dec ×6 (6)
Fasten off. Leave 35 cm tail for sewing to the head.
Arms / Front Legs
Make 2. Yarn: dark brown, then caramel brown — Source: Standard amigurumi math.
R1: dark brown, 6 sc in MR (6)
R2: inc ×6 (12)
R3: (sc, inc) ×6 (18)
R4: BLO sc around (18)
R5: (sc, dec) ×6 (12)
R6: change to caramel brown, sc around (12)
R7: sc around (12)
R8: sc around (12)
R9: sc around (12)
R10: sc around (12)
R11: sc around (12)
R12: sc around (12)
Stuff only the hoof and lower third.
R13: sc around (12)
Flatten top and sc through both layers for 6 sc. Fasten off. Leave 25 cm tail.
Back Legs
Make 2. Yarn: dark brown, then caramel brown — Source: Standard amigurumi math.
R1: dark brown, 6 sc in MR (6)
R2: inc ×6 (12)
R3: (sc, inc) ×6 (18)
R4: (2 sc, inc) ×6 (24)
R5: BLO sc around (24)
R6: sc around (24)
R7: (2 sc, dec) ×6 (18)
R8: (sc, dec) ×6 (12)
R9: change to caramel brown, sc around (12)
R10: sc around (12)
R11: sc around (12)
Stuff the hoof firmly and leave the top softer for a seated angle.
R12: sc around (12)
Fasten off. Leave 30 cm tail.
Ears and Inner Ears
Make 2 outer ears and 2 inner patches. Yarn: caramel brown and cream — Source: Standard amigurumi math.
Outer ear:
R1: caramel brown, 6 sc in MR (6)
R2: inc ×6 (12)
R3: (sc, inc) ×6 (18)
R4: sc around (18)
R5: sc around (18)
R6: sc around (18)
R7: (sc, dec) ×6 (12)
Flatten and pinch the lower edge. Fasten off. Leave 30 cm tail.
Inner ear patch:
R1: cream, 6 sc in MR (6)
R2: inc ×6 (12)
Sl st to first stitch.
Fasten off. Leave 18 cm tail. Sew one cream circle slightly low inside each ear.
Antlers
Make 2 main antlers and 2 branches. Yarn: beige — Source: Standard 6-stitch tube math; searched deer patterns confirm separate antlers as a common construction choice.
Main antler:
R1: 6 sc in MR (6)
R2: sc around (6)
R3: sc around (6)
R4: sc around (6)
R5: sc around (6)
R6: sc around (6)
R7: sc around (6)
Fasten off. Leave 25 cm tail.
Branch:
R1: 6 sc in MR (6)
R2: sc around (6)
R3: sc around (6)
R4: sc around (6)
Fasten off. Leave 20 cm tail. Sew each branch to the side of one main antler between R4 and R5.
Muzzle / Snout
Yarn: cream — Source: Standard amigurumi math.
R1: 6 sc in MR (6)
R2: inc ×6 (12)
R3: (sc, inc) ×6 (18)
R4: sc around (18)
Sl st to finish.
Fasten off. Leave 30 cm tail. Add a small amount of stuffing before sewing. Embroider a dark brown oval nose across R2–R3 and one short vertical mouth line below it.
Cheek Patches
Make 2. Yarn: cream — Source: Standard flat circle math.
R1: 6 sc in MR (6)
R2: inc ×6 (12)
R3: (sc, inc) ×6 (18)
Sl st to finish.
Fasten off. Leave 25 cm tail. Pin one patch around each eye, letting the lower edge touch the muzzle.
Belly Patch
Yarn: cream — Source: Standard flat circle math.
R1: 6 sc in MR (6)
R2: inc ×6 (12)
R3: (sc, inc) ×6 (18)
R4: (2 sc, inc) ×6 (24)
R5: sc around (24)
Sl st to finish.
Fasten off. Leave 35 cm tail. Block into a soft oval with pins before sewing.
Tail
Yarn: cream, then caramel brown — Source: Standard amigurumi math.
R1: cream, 6 sc in MR (6)
R2: inc ×6 (12)
R3: change to caramel brown, sc around (12)
R4: dec ×6 (6)
Fasten off. Leave 25 cm tail. Do not overstuff.
Forehead Spots
Yarn: white embroidery yarn — Source: photo-specific surface embroidery.
Make 9–11 short vertical stitches on the forehead. Place the first stitch at the center between the antlers, then stagger the remaining stitches in two loose columns down toward the eyes. Each stitch should span one crochet round only.
Mini Mushroom Prop
Optional accessory from photo. Yarn: cream stem and tan cap — Source: Standard amigurumi math.
Stem:
R1: cream, 6 sc in MR (6)
R2: inc ×6 (12)
R3: sc around (12)
R4: sc around (12)
R5: sc around (12)
R6: dec ×6 (6)
Fasten off. Leave 20 cm tail.
Cap:
R1: tan, 6 sc in MR (6)
R2: inc ×6 (12)
R3: (sc, inc) ×6 (18)
R4: sc around (18)
R5: sc around (18)
R6: (sc, dec) ×6 (12)
Stuff lightly. Sew cap to stem.
Assembly
- Sew the head to the body with the body opening centered under the head, using the 35 cm body tail.
- Pin the muzzle low on the face, centered between the eyes, then sew it down after checking the nose angle.
- Sew the cheek patches around the eyes, keeping both inner edges close to the muzzle.
- Attach the belly patch to the front of the body from R7 to R13.
- Sew the front legs to the upper body so the dark hooves rest against the belly patch.
- Sew the back legs to the lower sides, angled forward enough to create a stable sitting base.
- Attach the ears at the upper sides of the head, with inner cream patches facing forward.
- Sew the antlers between the ears, 2 rounds inward from each ear base.
- Add the tail to the back center of the body and embroider the forehead spots.
- Place the mushroom prop beside the finished fawn and trim all yarn tails after final shaping.
The completed fawn has a 14 cm sitting height when made with DK yarn, a 2.5 mm hook, and firm amigurumi tension.
7 Technical Tips
- Stitch marker drift: A deer face becomes uneven when the start marker spirals across the forehead. Recenter the eye line by counting from the center front, not from the marker.
- Stuffing firmness: Understuffed cheeks collapse after the safety-eye washers are locked. Add small pieces of stuffing behind each eye until the face holds a rounded mask shape.
- Invisible decrease gaps: Regular decreases can leave six visible holes on R13–R17 of the head. Work invisible decreases and pull each decrease snug before starting the next stitch.
- Eye placement timing: Locking the eyes before cheek patches are pinned can trap the face too wide or too narrow. Place eyes between R9 and R10, pin the patches, then lock the washers.
- Velvet tension risk: Velvet or chenille yarn can turn 10 mm eyes into undersized dots. Move to 12–14 mm eyes only after making a test head, because yarn thickness changes the face scale.
- Pinning symmetry: Antlers that look even from the front can lean backward from the side. Pin both antlers, view the head from three angles, then sew each base through at least 6 stitches.
- Tail weaving: Short tails can work loose near hooves and ears after handling. Leave 25–35 cm sewing tails and weave each tail through a stuffed section before trimming.
Conclusion
This build works because the fawn identity is carried by placement, not extra bulk: pale cheek circles, a short muzzle, small antlers, wide ears, and staggered white forehead stitches. Block the belly patch before final sewing, then compare both antlers from the front and side. The next practical step is to make one test head in scrap DK yarn and record eye spacing before cutting your main yarn. Share the finished deer amigurumi crochet pattern sample on Pinterest and Instagram with the sitting-height measurement in the caption. Use #WoodlandFawnDeer. Which feature on your fawn changed the face most: the cream cheek patches, the antler height, or the white forehead spots?









