Introduction
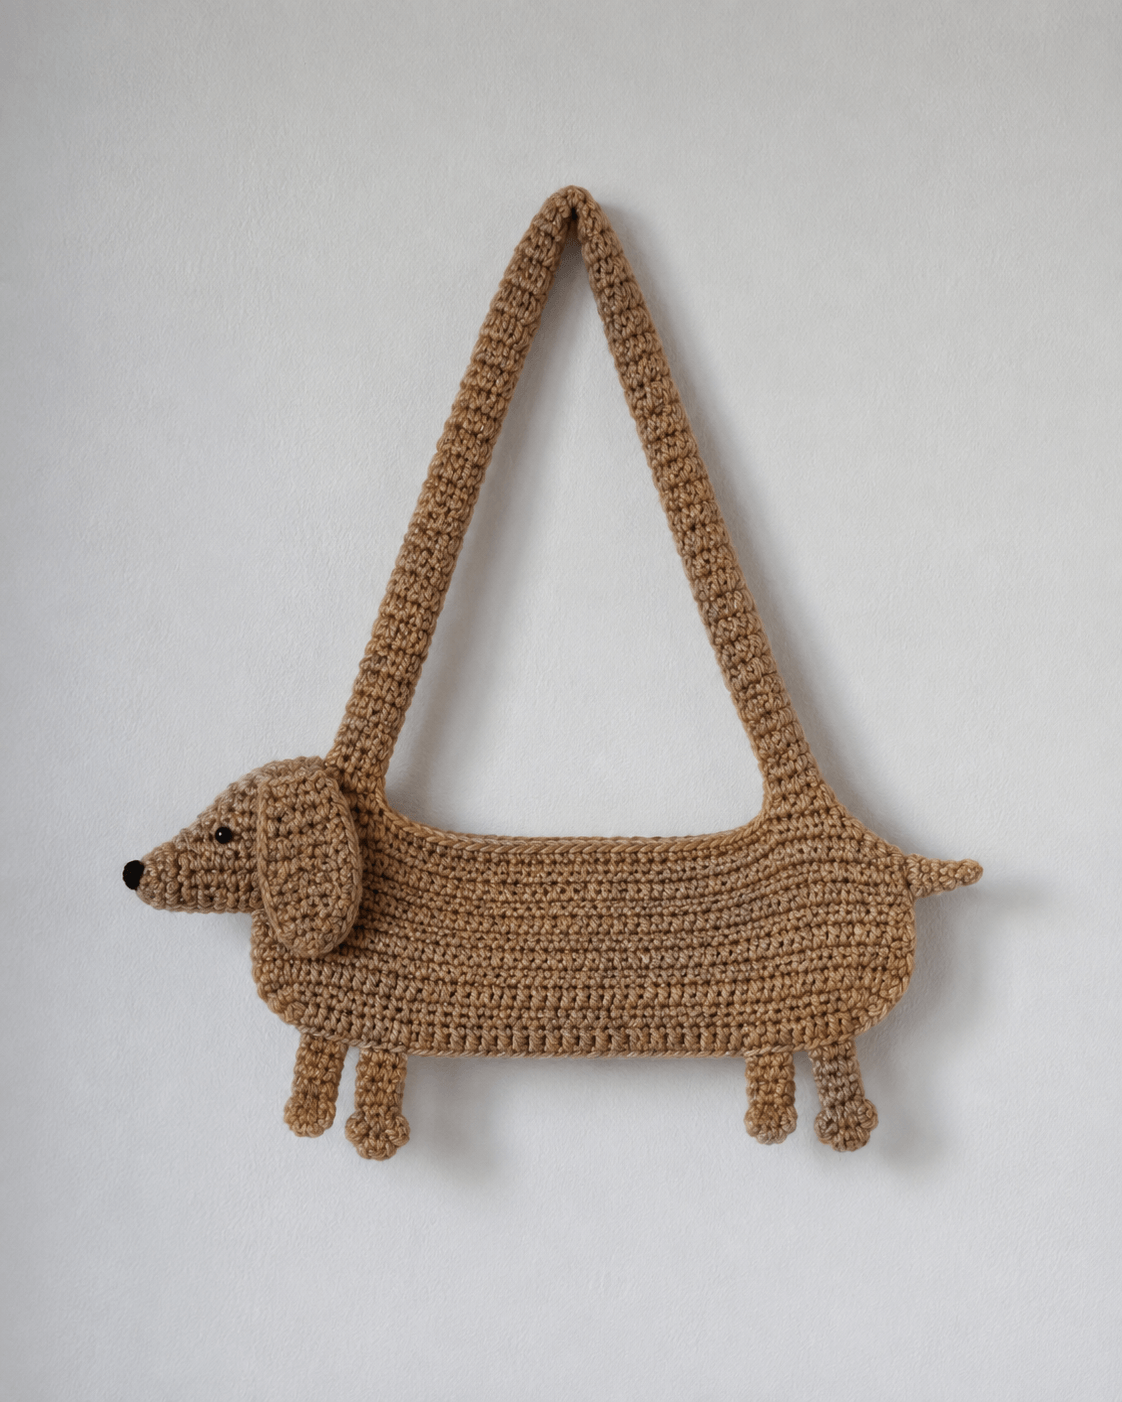
A dachshund’s torso is already shaped like a handbag, but the four short legs cannot be allowed to carry any of the purse load. This dachshund crochet bag pattern converts the long brown body into a functional compartment while keeping the pointed muzzle, floppy ear and tail visible. Work it in worsted yarn with a 5 mm hook for a body near 30 cm long. Intermediate shaping, lining and reinforced strap sewing are required.
The Design: What Makes This Dachshund Bag Different
The storage compartment follows the breed’s long horizontal body rather than hiding a dog appliqué on a conventional tote. Two shaped panels create the torso, while a narrow gusset supplies enough depth for a phone, wallet and other small items. The muzzle extends directly from the front body panel, which keeps the profile continuous and separates this dachshund shoulder bag from rectangular dog-themed bags. Four short legs hang beneath the lower seam and remain decorative; the load transfers through two wide straps attached across the upper body. A long floppy ear covers part of the head-to-body transition and reinforces the characteristic dachshund profile. One frequent failure is placing the tail too low. The tail should continue the upper back line, not emerge from the bottom seam, or the elongated body loses its recognizable silhouette.
Project Information at a Glance
| Skill Level | Time | Finished Size | Hook | Best For |
|---|---|---|---|---|
| Intermediate | 9–12 hours | Approx. 30.5 cm long body | 5 mm | Shoulder purse and light everyday carry |
A published Dachshund Dog Purse uses Aran-weight yarn, a 5 mm hook and approximately 229–274 metres of yarn. Its stated size is 12 inches long by 10¾ inches tall, or about 30.5 × 27.3 cm. Use those figures as a scale reference rather than a fixed gauge requirement.
Materials and Tools
Yarn
- Caramel brown — Aran/worsted cotton or cotton blend — approximately 230–275 m — body, head, legs, ears, tail and straps
- Black — small yarn or embroidery-thread scrap — eye and nose
Tools
- 5 mm crochet hook
- One or two 9 mm black safety eyes, depending on whether both sides receive facial details
- Yarn needle
- Stitch markers
- Scissors
- Dressmaking clips or pins
- Optional cotton lining fabric
- Optional zipper measuring approximately 25 cm
- Optional 20 mm magnetic closure
- Optional cotton webbing or twill tape for strap reinforcement
Cotton-rich yarn limits stretch better than soft acrylic when the finished item is used as a handbag. The published Ravelry dachshund purse also includes lining and zipper instructions as part of its functional construction.
Abbreviations
- MR — magic ring
- sc — single crochet
- inc — two single crochet stitches in one stitch
- dec — decrease over two stitches
- sl st — slip stitch
- ch — chain
- hdc — half double crochet
- BLO — back loop only
An invisible decrease is worked through the front loops of the following two stitches before completing them together as one single crochet.
Pattern — Step by Step
This project is constructed primarily in flat rows rather than continuous amigurumi spirals. Keep the body firm enough that it does not sag when empty, and work both straps at slightly tighter tension.
Front Body Panel
Yarn: caramel brown — original photo-matched flat-panel construction.
Row 1: ch 19, sc in second ch from hook and across (18)
Row 2: ch 1, turn, inc, 16 sc, inc (20)
Row 3: ch 1, turn, inc, 18 sc, inc (22)
Row 4: ch 1, turn, inc, 20 sc, inc (24)
Row 5: ch 1, turn, inc, 22 sc, inc (26)
Row 6: ch 1, turn, inc, 24 sc, inc (28)
Row 7: ch 1, turn, inc, 26 sc, inc (30)
Row 8: ch 1, turn, inc, 28 sc, inc (32)
Row 9: ch 1, turn, inc, 30 sc, inc (34)
Row 10: ch 1, turn, inc, 32 sc, inc (36)
Row 11: ch 1, turn, inc, 34 sc, inc (38)
Row 12: ch 1, turn, inc, 36 sc, inc (40)
Row 13: ch 1, turn, inc, 38 sc, inc (42)
Row 14: ch 1, turn, inc, 40 sc, inc (44)
Row 15: ch 1, turn, inc, 42 sc, inc (46)
Row 16: ch 1, turn, inc, 44 sc, inc (48)
Row 17: ch 1, turn, inc, 46 sc, inc (50)
Row 18: ch 1, turn, inc, 48 sc, inc (52)
Row 19: ch 1, turn, inc, 50 sc, inc (54)
Row 20–Row 32: ch 1, turn, sc across (54)
Row 33: ch 1, turn, dec, 50 sc, dec (52)
Row 34: ch 1, turn, dec, 48 sc, dec (50)
Row 35: ch 1, turn, dec, 46 sc, dec (48)
Row 36: ch 1, turn, dec, 44 sc, dec (46)
Row 37: ch 1, turn, dec, 42 sc, dec (44)
Row 38: ch 1, turn, dec, 40 sc, dec (42)
Fasten off. Leave a 50 cm tail if the body will be sewn rather than crocheted to the gusset.
Back Body Panel
Yarn: caramel brown.
Repeat Front Body Panel Rows 1–38.
Lay both panels together before proceeding. Their widest rows must contain the same 54 stitches and their top edges should match without stretching.
Head and Long Muzzle — Make Two Side Panels
Yarn: caramel brown. Work from neck toward nose.
Row 1: ch 29, sc in second ch from hook and across (28)
Row 2–Row 5: ch 1, turn, sc across (28)
Row 6: ch 1, turn, dec, 24 sc, dec (26)
Row 7: ch 1, turn, sc across (26)
Row 8: ch 1, turn, dec, 22 sc, dec (24)
Row 9: ch 1, turn, sc across (24)
Row 10: ch 1, turn, dec, 20 sc, dec (22)
Row 11: ch 1, turn, dec, 18 sc, dec (20)
Row 12: ch 1, turn, dec, 16 sc, dec (18)
Row 13: ch 1, turn, dec, 14 sc, dec (16)
Row 14: ch 1, turn, dec, 12 sc, dec (14)
Row 15: ch 1, turn, dec, 10 sc, dec (12)
Row 16: ch 1, turn, dec, 8 sc, dec (10)
Row 17: ch 1, turn, dec, 6 sc, dec (8)
Fasten off and leave a 35 cm sewing tail. Join the two head panels around the top, muzzle and lower edge, leaving the neck edge open.
Add only a thin strip of stuffing to the muzzle if a slightly dimensional profile is wanted. Do not pack the head firmly because it forms part of the bag exterior.
Nose
Yarn: black.
R1: 6 sc in MR (6)
R2: inc × 6 (12)
Fasten off and leave a 20 cm tail. Fold the circle slightly around the muzzle tip and sew it across the final two head rows.
Floppy Ears — Make Two
Yarn: caramel brown. Only one ear is clearly visible in the photograph; a second gives the bag a finished reverse side.
Row 1: ch 9, sc in second ch from hook and across (8)
Row 2: ch 1, turn, inc, 6 sc, inc (10)
Row 3: ch 1, turn, inc, 8 sc, inc (12)
Row 4–Row 11: ch 1, turn, sc across (12)
Row 12: ch 1, turn, dec, 8 sc, dec (10)
Row 13: ch 1, turn, dec, 6 sc, dec (8)
Row 14: ch 1, turn, dec, 4 sc, dec (6)
Work single crochet around the full perimeter, placing two stitches around each lower corner. Fasten off and leave a 30 cm sewing tail.
Front Legs — Make Two
Yarn: caramel brown.
R1: 6 sc in MR (6)
R2: inc × 6 (12)
R3–R8: sc around (12)
R9: (sc, dec) × 4 (8)
R10–R12: sc around (8)
Do not stuff heavily. Add only enough filling to prevent the leg from collapsing completely.
Fasten off and leave a 25 cm attachment tail.
Back Legs — Make Two
Yarn: caramel brown.
R1: 6 sc in MR (6)
R2: inc × 6 (12)
R3–R7: sc around (12)
R8: (sc, dec) × 4 (8)
R9–R11: sc around (8)
Fasten off and leave a 25 cm sewing tail. Add only light stuffing.
Pointed Tail
Yarn: caramel brown.
R1: 6 sc in MR (6)
R2–R3: sc around (6)
R4: inc, 5 sc (7)
R5: sc around (7)
R6: inc, 6 sc (8)
R7: sc around (8)
R8: inc, 7 sc (9)
R9–R10: sc around (9)
Fasten off and leave a 25 cm tail. Do not stuff the last four rounds; the point should remain narrow enough to angle slightly upward.
Bottom and Side Gusset
Yarn: caramel brown.
Row 1: ch 7, sc in second ch from hook and across (6)
Row 2–Row 78: ch 1, turn, sc across (6)
Compare the strip against the front panel from the upper front corner, around the base and up to the upper rear corner. Add or remove rows until the gusset fits without stretching.
Fasten off and leave a 70 cm sewing tail. Six single crochet stitches should produce approximately 3–4 cm of finished purse depth with medium worsted yarn.
Shoulder Straps — Make Two
Yarn: caramel brown.
Row 1: ch 8, sc in second ch from hook and across (7)
Row 2–Row 90: ch 1, turn, sc across (7)
Measure before fastening off. Each strap should reach comfortably from its body attachment to the intended top meeting point without tension.
Fasten off with a 50 cm tail.
Join yarn to one long edge and work slip stitches from bottom to top. Repeat along the opposite edge. The added edge stitches restrict stretching under load.
Optional Inner Pocket
Yarn: caramel brown.
Row 1: ch 23, sc in second ch from hook and across (22)
Row 2–Row 13: ch 1, turn, sc across (22)
Fasten off and sew three sides to the inside back panel before the body is assembled.
Assembly
- Pin the gusset around the front body panel from the upper chest area, across the bottom and up the rear. Align the midpoint of the gusset with the midpoint of the body base before sewing.
- Attach the back body panel to the remaining gusset edge, keeping the upper opening free. Compare the two upper edges before tightening the final seam.
- Sew the completed head to the upper-left end of the body. Overlap the neck edge across at least 8–10 body stitches so the muzzle projects horizontally rather than downward.
- Attach the black nose at the muzzle tip, then place a 9 mm eye above the muzzle line. Sew the floppy ear behind the eye so its lower end covers part of the neck seam.
- Attach the two front legs beneath the chest and the two rear legs beneath the rear quarter. Keep approximately the same visible leg length below the body seam.
- Sew the pointed tail into the upper-right body edge. Angle it upward by roughly 10–15 degrees to continue the top line of the back.
- Attach one shoulder strap across approximately 7–10 stitches near the head end and the second across the same width near the rear. Sew through two body rows rather than only the upper edge.
- Bring the strap ends together above the bag and overlap them by approximately 3 cm. Sew around the overlap, then add a second hidden line through its centre.
- Install the optional lining, zipper or magnetic closure after all exterior seams have been checked. Keep closure hardware clear of both strap attachment areas.
- Load the purse with approximately 500 g for 30 minutes. Reinforce any strap or body seam that stretches more than 5 mm before weaving in the remaining structural tails.
The completed dachshund bag should hang horizontally with the muzzle pointing forward, four legs below the body and the tail continuing the upper back line.
7 Technical Tips
- Body sag: Loose single crochet allows the 54-stitch centre section to stretch vertically when loaded. Move down to a 4.5 mm hook if openings larger than about 1 mm appear between stitches.
- Weak strap attachment: Joining a strap to only the top row concentrates the load into seven stitches. Sew each attachment through at least two horizontal body rows and a width of 7–10 stitches.
- Unequal strap length: A difference of five rows is enough to tilt the dachshund body. Count both 90-row straps before joining their upper ends and compare them without stretching.
- Rotated muzzle: Sewing the head before pinning the ear can turn the muzzle several degrees downward. Pin the head, ear and front strap simultaneously and inspect the silhouette before making permanent stitches.
- Leg misalignment: A front-to-back difference greater than approximately 1 cm makes the feet appear randomly attached. Mark all four leg positions along the bottom seam before sewing the first leg.
- Overfilled legs: Firmly stuffed 12-stitch legs project forward instead of hanging beneath the purse. Use only enough filling to maintain the tube shape and leave the upper two rounds unstuffed.
- Short structural tails: A 10 cm tail is inadequate for a loaded handbag seam. Leave 25–50 cm for the head, straps, gusset and legs, then weave each tail through at least three stitch directions.
Getting the Dachshund Proportions Right
The body-to-leg ratio matters more than fine facial detail in a wiener dog bag pattern. A dachshund is identified by an exceptionally long back resting above short legs, so shortening the body to save rows changes the entire silhouette. Keep the long 54-stitch plateau even when making a smaller bag; reduce scale through yarn and hook choice instead.
The muzzle should project farther than the floppy ear. After attaching the head, check the profile against a flat background. If the ear reaches the nose, fold its upper attachment point slightly backward rather than shortening the muzzle.
Position the eye toward the upper half of the head. A low eye makes the muzzle appear deeper and more rounded, while the photograph shows a narrow, elongated profile.
Making the Shoulder Straps Carry the Load
The straps are the functional difference between a dachshund amigurumi and a dachshund crochet bag pattern. Decorative crochet can tolerate some stretch; a handbag handle cannot. Seven tightly worked single crochet stitches create a strap broad enough to distribute pressure without visually overpowering the dog.
Surface slip stitches along both edges limit longitudinal stretching. For regular use, cotton twill tape can be hand sewn to the wrong side before the strap ends are joined. The tape should stop approximately 2 cm above each body attachment so it remains hidden inside the purse.
Do not secure a strap only through the decorative top edging. Pass the sewing yarn down into the body panel itself. That transfers weight into a larger section of fabric instead of one vulnerable row.
Floppy Ear Placement
The visible ear is one of the strongest breed markers in the photographed crochet dog purse. Its top edge starts behind the eye and its lower section hangs over the side of the neck. Sewing it too far forward hides the eye; moving it too far back exposes the head seam.
Pin the ear at three points before sewing: top, centre and lower tip. Leave most of the lower edge free so the ear hangs naturally rather than lying completely flat against the bag.
If both faces of the purse will be displayed, make a second matching ear and eye. For a primarily one-sided shoulder bag, the reverse ear can be omitted, but the head seam should then be particularly neat.
Adding a Lining and Closure
A lining reduces stretch and prevents keys or pens from passing through crochet stitches. Trace the completed body panel onto cotton fabric, then add approximately 1 cm of seam allowance around the sides and bottom. Cut two matching fabric pieces.
Sew the fabric body first and place it inside the crochet shell with wrong sides facing. Fold the upper fabric edge inward and hand stitch it just below the crochet opening. Do not catch the outer strap stitches while attaching the lining.
A 25 cm zipper suits a body around 30 cm long because a small margin remains at both ends. When using a magnetic snap instead, attach it to the fabric lining before the lining is inserted.
Adjusting the Bag Size
A published dachshund purse measures approximately 30.5 cm long and uses worsted/Aran yarn with a 5 mm hook. That provides a practical baseline for this photo-matched build. The exact finished dimensions will still depend on stitch height and yarn composition.
To create a longer bag, add plain rows to the 54-stitch body plateau rather than increasing its stitch width. Four additional rows extend the torso without making it taller. Apply the same extra rows to both panels.
For a smaller accessory, use DK yarn and a 3.5–4 mm hook while retaining the written proportions. A published DK dachshund toy measuring about 25 cm long demonstrates how thinner yarn can reduce overall scale substantially.
Choosing Yarn
Worsted yarn is verified for published dachshund purses, and current sausage-dog bag patterns also specify Aran or worsted yarn with 5 mm hooks. Cotton or a firm cotton blend is particularly suitable for the photographed minimalist form because its stitch definition keeps the long body edge crisp.
Soft acrylic can work, but it stretches more under load. Add both lining and strap reinforcement if acrylic forms the main body. Very bulky yarn changes the proportions by making the legs and muzzle disproportionately thick.
Use the same brown yarn for every visible structural component. Switching to a thicker yarn for the straps may strengthen them, but it also creates a noticeable texture change where they meet the dog’s back.
Finishing Checks
Hang the empty bag against a flat wall before hiding the last tails. The long back should remain close to horizontal, and the head should not rotate downward under its own weight.
Add a phone, wallet and keys, then repeat the check. If the rear sits lower than the head, shorten the rear strap attachment or move it approximately one centimetre toward the centre of the body.
Inspect the four legs last. Their purpose is visual rather than structural, so none should carry the bag’s weight when it hangs. The pointed tail should remain visible beyond the rear edge rather than being covered by the strap attachment.
Conclusion
Measure the finished body from nose to tail and record the strap length before changing yarn for another version. The next practical step is a 30-minute load test with approximately the same weight you plan to carry; that exposes strap stretch and weak gusset seams before regular use. Save this dachshund crochet bag pattern to Pinterest and share the finished purse on Instagram with #LongDogCrochetBag. Keep the ear loose enough to hang over the neck seam rather than stitching its entire perimeter flat. For another dachshund, would you keep this single caramel color or add darker brown ears and a matching tail tip?
Sources
- Ravelry — Dachshund Dog Purse by Donna Collinsworth: Aran yarn, 5 mm hook, 229–274 m and approximately 30.5 × 27.3 cm finished size.
- Devout Hand — Sausage Dog Bag: Aran/worsted yarn, 5 mm hook, two-panel bag construction and beginner tapestry-crochet techniques.
- Ravelry — Dachshund by Megan Kreiner: worsted yarn, 9 mm safety eyes and dachshund proportion reference.
- Current Dachshund Shoulder Bag tutorial — dedicated construction sections for feet, ears, sewing and strap installation.









