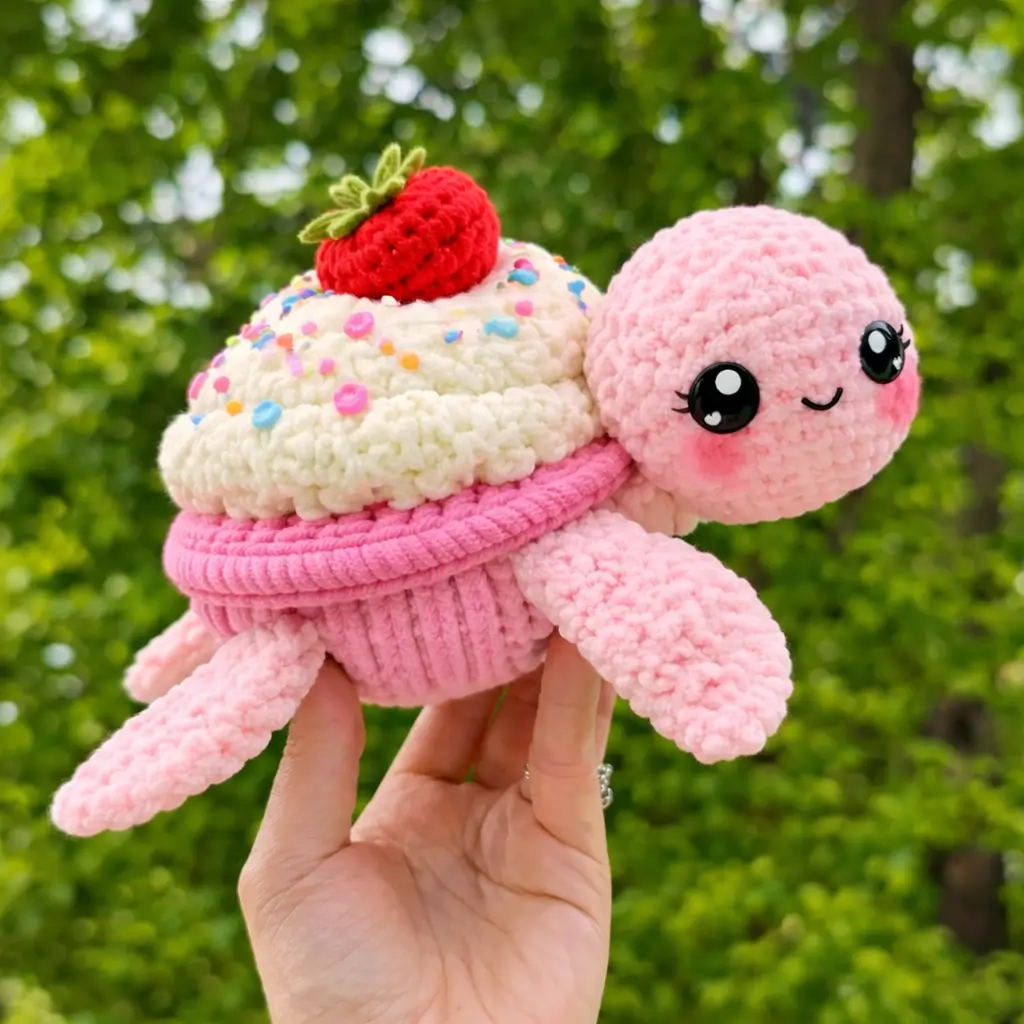
A turtle shell does not flare like a cupcake wrapper, so this cupcake turtle amigurumi pattern builds the pastry shape as a separate shell system. You will need super bulky chenille, a 4.5 mm hook, and 16 mm eyes to make a plush that lands around 15 cm long. The project suits an advanced beginner and works well as a birthday-table topper or market sample.
The Design: What Makes This Turtle Different
You are not shaping a standard turtle shell here. The first decision is the split between the pink liner and the white frosting cap. A single shell piece flattens the dessert read, while a layered build creates the overhang seen in a strawberry cupcake turtle crochet design and gives the body enough width to hide limb joins. Second, the head stays large and round instead of tapered. That keeps the face visible once the shell sits high on the back, which is a common issue in dessert turtle crochet pattern layouts. Third, the front flippers run longer than the rear pair. The finished turtle reads as a sea turtle from profile, while the plush still balances under the heavier shell. A frequent mistake is crowding the flippers too close to the frosting edge, which makes the body look pinched.
Project Info at a Glance
| Skill Level | Time | Finished Size | Hook | Best For |
|---|---|---|---|---|
| Advanced beginner | 3–4 hours | Approx. 15 cm long x 13 cm tall | 4.5 mm | Birthday plush, dessert display, market table |
Materials and Tools
Yarn
- Pastel pink chenille — super bulky (#6) — 1 x 100 g ball — Premier Parfait Chunky or similar
- White chenille — super bulky (#6) — 1 x 100 g ball — Premier Parfait Chunky or similar
- Red chenille — super bulky (#6) — small amount — strawberry topper
- Green chenille — super bulky (#6) — small amount — strawberry leaves
- Pink DK or cotton — small amount — blush embroidery or cheek patch sewing
- Rainbow yarn scraps — tiny amounts — sprinkle embroidery
Tools
- Hook 4.5 mm
- 16 mm safety eyes
- Polyester stuffing
- Tapestry needle
- Stitch markers
- Scissors
- Sewing pins
Abbreviations
MR = magic ring, sc = single crochet, inc = increase, dec = decrease, sl st = slip stitch, ch = chain, BLO = back loop only, FLO = front loop only.
Work each invisible decrease through the front loops only so the chenille surface stays closed.
Continuous spiral unless noted.
Pattern — Step by Step
Head (Make 1)
Yarn: pastel pink — source basis: cupcake turtle head counts adapted from visible 42-st head structure
R1: 6 sc in MR (6)
R2: inc x6 (12)
R3: (sc, inc) x6 (18)
R4: (2 sc, inc) x6 (24)
R5: (3 sc, inc) x6 (30)
R6: (4 sc, inc) x6 (36)
R7: (5 sc, inc) x6 (42)
R8: sc around (42)
R9: sc around (42)
R10: sc around (42)
R11: sc around (42)
R12: sc around (42)
R13: sc around (42)
R14: sc around (42)
R15: (5 sc, dec) x6 (36)
R16: (4 sc, dec) x6 (30)
R17: (3 sc, dec) x6 (24)
R18: (2 sc, dec) x6 (18)
R19: (sc, dec) x6 (12)
R20: dec x6 (6)
Insert the 16 mm safety eyes between R6 and R7 before closing the head. Place them about 10 stitches apart. Add the smile after stuffing so the face curve stays centered.
Fasten off. Leave a 20 cm tail.
Body (Make 1)
Yarn: pastel pink — standard amigurumi math sized to support the frosting cap
R1: 6 sc in MR (6)
R2: inc x6 (12)
R3: (sc, inc) x6 (18)
R4: (2 sc, inc) x6 (24)
R5: (3 sc, inc) x6 (30)
R6: (4 sc, inc) x6 (36)
R7: (5 sc, inc) x6 (42)
R8: BLO sc around (42)
R9: sc around (42)
R10: sc around (42)
R11: sc around (42)
R12: (5 sc, dec) x6 (36)
R13: sc around (36)
R14: (4 sc, dec) x6 (30)
R15: sc around (30)
R16: (3 sc, dec) x6 (24)
R17: (2 sc, dec) x6 (18)
R18: (sc, dec) x6 (12)
R19: dec x6 (6)
Stuff the lower half firmly. Keep the upper third a little softer so the shell can sit flatter. The BLO round at R8 marks the liner transition.
Fasten off. Leave a 20 cm tail.
Front Flippers (Make 2)
Yarn: pastel pink — standard amigurumi math
R1: 6 sc in MR (6)
R2: inc x6 (12)
R3: (sc, inc) x6 (18)
R4: (2 sc, inc) x6 (24)
R5: sc around (24)
R6: sc around (24)
R7: sc around (24)
R8: (2 sc, dec) x6 (18)
R9: sc around (18)
R10: sc around (18)
Do not stuff. Flatten the piece so the tip reads wide and soft rather than tubular.
Fold flat and sc through both layers for 9 stitches. Fasten off. Leave a 20 cm tail.
Back Flippers (Make 2)
Yarn: pastel pink — standard amigurumi math
R1: 6 sc in MR (6)
R2: inc x6 (12)
R3: (sc, inc) x6 (18)
R4: sc around (18)
R5: sc around (18)
Do not stuff. These should sit shorter than the front pair.
Fold flat and sc through both layers for 9 stitches. Fasten off. Leave a 18 cm tail.
Tail (Make 1)
Yarn: pastel pink — source basis: visible cupcake turtle tail preview
R1: 6 sc in MR (6)
R2: (inc, 2 sc) x2 (8)
R3: (inc, 3 sc) x2 (10)
R4: sc around (10)
R5: sc around (10)
Do not stuff.
Fold flat and sc through both layers for 5 stitches. Fasten off. Leave a 15 cm tail.
Cupcake Rim (Make 1)
Yarn: pastel pink — custom band for the liner edge in the photo
Ch 42. Join with sl st, taking care not to twist. (42)
R1: sc around (42)
R2: sc around (42)
R3: sc around (42)
Keep this band dense. A loose rim collapses instead of standing proud around the shell.
Fasten off. Leave a 35 cm tail.
Frosting Cap (Make 1)
Yarn: white — source logic follows the larger cupcake shell structure with a 48-st plateau
R1: 6 sc in MR (6)
R2: inc x6 (12)
R3: (sc, inc) x6 (18)
R4: (2 sc, inc) x6 (24)
R5: (3 sc, inc) x6 (30)
R6: (4 sc, inc) x6 (36)
R7: (5 sc, inc) x6 (42)
R8: (6 sc, inc) x6 (48)
R9: sc around (48)
R10: sc around (48)
R11: sc around (48)
R12: sc around (48)
R13: FLO sc around (48)
R14: sc around (48)
R15: sc around (48)
R16: (6 sc, dec) x6 (42)
R17: sc around (42)
Do not stuff. Embroider sprinkles before attaching. Catch only the back loops at R13 when you want the edge to curl down slightly like frosting overhang.
Fasten off. Leave a 40 cm tail.
Cheek Patches (Make 2)
Yarn: blush pink — standard flat circle
R1: 6 sc in MR (6)
R2: inc x6 (12)
Keep these thin. They should tint the face, not puff it out.
Join with sl st. Fasten off. Leave a 12 cm tail.
Strawberry Topper (Make 1)
Yarn: red — adapted from plush strawberry construction for this scale
R1: 6 sc in MR (6)
R2: inc x6 (12)
R3: (sc, inc) x6 (18)
R4: (2 sc, inc) x6 (24)
R5: sc around (24)
R6: sc around (24)
R7: (2 sc, dec) x6 (18)
R8: sc around (18)
R9: (sc, dec) x6 (12)
R10: dec x6 (6)
Stuff lightly after R8. Embroider seed dashes before sewing the strawberry to the shell.
Fasten off. Leave a 25 cm tail.
Strawberry Leaves (Make 1)
Yarn: green — simple crown for the topper
R1: 5 sc in MR, join with sl st (5)
R2: [ch 4, sl st in 2nd ch from hook, sc in next ch, sl st in next st] x5
Flatten the leaves with your fingers before sewing so they sit wide over the berry top.
Fasten off. Leave a 15 cm tail.
Assembly
- Sew the head to the front of the body, slightly above center, so the chin sits just below the liner line.
- Attach the front flippers on each side of the body between R9 and R12, angling them slightly forward.
- Sew the back flippers lower and farther back than the front pair so the silhouette stays turtle-like from the side.
- Attach the tail at the back center, low on the body, in line with the head.
- Pin the cupcake rim around the upper body at the BLO transition round and sew it in place with slight stretch.
- Stitch the cheek patches below the eyes, then add the embroidered smile centered between them.
- Embroider sprinkle dashes on the frosting cap in short, scattered lines with at least 1 cm between colors of the same shade.
- Stretch the frosting cap over the top of the body and sew its lower edge just above the rim so it overhangs evenly.
- Sew the strawberry leaves to the top of the strawberry, then sew the strawberry slightly forward of center on the frosting.
- Add vertical surface slip stitches from the rim down the body to imitate cupcake liner ribs, spacing them about 1 cm apart.
The piece is complete when the frosting cap sits level and the turtle stands on all four flippers without rolling.
7 Technical Tips
- Mark every increase round. Losing one increase in chenille usually shows up two rounds later as a flat spot on the head or shell.
- Control stuffing pressure. Pack the head firmly, but keep the top third of the body about 20% softer so the frosting cap does not tip upward.
- Use invisible decreases on visible curves. Standard decreases leave notches that read clearly on white frosting and blush pink chenille.
- Place the eyes before R17 of the head. If you wait until the face closes too far, the eye backs crowd the stuffing and distort the smile line.
- Keep front flippers 1–1.5 cm longer than the rear flippers. Equal-length flippers make the turtle read more like a cupcake blob than a sea turtle.
- Pin the frosting cap in four directions first. Start at front, back, left, and right, or the overhang will drift and the strawberry will look off-center.
- Weave tails through dense stitch paths. Chenille tails that travel fewer than 4–5 cm inside the body can back out after handling.
Conclusion
This cupcake turtle amigurumi pattern works because the shell reads as dessert first and turtle second, but the proportions still hold from every side. Keep the rim firm, place the flippers low, and let the strawberry sit slightly forward on the frosting. Your next step is to make one sample in the exact photo palette, then test a second version with a darker berry and contrast sprinkles for cleaner market photography. Share the result on Pinterest and Instagram with progress shots of the shell layers. Use the tag #CupcakeTurtlePattern. When you made the topper, did you prefer the strawberry centered or slightly toward the forehead line of the shell?









