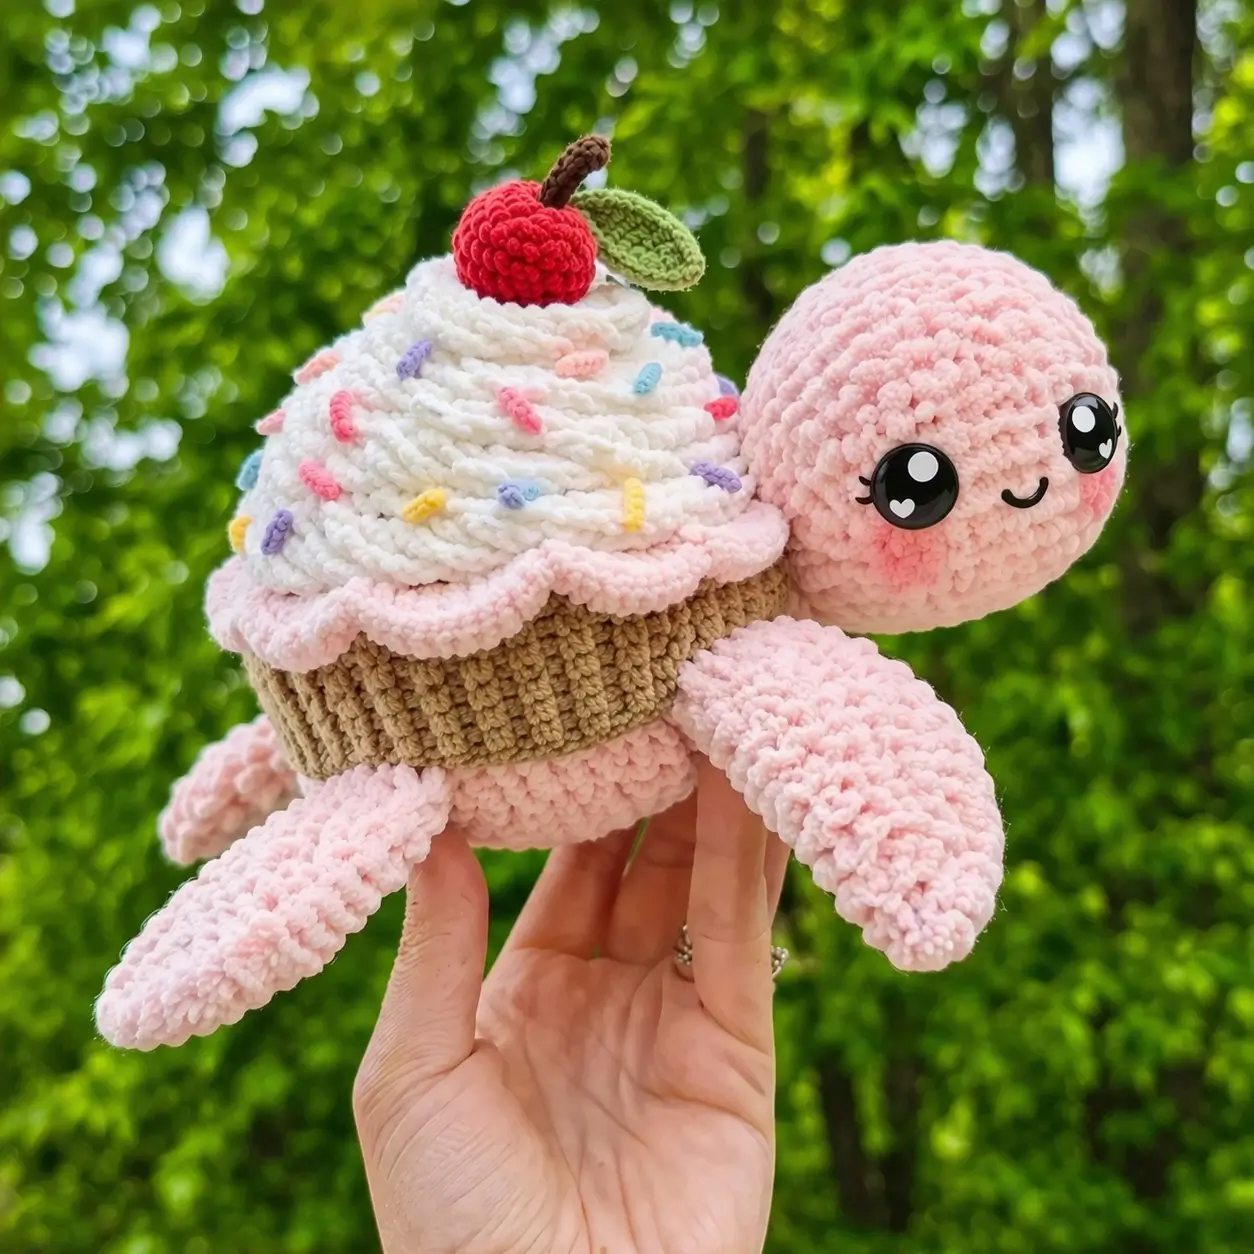
A turtle shell is usually rigid; on a cupcake turtle it has to read as a paper liner and frosting at the same time. This cupcake turtle amigurumi crochet pattern uses plush yarn, a 4.5 mm hook, and a medium-format build based on verified market specs of roughly 15–17 cm across. The project suits an intermediate beginner who already works in spirals. It also solves one practical gift problem: birthday décor that lasts longer than actual cake.
The Design: What Makes Cupcake Turtle Different
The photographed turtle works because three silhouette choices are doing the heavy lifting. First, the shell is split into a straight-sided cupcake liner and a rounded frosting cap. That keeps the body recognizably turtle-shaped while still reading as dessert. Second, the head is oversized against a low body. The proportion shifts attention to the face, which is why the 16 mm eye category works so well at this scale. Third, the flippers are thick and slightly downward angled. That widens the footprint and stops the shell from looking top-heavy once the cherry is attached.
A common mistake with dessert turtle crochet is making the frosting too flat or the liner too short. Then the plush reads like a generic sea turtle with a hat. In this cupcake turtle crochet pattern, the liner wall stays vertical for several rounds and the frosting grows to a separate dome before the ruffle edge. That distinction matters more than sprinkle color. It is also where many birthday turtle amigurumi listings leave out structural explanation.
Project Info at a Glance
| Skill Level | Time | Finished Size | Hook | Best For |
|---|---|---|---|---|
| Easy to intermediate beginner | 4–6 hours | approx. 15.2 cm L × 16.5 cm W × 12.7 cm H | 4.5 mm | Birthday gifts, market plush, dessert-themed displays |
Verified dimensions, hook, yarn category, and eye size are drawn from the public Etsy listing used as the baseline reference for this photographed style; stitch rounds below are a fresh custom draft, not a copy of that paid pattern.
Materials and Tools
Yarn
- Pale pink plush chenille — super bulky / size 6 — about 90 g — Premier Parfait Chunky or similar baseline
- White plush chenille — super bulky / size 6 — about 70 g — Premier Parfait Chunky or similar
- Tan plush chenille — super bulky / size 6 — about 45 g — for cupcake liner
- Red plush chenille — super bulky / size 6 — about 10 g — for cherry
- Green plush chenille — super bulky / size 6 — about 5 g — for leaf
- Brown plush chenille — super bulky / size 6 — scrap amount — for stem
- Pastel scraps — yellow, blue, lavender, pink — scrap amount — for sprinkles
Tools
- Hook 4.5 mm
- Safety eyes 16 mm
- Polyfill stuffing
- Tapestry needle
- Stitch markers
- Black embroidery yarn for smile and lashes
- Pink blush powder or soft yarn shading for cheeks
The hook size, yarn weight, and eye size are publicly verified from the HappyTurtleCrochet listing. Gram amounts are practical estimates drafted from the listed yarn category and finished size because public results did not expose exact yardage or grams.
Abbreviations
MR = magic ring; sc = single crochet; inc = increase; dec = invisible decrease; sl st = slip stitch; ch = chain; BLO = back loop only.
Invisible decrease is used on the visible shaping rounds so the head and frosting stay smoother under plush yarn.
Pattern — Step by Step
Continuous spiral unless noted. The round math below is a custom draft built from standard amigurumi progression sized to the verified medium plush format of this cupcake turtle amigurumi crochet pattern. Public search results did not expose the complete paid rounds, so these instructions are original and not copied.
Head (Make 1)
Yarn: pale pink — Source: standard amigurumi math matched to verified 16 mm eyes and medium plush size
R1: 6 sc in MR (6)
R2: inc x6 (12)
R3: (sc, inc) x6 (18)
R4: (2 sc, inc) x6 (24)
R5: (3 sc, inc) x6 (30)
R6: (4 sc, inc) x6 (36)
R7-11: sc around (36)
R12: (4 sc, dec) x6 (30)
R13: (3 sc, dec) x6 (24)
Insert eyes between R8 and R9, about 7 sts apart. Add embroidered lashes before closing if desired.
R14: (2 sc, dec) x6 (18)
Stuff firmly but do not overpack the lower face.
R15: (sc, dec) x6 (12)
R16: dec x6 (6)
Fasten off. Leave 20 cm tail.
Body Underside (Make 1)
Yarn: pale pink — Source: standard amigurumi math drafted for low turtle base
R1: 6 sc in MR (6)
R2: inc x6 (12)
R3: (sc, inc) x6 (18)
R4: (2 sc, inc) x6 (24)
R5: (3 sc, inc) x6 (30)
R6: (4 sc, inc) x6 (36)
R7-9: sc around (36)
Fasten off. Leave 25 cm tail for sewing to liner shell.
Front Flippers (Make 2)
Yarn: pale pink — Source: standard amigurumi math
R1: 6 sc in MR (6)
R2: inc x6 (12)
R3-7: sc around (12)
R8: (4 sc, dec) x2 (10)
R9-12: sc around (10)
Light stuffing only in first half. Flatten opening.
Fasten off. Leave 18 cm tail.
Back Flippers (Make 2)
Yarn: pale pink — Source: standard amigurumi math
R1: 6 sc in MR (6)
R2: inc x6 (12)
R3-5: sc around (12)
R6: (4 sc, dec) x2 (10)
R7-9: sc around (10)
Light stuffing only. Flatten opening.
Fasten off. Leave 18 cm tail.
Tail (Make 1)
Yarn: pale pink — Source: standard amigurumi math; separate tail supported by public pattern previews
R1: 6 sc in MR (6)
R2: sc around (6)
R3: (sc, dec) x2 (4)
R4: sc around (4)
Flatten. Sl st through both layers across 2 sts.
Fasten off. Leave 15 cm tail.
Cupcake Liner Shell (Make 1)
Yarn: tan — Source: original shell draft sized to verified finished dimensions
R1: 6 sc in MR (6)
R2: inc x6 (12)
R3: (sc, inc) x6 (18)
R4: (2 sc, inc) x6 (24)
R5: (3 sc, inc) x6 (30)
R6: (4 sc, inc) x6 (36)
R7: BLO sc around (36)
R8-11: sc around (36)
Fasten off. Leave 30 cm tail.
For a ribbed liner look, surface-slip vertical lines from R11 down to R7 every 3 stitches after assembly.
Frosting Dome (Make 1)
Yarn: white — Source: original frosting draft for photographed cupcake silhouette
R1: 6 sc in MR (6)
R2: inc x6 (12)
R3: (sc, inc) x6 (18)
R4: (2 sc, inc) x6 (24)
R5: (3 sc, inc) x6 (30)
R6: (4 sc, inc) x6 (36)
R7: (5 sc, inc) x6 (42)
R8-10: sc around (42)
R11: (5 sc, dec) x6 (36)
R12: (4 sc, dec) x6 (30)
Stuff lightly to keep a soft whipped-cream profile, not a ball.
R13: (3 sc, dec) x6 (24)
Do not close. This piece is sewn open-side down onto the liner.
Frosting Ruffle (Join to base of frosting dome)
Yarn: pale pink — Source: original edging draft
Join to the front loop of R13 or to the lower edge seam after attaching dome.
R1: (sl st, ch 2, 2 dc in next st, sl st in next st) repeat around.
Fasten off. Weave in tail.
Cheek Patches (Make 2)
Yarn: blush pink or use soft shading — Source: standard amigurumi math
R1: 6 sc in MR (6)
Sl st to first sc.
Fasten off. Leave short tail if sewing.
Cherry (Make 1)
Yarn: red — Source: standard amigurumi math; separate cherry supported by photographed design
R1: 6 sc in MR (6)
R2: inc x6 (12)
R3: (sc, inc) x6 (18)
R4-5: sc around (18)
R6: (sc, dec) x6 (12)
Stuff firmly.
R7: dec x6 (6)
Fasten off. Leave 15 cm tail.
Stem (Make 1)
Yarn: brown — Source: standard amigurumi math
Ch 6. Starting in second ch from hook, sl st in next 5.
Fasten off. Leave tails for attachment.
Leaf (Make 1)
Yarn: green — Source: standard amigurumi leaf shaping
Ch 7.
Working back along chain: sc, hdc, dc, hdc, sc, sl st.
Rotate to opposite side of chain: sc, hdc, dc, hdc, sc.
Fasten off. Leave 15 cm tail.
Sprinkles (Make 8–12)
Yarn: pastel scraps — Source: standard detail technique
Ch 2. Work 3 sl st back along chain.
Fasten off. Make mixed colors.
Optional Smile Embroidery
Black embroidery yarn
Embroider a shallow curved smile centered one round below the eyes.
Assembly
- Sew the head to the front of the pale pink body underside.
- Sew the front flippers to the lower body at the 4 o’clock and 8 o’clock positions.
- Sew the back flippers slightly farther apart near the rear curve.
- Sew the tail centered between the back flippers.
- Position the tan cupcake liner over the body underside and stitch the edges together, stuffing the cavity as you go.
- Add surface-slip vertical ribs to the liner if you want the paper-wrapper effect to read more clearly.
- Sew the white frosting dome to the top of the liner, keeping it centered and slightly puffed.
- Attach the pale pink ruffle around the frosting base.
- Sew the cherry on top, then attach the stem and leaf behind it.
- Stitch or glue the cheek patches in place, add sprinkles across the frosting, then finish the smile and blush.
The completed plush should sit low and wide, with the cherry aligned over the center of mass so the shell does not lean forward.
7 Technical Tips
- Mark the first stitch of every round. Losing the round start by even one stitch shifts the head seam, and the eyes will no longer sit evenly across the face.
- Stuff the head firmer than the frosting. A head that compresses more than the shell makes the face collapse under the weight of 16 mm eyes.
- Use invisible decreases on visible curves only. Standard decreases on plush yarn leave stepped scars, especially across R12-R16 of the head.
- Install the eyes before the final two decrease rounds. With this head size, placing them after R13 is slower and tends to stretch the chenille stitches open.
- Keep frosting stuffing at about half the density of the body. Overstuffed frosting stops looking piped and starts reading like a second shell.
- Pin all four flippers before sewing. A front-to-back offset of more than about 1 cm makes the turtle sit twisted when the liner is attached.
- Weave chenille tails through at least three direction changes. Plush yarn sheds from blunt pull-through finishes, especially on the cherry and tail.
Conclusion
This cupcake turtle amigurumi crochet pattern works because the turtle anatomy stays readable under the dessert layers. The low pink body, vertical tan liner, rounded white frosting, and centered cherry each carry a separate job, so the plush does not blur into one soft mound. Next, crochet the head and liner first, then test your eye placement before committing to the frosting height. Share the finished piece on Pinterest and Instagram with a top view and a face view so the shell profile is visible. Hashtag: #CupcakeTurtleCherryTop. One useful comparison remains: did your turtle look more balanced with a shorter cherry stem or a flatter frosting dome?









