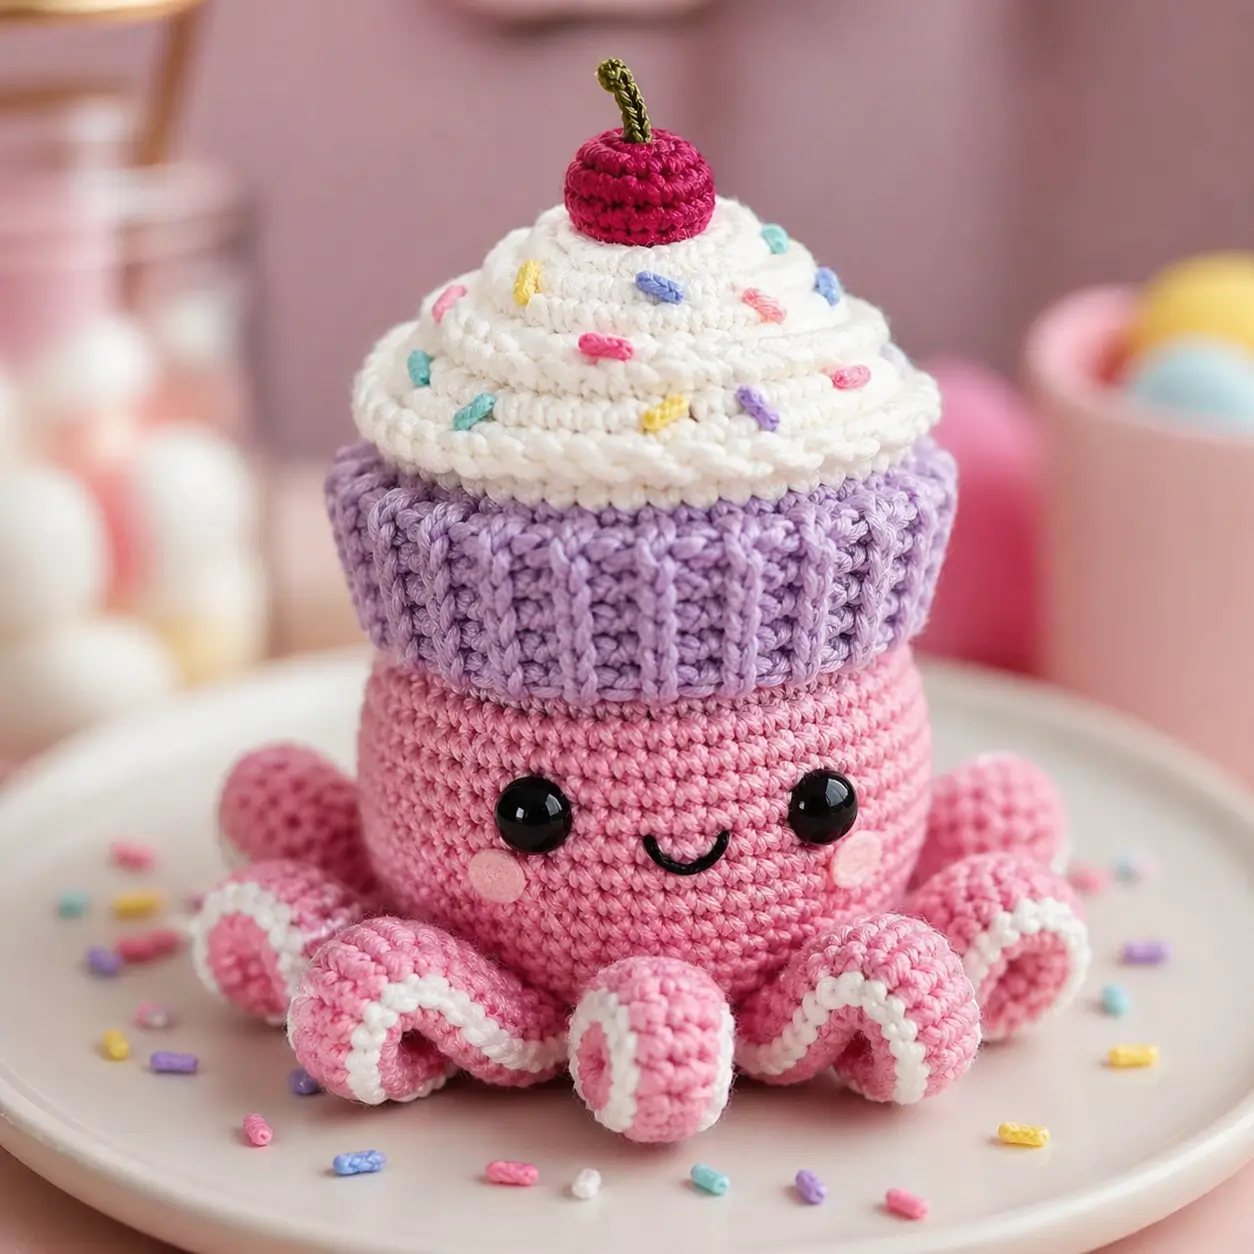
An octopus only reads as a cupcake when the tentacles flare wider than the frosting. This cupcake octopus amigurumi pattern uses sport-weight yarn, a 2.5–3 mm hook, and compact shaping to produce a piece around 8.9 cm tall. You work it in continuous rounds at a small-plush scale. It suits desk display, party decor, or a gift topper that needs a stable base.
The Design: What Makes Cupcake Octopus Different
You need three silhouette breaks for this character to read correctly: a round pink cephalopod base, a distinct ribbed liner band, and a cream spiral that rises without hiding the face. Instead of letting the wrapper act like a hat brim, the structure has to grip the upper third of the head so the octopus cupcake crochet pattern stays squat and stable. That is why this adaptation separates the liner from the sphere and adds surface ribs afterward. A second decision is the cream spiral. The original free cupcake octopus pattern uses a rolled strip, which is effective because it builds height without a wide top disk. Most failed versions push the eyes too high or make the frosting taller than the tentacles, which turns the toy into a cupcake with arms instead of a readable octopus.
Project Info at a Glance
| Skill Level | Time | Finished Size | Hook | Best For |
|---|---|---|---|---|
| Easy / beginner-friendly | Not stated in source | about 8.9 cm tall | 2.5–3.0 mm | small plush decor, gift topper, shelf display |
Materials and Tools
Yarn
- Pink — sport / #2 fine — photo-matched estimate 20–22 g — suggested base: Knit Picks Brava Sport or similar sport acrylic
- Lilac — sport / #2 fine — photo-matched estimate 8–10 g
- White — sport / #2 fine — photo-matched estimate 8–10 g
- Cherry red — sport / #2 fine — photo-matched estimate 2–3 g
- Olive green — sport / #2 fine — scrap amount
- Sprinkle scraps — aqua, yellow, lavender, blue, pink
Tools
- Hook 2.5–3.0 mm
- Safety eyes 4 mm
- Stuffing
- Tapestry needle
- Stitch markers
- Black embroidery thread for smile
Abbreviations
- MR = magic ring
- sc = single crochet
- inc = increase
- dec = invisible decrease
- sl st = slip stitch
- ch = chain
- BLO = back loop only
- surface sl st = slip stitch worked on the outside of a finished piece
Use invisible decrease on the visible shaping rounds so the pink sphere keeps a clean face side without paired holes.
Pattern — Step by Step
Continuous spiral unless noted.
Head (Make 1)
Yarn: pink
R1: 6 sc in MR (6)
R2: inc x6 (12)
R3: (sc, inc) x6 (18)
R4: (2 sc, inc) x6 (24)
R5: (3 sc, inc) x6 (30)
R6: (4 sc, inc) x6 (36)
R7: sc around (36)
R8: sc around (36)
R9: sc around (36)
R10: sc around (36)
R11: sc around (36)
R12: (4 sc, dec) x6 (30)
R13: (3 sc, dec) x6 (24)
Insert the safety eyes between R9 and R10, spaced 7 stitches apart. Stitch the smile centered between them, 2 rounds lower.
R14: (2 sc, dec) x6 (18)
R15: (sc, dec) x6 (12)
Stuff firmly. Keep the front flatter than the crown so the wrapper sits level.
R16: dec x6 (6)
Fasten off. Leave a 25 cm tail.
Cupcake Liner Shell (Make 1)
Yarn: lilac
R1: 6 sc in MR (6)
R2: inc x6 (12)
R3: (sc, inc) x6 (18)
R4: (2 sc, inc) x6 (24)
R5: (3 sc, inc) x6 (30)
R6: (4 sc, inc) x6 (36)
R7: BLO sc around (36)
R8: sc around (36)
R9: sc around (36)
R10: sc around (36)
R11: sc around (36)
Do not stuff. Work 12 vertical surface slip-stitch ribs from R11 up to R7, placing one rib every 3 stitches.
Fasten off. Leave a 45 cm tail.
Tentacles (Make 8)
Yarn: pink
R1: 6 sc in MR (6)
R2: inc x6 (12)
R3: sc around (12)
R4: sc around (12)
R5: sc around (12)
R6: sc around (12)
R7: sc around (12)
R8: sc around (12)
R9: sc around (12)
R10: sc around (12)
Stuff only the upper half. Leave the tip soft so it can curl forward.
R11: flatten and sc through both layers across (6)
Fasten off. Leave a 20 cm tail.
After assembly, add one white surface line along the lower outer curve of each tentacle.
Whipped Cream Spiral (Make 1)
Yarn: white
Ch 46.
Row 1: starting in 2nd ch from hook, 2 sc in each ch across (90)
Roll from one short end into a tight spiral. Keep the base edge wider than the top edge so the cream forms a dome.
Fasten off. Leave a 40 cm tail.
Cherry (Make 1)
Yarn: cherry red
R1: 6 sc in MR (6)
R2: inc x6 (12)
R3: sc around (12)
Stuff lightly.
R4: dec x6 (6)
Fasten off. Leave a 20 cm tail. Thread through front loops and close.
Stem
With olive yarn:
Ch 6
Sl st in 2nd ch from hook and next 4 ch (5)
Fasten off. Leave an 8 cm tail.
Cheek Patches (Make 2)
Yarn: pale pink
R1: 6 sc in MR (6)
Sl st to first st (6)
Fasten off. Leave a 10 cm tail.
Sprinkles (Make 10–14)
Yarn: mixed scrap colors
Stitch 1 cm straight dashes across the cream in pink, yellow, aqua, lavender, and blue. Keep them angled in mixed directions, but leave the bottom edge clear so the cream seam stays hidden.
Assembly
- Center the lilac liner shell over the top third of the pink head and pin it so the front rib lands above the face.
- Sew the lower edge of the liner to the head with small whip stitches, keeping the ribbed columns vertical.
- Pin eight tentacles around the base, spacing them evenly and letting the front three curl toward the camera side.
- Sew each tentacle at a slight upward angle so the body does not sit directly on the tube ends.
- Add the white underside stripe to each tentacle with surface slip stitch or backstitch after the tentacles are attached.
- Roll the white strip into a spiral and stitch it closed as you go, forming a domed whipped-cream mound.
- Sew the whipped cream to the top center, covering the upper seam of the liner shell.
- Attach the cherry at the crown of the cream, then fix the olive stem so it leans slightly backward.
- Sew the cheek patches one stitch outside the smile corners, low enough that the eyes still dominate the face.
- Add the sprinkle stitches last and weave all tails inside the liner cavity.
Made at the verified finished-plush scale, this version lands close to 8.9 cm tall.
7 Technical Tips
- Round-marker drift: Losing the first-stitch marker on a 36-stitch head shifts the face noticeably off center. Keep the marker in place through R13, not just the increase rounds.
- Stuffing firmness: Underfilled heads collapse under the liner shell and tip the cream backward. Fill until the sidewall springs back after a light pinch.
- Invisible decrease: Standard sc2tog leaves paired holes on the face side during R12–R16. Invisible decreases keep the stitch line tighter and cleaner.
- Eye placement timing: Insert 4 mm eyes at the 24-stitch stage between R9 and R10. Installing them after R14 can distort the head and widen the eye spacing.
- Wrapper rib spacing: Uneven rib gaps break the cupcake read from the front view. Place exactly 12 ribs, one every 3 stitches, so the liner stays regular.
- Tentacle pinning: Let each front tentacle extend about 1–1.5 cm beyond the body edge before sewing. Shorter placement hides the octopus silhouette and makes the toy read like a plain cupcake.
- Tail weaving: Do not bury the cherry tail straight downward through the cream center. Run it sideways for 2–3 cm inside the spiral so the top knot does not sink and flatten the dome.
Conclusion
The next step is mechanical: pick the pink, lilac, and white sport yarns first, then test the liner fit on the finished head before any tentacles are sewn. That order keeps the silhouette close to the verified small-plush scale and stops the wrapper from riding too high. When you publish your version, post one straight-on photo and one top view to Pinterest and Instagram so the cream spiral and rib spacing are readable. Use #CupcakeOctopusPattern. Did you keep the white undersides on the tentacles, or did you swap them for sprinkle-colored stripes in your cupcake octopus amigurumi pattern?









