Introduction
Five tall stitches sharing one insertion point are what give a crochet shell its characteristic fan-shaped spread. This crochet shell stitch pattern uses chains, single crochet and double crochet to build repeating scallops with controlled spacing. Medium yarn and a 5 mm hook make a practical practice combination, and the technique suits advanced beginners who can already maintain consistent double-crochet height. Use the resulting fabric for panels, scarves, blankets or decorative borders.
The Design: What Makes the Shell Stitch Different
A shell is created by placing several tall stitches into one location instead of distributing them across separate stitches. Five double crochets are common, producing enough width for a distinct fan without making the group excessively dense.
Spacing matters just as much. Stitches are skipped beside each shell so the group can spread laterally, while a single crochet forms a low anchor between adjacent fans. This alternating tall-and-short construction creates the recognizable crochet fan stitch pattern.
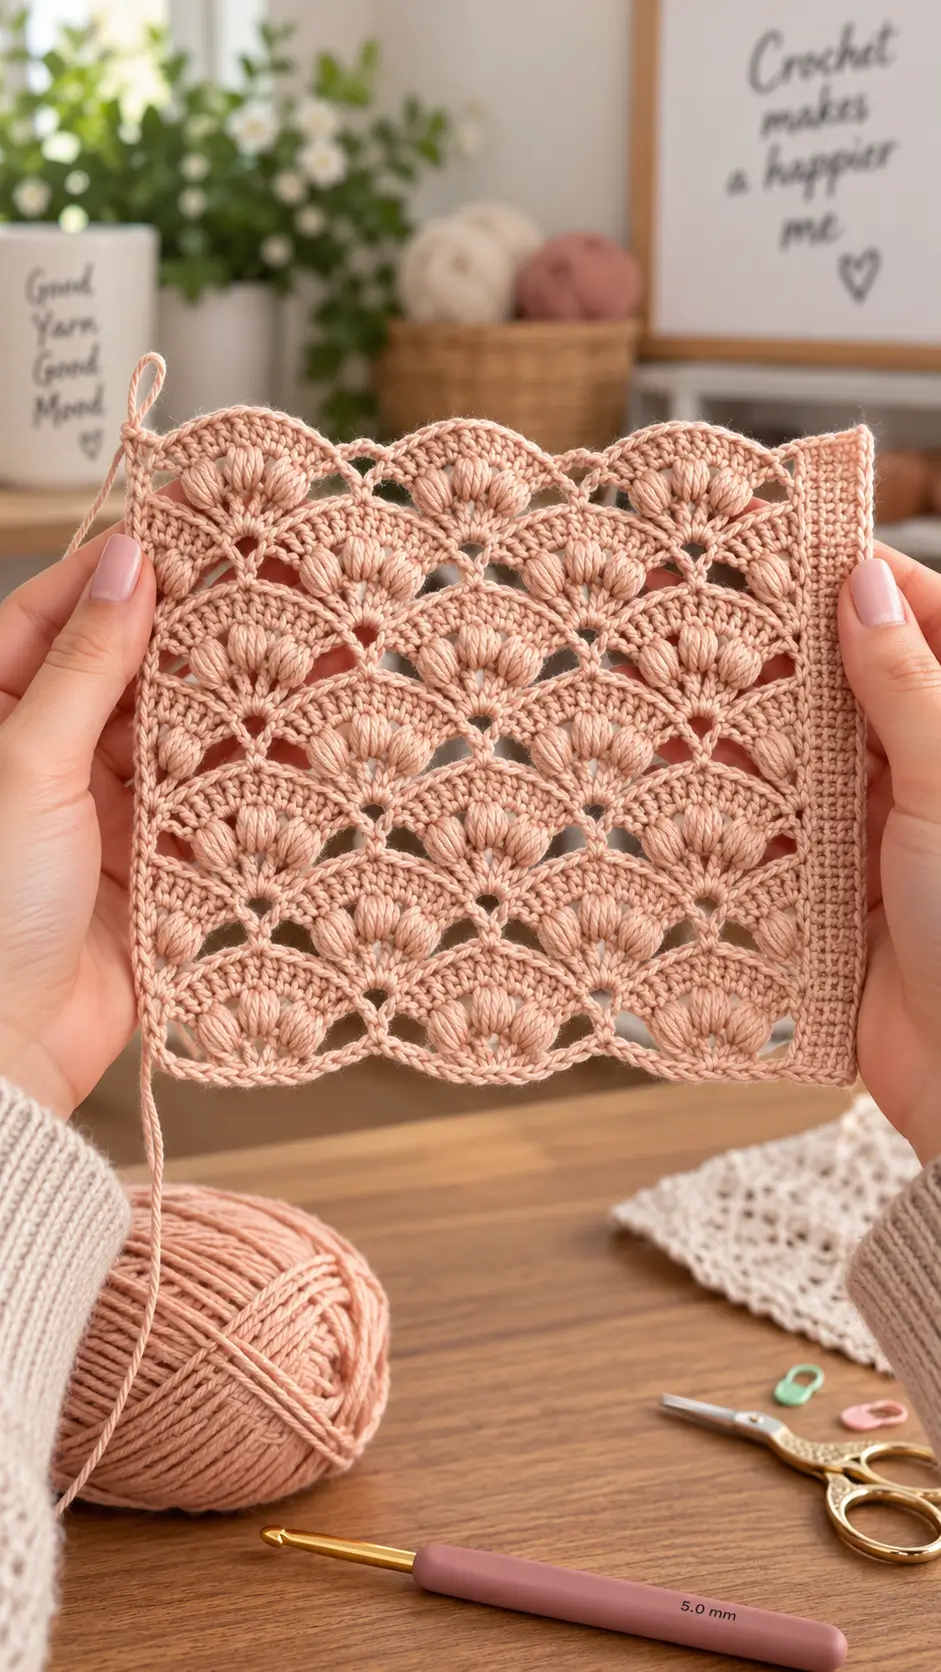
The photographed sample pushes that principle further: its motifs contain prominent raised vertical clusters and comparatively large open spaces. It therefore should not be represented as an exact example of the basic shell instructions below.
A frequent shell-stitch error is losing one skipped stitch. The mistake shifts every subsequent fan and makes the columns lean instead of stacking predictably.
Project Info at a Glance
| Skill Level | Time | Finished Size | Hook | Best For |
|---|---|---|---|---|
| Advanced beginner | Variable | Adjustable | 5.0 mm | Swatches, scarves, panels, blankets |
A 5.0 mm crochet hook is a practical choice for testing this stitch with medium-weight yarn. The exact hook can be adjusted according to the yarn and the amount of openness required in the finished fabric.
Materials and Tools
Yarn
- Dusty peach yarn — worsted / Category 4 — quantity depends on project dimensions.
- Fiber — smooth cotton, acrylic or cotton-blend yarn with clear stitch definition.
The reference image appears to use a smooth yarn with clearly defined stitches. Fiber content and exact yarn weight cannot be confirmed from a photograph alone, so make a gauge swatch before committing yarn to a larger panel.
Tools
- 5.0 mm crochet hook
- Scissors
- Yarn needle
- Stitch markers
- Tape measure
No stuffing or safety eyes are required because this is a flat crochet project rather than amigurumi.
Abbreviations
- ch — chain
- sc — single crochet
- dc — double crochet
- sl st — slip stitch
- sk — skip
- st/sts — stitch/stitches
- rep — repeat
- shell — designated group of tall stitches worked into one location
The invisible decrease used in amigurumi is not part of this flat shell-stitch construction.
Crochet Shell Stitch Pattern — Step by Step
The instructions below use a 6 + 2 foundation structure. Shell-stitch variations can use different foundation multiples, so do not transfer the stitch multiple from one version to another without checking its row construction.
Foundation Chain
Yarn: dusty peach.
Chain a multiple of 6, then add 2 chains.
For a small practice swatch:
Foundation: ch 26.
This gives four complete six-chain repeats plus two additional chains.
Do not count the foundation by eye. Place a stitch marker into every sixth chain while checking the total because one missing chain changes the position of every following shell.
Row 1 — Full Shells
Work 1 sc in the second chain from the hook.
Repeat: Skip 2 chains, work 5 dc into the next chain, skip 2 chains, then work 1 sc into the next chain.
Repeat the sequence across the foundation.
The five double crochets share the same insertion point. They should spread outward to create one fan. Do not place the five double crochets into five consecutive foundation chains.
At the end of the row, chain 3 and turn.
Row 2 — Half Shells and Full Shells
The second row offsets the motifs rather than placing every new shell directly into the same type of position.
Work 2 dc into the first stitch beside the turning chain. When the turning chain counts as the first double crochet, this creates a three-double-crochet half shell at the edge.
Skip 2 stitches.
Work 1 sc into the center double crochet of the shell below.
Skip the next 2 stitches.
Work 5 dc into the single crochet positioned between the previous row’s shells.
Continue repeating this sequence across the row.
Finish with a three-double-crochet half shell at the opposite edge.
The half shells help maintain a straighter side edge. Using unrestricted full shells at every edge can add unnecessary width and make the sides appear uneven.
Chain 1 and turn.
Row 3 — Full Shells
Work 1 sc into the first stitch.
Skip 2 stitches.
Work 5 dc into the next single crochet.
Skip 2 stitches.
Work 1 sc into the center double crochet of the shell beneath.
Continue alternating full shells and single-crochet anchors across the row.
Finish with a single crochet at the edge.
Repeat Rows 2 and 3 until the crochet panel reaches the required length.
How to Crochet the Shell Motif
Yarn: main color.
The standard shell used in this version is:
5 dc in the same stitch.
The five double crochets are not conventional increases. They form a decorative stitch group sharing one insertion point, which forces the stitches to spread into the characteristic fan shape.
Keep all five double crochets at a comparable height. If the center stitches are noticeably shorter, the shell develops a flattened top. Excessively loose outside stitches can create the opposite problem and make the motif flare.
Single-Crochet Anchor
Work the single crochet into the designated center position between shell groups.
This low stitch pulls the fabric downward between adjacent fans. It also creates the structural point used by the offset shell in the following row.
A misplaced anchor shifts the complete pattern repeat horizontally. Count the skipped stitches rather than choosing the insertion point based only on appearance.
Creating a More Open Crochet Fan Stitch
The reference image contains larger open spaces than a basic closed shell stitch. These spaces can be created with shell variations that incorporate chains between structural stitch groups.
The exact chain count in the photographed piece cannot be confirmed from the image alone. Changing the number of chains affects both motif width and vertical spacing, so test the modification on a small swatch first.
A chain-space shell can be constructed by alternating tall stitches and chain spaces inside the fan. This produces more visible negative space than five adjacent double crochets.
Remember that changing the shell construction can also change the required foundation multiple.
Raised Cluster Variation
The raised vertical groups inside the photographed fans are one of the most distinctive characteristics of the reference panel. They visually resemble elongated puff or cluster stitches rather than conventional double crochets.
A cluster has a different structure from a basic five-dc shell. Several partial stitches or elongated loops are gathered before the stitch is closed, producing a thicker central element.
The exact number of loops cannot be counted reliably from the photograph. For that reason, a fixed puff formula should not be presented as an exact reconstruction of the reference piece.
When adding a raised cluster to a shell design, make a separate gauge swatch. The extra loops increase thickness and yarn consumption while potentially changing the width of the fan.
Straight Side Edge
The reference photograph shows a relatively dense vertical strip along the right-hand side of the crochet panel. A structured border can stabilize an open shell fabric and provide a cleaner rectangular edge.
For a general shell panel, work an evenly distributed row of single crochet along the side before adding a decorative border.
The required number of stitches depends on the row gauge. Adding too many stitches causes the edge to ripple. Too few stitches pull the panel inward and create a curved side.
Lay the work flat regularly while crocheting the edging. Correct the stitch distribution as soon as contraction or rippling becomes visible.
Shell Border
A basic shell border can use the following repeat:
Skip 1 stitch, work 5 dc in the next stitch, skip 1 stitch, work 1 sc in the next stitch.
Repeat the sequence across a prepared edge.
This border construction does not necessarily use the same foundation multiple as the main crochet shell stitch pattern. Treat the body stitch and edging as separate calculations.
Finishing Row
Finish the panel after completing a full pattern repeat rather than stopping halfway through a shell sequence.
Cut the yarn while leaving approximately 15 cm for weaving.
Pull the yarn completely through the final loop.
Thread the tail onto a yarn needle and weave it through several nearby stitches. Reverse direction through a different stitch path before trimming the excess yarn.
Smooth yarns require adequate tail length because short ends have fewer secure paths through an openwork fabric.
Finishing and Assembly
- Complete the final shell row.
- Check both side edges for missing single-crochet anchors.
- Measure the crochet panel before adding its border.
- Add a stabilizing single-crochet edge where required.
- Work the selected border only after checking its stitch multiple.
- Fasten off with approximately 15 cm of yarn remaining.
- Thread the tail through a yarn needle.
- Weave the starting and finishing tails through separate stitch paths.
- Block the panel according to the care instructions for the selected yarn fiber.
- Measure the finished piece after it is completely dry.
The completed crochet panel should lie flat without pronounced edge contraction or uncontrolled ruffling.
7 Technical Tips for a Cleaner Crochet Shell Stitch
- Mark every foundation repeat. A missing foundation chain shifts every shell after the error point. When using a six-stitch repeat, place a marker every six chains while checking the foundation.
- Watch the center double crochet. A shortened center stitch can flatten the top of a five-dc shell. Keep the working tension consistent through all five stitches instead of pulling the center stitches tighter.
- Count every skipped stitch. Accidentally skipping three stitches instead of two shifts the next anchor and produces diagonal shell columns. Touch each skipped stitch with the hook tip while counting.
- Check the anchor position before making another shell. Placing the single crochet one stitch left or right distorts the staggered repeat. Confirm the center position before inserting the hook.
- Test raised clusters separately. Adding puff or cluster stitches increases thickness and yarn consumption. Even one additional elongated loop can noticeably change the central feature of the fan.
- Measure a 10 cm section after blocking. Openwork can change dimensions after blocking. Compare the same 10 cm section before and after drying rather than calculating a large project’s dimensions from an untreated swatch.
- Leave approximately 15 cm for weaving. Open shell fabric provides fewer concealed paths for securing short yarn ends. A longer tail allows the yarn to reverse direction through several stitches before trimming.
How to Adjust the Width
The width of the project is controlled primarily by the number of complete pattern repeats in the foundation chain. For the version described here, start with a multiple of 6 and add the required turning chains.
For example, adding another six foundation chains adds one complete repeat. Removing six chains removes one repeat.
This method is more reliable than adding arbitrary individual chains. A partial repeat leaves insufficient space for the final shell and anchor sequence.
Always crochet a small sample before calculating a blanket, scarf or large decorative panel. Measure several repeats together because measuring one shell magnifies small errors when that measurement is multiplied across a wide project.
How to Adjust the Fabric Density
Three variables control how open the finished fabric appears: yarn thickness, hook size and the construction of the shell itself.
A larger hook generally creates more space between stitches. A smaller hook makes the same yarn produce a denser structure. Neither adjustment changes the written stitch count, but both affect the physical dimensions.
Adding chain spaces inside or between shells creates a more pronounced lace effect. Removing those spaces creates a more compact fabric.
Change only one variable at a time when testing. If the hook size, yarn weight and shell construction are all changed simultaneously, identifying the cause of an unwanted gauge change becomes difficult.
Common Shell Stitch Problems
The Panel Gets Wider
Check the number of shells and anchors in each row. Accidental additional shells are often created when an edge stitch is mistaken for a designated anchor point.
Also inspect the turning chain. Treat it consistently throughout the project: either count it as a stitch where specified or do not count it. Switching methods between rows alters the edge count.
The Panel Gets Narrower
A missing shell or anchor is the first point to inspect. Count the motifs in the most recent correct row, then compare that number with the current row.
Excessively tight single-crochet anchors can also pull the fabric inward. The anchor should control the space between shells without cinching the surrounding stitches.
The Shells Lean Sideways
Misplaced anchor stitches are a common cause. Each shell depends on the position established by the row beneath it.
Check every skipped-stitch count around the first distorted motif. The original error may be one repeat earlier than the shell where the lean becomes obvious.
The Border Ripples
Too many stitches have probably been distributed along the side edge. Remove the edging and reduce the number of foundation stitches along the affected section.
If the border pulls the panel inward instead, the opposite problem is likely: the edge does not contain enough stitches for its natural length.
Conclusion
Before turning the swatch into a finished project, crochet at least three complete shell rows and measure the repeat after the fabric has relaxed. That test establishes width, yarn behavior and edge stability before a long foundation chain commits more material. For the photographed look, test a raised puff or cluster separately rather than assuming the standard five-dc shell will reproduce it exactly. Save this crochet shell stitch pattern to Pinterest with the foundation multiple in the description, then share the finished test panel on Instagram with #CrochetShellStitch. Which cluster construction gives your central fan the closest match to the raised columns in the reference?









