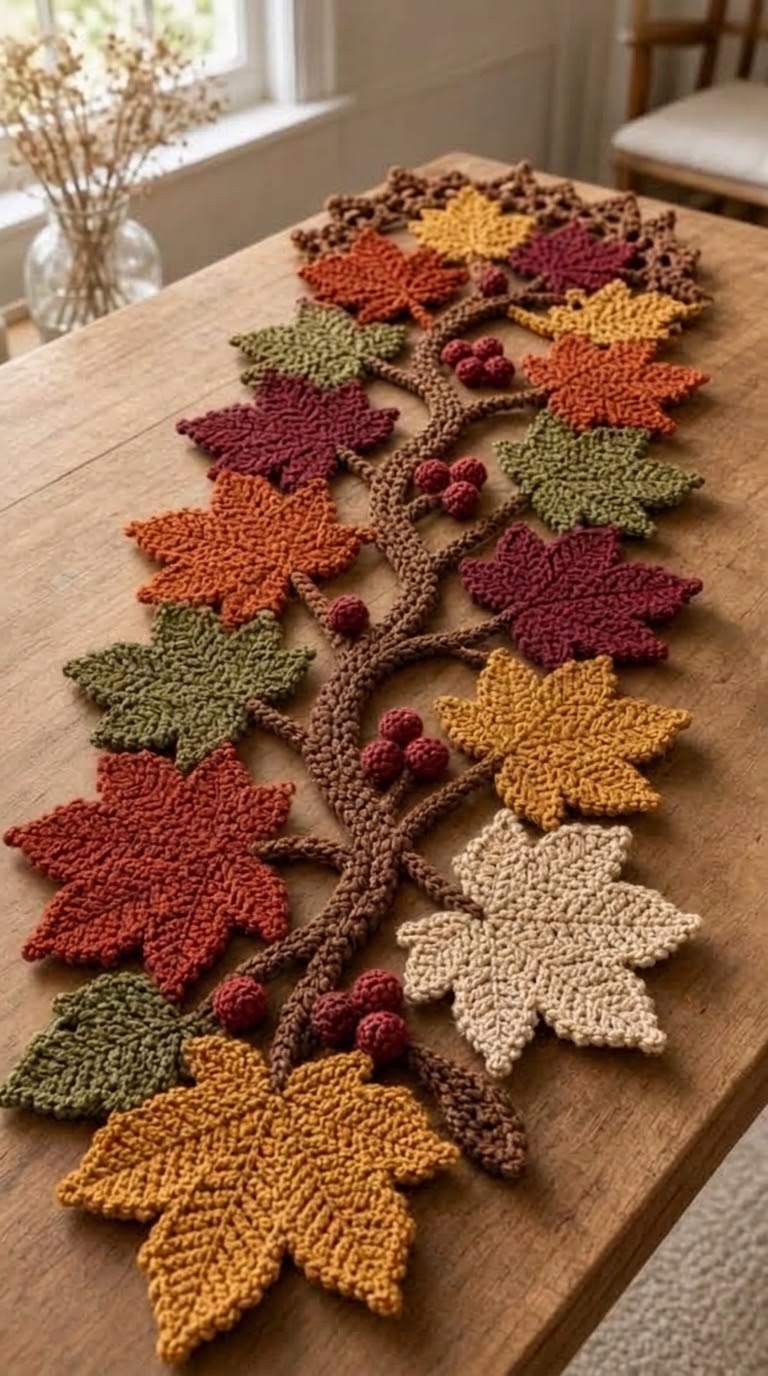
A maple leaf needs five readable points before color can do any of the design work. This crochet maple leaf garland pattern turns an autumn branch into a flat table decoration using DK yarn, a 3.5 mm hook, maple-style leaves, branching stems, and dimensional berries. Individual leaves measure approximately 10–11 cm. The modular construction also makes the finished runner easy to lengthen or shorten for a specific table.
The Design: What Makes This Maple Leaf Garland Different
This design uses three structural features rather than depending on autumn color alone. First, broad five-point leaves interrupt the narrow brown branch, giving every leaf enough separation for its outline to remain visible. Second, the central stem divides into smaller branches instead of functioning like a conventional straight bunting cord. That branching geometry gives the crochet autumn leaf garland the appearance of a trailing maple branch.
The berries add a third level of structure. They are worked as small three-dimensional forms while the leaves remain comparatively flat. Their raised shape breaks up the larger leaf surfaces without competing with the main motifs.
A frequent problem in a crochet maple leaf pattern is making all five points the same length. The center point should project farther than the lower side lobes. Leaf direction should also vary along the runner so the finished piece does not develop an obvious repeated grid.
Project Info at a Glance
| Skill Level | Time | Finished Size | Hook | Best For |
|---|---|---|---|---|
| Intermediate | Variable; modular project | Leaves approx. 10–11.5 cm; runner length adjustable | 3.5 mm | Table runners, mantel displays, and autumn decorations |
Materials and Tools
Yarn
- Brown DK yarn — for the main branch and side branches
- Mustard yellow DK yarn — approximately 5–8 g per medium leaf as a working allowance
- Burnt orange DK yarn — approximately 5–8 g per medium leaf
- Burgundy DK yarn — approximately 5–8 g per medium leaf
- Olive green DK yarn — approximately 5–8 g per medium leaf
- Cream DK yarn — approximately 5–8 g per medium leaf
- Dark red DK yarn — small quantity for the berries
The per-leaf quantities above are working allowances because actual yarn consumption changes with fiber, tension, and leaf dimensions.
Tools
- 3.5 mm crochet hook
- Tapestry needle
- Locking stitch markers
- Scissors
- Blocking pins
- Blocking mat
- Polyester stuffing — a small amount for berries
Safety eyes are not required because this is a botanical crochet project rather than a stuffed character.
Abbreviations
- MR — magic ring
- sc — single crochet
- inc — 2 single crochet stitches in one stitch
- dec — invisible single crochet decrease
- sl st — slip stitch
- ch — chain
- hdc — half double crochet
- dc — double crochet
- tr — treble crochet
- BLO — back loop only
- st/sts — stitch/stitches
For an invisible decrease, insert the hook through the front loops of the next two stitches, yarn over, draw through both front loops, then complete the single crochet.
Pattern — Step by Step
The flat leaves are worked differently from conventional amigurumi spheres. The berries use standard six-stitch amigurumi shaping, while the leaves combine a circular center with individually shaped points.
Maple Leaf Motif — Make Approximately 14
Yarn: mustard yellow, burnt orange, burgundy, olive green, or cream.
The goal is a five-point maple silhouette with the central point extending farther than the surrounding lobes.
Center
R1: 6 sc in MR (6)
R2: inc ×6 (12)
R3: (sc, inc) ×6 (18)
R4: (2 sc, inc) ×6 (24)
Do not fasten off.
Point 1: Ch 6. Beginning in the second ch from hook, work sl st, sc, hdc, dc, tr. Skip 1 stitch of the center and sl st into the next center stitch.
Point 2: Ch 8. Beginning in the second ch from hook, work sl st, sc, hdc, dc, dc, tr, tr. Skip 1 center stitch and sl st into the next stitch.
Center Point: Ch 10. Beginning in the second ch from hook, work sl st, sc, hdc, dc, dc, tr, tr, tr, dc. Skip 1 center stitch and sl st into the next stitch.
Point 4: Repeat Point 2.
Point 5: Repeat Point 1.
Work slip stitches along the center edge as required to return to the starting area. Keep these stitches loose enough that the center remains flat.
Stem: Ch 8. Beginning in the second chain from the hook, sl st across the remaining chains.
Fasten off. Leave approximately 15 cm of yarn when the leaf will be sewn directly onto a branch.
Block the leaf with the center point extending slightly farther than the upper side points. Keep the two lower lobes shorter to preserve the maple outline.
Main Branch
Yarn: brown.
Foundation: Ch 151.
Row 1: Starting in the second ch from the hook, sc across (150).
Row 2: Ch 1, turn. Sc in first 30 sts, hdc in next 20 sts, sc in next 50 sts, hdc in next 20 sts, sc in final 30 sts (150).
For a thicker central trunk similar to the photographed design, make a second identical strip. Place both strips together and whipstitch their long edges.
Do not stuff the main branch. Two layers of crochet fabric provide additional thickness while allowing the runner to lie flat on a table.
Adjust the runner before crocheting Row 1 if a different length is required. Add chains for a longer centerpiece or remove chains for a compact mantel decoration.
Side Branches — Make 8 to 12
Yarn: brown.
Use several branch lengths so the finished structure remains asymmetrical.
Short Branch: Ch 21. Starting in the second chain from hook, sc across (20).
Medium Branch: Ch 31. Starting in the second chain from hook, sc across (30).
Long Branch: Ch 41. Starting in the second chain from hook, sc across (40).
Fasten off each branch and leave approximately 20 cm of yarn for sewing.
Attach short, medium, and long branches at alternating angles. Avoid positioning two branches of identical length directly opposite each other.
Crochet Berries — Make 18 to 24
Yarn: dark red or burgundy.
R1: 6 sc in MR (6)
R2: inc ×6 (12)
R3: sc around (12)
R4: dec ×6 (6)
Insert a small amount of polyester stuffing before closing the berry.
Fasten off and leave a 12 cm tail. Thread the tail through the remaining front loops and pull the opening closed.
Do not overstuff the berries. Excess filling enlarges the sphere and makes a cluster disproportionately heavy beside the flat leaves.
Berry Clusters — Make 5 to 7
Use three completed berries for each cluster.
Position three berries in a triangular arrangement. Pass one berry tail through the neighboring berry, then repeat with the third berry. Secure the joining tails on the underside.
With brown yarn, ch 8.
Row 1: Beginning in the second chain from the hook, sl st across (7).
Fasten off. Sew one end of this short stem underneath the berry cluster. Leave the opposite end available for attaching the cluster to the main branch.
Narrow Brown Bud Leaves — Make 2
Yarn: brown.
Foundation: Ch 9.
Row 1: Starting in the second chain from hook, work sl st, sc, hdc, dc, dc, hdc, sc, sl st.
Rotate the work and crochet along the opposite side of the foundation chain.
Row 2: Work sl st, sc, hdc, dc, dc, hdc, sc, sl st along the opposite side.
Fasten off. Leave a 15 cm tail.
These narrow motifs are positioned near the lower section of the branch to reproduce the smaller brown forms visible in the reference design.
Optional Leaf Veins
Surface stitching can be added when stronger internal leaf definition is required.
Cut approximately 40 cm of matching or slightly darker yarn. Thread it onto a tapestry needle.
Bring the yarn from the back of the leaf near the base. Work one line toward the center point. Return to the center and add diagonal stitches toward the side lobes.
Keep every surface stitch loose enough for the leaf to remain flat. Tight vein stitches pull the motif inward and distort the points.
Assembly
- Place the main brown branch flat on a table or blocking mat and establish its final direction before sewing anything to it.
- Pin the side branches to the main branch. Alternate short, medium, and long pieces instead of creating symmetrical pairs.
- Sew every side branch firmly to the central structure using the long brown tails.
- Arrange the largest maple leaves first. Place them at different angles and leave visible sections of brown branch between neighboring motifs.
- Attach the remaining leaves, distributing mustard, orange, burgundy, olive, and cream across the full length rather than grouping identical colors.
- Secure each leaf through its stem and lower center. Avoid sewing around the complete perimeter because the points should remain free.
- Position the berry clusters in open spaces between larger leaves. Sew through both the berry stem and branch for a stable connection.
- Add individual berries where a three-berry cluster would make the arrangement too dense.
- Sew the two narrow brown bud leaves near the lower branches or another visually open section.
- Weave every remaining yarn tail into the underside, trim the ends, and block the completed runner flat.
The completed piece should lie flat while the leaves, berries, and branching structure remain individually readable.
7 Technical Tips
- Mark the beginning of every berry round. Losing the round boundary can shift a decrease by one or two stitches, producing an oval berry instead of a sphere.
- Limit berry stuffing to a compact central core. Stuffing that forces gaps between the 12 stitches of Round 3 is too firm and may remain visible.
- Use the invisible decrease through front loops only. A conventional decrease can leave a raised bar across a berry that contains only 12 stitches at its widest point.
- Pin each maple leaf before sewing it down. A rotation error of even 20–30 degrees can cause two neighboring leaves to overlap and hide their five-point outlines.
- Keep the branch fabric flatter than the berries. Stuffing the branch creates rolling and prevents the finished piece from functioning properly as a table runner.
- Block the center leaf point approximately 1–2 cm beyond the lower lobes. Equal-length points weaken the maple silhouette and make the motif resemble a generic star-shaped leaf.
- Weave branch tails for at least 3–4 cm. Short tails can pull free when the runner is folded, stored, or repositioned by its branches.
Adjusting the Size
The easiest way to resize this crochet maple leaf garland pattern is to change the branch rather than the individual leaves. A longer foundation chain creates more attachment space without changing the proportions of the motifs.
For a compact centerpiece, reduce the number of side branches and work approximately eight to ten leaves. A longer dining-table version can use fourteen or more leaves with additional berry clusters.
Changing yarn weight affects every dimension simultaneously. Thicker yarn creates larger leaves, heavier berries, and wider branches. If yarn weight changes, choose a hook that produces a firm fabric without making the leaf points rigid.
Color Placement
Do not distribute the five leaf colors in a fixed sequence. Repeating mustard, orange, burgundy, olive, and cream in the same order creates an obvious stripe effect along the runner.
Instead, position the strongest colors first. Burnt orange and burgundy can occupy separate sections, while mustard and olive fill the gaps. A single cream leaf creates a useful interruption in the darker palette.
The berries should remain darker than most surrounding leaves. Their function is to create small points of contrast along the brown branch rather than become the largest color element.
Blocking the Maple Leaves
Blocking controls the final geometry of each leaf. Place a completed motif on a blocking mat and pin the central point first. Pin the two upper side points next, followed by the shorter lower lobes.
Check the center before applying moisture or steam appropriate to the chosen fiber. The motif should remain flat with five distinct projections.
Acrylic yarn requires different heat handling from cotton or wool, so follow the care instructions supplied with the yarn. Excessive heat can permanently alter synthetic fibers.
Allow every motif to dry completely before sewing it onto the branch. Attaching an unblocked leaf first makes later correction more difficult because the branch restricts the direction in which the motif can be pinned.
Finishing the Autumn Table Runner
Inspect the complete runner from both ends before weaving in the final attachment tails. Large gaps can be corrected by rotating a leaf rather than adding another motif. Areas that appear crowded usually improve when one leaf is moved farther along its side branch.
Check the underside as carefully as the front. Knots, yarn ends, and attachment stitches should remain contained within the crocheted branch structure so they do not catch when the runner is moved across a table.
Store the finished piece flat when possible. If it must be folded, place the folds between leaves instead of directly across blocked points.
Conclusion
The final construction combines five-point leaves, flexible brown branches, narrow bud shapes, and small stuffed berries rather than treating the project as a line of identical motifs. Finish one test leaf first and measure it before producing the full set; that single measurement determines how many leaves the selected table length can carry. Once assembled, photograph the complete crochet maple leaf garland pattern from directly above so the branching layout remains visible. The finished version can also be shared on Pinterest or Instagram with #CrochetMapleLeafGarland. Which leaf color will occupy the central branch point: burnt orange, burgundy, mustard, olive, or cream?









