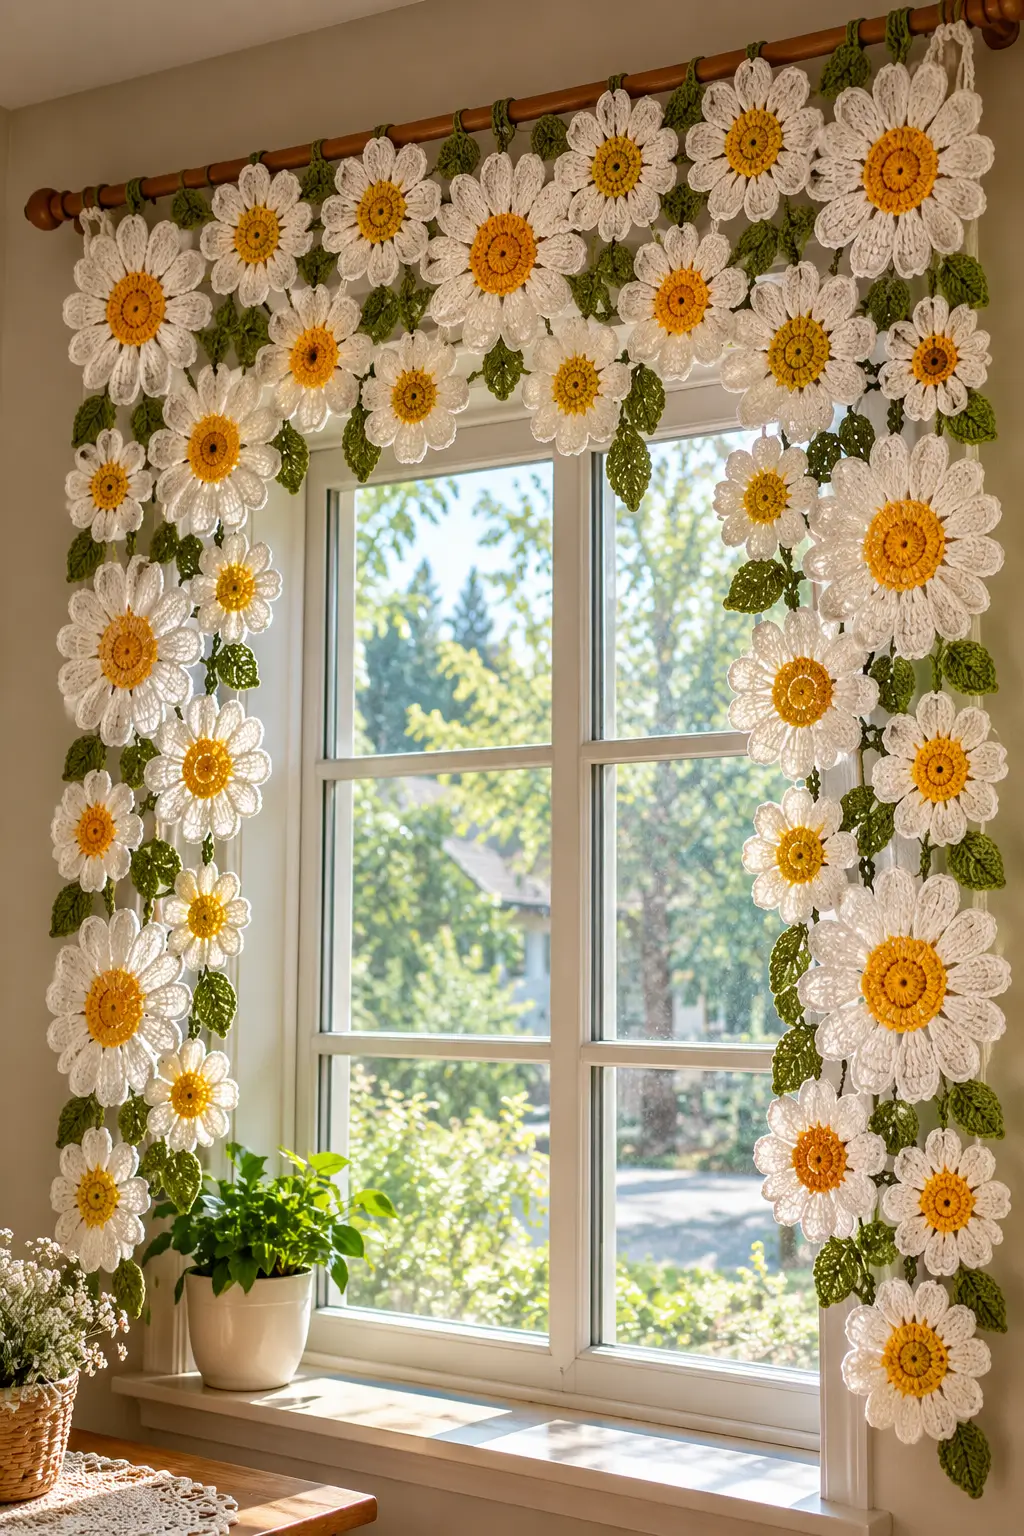
A daisy only reads correctly when its yellow disk stays visually smaller than the ring of long white petals. This crochet daisy garland pattern uses DK yarn, a 3.5 mm hook, 9–11 cm large flowers, smaller companion motifs, and separate leaves. The skill level is confident beginner. Its modular construction makes the finished curtain easy to resize for a narrow window, doorway, curtain rod, or wall panel.
The Design: What Makes This Daisy Garland Different
The reference uses three structural decisions that matter. First, flower diameter varies rather than repeating one identical motif. That breaks up the grid effect common in a basic crochet flower garland. Second, narrow green connections sit behind the blossoms, allowing white petals to remain visually dominant. Third, leaves occupy empty intervals instead of forming a continuous foliage border.
The large flowers use a 24-stitch center because that number divides cleanly into 12 petal positions. This construction produces evenly spaced petals while keeping the yellow disk compact in relation to the white outer section.
The common mistake in daisy curtain crochet is attaching through petal tips. Those points stretch. Connect the garland through the dense center or leaf base instead.
Project Info at a Glance
| Skill Level | Time | Finished Size | Hook | Best For |
|---|---|---|---|---|
| Confident beginner | 12–20 hours for curtain scale | Large flowers 9–11 cm; total dimensions adjustable | 3.5 mm | Windows, wall panels, and doorways |
Materials and Tools
Yarn
For a curtain approximately the density shown in the reference, use the following quantities as planning allowances. Actual yarn consumption depends on flower count, strand length, yarn composition, and tension.
- Cream/white: DK/light worsted, approximately 180–250 g, cotton or cotton/acrylic DK
- Golden yellow: DK/light worsted, approximately 60–90 g, cotton or cotton/acrylic DK
- Olive green: DK/light worsted, approximately 100–150 g, cotton or cotton/acrylic DK
Tools
- 3.5 mm crochet hook
- Yarn needle
- Scissors
- Stitch markers
- Blocking pins
- Blocking mat
- Tape measure
- Curtain rod or dowel
No safety eyes or stuffing are required.
Abbreviations
- MR – magic ring
- sc – single crochet
- inc – two stitches in one stitch
- dec – decrease
- sl st – slip stitch
- ch – chain
- hdc – half double crochet
- dc – double crochet
- tr – treble crochet
- BLO – back loop only
- st/sts – stitch/stitches
An invisible decrease works through the front loops of the next two stitches before completing one sc, reducing the visible ridge on three-dimensional crochet.
Pattern – Step by Step
US crochet terminology is used throughout. The flower motifs are worked from the center outward.
Large Daisy Center
Make as many as required. Yarn: golden yellow.
R1: 12 dc in MR, sl st to first dc (12)
R2: 2 dc in each st around, sl st to first dc (24)
The center should lie flat before the petals are added.
Fasten off the yellow yarn and weave the tail through the reverse side.
Large Daisy Petals
Make 12 petals per flower. Yarn: cream/white.
Join white yarn in any center stitch.
Petal 1: Ch 6. Starting in the second ch from the hook, work sl st, sc, hdc, dc, tr. Sl st into the next center stitch.
Skip the next center stitch.
Repeat the same petal sequence around, using one center stitch as the petal anchor and one as the spacer.
The completed flower has 12 petals distributed around the 24-stitch center.
If the petals twist, block them before joining the flowers to the curtain.
Fasten off. Weave the end through the yellow center rather than through a petal.
Medium Daisy Center
Yarn: golden yellow.
R1: 6 sc in MR (6)
R2: inc ×6 (12)
R3: (sc, inc) ×6 (18)
Sl st to close the round. Fasten off yellow.
Medium Daisy Petals
Make 9 petals per flower. Yarn: cream/white.
Join white yarn in any stitch.
Petal 1: Ch 5. Starting in the second ch from the hook, work sl st, sc, hdc, dc. Sl st into the next center stitch.
Skip one center stitch.
Repeat around for a total of 9 petals.
Fasten off and weave in the tail.
Small Daisy Center
Yarn: golden yellow.
R1: 6 sc in MR (6)
R2: inc ×6 (12)
Sl st to the first stitch. Fasten off yellow.
Small Daisy Petals
Make 6 petals per flower. Yarn: cream/white.
Join white yarn.
Petal 1: Ch 4. Starting in the second ch from the hook, work sl st, sc, hdc. Sl st into the next center stitch.
Skip one stitch.
Repeat around for 6 petals.
Fasten off. Weave the yarn tail into the back of the center.
Pointed Leaf
Make approximately 20–35. Yarn: olive green.
Ch 8.
Row 1: Starting in the second ch from the hook, work sl st, sc, hdc, dc, hdc, sc, sl st (7).
Do not turn. Continue along the opposite side of the foundation chain.
Row 2: sl st, sc, hdc, dc, hdc, sc, sl st (7).
Sl st at the leaf tip.
Fasten off. Leave a 15 cm tail when the leaf will be sewn directly to a strand.
Large Leaf
Make approximately 8–15. Yarn: olive green.
Ch 10.
Side 1: Starting in the second ch from the hook, work sl st, sc, hdc, dc, dc, dc, hdc, sc, sl st (9).
Rotate around the foundation chain.
Side 2: sl st, sc, hdc, dc, dc, dc, hdc, sc, sl st (9).
Fasten off and leave a 15 cm sewing tail.
Vertical Connecting Vine
Yarn: olive green.
The curtain uses several individual drops rather than one uninterrupted horizontal garland. Varying their lengths produces the irregular floral arrangement visible across the window.
For each vertical drop:
Ch 25–40 for the first interval.
Sl st securely through the reverse side of a flower center.
Ch 18–30.
Attach a leaf through its base.
Ch 12–25.
Attach the next flower through its center.
Continue alternating chains, flowers, and leaves until the strand reaches the planned window length.
The exact chain count depends on the dimensions of the window. Measure each strand under light tension because an unsupported crochet chain can lengthen after hanging.
Fasten off with a 20 cm tail.
Top Horizontal Garland
Yarn: olive green.
Make a foundation chain approximately equal to the usable curtain-rod width plus 20 cm.
Row 1: Sc in the second ch from the hook and in each ch across.
The row of single crochet gives the top line more resistance to stretching than an unreinforced chain.
Fasten off with a 20 cm tail.
Hanging Loops
Yarn: olive green.
Ch 18–30, adjusting the number of chains to the diameter of the curtain rod.
Join with a sl st to the first chain without twisting.
R1: Sc in each ch around.
Fasten off, leaving a 15 cm tail.
Make one loop for each major suspension point. Space the loops closely enough that the horizontal garland does not sag heavily between attachment points.
Optional Double-Layer Yellow Center
Some of the largest flowers can be given a thicker yellow center to reproduce the stronger dimensional effect of the reference.
Make two yellow disks:
R1: 6 sc in MR (6)
R2: inc ×6 (12)
R3: (sc, inc) ×6 (18)
Place the disks wrong sides together.
Join the two layers with 18 sl sts worked through both pieces.
Fasten off.
Attach the white petals around the outside edge. The double-layer construction is most useful on the largest flowers because the thicker center helps the motif maintain its shape while hanging vertically.
Assembly
- Block every large daisy to approximately 9–11 cm across, measuring from opposite petal tips.
- Arrange the top row on a flat surface before sewing. Alternate large and medium flowers instead of repeating a single flower size.
- Sew each flower to the horizontal green strip through the dense yellow center. Do not attach through the outer petal tips.
- Position the first vertical drops beneath the major flowers in the top row. Distribute the remaining strands between them.
- Attach medium and small daisies at unequal intervals so adjacent strands do not form identical horizontal rows.
- Sew leaves into the open spaces. Alternate their pointed ends inward and outward to prevent the foliage from forming rigid vertical lines.
- Reinforce every vertical-strand connection with two passes of green yarn through the reverse side of the flower center.
- Sew the hanging loops to the horizontal strip. Test them on the actual curtain rod before trimming the yarn tails.
- Hang the complete piece for several hours. Shorten any strand that stretches below the intended lower edge.
- Weave the remaining tails through dense center stitches, trim them, and lightly block any petals that twisted during assembly.
The finished curtain consists entirely of modular flowers, leaves, reinforced connecting chains, and rod loops.
7 Technical Tips for a Crochet Daisy Garland
- Lost stitch position: Place a marker in the first stitch of every circular center. One missing stitch in a 24-stitch center shifts the 12-petal spacing and creates a visible gap.
- Cupped center: If a 24-stitch disk refuses to lie flat, check the stitch total before changing hook size. Blocking cannot reliably correct a center containing the wrong number of increases.
- Unequal petals: Count the foundation chains instead of pulling individual petals longer after crocheting. A difference of one chain becomes visible when 12 petals radiate from the same disk.
- Stretched attachment: Keep structural seams at least 10–15 mm inside the petal tip. Joining through the tip places the hanging load on the narrowest section of the flower.
- Visible joins: Weave white tails into white petal bases and yellow tails into the flower centers. Avoid carrying green yarn across the reverse side of open white petals.
- Garland sag: Test the horizontal support with at least three completed vertical drops before assembling the full curtain. Additional flower weight can lengthen an unsupported chain.
- Twisted leaves: Pin each leaf along its central foundation chain while blocking. Pinning only the outer edges can spread the leaf too widely and remove its narrow pointed profile.
Finishing the Daisy Window Garland
Measure the curtain rod before making the connecting chains; the number of flowers matters less than their final distribution across the available width. Block one large 9–11 cm test flower first, then use its actual diameter to calculate how many motifs the window requires. This prevents a dense floral arrangement from becoming wider than its mounting point.
Keep the completed crochet daisy garland pattern modular. Extra flowers, leaves, or vertical strands can then be added later without rebuilding the horizontal support. Photograph the finished curtain against the window and share the layout on Pinterest or Instagram with #DaisyWindowGarland.
Which arrangement will you use: larger daisies concentrated across the top, or large flowers continuing down both sides of the window?









