Introduction
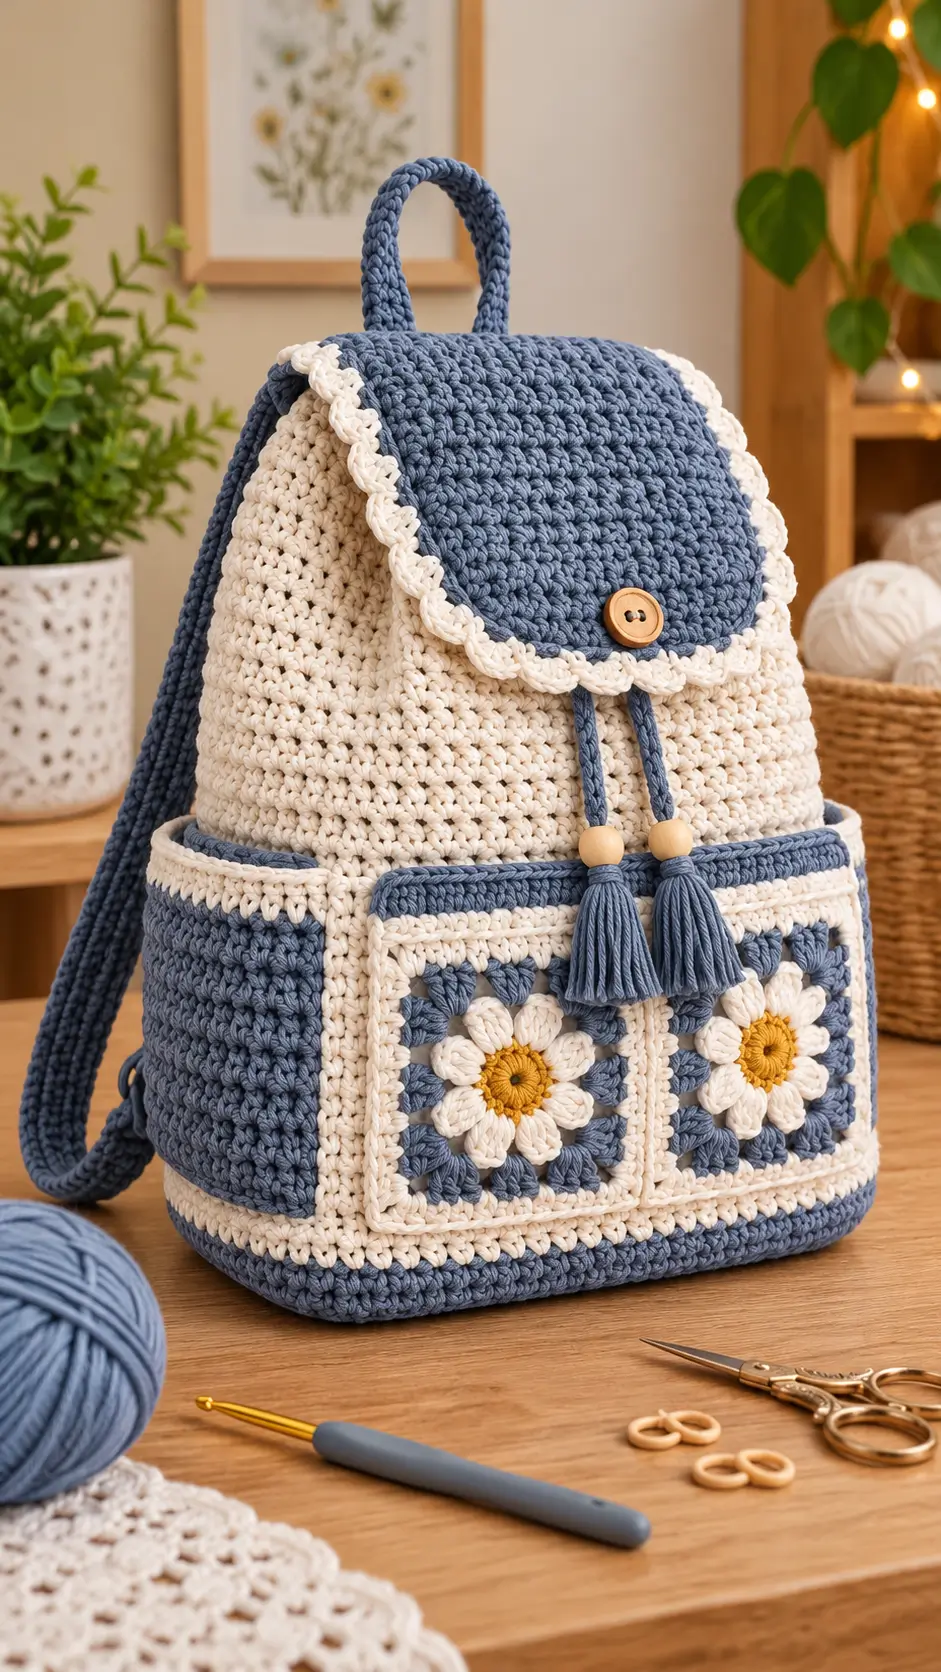
Daisy petals need a firm square border to remain flat against a loaded backpack. This crochet daisy backpack pattern combines two floral granny-square pockets with a cream body, slate-blue flap, reinforced base, and crocheted shoulder straps. The proposed design uses worsted-weight cotton and a 4 mm hook to produce an approximately 32 cm tall backpack. Intermediate crochet skills are recommended. Separate pocket panels make damaged or worn sections easier to repair.
The Design: What Makes This Daisy Backpack Different
The two daisy squares sit on the front of the backpack rather than forming its entire body. This keeps the main shell continuous, reducing gaps that could allow small objects to escape. Each flower has a mustard-yellow center, ivory petals, and slate-blue corner stitches. A cream border connects the floral panels visually to the main bag.
The second structural decision concerns the flap. Its curved lower edge is worked with decreases, then finished with contrasting scalloped trim. This creates a rounded cover without adding excessive thickness at the button.
Finally, the shoulder straps attach to reinforced sections of the back panel. In a daisy granny square backpack, attaching straps directly to decorative motifs can distort their corners. This blue and cream crochet backpack separates load-bearing construction from ornamentation.
Project Info at a Glance
| Detail | Specification |
|---|---|
| Skill level | Intermediate |
| Estimated time | 12–16 hours |
| Target height | 32 cm |
| Target width | 28 cm |
| Target depth | 10 cm |
| Hook | 4.0 mm |
| Yarn | Worsted-weight cotton |
| Construction | Panels, rounds, and seaming |
Measurements and quantities are proposed design targets, not verified results from a finished sample.
Materials and Tools
Yarn
- Dusty slate blue — worsted cotton — approximately 250 g: Main flap, straps, base edging, pockets, and floral backgrounds.
- Ivory cream — worsted cotton — approximately 200 g: Main body, flower petals, pocket borders, and scalloped edging.
- Mustard yellow — worsted cotton — approximately 15 g: Daisy centers.
- Extra blue yarn — approximately 20 g: Tassels and decorative cords, included in the blue allocation above.
Tools
- 4.0 mm crochet hook
- Tapestry needle
- Stitch markers
- Scissors and measuring tape
- Wooden button, approximately 20–25 mm
- Two wooden beads, approximately 12–15 mm
- Cotton fabric lining, optional
- Sewing needle and matching thread
Gauge
Work a 15-stitch by 15-row single-crochet swatch before constructing the bag. Measure the central 10 cm after washing and drying it flat. The proposed construction assumes a gauge close to 16 single-crochet stitches and 18 rows per 10 cm. Adjust stitch and row counts if your swatch differs.
Abbreviations
| Abbreviation | Meaning |
|---|---|
| MR | Magic ring |
| sc | Single crochet |
| inc | Increase |
| dec | Decrease |
| sl st | Slip stitch |
| ch | Chain |
| BLO | Back loop only |
| hdc | Half double crochet |
| dc | Double crochet |
| tr | Treble crochet |
| st | Stitch |
An invisible decrease works through the front loops of the next two stitches, reducing bulk compared with a conventional single-crochet decrease.
Pattern — Step by Step
Important: This is a photo-inspired, untested pattern prototype. The oval base and daisy background require stitch testing and correction before publication as a verified pattern. All instructions use US crochet terminology.
1. Main Backpack Base (Make 1)
Yarn: Dusty slate blue. Construction: Oval foundation.
Ch 37.
- R1: Sc in second ch from hook and next 34 ch, 3 sc in final ch. Work along opposite side with 34 sc, then 2 sc in starting ch (74).
- R2: Inc, 34 sc, inc ×3, 34 sc, inc ×2 (80).
- R3: (Sc, inc), 34 sc, (sc, inc) ×3, 34 sc, (sc, inc) ×2 (86).
- R4: (2 sc, inc), 34 sc, (2 sc, inc) ×3, 34 sc, (2 sc, inc) ×2 (92).
- R5: (3 sc, inc), 34 sc, (3 sc, inc) ×3, 34 sc, (3 sc, inc) ×2 (98).
- R6: (4 sc, inc), 34 sc, (4 sc, inc) ×3, 34 sc, (4 sc, inc) ×2 (104).
Provisional instructions: the oval-base stitch counts have not been validated and need correction during sample-making.
2. Main Backpack Body (Make 1)
Yarn: Ivory cream.
- R1: Sc BLO around (104).
- R2–R8: Sc around (104 each round).
- R9: Change to slate blue; sc around (104).
- R10–R12: Sc around (104 each round).
- R13: Change to cream; sc around (104).
- R14–R42: Sc around (104 each round).
- R43: Change to blue; sc around (104).
- R44–R46: Sc around (104 each round).
Fasten off, leaving a 20 cm yarn tail. Measure the body and adjust the number of plain rounds if needed.
3. Daisy Granny Squares (Make 2)
Yarn: Mustard yellow, ivory cream, and slate blue.
Flower Center
- R1: With yellow, 6 sc in MR (6).
- R2: Inc ×6 (12).
- R3: (Sc, inc) ×6 (18).
- R4: Sc around (18).
Sl st into first stitch and fasten off yellow.
Daisy Petals
R5: Join cream. Repeat [ch 3, 2 dc in next stitch, ch 3, sl st in following stitch] nine times (9 petals). Fasten off.
Square Background
- R6: Join blue behind a petal. Work granny clusters of 3 dc into suitable gaps, forming four corners with (3 dc, ch 2, 3 dc).
- R7: Work 3 dc in each side gap and (3 dc, ch 2, 3 dc) in each corner.
- R8: Repeat the granny-square border arrangement.
Continue until each square measures approximately 12–13 cm after blocking. Finish with a cream single-crochet border. The exact background cluster placement must be verified against the finished petals.
4. Front Pocket Backing Panels (Make 2)
Yarn: Ivory cream.
- Row 1: Ch 22, sc in second ch and across (21).
- Row 2–21: Ch 1, turn, sc across (21 each row).
Fasten off with a 25 cm tail. Block the backing to match the flower square. Join three sides, leaving the upper edge open.
5. Rounded Backpack Flap (Make 1)
Yarn: Dusty slate blue.
- Row 1: Ch 43, sc in second ch and across (42).
- Row 2–18: Ch 1, turn, sc across (42 each row).
- Row 19: Ch 1, turn, dec, 38 sc, dec (40).
- Row 20: Ch 1, turn, sc across (40).
- Row 21: Ch 1, turn, dec, 36 sc, dec (38).
- Row 22: Ch 1, turn, sc across (38).
- Row 23: Ch 1, turn, dec, 34 sc, dec (36).
- Row 24: Ch 1, turn, sc across (36).
- Row 25: Ch 1, turn, dec, 32 sc, dec (34).
- Row 26: Ch 1, turn, sc across (34).
- Row 27: Ch 1, turn, dec, 30 sc, dec (32).
- Row 28: Ch 1, turn, sc across (32).
Fasten off with a 35 cm sewing tail.
Cream Scalloped Edging
Join cream at the lower corner. Repeat [skip 1 edge stitch, 5 dc in next stitch, skip 1 edge stitch, sl st in following stitch] along the curved edge. Adjust spacing to prevent curling.
6. Shoulder Straps (Make 2)
Yarn: Dusty slate blue.
- Row 1: Ch 7, sc in second ch and across (6).
- Row 2–100: Ch 1, turn, sc across (6 each row).
Measure the straps before fastening off. Leave 30 cm sewing tails. Reinforce with cotton webbing for heavier use.
7. Top Carry Handle (Make 1)
Yarn: Dusty slate blue.
- Row 1: Ch 7, sc in second ch and across (6).
- Row 2–32: Ch 1, turn, sc across (6 each row).
Fold lengthwise, sew the long edges together, and attach securely to the upper back panel.
8. Side Pockets (Make 2)
Yarn: Dusty slate blue.
- Row 1: Ch 17, sc in second ch and across (16).
- Row 2–15: Ch 1, turn, sc across (16 each row).
- Row 16: Change to cream; sc across (16).
- Row 17–19: Ch 1, turn, sc across (16 each row).
Fasten off with a 25 cm tail. Sew the sides and bottom to the backpack, leaving the upper edge open.
9. Decorative Tassels (Make 2)
Cut approximately 20 blue strands, each 18 cm long, for each tassel. Fold around a cord, bind approximately 1.5 cm below the top, and trim to 7 cm. Thread a wooden bead above each tassel and secure it. Attach the cords beneath the flap.
10. Wooden Button Closure (Make 1)
Sew a 20–25 mm wooden button near the lower center of the flap. Create a button loop on the body by chaining 12, joining to form a loop, and working 12 sc around it. Reinforce the attachment and test the fit.
Assembly
- Block the backpack shell and check the base.
- Center the flap on the back opening.
- Sew the flap to the back panel.
- Align and attach the wooden button and loop.
- Position both floral pockets evenly on the front.
- Sew each backed square along three sides.
- Attach both side pockets.
- Reinforce and attach the shoulder straps.
- Secure the handle and decorative tassels.
- Weave in yarn tails, inspect seams, and add an optional lining.
The completed backpack has a continuous shell, two decorative front pockets, a curved flap, and reinforced carrying straps.
7 Technical Tips
- Stitch markers: Mark the beginning of every body round and both ends of the oval base. A misplaced marker can shift the seam and distort the flap alignment.
- Base firmness: A base that folds when lifted needs additional support. Use a removable stabilizer approximately 5 mm smaller than the interior base.
- Invisible decreases: Conventional decreases can form bumps along the curved flap. Work invisible decreases consistently on the same side.
- Pocket alignment: Measure both pockets from the bottom border before sewing. A difference of 5 mm can be visible.
- Yarn tension: Loose stitches may stretch when the bag is loaded. Check the washed gauge swatch before making the shell.
- Pinning: Pin all four corners of each flower square before sewing. Joining without pinning can distort the panel diagonally.
- Tail weaving: Weave strap tails through at least 5 cm of surrounding stitches. Reinforce load-bearing joins with sewing thread.
Troubleshooting Common Construction Problems
Why does the backpack lean forward?
Check the upper strap attachment points and confirm both straps are equal in length. Heavy front pockets can also shift the center of gravity.
Why does the flap curl?
Remove the edging, block the flap, and adjust scallop spacing. Tight edging can pull the curved edge inward.
Why do the daisy squares look uneven?
Differences in center and petal tension can change their dimensions. Block both squares before attaching the backing.
Can acrylic yarn replace cotton?
Yes, although acrylic may stretch more under load. Reinforced straps and a lining are recommended.
Should the backpack have a lining?
A lining is recommended when carrying small accessories, keys, or pens. It also protects objects from catching in decorative openings.
Can the backpack be resized?
Yes. Resize the base first, then adjust the body circumference and flap width to match.
Related Crochet Patterns
- Daisy Granny Square Tutorial — Explore a daisy square tutorial. [INTERNAL LINK NEEDED]
- Crochet Granny Square Backpack — Explore a modular backpack tutorial. [INTERNAL LINK NEEDED]
- Crochet Drawstring Backpack — Explore drawstring bag construction. [INTERNAL LINK NEEDED]
- Crochet Floral Bag Collection — Explore floral crochet bags. [INTERNAL LINK NEEDED]
Conclusion
This crochet daisy backpack pattern combines a structured bag body with two decorative flower pockets, a rounded flap, and reinforced carrying straps. The proposed construction is designed around worsted-weight cotton, contrasting borders, and separate components that can be adjusted during fitting. Before making the complete backpack, crochet one daisy square and a gauge swatch to confirm the dimensions. Record the finished height, width, and strap length for future versions.
Save the design to Pinterest or share a completed sample on Instagram using #DaisyCrochetBackpack. When adapting the design, would you keep the two daisy pockets separate or join them into one full-width floral panel?









