Introduction
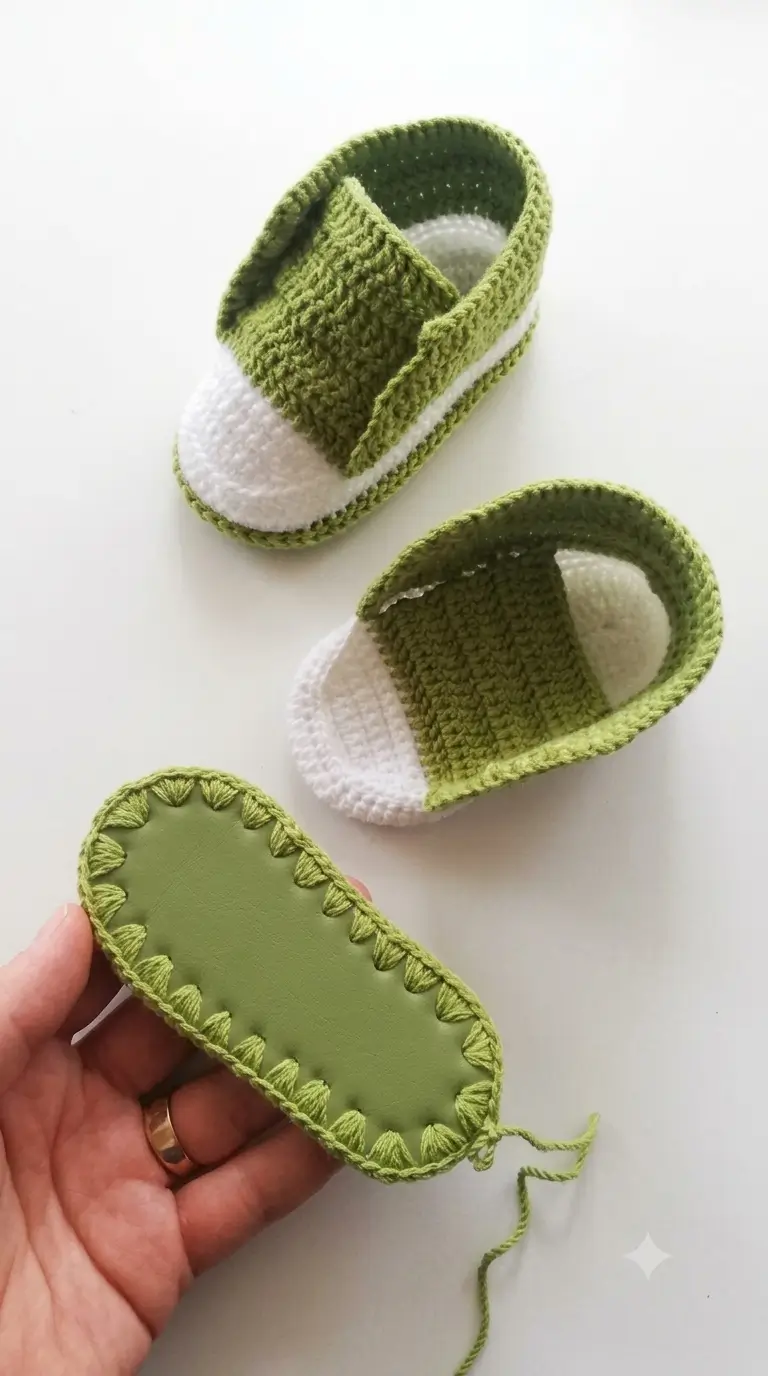
A wide olive-green instep crossing a white crochet toe gives these baby shoes their defining construction. This crochet baby shoes pattern combines DK cotton yarn with a firm faux-leather sole for a finished shoe approximately 9.5–10 cm long. The project suits intermediate crocheters who can work increases, decreases, shaped rows, and joined edging. The reinforced bottom also makes the finished pair more resistant to stretching than an all-crochet sole.
The Design: What Makes These Crochet Baby Shoes Different
The shoe is built around three structural decisions. First, the faux-leather outsole provides a fixed footprint, so the crochet upper must match the hole spacing rather than expand freely like a standard bootie. Second, the white toe is rounded with controlled increases and decreases to create volume without making the front bulky. Third, the olive-green side and heel section rises around the foot and overlaps the instep, producing the broad slip-on shape visible in the reference photo.
One common mistake with crochet baby shoes with leather soles is attaching the upper before checking symmetry. Even a difference of one attachment stitch can twist the toe away from the center line. Pin or mark the midpoint of the heel and toe before joining the crochet sections to the outsole.
Project Info at a Glance
| Skill Level | Time | Finished Size | Hook | Best For |
|---|---|---|---|---|
| Intermediate | 3–5 hours per pair | Approx. 9.5–10 cm | 3–3.5 mm | 0–3 month baby size |
Materials and Tools
Yarn
- Olive green — DK cotton or cotton blend — approximately 25–30 g
- White — DK cotton or cotton blend — approximately 15–20 g
Tools
- 3–3.5 mm crochet hook
- Two pre-punched faux-leather baby shoe soles
- Yarn needle
- Stitch markers
- Scissors
- Flexible measuring tape
- Sharp leather punch if the soles are not pre-punched
Choose a smooth, tightly spun yarn. Cotton gives the edge enough definition to sit cleanly against the faux-leather base and reduces excessive stretching around the opening.
Abbreviations
- MR — magic ring
- ch — chain
- sc — single crochet
- hdc — half double crochet
- dc — double crochet
- inc — 2 stitches worked into one stitch
- dec — decrease
- sl st — slip stitch
- BLO — back loop only
- FO — fasten off
For an invisible decrease, insert the hook through the front loops of the next two stitches, yarn over, pull through both front loops, then complete the single crochet.
Crochet Baby Shoes Pattern – Step by Step
Construction note: Make two shoes. Because the photograph uses a solid faux-leather outsole, this version treats the leather piece as the base rather than crocheting a complete yarn sole.
Step 1: Prepare the Faux-Leather Soles
Cut two matching rounded baby-shoe soles approximately 9.5–10 cm long and about 4.5–5 cm across the widest part.
Mark holes approximately 5–6 mm from the outside edge. Space them approximately 6–7 mm apart. Both soles must contain the same number of holes.
The exact count depends on the sole template. A typical sole of this size may contain approximately 36–42 holes around the perimeter.
Before crocheting, place both pieces together and check that every hole lines up with its partner.
Step 2: Blanket-Stitch the Sole Edge
Yarn: olive green.
Thread a yarn needle with approximately 150 cm of green yarn. Work one firm blanket stitch through every punched hole around the leather sole.
Keep the loops approximately equal in height. Do not pull hard enough to curl the leather.
At the end, join invisibly to the first stitch and weave the yarn tail securely beneath several edge stitches.
Step 3: Crochet Around the Sole
Yarn: olive green.
Insert the crochet hook under the top loop of the blanket stitching.
Round 1: Work 1 sc into each blanket stitch around the entire sole. Join with sl st.
Round 2: Ch 1, work 1 sc in each stitch around. Join with sl st.
The stitch count should remain equal to the number of edge loops created around the outsole.
Measure the edge after Round 2. It should rise cleanly from the leather without flaring outward or folding toward the center.
Step 4: White Toe Section
Yarn: white.
Mark the exact center of the toe. Count an equal number of stitches to the left and right of this marker.
For a 9.5–10 cm sole, approximately 18–20 front stitches usually provide enough width for the toe section.
Row 1: Join white yarn at the right toe marker. Ch 1, sc across the selected toe stitches. Turn.
Row 2: Ch 1, sc across. Turn.
Row 3: Ch 1, dec, sc across to last 2 sts, dec. Turn.
Row 4: Ch 1, sc across. Turn.
Row 5: Ch 1, dec, sc across to last 2 sts, dec. Turn.
Row 6: Ch 1, sc across. Turn.
Continue decreasing at both ends every second row until the toe panel curves smoothly over the front third of the shoe.
For most soles in this size range, 6–8 rows create enough height.
Fasten off. Leave approximately 15 cm of yarn for securing the final edge.
Step 5: Green Side and Heel Section
Yarn: olive green.
Join the green yarn at one side of the white toe panel.
Row 1: Ch 1. Sc through each available green edge stitch, continue around the heel, and stop at the opposite side of the white toe. Turn.
Row 2: Ch 1, sc in each stitch across. Turn.
Row 3: Ch 1, sc across. Turn.
Row 4: Ch 1, sc across. Turn.
Row 5: Ch 1, sc across. Turn.
Row 6: Ch 1, sc across. Turn.
Continue until the heel wall measures approximately 3–3.5 cm from the sole.
The side wall should remain nearly vertical. If it begins to flare, reduce one stitch near each side of the heel on the following row.
Step 6: Wide Instep Panel
Yarn: olive green.
The photographed shoe uses a broad green panel that extends across the top of the foot rather than a narrow strap.
Begin at the inner side of the shoe.
Row 1: Join yarn and work approximately 14–16 sc across the designated side stitches. Turn.
Row 2: Ch 1, sc across. Turn.
Row 3: Ch 1, sc across. Turn.
Row 4: Ch 1, sc across. Turn.
Row 5: Ch 1, sc across. Turn.
Row 6: Ch 1, sc across. Turn.
Row 7: Ch 1, sc across. Turn.
Row 8: Ch 1, sc across.
Test the panel across the white toe. It should cover the instep without pulling the side wall inward.
If additional length is required, add rows one at a time. A finished panel length of approximately 4.5–5.5 cm suits many shoes in this size range.
Fasten off with a 20 cm tail.
Step 7: Attach the Instep Panel
Lay the panel diagonally or nearly straight across the white toe according to the appearance shown in the reference photo.
Pin the free edge against the opposite side wall.
Check three measurements before sewing:
- The toe remains centered.
- The heel is not pulled forward.
- Both shoe openings are equal in circumference.
Use the long green yarn tail to sew the free edge securely to the side of the shoe. Work through matching crochet loops so the join does not form a thick ridge.
Step 8: Collar Edging
Yarn: olive green.
Join green yarn at the back center of the heel.
Round 1: Ch 1, sc evenly around the complete shoe opening. Join with sl st.
Round 2: Ch 1, sc around. Join with sl st.
Do not add unnecessary increases. The collar needs enough structure to hold its oval shape.
Fasten off and weave the tail beneath at least 4–5 stitches.
Step 9: White Side Accent
Yarn: white.
The photograph shows a thin white stripe between the green upper and green outsole edging.
Join white yarn along the side immediately above the green sole border.
Work surface slip stitches or a narrow line of single crochet around the visible side and heel section.
Keep every stitch at the same depth. Irregular insertion points will make the stripe wave.
Fasten off invisibly.
Assembly
- Place both faux-leather soles together and confirm that their dimensions and hole spacing match.
- Work the olive blanket stitching around each sole using equal tension.
- Crochet the green foundation edging around both soles.
- Mark the center toe and center heel before adding upper sections.
- Work the white toe panels and compare their row counts before fastening off.
- Crochet the green heel and side walls to matching heights.
- Make the wide instep panels with identical stitch and row counts.
- Pin each panel across the shoe and compare the openings before sewing.
- Add the green collar edging and white side accent.
- Weave every yarn tail into the crochet fabric and inspect both soles for loose attachment stitches.
The completed pair should have matching toe curves, equal heel heights, centered instep panels, and flat leather outsoles.
7 Technical Tips for Better Crochet Baby Shoes
- Mark the center points before attaching the upper. A toe panel shifted by even two stitches can make the finished shoe appear twisted when viewed from above.
- Keep the leather-edge loops consistent. A difference greater than approximately 2–3 mm in loop height can produce a visibly uneven green border around the outsole.
- Do not overtighten the first crochet round. Excessive tension draws the leather edge upward and creates a shallow bowl instead of a flat sole.
- Measure both toe panels after every two rows. A difference of one full row can change the height enough to make one shoe fit more tightly across the toes.
- Pin the instep panel before sewing. Attaching it without checking the opening can reduce the usable circumference and make the shoe difficult to place on the foot.
- Keep the white accent stripe at one fixed level. Moving the hook between different crochet rows creates a wavy line that is particularly noticeable against the olive-green background.
- Weave tails for at least 4–5 stitches. Short tail weaving near the outsole can loosen because this area receives more flexing than the upper collar.
Adjusting the Size
The safest way to resize this crochet baby shoes pattern is to change the sole first. Do not simply add rows to the upper while keeping the original outsole.
For a smaller size, begin with an approximately 8–9 cm sole and reduce the number of edge stitches proportionally. For a larger baby size, increase the sole to approximately 10.5–11 cm and distribute extra stitches evenly around the perimeter.
The toe section should occupy roughly the front third of the shoe. Keep the instep panel long enough to cross the upper without pulling the side wall toward the center.
Yarn and Tension
DK cotton or a cotton-rich blend works well for this construction because the stitches remain compact around the leather edge. A soft acrylic yarn can also be used, but its greater elasticity may require a smaller hook.
With DK yarn, begin with a 3–3.5 mm hook. The finished fabric should be dense enough that the individual stitches hold their shape while still bending with the upper.
Make a small swatch if changing yarn type. Compare the width of 10 single crochet stitches before committing to both shoes. Even a small gauge change multiplies across the entire side wall and can alter the opening significantly.
Making the Two Shoes Match
Work the pair in stages rather than finishing one complete shoe before beginning the second. Prepare both soles first. Then complete both white toes, both heel sections, both instep panels, and finally both collars.
This method makes discrepancies easier to catch. Compare stitch counts, row counts, panel width, heel height, and opening circumference after each stage.
Place the finished shoes side by side with their heels aligned. The white toe sections should end at approximately the same point, and the green upper panels should cross the feet at matching angles.
Safety and Wear Notes
These crochet baby shoes are intended as soft footwear rather than walking shoes. A smooth faux-leather sole can become slippery on hard flooring, especially when used by a child who is standing or beginning to walk.
Avoid loose buttons, beads, charms, or other detachable decorations. Inspect the perimeter stitching regularly because the junction between the crochet yarn and leather sole receives repeated flexing.
For babies who are actively walking, use footwear designed specifically for traction and walking support.
Conclusion
The defining feature of this crochet baby shoes pattern is the combination of a fixed faux-leather outsole, rounded white toe, and broad olive-green instep panel. After completing the first shoe, record the exact number of leather holes, toe stitches, heel rows, and instep rows before making its partner. That written count is the most reliable way to produce a symmetrical pair. Save the finished project to Pinterest and share the completed shoes on Instagram with #GreenBabyShoes. When adjusting this design, which detail would you change first: the width of the green instep panel or the height of the heel?









