Introduction
Baby booties usually lose their fit at the ankle before the sole becomes the problem. This crochet baby booties pattern addresses that point with a shaped toe and attached ribbed cuff. Use DK yarn, a 3.5 mm hook, and roughly 35–40 g for the pair; the target newborn sole is about 8.4 cm. Basic crochet skills are sufficient, and the compact construction makes gauge correction practical before the upper is completed.
The Design: What Makes These Pink Booties Different
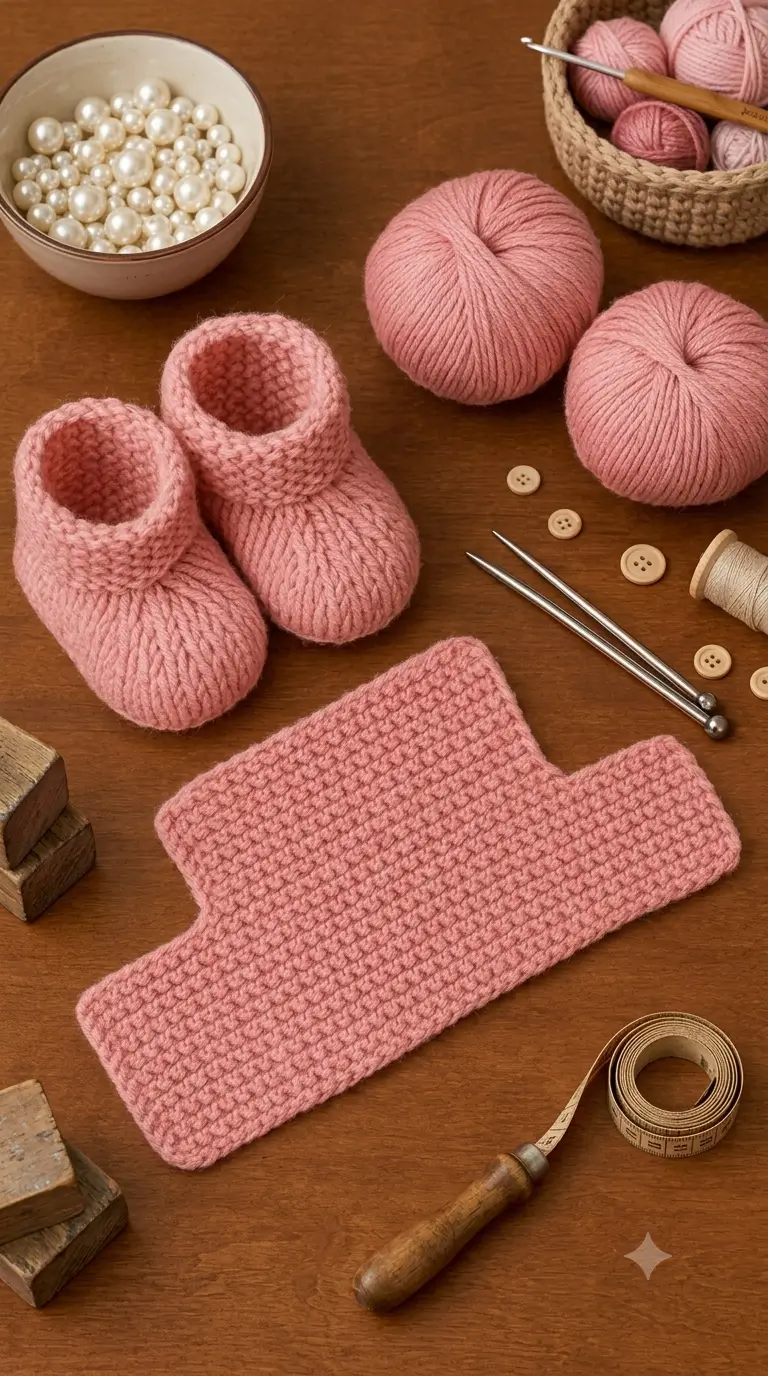
The photograph shows three useful structural cues: a broad rounded toe, a relatively narrow ankle opening, and vertical texture near the upper edge. The rounded front gives the toes more width than a sharply tapered shoe shape, while concentrated decreases control volume above the foot. A fitted ankle matters because an infant bootie with the correct sole length can still slip when the opening is too wide.
The ribbed finish adds horizontal stretch without adding a bulky strap or button. That makes the construction visually closer to ribbed baby booties than to Mary Janes or lace-up shoes.
A common error with newborn crochet shoes is treating age as the only sizing measurement. Published patterns instead recommend checking the actual sole length during construction because hook size, yarn diameter, and personal tension can shift the result.
Project Info at a Glance
| Skill Level | Time | Finished Size | Hook | Best For |
|---|---|---|---|---|
| Advanced beginner | 1.5–2.5 hours per pair | Approx. 8.4 cm sole | 3.5 mm | Newborn / 0–3 month sizing benchmark |
The 8.4 cm sole and 3.5 mm hook combination comes from a published newborn sizing reference. Finished dimensions still depend on gauge.
Materials and Tools
Yarn
- Dusty rose pink — DK / category 3 light — 35–40 g total pair
The photographed yarn appears slightly plumper than some DK bases, so treat the listed weight as the technical starting point rather than proof of what the image used. A test sole provides more useful sizing information than the yarn label alone.
Tools
- 3.5 mm crochet hook
- 2 stitch markers
- Tapestry needle
- Small scissors
- Flexible ruler or tape measure
- Optional elastic thread for cuff retention
No safety eyes, beads, buttons, stuffing, or hard decorative pieces are required for this version. The pearl beads shown in the photograph are props rather than a necessary component.
Abbreviations
- ch — chain
- sc — single crochet
- hdc — half double crochet
- sl st — slip stitch
- inc — work 2 stitches into the same stitch
- dec — crochet two stitches together
- BLO — back loop only
- st / sts — stitch / stitches
- RS — right side
An invisible decrease is worked through selected front loops before completing one single crochet, reducing bulk where two stitches become one.
Pattern — Step by Step
This is an original construction written for the visual style in the supplied image. Unlike amigurumi, the sole begins around a foundation chain rather than a six-stitch magic ring.
Bootie Sole and Upper — Make 2
Yarn: dusty rose DK. Size benchmark: approximately 8.4 cm sole with a 3.5 mm hook.
Foundation: Ch 11.
R1: Starting in second ch from hook, 2 hdc in first ch, hdc in next 8 ch, 5 hdc in last ch. Rotate to work along the unused side of the foundation chain; hdc in next 8 loops, 3 hdc in final loop. Join with sl st. (26)
The first and last groups create the heel and toe curves. Keep the foundation chain loose enough that the sole remains flat.
R2: Ch 1, inc in next 2 sts, hdc in next 8 sts, inc in next 5 sts, hdc in next 8 sts, inc in next 3 sts. Join. (36)
Measure the sole now. The target after blocking and subsequent rounds is approximately 8.4 cm for the selected newborn benchmark; tension may require a hook change.
R3: Ch 1, sc BLO in each st around. Join. (36)
Working only through the back loop creates a defined turning ridge between the sole and side wall.
R4: Ch 1, sc in each st around. Join. (36)
R5: Ch 1, sc in first 12 sts, dec ×6, sc in last 12 sts. Join. (30)
Place the six decreases centrally across the toe. If they drift toward either side, the toe will twist.
R6: Ch 1, sc in first 10 sts, dec ×5, sc in last 10 sts. Join. (25)
R7: Ch 1, sc in first 9 sts, dec ×3, sc in last 10 sts. Join. (22)
The opening should now sit above the foot rather than flare outward.
R8: Ch 1, sc in each st around. Join. (22)
R9: Ch 1, sc in each st around. Join. (22)
Do not fasten off. Continue directly to the cuff.
Ribbed Ankle Cuff — Make 2
Yarn: dusty rose DK. Construction: attached vertical BLO ribbing; selected to match the narrow textured opening visible in the photograph.
Cuff setup: Ch 7 from the working loop.
Row 1: Sc in second ch from hook and in next 5 ch. Sl st into the next 2 unworked stitches along the bootie opening. Turn. (6 sc + 2 sl st)
Row 2: Skip the two attachment sl sts. Sc BLO across the 6 ribbing sts. Ch 1, turn. (6)
Row 3: Sc BLO across 6 sts. Sl st into the next 2 unworked ankle stitches. Turn. (6 sc + 2 sl st)
Repeat Rows 2–3 around the entire ankle edge.
Because the bootie opening has 22 stitches and each outward row advances across two edge stitches, the cuff will form approximately 11 raised ribs.
After the final attachment, bring the first and last cuff edges together.
Seaming row: Sl st through corresponding loops of the first and last cuff rows from bottom to top. (6 joining sts)
Fasten off. Leave an 18 cm tail for final securing and weaving.
Toe Shape
The toe is not made separately; its shape comes from Rounds 5–7 of the main bootie. This reduces sewing and keeps the top free of a bulky seam.
For a more rounded front, keep each decrease directly above the center twelve stitches from the previous round. A misplaced decrease changes the shoe’s axis much faster than one additional plain stitch changes its circumference.
Heel
No separate heel piece is needed. The heel is formed by the wider end of the oval sole and the vertical side rounds.
Check that the start-of-round join remains centered close to the rear of the bootie. A seam that gradually migrates toward the side makes the left and right booties appear different even when their stitch totals match.
Optional Elastic Retention
The photographed bootie has no visible fastening. If added retention is required, a fine elastic thread can be passed through the inner base of the ribbing after crochet is complete.
Use no hard exposed knot inside the ankle area. Join the elastic ends securely within the crochet fabric and trim only after checking that the cuff can still stretch.
Matching Flat Crochet Panel From the Photo
The rectangular pink panel visible beside the booties cannot be identified with enough certainty to claim that it belongs to the footwear. It may be a swatch or part of another project.
Do not incorporate it into the bootie instructions solely because it appears in the same photograph. The finished pair of shoes should remain the primary subject.
Assembly
- Place both completed soles side by side and compare length before continuing with finishing.
- Check that both heel joins sit in the same rear position.
- Shape each toe by pressing the decrease area flat with the center line running heel to toe.
- Inspect the ankle circumference and confirm that the two cuffs contain the same number of attached rib sections.
- Seam the first and last ribbing rows together on each bootie.
- Thread the starting yarn tail through the foundation-chain area and close any visible center gap.
- Weave the sole tail back through several stitches without creating a hard knot beneath the foot.
- Weave the cuff tail vertically through the ribbing so the end does not pull across the stretch direction.
- Measure both soles again and compare the pair before trimming yarn ends.
- Lightly shape the booties by hand and allow them to rest flat rather than stretching the cuff over a rigid form.
The completed pair should have matching sole lengths, centered toe decreases, and two cuffs with comparable stretch.
7 Technical Tips
- Use a stitch marker at the heel join. A migrating round start can shift more than 1 cm around a small bootie before the error becomes visually obvious.
Sizing and Gauge Adjustments
A written age range is only a starting reference. A useful newborn benchmark is approximately 8.4 cm for 0–3 months, with larger sizes increasing progressively from that point.
For this original pattern, do not scale by adding random upper stitches. Change the sole first.
A slightly larger hook increases both stitch width and row height. If that moves the sole to the required measurement while preserving a firm fabric, the remainder of the same construction may be tested. When a much larger size is required, redraw the oval with a longer starting chain rather than forcing an oversized hook through thin yarn.
The fabric should still hold the shoe shape when placed on a table.
Yarn Choice for Baby Booties
Baby bootie patterns are commonly made with DK, sport, fingering, worsted, and Aran yarns, so there is no single required yarn weight.
For the pictured look, a smooth DK yarn gives clear stitch definition. The dusty pink surface in the reference photograph has very little halo, which supports choosing a smooth spun yarn rather than chenille or brushed fiber.
Washability also matters for an infant item. Check the manufacturer’s care instructions before selecting a fiber, particularly when the finished booties are intended for regular wear rather than photography.
The 35–40 g total benchmark is useful when buying yarn for a small pair. One standard skein will commonly provide more than enough yardage, depending on its weight and put-up.
Why the Ribbed Cuff Matters
The cuff is more than surface texture. It changes how the shoe behaves around the ankle.
Plain single crochet worked directly upward has limited horizontal recovery. Vertical BLO ribbing stretches across its rows, then contracts when released. That property suits a slip-on bootie because the opening has to expand over the heel without remaining permanently wide afterward.
The image exaggerates this function visually: the lower shoe is broad through the toe, while the ankle remains narrow and upright. Keeping that proportion is more important than copying every visible stitch.
Conclusion
Measure the first sole before committing yarn to the second bootie. That single checkpoint gives you a practical way to correct hook size, tension, and the newborn fit before the cuff is added. This crochet baby booties pattern targets an approximately 8.4 cm sole with DK yarn and a 3.5 mm hook, then uses concentrated toe shaping and attached ribbing to reproduce the proportions visible in the pink reference pair. Save the finished project to Pinterest and share the matched pair on Instagram with #PinkRibbedBabyBooties. For your next version, would you keep this narrow ankle opening or add two more cuff stitches for extra stretch?









