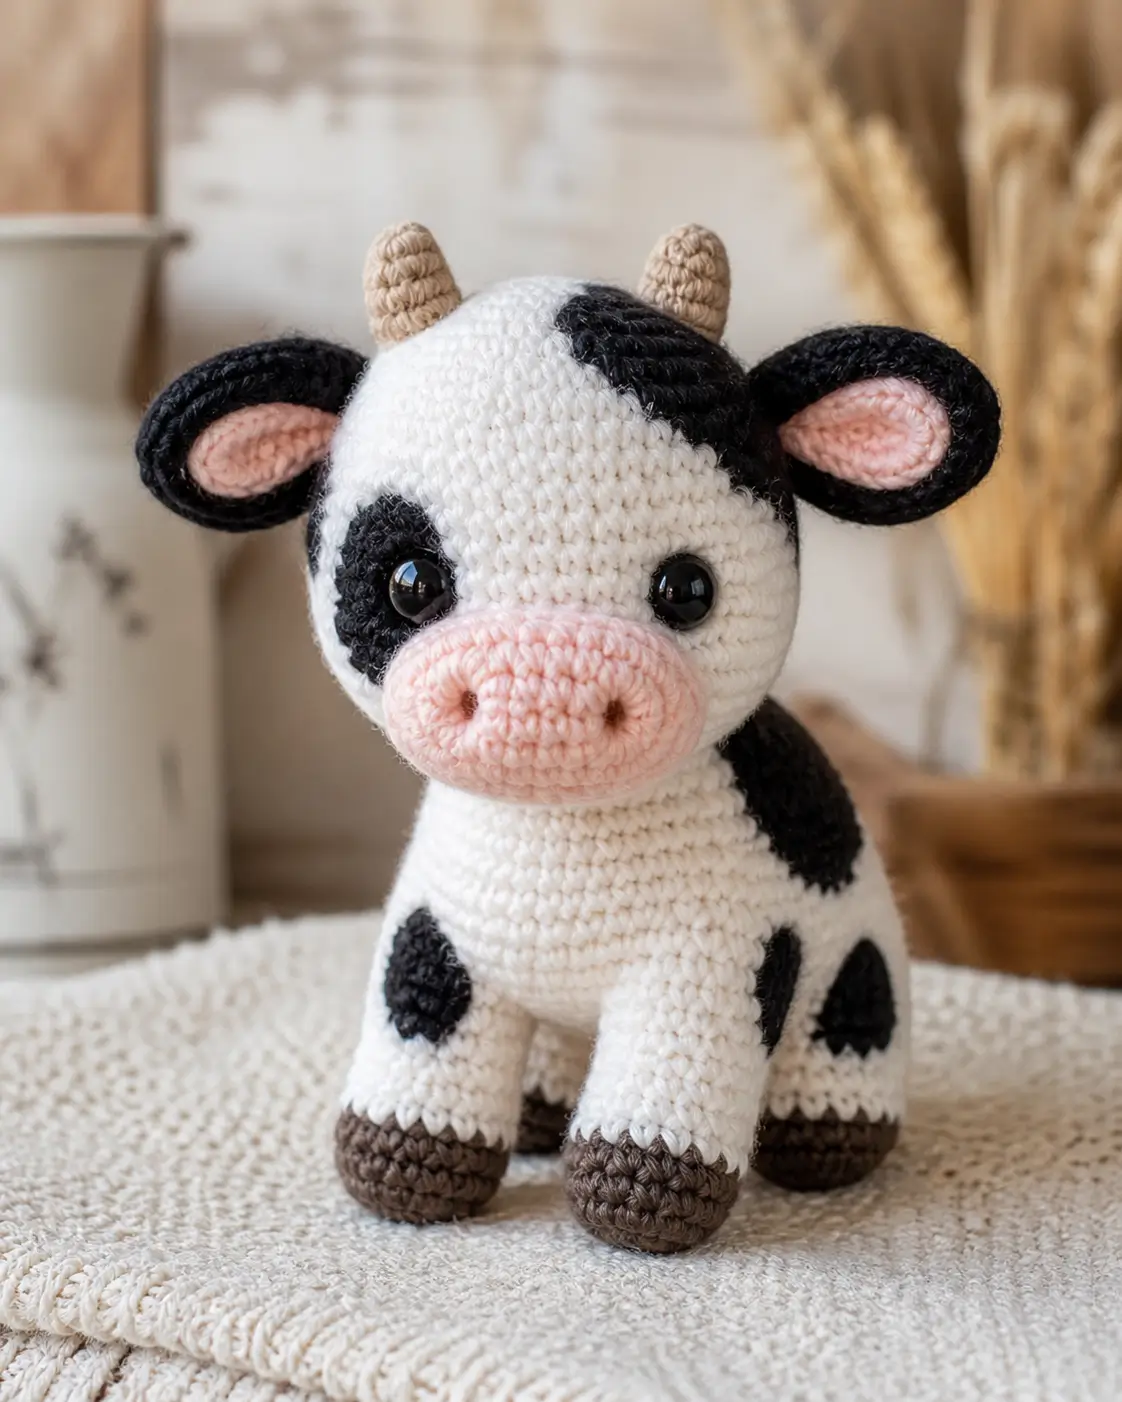
A cow snout is not round; it is a flattened pink oval with nostrils set wide. This cow amigurumi crochet pattern builds that shape with a firm muzzle, upright horns, four hooved legs, and sewn black patches. Use DK or light worsted yarn, a 3.5 mm hook, and intermediate skills. The finished calf stands about 18 cm, a practical size for shelf display or a farm-themed set.
The Design: What Makes This Calf Different
This spotted cow amigurumi uses a medium 36-stitch head rather than an oversized plush sphere. That keeps the muzzle dominant without making the horns look too small. The four legs are built as separate cylinders with brown hooves and white upper sections, because the photo shows a standing calf rather than a sitting bean shape. Pin them before sewing; the maker’s usual error is placing the back legs too close together, which makes the body tip forward. The black markings are separate flat patches, not stranded colorwork. That choice gives cleaner edges around the eye patch and allows the crocheter to copy the asymmetry of a Holstein calf. For a crochet farm animal, proportion matters more than extra decoration.
Project Info at a Glance
| Skill Level | Time | Finished Size | Hook | Best For |
|---|---|---|---|---|
| Intermediate | 6–8 hours | 18 cm | 3.5 mm | Farm set, shelf display, nursery decor with embroidered eyes |
Ravelry lists an 18 cm DK cow with a 3.5 mm hook, and Tessiland gives 6–8 hours for a small intermediate cow kit. Safety eyes should be replaced with embroidery for toys given to children under 3.
Materials and Tools
Yarn
- White — DK or light worsted — 80 g — Stylecraft Special DK, Paintbox Simply DK, or similar.
- Black — DK or light worsted — 15–20 g — for face patch, ears, and body spots.
- Pale pink — DK or light worsted — 10 g — for muzzle and inner ears.
- Tan / beige — DK or light worsted — 10 g — for horns.
- Dark brown — DK or light worsted — 10 g — for hooves.
- Black embroidery thread — small amount — for nostrils.
Tools
- Hook 3.5 mm
- Safety eyes 12 mm, or embroidered eyes for child-safe use
- Polyester stuffing
- Yarn needle
- Stitch markers
- Straight pins
- Scissors
- Disappearing fabric marker
Abbreviations
MR = magic ring
sc = single crochet
inc = 2 sc in one stitch
dec = invisible decrease over 2 stitches
sl st = slip stitch
ch = chain
BLO = back loop only
FO = fasten off
Invisible decrease is worked through the front loops of the next 2 stitches, reducing bulk and limiting holes on stuffed curves.
Pattern — Step by Step
This pattern is an original stitch plan drafted from the photo. It uses standard 6-stitch amigurumi math and does not copy any published cow pattern.
Head
Yarn: white — Source: Standard amigurumi math.
R1: 6 sc in MR (6)
R2: inc ×6 (12)
R3: (1 sc, inc) ×6 (18)
R4: (2 sc, inc) ×6 (24)
R5: (3 sc, inc) ×6 (30)
R6: (4 sc, inc) ×6 (36)
R7–R14: sc around (36)
R15: (4 sc, dec) ×6 (30)
R16: (3 sc, dec) ×6 (24)
R17: (2 sc, dec) ×6 (18)
Insert 12 mm safety eyes between R10 and R11, about 8 stitches apart. Place the left eye through the black face patch later if you prefer a cleaner patch edge.
R18: (1 sc, dec) ×6 (12)
Stuff firmly, especially across the cheeks.
R19: dec ×6 (6)
Fasten off. Leave a 20 cm tail and close the opening.
Body
Yarn: white — Source: Standard amigurumi math.
R1: 6 sc in MR (6)
R2: inc ×6 (12)
R3: (1 sc, inc) ×6 (18)
R4: (2 sc, inc) ×6 (24)
R5: (3 sc, inc) ×6 (30)
R6: (4 sc, inc) ×6 (36)
R7–R15: sc around (36)
R16: (4 sc, dec) ×6 (30)
R17: (3 sc, dec) ×6 (24)
R18: (2 sc, dec) ×6 (18)
Stuff the body firmly at the base, then lightly near the neck so the head can sit level.
R19: (1 sc, dec) ×6 (12)
R20: dec ×6 (6)
Fasten off. Leave a 25 cm tail for sewing to the head.
Front Legs
Make 2. Yarn: dark brown, then white — Source: Standard amigurumi math.
R1: 6 sc in MR with brown (6)
R2: inc ×6 (12)
R3: (1 sc, inc) ×6 (18)
R4: BLO sc around (18)
R5: sc around (18)
Change to white.
R6–R11: sc around (18)
R12: (1 sc, dec) ×6 (12)
Stuff the hoof firmly and the upper leg lightly.
R13: dec ×6 (6)
Fasten off. Leave a 22 cm tail.
Back Legs
Make 2. Yarn: dark brown, then white — Source: Standard amigurumi math.
R1: 6 sc in MR with brown (6)
R2: inc ×6 (12)
R3: (1 sc, inc) ×6 (18)
R4: BLO sc around (18)
R5–R6: sc around (18)
Change to white.
R7–R10: sc around (18)
R11: (1 sc, dec) ×6 (12)
Stuff the lower half firmly. Keep the top flatter than the front legs so the cow stands on all four hooves.
R12: dec ×6 (6)
Fasten off. Leave a 22 cm tail.
Outer Ears
Make 2. Yarn: black — Source: Standard amigurumi math.
R1: 6 sc in MR (6)
R2: inc ×6 (12)
R3: (1 sc, inc) ×6 (18)
R4–R6: sc around (18)
Do not stuff. Flatten each ear into an oval with the opening at the head side.
Fasten off. Leave a 25 cm tail.
Inner Ear Inserts
Make 2. Yarn: pale pink — Source: Standard amigurumi math.
R1: 6 sc in MR (6)
R2: inc ×6 (12)
R3: (1 sc, inc) ×6 (18)
sl st to finish (18)
Fasten off. Leave a 20 cm tail. Sew one pink insert to each black outer ear before attaching the ears to the head.
Horns
Make 2. Yarn: tan / beige — Source: Standard amigurumi math.
R1: 6 sc in MR (6)
R2: sc around (6)
R3: inc ×6 (12)
R4–R5: sc around (12)
Stuff with a pea-sized amount only. Overstuffed horns flare at the base.
Fasten off. Leave a 25 cm tail.
Muzzle
Yarn: pale pink — Source: Standard amigurumi math.
R1: 6 sc in MR (6)
R2: inc ×6 (12)
R3: (1 sc, inc) ×6 (18)
R4: (2 sc, inc) ×6 (24)
R5: sc around (24)
Press into a horizontal oval before sewing. Embroider two nostrils on R3, spaced 8–10 stitches apart.
Fasten off. Leave a 30 cm tail.
Black Face Patches
Make 2. Yarn: black — Source: Standard amigurumi math.
R1: 6 sc in MR (6)
R2: inc ×6 (12)
R3: (1 sc, inc) ×6 (18)
R4: (2 sc, inc) ×6 (24)
sl st to finish (24)
Fasten off. Leave a 25 cm tail. Use one patch around the left eye and trim the second into a cap-like curve by sewing only part of its edge near the top right of the head.
Cheek Patches
Make 2. Yarn: pale pink — Source: Standard amigurumi math.
R1: 6 sc in MR (6)
R2: inc ×6 (12)
sl st to finish (12)
Fasten off. Leave a 15 cm tail. Place these low and wide beside the muzzle only if you want a softer face; omit them for a stricter photo copy.
Body Spots
Make 3. Yarn: black — Source: Standard amigurumi math.
R1: 6 sc in MR (6)
R2: inc ×6 (12)
R3: (1 sc, inc) ×6 (18)
R4: (2 sc, inc) ×6 (24)
sl st to finish (24)
Fasten off. Leave a 25 cm tail. Sew one spot to the left front leg area, one to the right side body, and one to the back hip.
Tail
Yarn: white with black or brown tip — Source: Standard amigurumi math.
R1: 6 sc in MR with white (6)
R2–R6: sc around (6)
Change to black or brown.
R7–R8: sc around (6)
Fasten off. Leave a 20 cm tail. Do not stuff.
Accessory From Photo
No accessory is visible in the photo. Do not add a bow, bell, scarf, or flower if the goal is a close match.
Assembly
- Pin the head to the body with the muzzle facing forward and the body seam at the back.
- Sew the head to the body through R18–R20 of the body opening, adding extra stuffing under the chin before closing the seam.
- Sew the muzzle across R10–R14 of the head, keeping the nostrils horizontal and centered.
- Attach the black eye patch before locking the left safety eye washer, or sew the patch around the already fixed eye with small backstitches.
- Sew the second black patch to the upper right head area and tack down only enough edge to create an irregular Holstein shape.
- Attach ears at R8–R11 on both sides of the head, with pink inserts facing forward.
- Sew horns between the ears on R5–R7, spaced about 5 stitches apart.
- Attach front legs under the chest and back legs under the hip line, checking that all four hooves touch the table.
- Sew body spots flat, then attach the tail at the center back between R10 and R12 of the body.
- Weave in all tails through stuffed sections, trim hidden ends, and reshape the muzzle with your fingers.
The finished calf has a white body, black Holstein-style patches, pink muzzle, tan horns, and four dark hooves.
7 Technical Tips
- Stitch marker drift: If the marker leans more than 3 stitches from center by R10 of the head, your increases are stacking unevenly. Move the marker at the end of a round, not midway through the next one.
- Stuffing firmness: The muzzle will cave in if the head is packed loosely behind R10–R14. Add small fiberfill pieces until the face resists light thumb pressure.
- Invisible decrease gaps: Standard decreases can leave six visible holes on R15–R19 of the head. Use front-loop invisible decreases only, then brush the stitches sideways with a needle tip.
- Eye placement timing: Safety eyes must be placed before the head closes at R18. For this calf, center them between R10 and R11 with about 8 stitches between stems.
- Velvet tension risk: If using velvet or chenille, the 36-stitch head may grow past 22 cm in finished height. Drop to a 30-stitch plateau or reduce the hook by 0.5 mm.
- Pinning legs: A four-legged cow fails when the back legs sit less than 3 cm apart on an 18 cm toy. Pin the legs first and test the stance on a flat surface before sewing.
- Tail weaving: Horns and ears loosen when tails are woven through only one stitch path. Run each tail through at least 4 cm of stuffed fabric, turn once, then bury it in a second direction.
Conclusion
The most important shaping choice is the wide muzzle: it sets the calf apart from a generic round-headed toy. Work the head and body to a 36-stitch plateau, then keep the patches separate so the black markings can be adjusted after stuffing. Before final sewing, place the cow on a flat surface and check that all four brown hooves touch down evenly. Save this cow amigurumi crochet pattern to Pinterest for your farm-animal board, then share the finished calf on Instagram with #SpottedFarmCalf. Which marking will you change first: the left eye patch, the forehead patch, or the hip spot?









