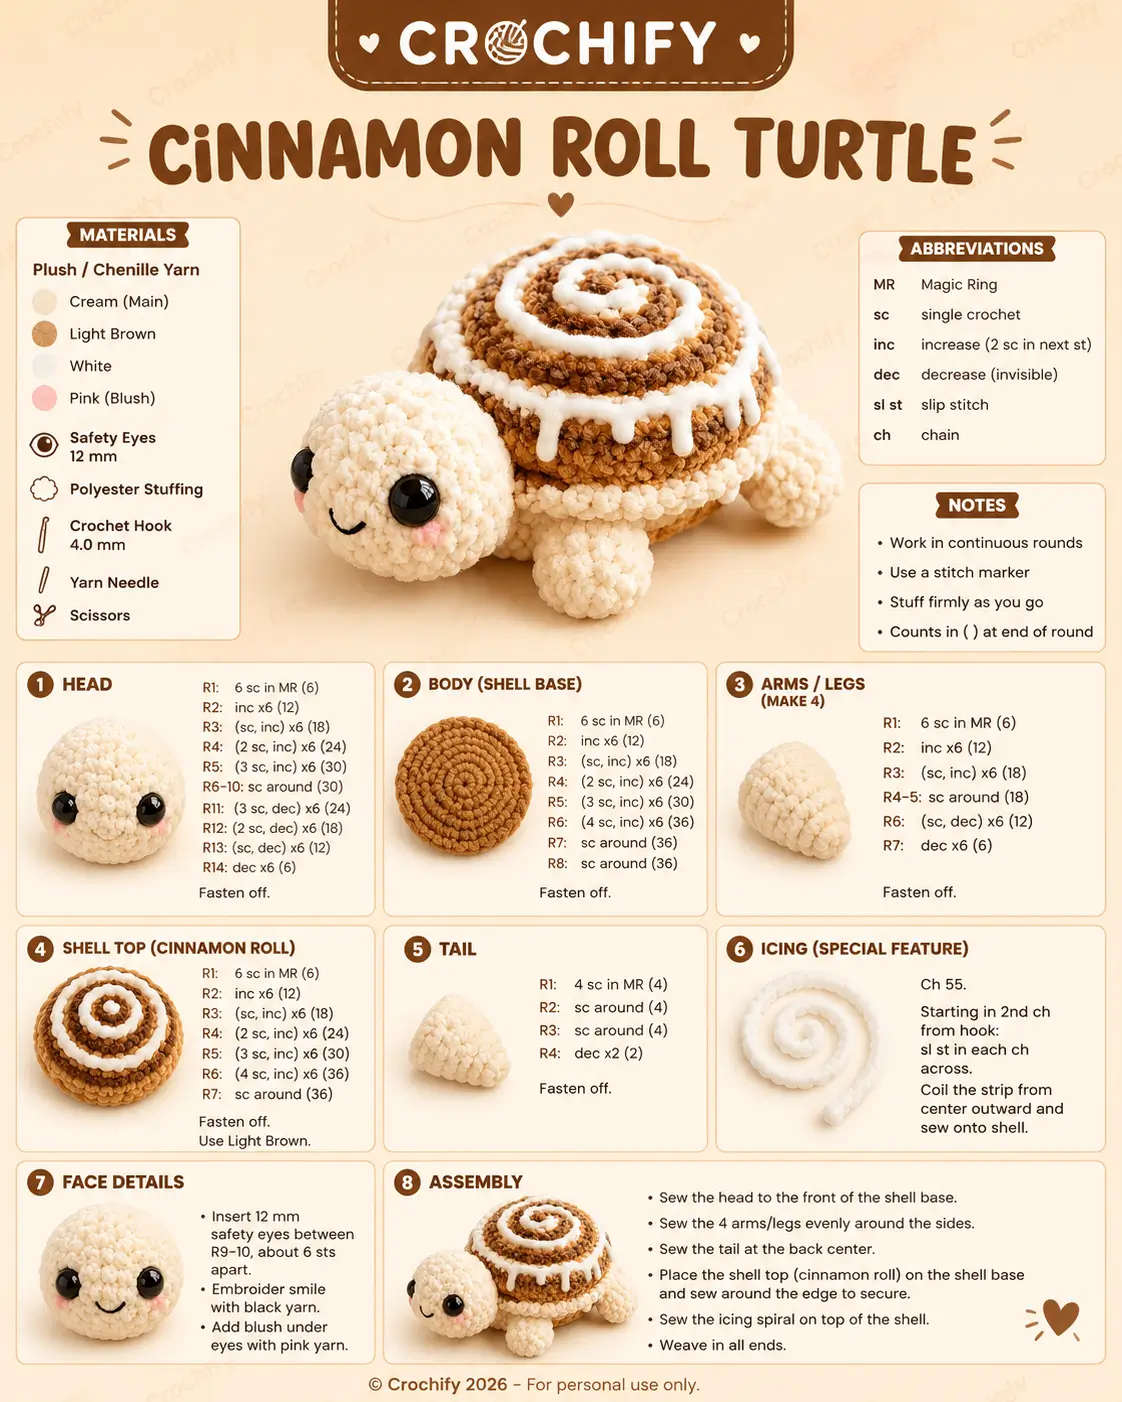
A cinnamon roll turtle fails when the shell spiral looks like a target instead of icing. This cinnamon roll turtle amigurumi uses cream chenille, light brown shell yarn, white icing, 12 mm safety eyes, and a 4.0 mm hook to make a medium plush about 15 cm long. You need basic amigurumi control: spirals, firm stuffing, clean decreases. Make it when a market table needs one compact food-animal design.
The Design: What Makes This Turtle Different
Construction splits the animal from the pastry. Head and four legs stay cream so the reader sees turtle first, while the raised brown shell carries the roll logic. A 36-stitch shell top gives enough diameter for the spiral without turning the body into a disk. White slip-stitch icing is added after shaping because sewn chains sit higher than surface color changes; they look cleaner on plush yarn.
You will place the head low on the front edge, not centered on top. That shift keeps the shell weight behind the face, so the plush sits without tipping. A common mistake in any dessert turtle crochet pattern is making the limbs too long. The maker then gets a pancake shape. This cinnamon roll turtle crochet pattern keeps the legs short, tapered, and partly hidden under the shell.
Project Info at a Glance
| Skill Level | Time | Finished Size | Hook | Best For |
|---|---|---|---|---|
| Easy / confident beginner | 1–2.5 hours | About 15 × 10 × 6.5 cm | 4.0 mm | Market plush, dessert animal sets, display |
Materials and Tools
Yarn
- Cream — plush / chenille, super bulky look — about 55 g — Premier Just Chenille, Bernat Blanket, or similar
- Light Brown — plush / chenille, super bulky look — about 35 g — Premier Just Chenille Cocoa or similar
- White — plush / chenille, super bulky look — about 12 g — white icing yarn
- Pink — chenille or worsted scrap — under 1 g — blush cheeks
- Black embroidery yarn — small length — smile line
Tools
- Hook 4.0 mm
- 12 mm safety eyes
- Polyester stuffing
- Yarn needle
- Stitch markers
- Pins
- Scissors
Use embroidered eyes instead of plastic safety eyes for infant or toddler items.
Abbreviations
MR = magic ring; sc = single crochet; inc = 2 sc in next stitch; dec = invisible decrease; sl st = slip stitch; ch = chain; BLO = back loop only; FO = fasten off; R = round.
An invisible decrease is worked through the front loops of the next two stitches before completing one single crochet, which reduces bulk on plush yarn.
Pattern — Step by Step
Continuous spiral unless noted. Counts appear in brackets at the end of each round.
Head
Yarn: Cream
R1: 6 sc in MR (6)
R2: inc ×6 (12)
R3: (sc, inc) ×6 (18)
R4: (2 sc, inc) ×6 (24)
R5: (3 sc, inc) ×6 (30)
R6–10: sc around (30)
R11: (3 sc, dec) ×6 (24)
R12: (2 sc, dec) ×6 (18)
R13: (sc, dec) ×6 (12)
R14: dec ×6 (6)
Insert 12 mm eyes between R8 and R9, about 6 stitches apart. Start stuffing before R11 and finish before R14.
Fasten off. Leave 25 cm tail.
Body / Shell Base
Yarn: Light Brown
R1: 6 sc in MR (6)
R2: inc ×6 (12)
R3: (sc, inc) ×6 (18)
R4: (2 sc, inc) ×6 (24)
R5: (3 sc, inc) ×6 (30)
R6: (4 sc, inc) ×6 (36)
R7–9: sc around (36)
R10: (4 sc, dec) ×6 (30)
R11: (3 sc, dec) ×6 (24)
R12: (2 sc, dec) ×6 (18)
R13: (sc, dec) ×6 (12)
R14: dec ×6 (6)
Stuff into a low dome. Keep the underside flat so the turtle does not rock forward.
Fasten off. Leave 30 cm tail.
Shell Top / Cinnamon Roll Cap
Yarn: Light Brown
R1: 6 sc in MR (6)
R2: inc ×6 (12)
R3: (sc, inc) ×6 (18)
R4: (2 sc, inc) ×6 (24)
R5: (3 sc, inc) ×6 (30)
R6: (4 sc, inc) ×6 (36)
R7: BLO sc around (36)
R8: sc around (36)
R9: (4 sc, dec) ×6 (30)
R10: (3 sc, dec) ×6 (24)
R11: (2 sc, dec) ×6 (18)
R12: (sc, dec) ×6 (12)
R13: dec ×6 (6)
Stuff lightly. Overstuffing makes the icing coil sit unevenly.
Fasten off. Leave 35 cm tail.
Front Legs
Make 2. Yarn: Cream
R1: 6 sc in MR (6)
R2: inc ×6 (12)
R3: (sc, inc) ×6 (18)
R4–5: sc around (18)
R6: (sc, dec) ×6 (12)
R7: dec ×6 (6)
Stuff only the rounded front half. Leave the top end soft for sewing under the shell.
Fasten off. Leave 20 cm tail.
Back Legs
Make 2. Yarn: Cream
R1: 6 sc in MR (6)
R2: inc ×6 (12)
R3–4: sc around (12)
R5: dec ×6 (6)
Back legs are shorter than front legs so the tail stays visible at the rear center.
Fasten off. Leave 20 cm tail.
Tail
Yarn: Cream
R1: 6 sc in MR (6)
R2: sc around (6)
R3: inc ×6 (12)
R4: sc around (12)
R5: dec ×6 (6)
Use a small amount of stuffing or yarn scraps. The tail should taper, not bulge.
Fasten off. Leave 18 cm tail.
Cheek Patches
Make 2. Yarn: Pink
R1: 6 sc in MR (6)
R2: inc ×6 (12)
Sl st to first stitch (12)
Do not stuff. Pull the center tight and flatten with the yarn tail.
Fasten off. Leave 15 cm tail.
Icing Spiral
Yarn: White
Row 1: ch 61 (61 ch)
Row 2: starting in 2nd ch from hook, sl st in each ch across (60)
Do not pull the slip stitches tight. Coil from the center of the shell top outward and pin every 1 cm before sewing.
Fasten off. Leave 45 cm tail.
Icing Drips
Make 8. Yarn: White
Long drip, make 3: ch 6 (6 ch)
Row 1: starting in 2nd ch from hook, sl st in each ch across (5)
Short drip, make 5: ch 4 (4 ch)
Row 1: starting in 2nd ch from hook, sl st in each ch across (3)
Place long drips near the front shell rim and short drips near the sides and back.
Fasten off. Leave 12 cm tail on each drip.
Mouth Embroidery
Yarn: Black embroidery yarn
Cut one 25 cm strand. Place the smile one round below the eye line and span about 5 stitches. Anchor at the left corner, make one shallow curve, then return through the right corner. Tie inside the head if the head is still open, or bury both ends through the lower head.
Assembly
- Pin the head to the front of the body / shell base, with the lower head touching the table surface.
- Sew the head through R6–R10 of the head and the front edge of the body.
- Place the shell top on the body and align its center with the body center.
- Sew the shell top to the body with small stitches hidden under the rim.
- Attach the safety eyes if they were not locked earlier, then sew the pink cheek patches under the eyes.
- Embroider the smile after the cheek patches are fixed, so the curve stays centered.
- Sew the two front legs under the front shell edge, angled slightly outward.
- Sew the two back legs under the rear shell edge, leaving a center gap for the tail.
- Sew the tail at the back center, then sew the icing spiral to the shell top from center outward.
- Add the icing drips around the shell rim, bury all yarn tails, and trim only after tension is checked.
The finished piece is a low-profile turtle plush with a raised cinnamon roll shell and fixed icing detail.
7 Technical Tips
- Stitch marker drift: Failure mode: the shell spiral slants when the marker moves into the increase stitch. Move the marker after the last stitch of each round and recount every +6 round.
- Stuffing firmness: Failure mode: the shell dents under the icing strip if the body is soft. Fill the body to firm resistance but keep the finished height near 6.5 cm.
- Invisible decrease gaps: Failure mode: white stuffing shows between R11 and R14 on the head. Work each dec through front loops only and pull the chenille tail downward, not sideways.
- Eye placement timing: Failure mode: eyes land too low after the head is closed. Place 12 mm eyes between R8 and R9, about 6 stitches apart, before R11 decreases.
- Velvet tension: Failure mode: worming yarn makes long loops on the icing chain. Use a 4.0 mm hook and keep slip stitches loose enough that the strip coils without curling.
- Pinning shell parts: Failure mode: the shell top slides off center during sewing. Pin at four compass points first and leave 3–5 mm of clearance above the head.
- Tail weaving: Failure mode: legs loosen when the plush is handled at a market table. Weave each limb tail through the body twice and bury the final 4 cm inside the shell base.
Conclusion
Block the shell before the last yarn tail is buried; the icing line shows every tilt. Pin the coil from the center outward, then sew the head and legs only after the shell sits flat on the table. That order gives you a compact plush with a readable pastry top and a stable turtle profile. For the next step, photograph the finished piece from a low front angle so the face, shell rim, and icing spiral appear in one frame. Save the process image for Pinterest and share the finished turtle on Instagram with #CinnamonRollTurtle. Which spacing looks better on this cinnamon roll turtle amigurumi: three long icing drips at the front, or one drip centered over each leg?









