Introduction
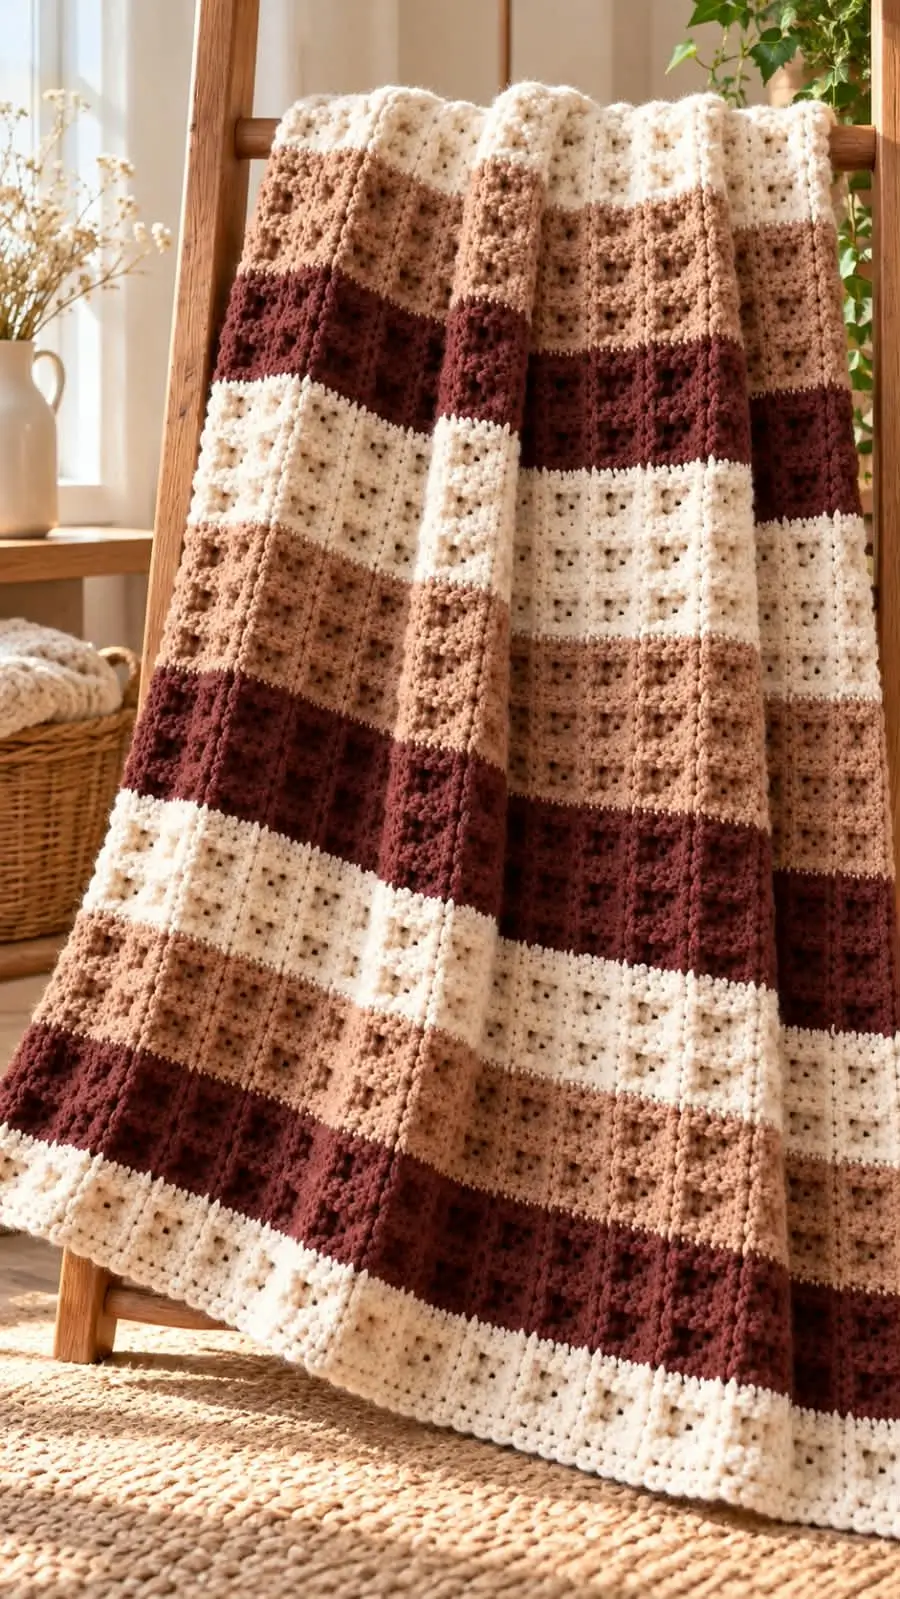
Three repeating bands of cream, camel, and burgundy give this blanket its distinctive horizontal structure. This chunky striped crochet blanket pattern uses bulky yarn, an 8 mm hook, and alternating textured stitches to create a substantial rectangular throw. The proposed finished size is approximately 120 × 160 cm, subject to gauge. Designed for confident beginners, its repeating eight-row color bands make it practical to resize or adapt to different interior color schemes.
The Design: What Makes This Striped Blanket Different
The main feature of this textured crochet blanket is its consistent sequence of three contrasting colors. Cream provides visual separation, camel creates a middle-value transition, and burgundy introduces the darkest band. Repeating the same stripe height prevents one color from dominating the finished fabric.
A second design decision concerns stitch texture. Alternating half double crochet and slip stitches produces a dense surface with subtle raised areas. This construction differs from an ordinary double crochet blanket, where taller stitches create a more open fabric.
Finally, the blanket uses a rectangular, bottom-up construction. No separate motifs need joining. The maker works a three color crochet throw as one continuous piece of flat fabric.
A common mistake is changing colors halfway through a stitch or allowing the edges to lose stitches. Both problems interrupt the horizontal stripes and distort the blanket’s outline.
Project Info at a Glance
| Feature | Details |
|---|---|
| Skill Level | Confident Beginner |
| Estimated Time | 18–30 hours (untested estimate) |
| Target Finished Size | 120 × 160 cm |
| Crochet Hook | 8 mm |
| Yarn Weight | Category 5 Bulky |
| Construction | Flat Rows |
| Stitch Pattern | Alternating HDC and SL ST |
| Color Changes | Every 8 Rows |
| Best For | Sofa Throw or Decorative Bed Blanket |
The measurements are proposed pattern targets. Actual dimensions depend on yarn, tension, and gauge.
Materials and Tools
Yarn
Use three colors of similar-thickness Category 5 bulky yarn.
- Warm Cream / Ivory: Bulky weight, approximately 700 g. Suggested yarn family: Lion Brand Hue + Me.
- Camel / Light Brown: Bulky weight, approximately 600 g. Choose a compatible shade from the same yarn family.
- Deep Burgundy / Wine: Bulky weight, approximately 600 g. Choose a compatible shade from the same yarn family.
These quantities are provisional purchasing allowances, not measured consumption. Check the meters per ball and calculate the required quantity from a weighed gauge swatch before purchasing the full supply.
Tools
- 8 mm Crochet Hook: Adjustable after swatching.
- Tapestry Needle: With an eye large enough for bulky yarn.
- Stitch Markers: At least four.
- Measuring Tape: For checking width and length.
- Sharp Scissors: For cutting color-change tails.
- Digital Kitchen Scale: For estimating yarn consumption.
- Blocking Mats: Optional and appropriate to the yarn fiber.
The Craft Yarn Council recommends 6.5–9 mm hooks for Category 5 yarn, so the proposed 8 mm hook falls within its general guidance. See the Craft Yarn Council yarn weight standards.
Crochet Abbreviations
| Abbreviation | Meaning |
|---|---|
| ch | Chain |
| sc | Single Crochet |
| hdc | Half Double Crochet |
| sl st | Slip Stitch |
| st(s) | Stitch(es) |
| RS | Right Side |
| WS | Wrong Side |
| rep | Repeat |
| FO | Fasten Off |
Use US crochet terminology throughout.
The invisible decrease used in amigurumi is not needed because this blanket is rectangular and contains no shaping decreases.
Chunky Striped Crochet Blanket Pattern – Step by Step
This is an original, untested blanket pattern developed from the photograph’s color arrangement. The stitch sequence and row counts have been checked arithmetically; physical gauge, drape, and yarn consumption have not been tested.
Step 1: Make a Gauge Swatch
With the 8 mm hook and your chosen yarn, chain 22.
Row 1: Sc in the second chain from hook and each chain across. (21 sts)
Row 2: Ch 1, turn. Hdc in first stitch, then alternate sl st and hdc across. (21 sts)
Row 3: Ch 1, turn. Sl st in first stitch, then alternate hdc and sl st across. (21 sts)
Rows 4–16: Repeat Rows 2–3, maintaining 21 stitches per row.
Measure the central 10 cm after allowing the swatch to relax.
The design target is approximately 10 stitches and 8 rows per 10 cm. This is a target, not a verified gauge.
If your gauge differs, adjust the hook size or foundation stitch count. The row schedule below assumes that you achieve the target measurements.
Step 2: Foundation Chain
Yarn: Cream
Foundation: Ch 122.
Row 1: Sc in second ch from hook and each ch across. (121 sts)
Ch 1 and turn.
The foundation row establishes a firm lower edge. Count all 121 stitches before continuing.
Place a marker in the first and last stitch. These markers identify the edge stitches and reduce the risk of accidentally narrowing the blanket.
Step 3: First Cream Stripe
Row 2: Hdc in first stitch, sl st in next stitch; repeat the pair across, ending with hdc. (121 sts)
Row 3: Sl st in first stitch, hdc in next stitch; repeat the pair across, ending with sl st. (121 sts)
Row 4: Repeat Row 2. (121 sts)
Row 5: Repeat Row 3. (121 sts)
Row 6: Repeat Row 2. (121 sts)
Row 7: Repeat Row 3. (121 sts)
Row 8: Repeat Row 2. (121 sts)
The first stripe contains eight rows, including the foundation row.
Keep the slip stitches loose enough to insert the hook on the next row. Excessively tight slip stitches can shorten the row height and make the fabric rigid.
Step 4: Change to Camel Yarn
At the end of Row 8, begin the final yarn-over of the last hdc using cream.
Draw the camel yarn through to complete the stitch. The new color is now positioned for the following row.
Cut the cream yarn, leaving a tail of approximately 15 cm.
Row 9: Ch 1, turn. Sl st in first stitch, then alternate hdc and sl st across. (121 sts)
Row 10: Ch 1, turn. Hdc in first stitch, then alternate sl st and hdc across. (121 sts)
Rows 11–16: Continue alternating Rows 9 and 10. (121 sts each)
The second stripe contains eight rows of camel.
Avoid pulling the new yarn tightly at the edge. Excess tension at color changes can cause one side of the blanket to contract.
Step 5: Crochet the Burgundy Stripe
Change to burgundy during the final yarn-over of Row 16.
Row 17: Repeat the stitch sequence of Row 9. (121 sts)
Row 18: Repeat the stitch sequence of Row 10. (121 sts)
Rows 19–24: Continue alternating these two row sequences. (121 sts each)
At the end of Row 24, change back to cream.
The first complete three-color sequence now contains 24 rows.
Step 6: Repeat the Color Sequence
Continue the same alternating stitch pattern. Each stripe contains eight rows, and every row maintains 121 stitches.
Use the following complete color schedule.
| Rows | Yarn Color | Stitches Per Row |
|---|---|---|
| 1–8 | Cream | 121 |
| 9–16 | Camel | 121 |
| 17–24 | Burgundy | 121 |
| 25–32 | Cream | 121 |
| 33–40 | Camel | 121 |
| 41–48 | Burgundy | 121 |
| 49–56 | Cream | 121 |
| 57–64 | Camel | 121 |
| 65–72 | Burgundy | 121 |
| 73–80 | Cream | 121 |
| 81–88 | Camel | 121 |
| 89–96 | Burgundy | 121 |
| 97–104 | Cream | 121 |
| 105–112 | Camel | 121 |
| 113–120 | Burgundy | 121 |
| 121–128 | Cream | 121 |
Pattern calculation: 16 stripes × 8 rows = 128 rows. At the proposed gauge of 8 rows per 10 cm, the calculated length is 160 cm.
Work the odd-numbered rows from Row 3 onward beginning with a slip stitch. Work even-numbered rows beginning with a half double crochet. This keeps the alternating texture consistent throughout the blanket.
If your measured length differs, adjust the number of rows within the last stripe or add another complete three-color sequence. For the closest visual match to the photograph, keep the stripes equal in height.
Step 7: Check the Blanket Dimensions
Lay the blanket flat without stretching.
Measure the width at three positions: near the foundation, at the center, and near the working edge.
Compare the measurements. If one section is noticeably narrower, recount the stitches and inspect the edge tension.
At the target gauge, 121 stitches produce approximately 121 cm of width before any optional finishing adjustment.
Measure the length from the foundation to the top of Row 128. The design target is approximately 160 cm.
If the blanket is significantly shorter, compare its row gauge with the original swatch. Adding rows may be preferable to stretching the fabric during blocking.
Step 8: Optional Crochet Border
The photographed blanket appears to have relatively simple edges. A wide decorative border is therefore unnecessary.
For a minimal finish, work one round of single crochet around the perimeter using cream yarn.
Place approximately one single crochet into each stitch across the top and bottom edges. Along the sides, distribute stitches evenly according to the fabric’s actual row height rather than assuming one stitch per row.
Work three single crochets into each corner.
Join with a slip stitch and fasten off, leaving a 15 cm tail.
Check the border while the blanket lies flat. Ruffling indicates too many edge stitches; curling inward indicates too few.
Assembly and Finishing
- Complete all 128 pattern rows, finishing with the cream stripe.
- Count the stitches in the final row and confirm that 121 remain.
- Measure the blanket’s width at the top, middle, and bottom.
- Inspect each color transition for loose loops or tightened edge stitches.
- Turn the blanket to the wrong side and locate all yarn tails.
- Thread each tail through a tapestry needle and weave it through several nearby stitches.
- Reverse the weaving direction where practical to improve security.
- Add the optional cream border if the edges need additional definition.
- Wash or block according to the yarn manufacturer’s care instructions, avoiding excessive stretching.
- Lay flat, allow to dry completely, and record the finished dimensions.
The completed blanket contains 128 main fabric rows and 16 horizontal color bands, excluding any optional border.
7 Technical Tips for Better Results
- Stitch Markers: Missing the last stitch can reduce the blanket width by one stitch per row. Place markers in both edge stitches and move them after every completed row.
- Slip Stitch Tension: Tight slip stitches can compress the fabric and make the next row difficult to work. Compare the width of a 10 cm swatch before and after several textured rows.
- Color Change Placement: Switching yarn after completing the final stitch can create a visible color jog. Introduce the next color during the final yarn-over of the previous row.
- Row Gauge: A difference of one row per 10 cm can significantly change the length over 128 rows. Measure the height after every 24 rows and compare it with the planned dimensions.
- Foundation Tension: A tight starting chain can pull the bottom edge inward. If the foundation measures more than 2 cm narrower than the main fabric, remake it with a larger hook.
- Edge Alignment: Uneven turning chains can make the sides appear stepped. Use one turning chain consistently and never count it as a stitch in this pattern.
- Tail Weaving: Short yarn ends can work loose after repeated washing. Leave approximately 15 cm at color changes and weave each tail through multiple stitches, changing direction where the fabric permits.
Common Problems and Fixes
Why Are the Stripes Different Heights?
Stripe height depends on row gauge, not only row count. Changes in tension or yarn thickness can make one color band taller than another.
Use yarns of the same weight and preferably the same product line. Measure the first complete three-color repeat before working the remaining blanket.
Why Does the Blanket Curl at the Bottom?
A tight foundation chain is a common cause. The alternating texture can also produce temporary curling before the fabric has enough weight to hang naturally.
Compare the foundation width with the working width. If the difference is substantial, remake the chain with a hook one size larger.
Can Worsted-Weight Yarn Replace Bulky Yarn?
Yes, but the original stitch and row counts will produce different dimensions.
The free Sequoia Striped Blanket uses worsted-weight yarn with a 6.5 mm hook, demonstrating that textured stripe construction can work with lighter yarn. Its published gauge and yarn quantities differ from this proposed bulky-weight design.
Make a new swatch and recalculate the foundation chain before substituting.
How Can the Blanket Be Made Wider?
Calculate the required stitch count from the measured gauge.
For example, at 10 stitches per 10 cm, a 140 cm width requires approximately 140 stitches.
Because this design uses alternating pairs and benefits from an odd stitch count, choose 141 stitches and begin with a foundation chain of 142.
Maintain that count in every row.
Can the Blanket Be Machine Washed?
Care instructions depend on fiber content and yarn construction.
Check the manufacturer’s label before washing. Acrylic, wool, cotton, and blended yarns may require different temperatures, drying methods, and handling.
Conclusion
This chunky striped crochet blanket pattern provides a complete row schedule for a rectangular throw using three repeating colors and an alternating stitch texture. The 121-stitch width, 128-row structure, and eight-row stripe intervals are mathematically consistent, although the proposed gauge and yarn quantities still require physical testing.
Before committing to the full blanket, make a swatch, measure it, and record yarn consumption. Use those measurements to confirm the required materials.
Save the project to Pinterest or share a finished version on Instagram using #ChunkyStripedCrochetBlanket.
For the next version, would you keep the burgundy stripes equal in height or make them narrower than the cream and camel bands?









