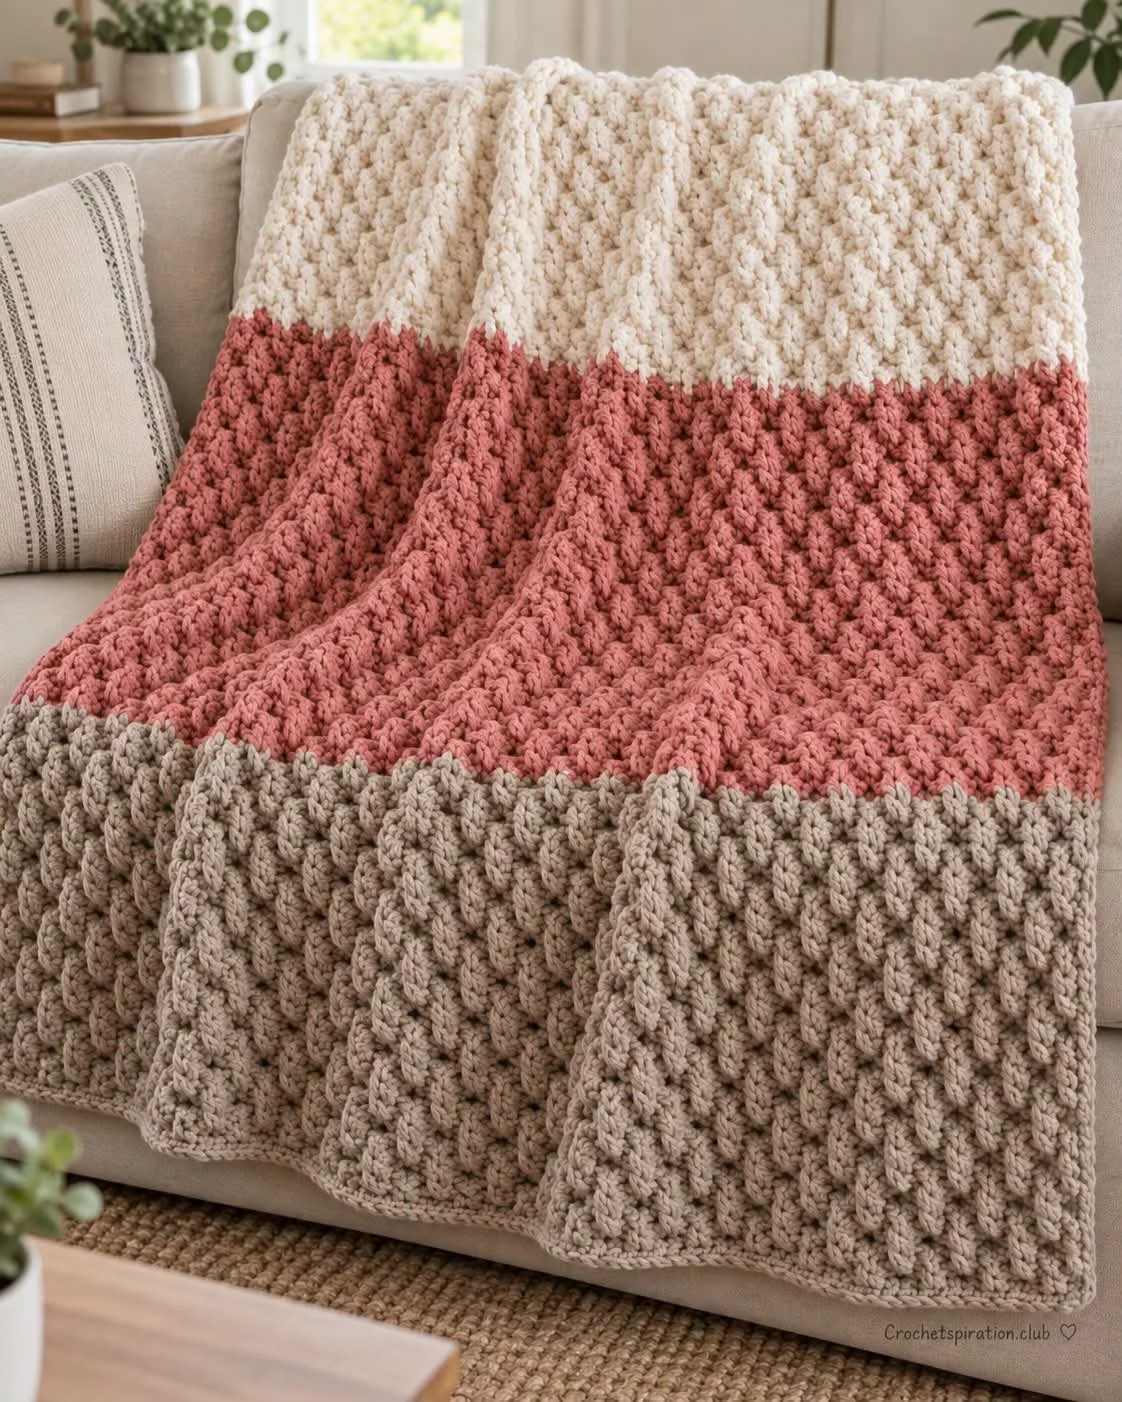
This throw is worked flat in one piece, using broad bands of taupe, dusty rose, and ivory. Raised ribbing gives the fabric a pronounced, cozy texture, while the simple color changes create a clean striped layout without requiring separate panels or seaming.
The ribs are made with front-post and back-post double crochet stitches worked around the posts of the previous row. The blanket begins with a foundation row of double crochet, then the ribbing continues across the full width. A small swatch is especially helpful: it lets you check the fabric’s softness and drape, confirm the width, and estimate whether you will need extra yarn.
Pattern at a Glance
- Skill level: Confident beginner or intermediate; familiarity with double crochet is helpful.
- Terminology: US crochet terms.
- Construction: One rectangular piece worked back and forth in rows.
- Finished size: Approximately 45 × 60 in (114 × 152 cm); adjustable.
- Yarn weight: Super-bulky (#6), soft yarn.
- Hook: 10–12 mm, selected to suit the yarn label and your swatch.
- Main stitch: Four-stitch post-stitch ribbing, alternating front-post and back-post double crochet in groups of two.
- Gauge: Not specified. Make a swatch to check width, softness, drape, and yarn use.
- Color layout: Taupe for approximately 20 in (51 cm), dusty rose for approximately 20 in (51 cm), then ivory to a total length of approximately 60 in (152 cm).
- Joining: No seaming or joining is required.
- Border: Optional loose round of single crochet, with 3 single crochet in each corner.
Materials
- Super-bulky (#6) soft yarn in taupe, dusty rose, and ivory: approximately 350–450 yd (320–410 m) of each color. Buy extra if your swatch suggests you will need it.
- 10–12 mm crochet hook, matched to the yarn label and your swatch.
- Scissors.
- Yarn needle for weaving in ends.
- Stitch markers, useful for marking the color-change points or checking sections.
- Tape measure.
Yarn usage can vary with the fiber, the yarn’s thickness, hook size, and how firmly you crochet. A post-stitch fabric may use more yarn than a flatter stitch fabric because the stitches travel around the posts and create raised texture. Use the swatch not only to check the fabric but also to get a practical sense of how quickly your yarn is being used.
Yarn and Color Notes
Choose a soft yarn that feels comfortable against the skin and has enough structure to show the raised ribs. A very fuzzy yarn can soften the stitch definition, making it harder to see where each post lies. A smooth, bulky yarn makes it easier to identify the front-post and back-post stitches and usually shows the rib pattern clearly.
The three-color arrangement uses taupe first, dusty rose in the middle, and ivory for the final section. For crisp bands, change colors at the end of a row and keep the edge of each color section straight. If substituting colors, keep the same sequence or use a palette that gives each stripe enough contrast to distinguish the sections.
The supplied yarn quantity is an estimate for each color, not a guarantee. If your swatch uses a lot of yarn or your finished width is larger than expected, you may need more than the listed amount.
Finished Measurements
The target finished size is approximately 45 × 60 in (114 × 152 cm). The width is established by the foundation chain and its first row; the length is built by adding rows until the three color sections measure about 20 in (51 cm), 20 in (51 cm), and a final ivory section that brings the total length to about 60 in (152 cm).
Because no exact gauge is supplied, the finished dimensions are approximate. Yarn thickness, hook size, and personal tension all affect the result. Measure the blanket on a flat surface without stretching it. The ribbing can make the fabric contract slightly across its width, so assess the width after completing a few rows of the actual post-stitch pattern rather than relying only on the foundation chain.
Gauge
No numerical gauge is provided. Instead, make a small swatch in post stitches before starting the blanket. Use the same yarn and hook you plan to use for the project, and work enough rows to see how the ribbing behaves.
Check the swatch for:
- Width: Is the fabric likely to produce the desired blanket width from the supplied foundation?
- Softness and drape: Does it feel comfortable and flexible, or is it too stiff?
- Stitch definition: Can you clearly see and work around the posts?
- Yarn use: How quickly does the swatch consume the yarn?
If your stitches are looser and the swatch is wider or more open than you want, try a smaller hook within the recommended range. If the fabric feels tight or stiff, try a larger hook within that range. Recheck the drape after adjusting. Since the project is a blanket rather than a fitted garment, an exact stitch gauge is less critical than achieving a fabric that is comfortable, stable, and close to the intended dimensions.
Abbreviations
- ch: chain
- dc: double crochet
- FPdc: front-post double crochet
- BPdc: back-post double crochet
- sc: single crochet
Important Pattern Notes
- The pattern uses US crochet terminology.
- The foundation is ch 98, followed by 96 dc. The turning chain does not count as a stitch.
- At the end of each row, ch 2 to turn. This turning chain is for height only and is not included in the stitch count.
- The ribbing repeat uses four stitches: FPdc around the next 2 posts, then BPdc around the next 2 posts. Across 96 posts, this creates 24 four-stitch ribs.
- On return rows, reverse the post orientation for each column: work a BPdc around columns that were FPdc on the previous row, and an FPdc around the other columns. This keeps the same raised columns visible on the front.
- Change colors at the end of a row. This keeps the color bands aligned with the row edges.
- The stated section lengths are approximate. Measure the fabric rather than relying on a set number of rows, since no row gauge is supplied.
- The optional border should be worked loosely. Tight edging can draw in the sides and prevent the blanket from lying flat.
Special Stitches and Techniques
Front-post double crochet (FPdc)
Yarn over and insert the hook from the front of the fabric, around the post of the indicated stitch, and back to the front. Yarn over and pull up a loop, then complete the double crochet as usual. The post is wrapped rather than worked into its top loops, so the stitch stands forward and forms a raised rib.
Back-post double crochet (BPdc)
Yarn over and insert the hook from the back of the fabric, around the post of the indicated stitch, and back to the back. Yarn over and pull up a loop, then complete the double crochet as usual. This pushes the stitch behind the fabric and forms a recessed channel beside the raised ribs.
Alternating the post stitches on return rows
The visible ribs are formed by keeping the raised and recessed columns in the same positions on the front of the blanket. On a return row, the post stitch worked around a given column must be the opposite type from the stitch used around that column in the previous row: use BPdc around a previous FPdc column and FPdc around the other columns. If the rib pattern appears to shift, stop and check the columns before continuing.
Understanding the Construction
The throw is a single rectangle, worked from one short edge toward the other. First, a chain foundation establishes the width. One row of double crochet provides the posts needed for the ribbing. The post stitches are then worked across those posts in repeated groups of four.
The color bands are added as the rectangle grows: taupe first, dusty rose second, and ivory last. There are no separate pieces to assemble. Once the final length is reached, fasten off, weave in the ends, and decide whether to add the optional single-crochet border.
Full Pattern Instructions
Swatch
Make a small swatch in the post-stitch pattern using your chosen yarn and hook. Check its softness, width, stitch definition, and yarn use before beginning the full blanket. Adjust the hook within the recommended 10–12 mm range if needed, then use that same hook for the project.
Foundation and first row
With taupe, ch 98.
Work 1 dc in the third chain from the hook, then work 1 dc in each following chain across. You will have 96 dc. The turning chain does not count as a stitch.
At the end of the row, ch 2 and turn. This turning chain does not count as a stitch.
Checkpoint: Confirm that the foundation row contains 96 dc. If the count is off, correct it now; the ribbing is worked across these 96 posts.
Establish the ribbing
Working across the 96 dc posts, repeat:
[FPdc around the next 2 posts, BPdc around the next 2 posts]
Continue the four-stitch repeat across the row. The 96 posts divide into 24 groups of 4, forming 24 raised ribs.
At the end of the row, ch 2 and turn. On the return row, work BPdc around the columns that were FPdc on the previous row, and FPdc around the other columns. Continue across, preserving the same raised columns on the front of the blanket.
Keep alternating the post-stitch orientation in this way on each return row. At the end of every row, ch 2 and turn; the turning chain never counts as a stitch.
Checkpoint: After several rows, check that the ribs run in straight columns rather than shifting sideways. The fabric should show a consistent raised-and-recessed texture across the width.
Taupe section
Continue the established ribbing in taupe until this section measures approximately 20 in (51 cm). Measure from the foundation edge along the length of the blanket, laying the piece flat without stretching it.
At the end of a row, change to dusty rose. Make the color change at the row edge so the stripe begins evenly.
Checkpoint: Before changing colors, confirm that the taupe section is close to 20 in (51 cm) and that the rib columns remain aligned.
Dusty rose section
Continue working the same ribbing in dusty rose for approximately 20 in (51 cm). Maintain the established return-row rule and keep the turning chain out of the stitch count.
At the end of a row, switch to ivory.
Checkpoint: The taupe and dusty rose sections should each measure roughly 20 in (51 cm). If the fabric has been handled or stretched while measuring, lay it flat again before assessing the section length.
Ivory section
Continue the established ribbing in ivory until the total blanket length is approximately 60 in (152 cm). This produces a final section of about 20 in (51 cm) when the first two sections are each close to their target length.
Checkpoint: Check the overall length and make sure the three color bands are in the intended order: taupe, dusty rose, then ivory. The finished size is approximate, so use the total measurement as your guide rather than counting rows.
Fasten off and optional border
When the blanket reaches about 60 in (152 cm), fasten off and weave in the ends with a yarn needle.
If you want a finished edge, work one loose round of sc around the blanket. Work 3 sc in each corner to help the edging turn neatly. Avoid tightening the border: a snug round can pull the blanket inward, while an even, relaxed round should let it lie flat.
Finishing and Blocking
After weaving in the ends, lay the blanket flat and check its shape. The sides should remain reasonably straight, and the corners should not curl or pull inward. If you added the optional border, check that it has not tightened the edges.
Wash and dry the blanket according to the yarn label. Follow the care instructions for the specific fiber rather than assuming all super-bulky yarns can be treated the same way. Let the fabric dry in a shape close to its intended dimensions, and avoid stretching the raised ribs while arranging it.
How to Resize the Throw
The pattern is adjustable, but changes should follow the structure of the ribbing.
Adjusting the width
The supplied foundation is ch 98, which produces 96 dc because the dc begin in the third chain and the turning chain is not counted. The ribbing is based on a four-stitch repeat. To preserve complete ribs, any change to the number of posts should keep the total divisible by four.
For the supplied width, 96 posts make 24 complete repeats. If you want to change the width, swatch first and use the width of that fabric to guide your adjustment. Do not change the foundation count without accounting for the four-stitch repeat, and check that the resulting chain produces the intended number of dc posts.
Adjusting the length
Length is controlled by the number of rows, so work each color until it reaches the desired section length. The source proportions use about 20 in (51 cm) for taupe, another 20 in (51 cm) for dusty rose, and ivory to bring the total to about 60 in (152 cm). To make the blanket shorter or longer, add or remove rows while keeping the same ribbing and color sequence.
If changing the total length, you can keep the three bands close to equal by adjusting each section to a similar measured length. Row counts cannot be specified in advance because no row gauge is supplied.
Useful Variations
- One-color throw: Work the entire blanket in one color, keeping the same foundation and ribbing.
- Two-color version: Use one color for the first section and another for the remaining length, changing at the end of a row.
- Alternate palette: Keep the taupe–dusty rose–ivory order or substitute other colors while preserving the three-band layout.
- Longer or shorter throw: Change the number of rows in the color sections while measuring the total length as you work.
- Larger throw: Adjust the foundation width using the four-stitch repeat, then swatch to check the resulting width and yarn requirements.
Troubleshooting
Why are my rib columns shifting?
Check the return-row stitch orientation. A column that was worked as FPdc on the previous row needs BPdc on the return row; the other columns need FPdc. If you work the same type around each post on every row, the raised columns can move or the texture can change. Follow the visible columns rather than relying on a memorized sequence alone.
Why does my stitch count seem wrong?
The foundation should produce 96 dc from ch 98, and the turning chain never counts as a stitch. When working the post stitches, cover every post across the row without adding a stitch around the turning chain. Count or mark the groups of four if it is difficult to see where each repeat begins.
Why is my blanket getting wider or narrower?
Post stitches can be easy to misplace at the row ends. Make sure the first and final posts are worked, and do not add a stitch into the turning chain. Check the width after several rows, when the ribbing has formed, and compare the edges without stretching the fabric.
Why does the edge look uneven?
Uneven edges often come from missing the first or last post, or accidentally treating the turning chain as a stitch. Keep the rule consistent: ch 2 to turn, but do not count or work into it as an extra stitch. A stitch marker at the first or last post can help you identify the row edge.
Why does the fabric feel too stiff?
A dense fabric may result from tight tension or a hook that is too small for the yarn. Recheck your swatch and try a larger hook within the recommended 10–12 mm range. The fabric should feel comfortable and flexible enough for a throw, while still showing the raised ribs.
Why are the color changes uneven?
Switch colors at the end of a row, not partway across. Keep the change at the same edge for each transition, and check that the new color begins after the previous section reaches its intended length. Weave in the yarn ends securely during finishing.
Why is the border pulling the blanket inward?
The optional sc round may be too tight. Work it loosely, especially along the sides, and place 3 sc in each corner. If the blanket still draws inward, loosen the edging rather than trying to stretch the finished border into shape.
Why does the blanket not lie flat?
First check whether the ribbing or border is unusually tight. A tight border can pull the edges inward; an uneven stitch count can also distort the sides. Lay the blanket flat after washing and drying according to the yarn label, and shape it gently without stretching the ribs.
Frequently Asked Questions
Can I use a different yarn weight?
The supplied pattern is written for super-bulky (#6) yarn and a 10–12 mm hook. A different yarn weight will change the size, texture, and yarn requirements. If substituting, make a swatch first and use it to assess drape and width; the stated measurements and yardage may no longer apply.
Can I use a different hook?
Choose within the recommended 10–12 mm range based on the yarn label and your swatch. A smaller hook generally makes a firmer fabric, while a larger hook generally makes it looser. Check that the resulting fabric remains comfortable and that the ribs are clear.
Can I make it in one color?
Yes. The construction does not depend on color changes. Work the same post-stitch ribbing for the full length, measuring until the blanket reaches approximately 60 in (152 cm).
Is the pattern reversible?
The stitch texture can be seen from both sides, but the front and back do not have identical relief. The pattern instructions specifically maintain the raised columns on the front by reversing the post-stitch orientation on return rows.
How do I know when to change colors?
Measure the taupe section to approximately 20 in (51 cm), then change to dusty rose at the end of a row. Work dusty rose for another approximately 20 in (51 cm), then switch to ivory and continue until the total length is about 60 in (152 cm).
Do I need to add the border?
No. The single-crochet edging is optional. The blanket can be fastened off and finished without it. If you add the border, keep it loose and work 3 sc in each corner.
How should I care for the finished blanket?
Follow the washing and drying instructions on the yarn label. Fiber content and yarn construction determine the appropriate care, so use the label rather than a general method.
Can I make a smaller version?
Yes. Reduce the width while keeping a complete multiple of four posts for the ribbing, and reduce the number of rows to shorten the blanket. Swatch first to estimate the new width and check the fabric before committing to the full project.
Final Construction Recap
Work a swatch, then make the ch 98 foundation and establish 96 dc. Build the ribbing across those posts in 24 groups of four, reversing the post-stitch orientation on each return row to keep the raised columns aligned. Work taupe, dusty rose, and ivory in measured sections, finish at about 60 in (152 cm) total length, and add the optional loose single-crochet border if desired.









