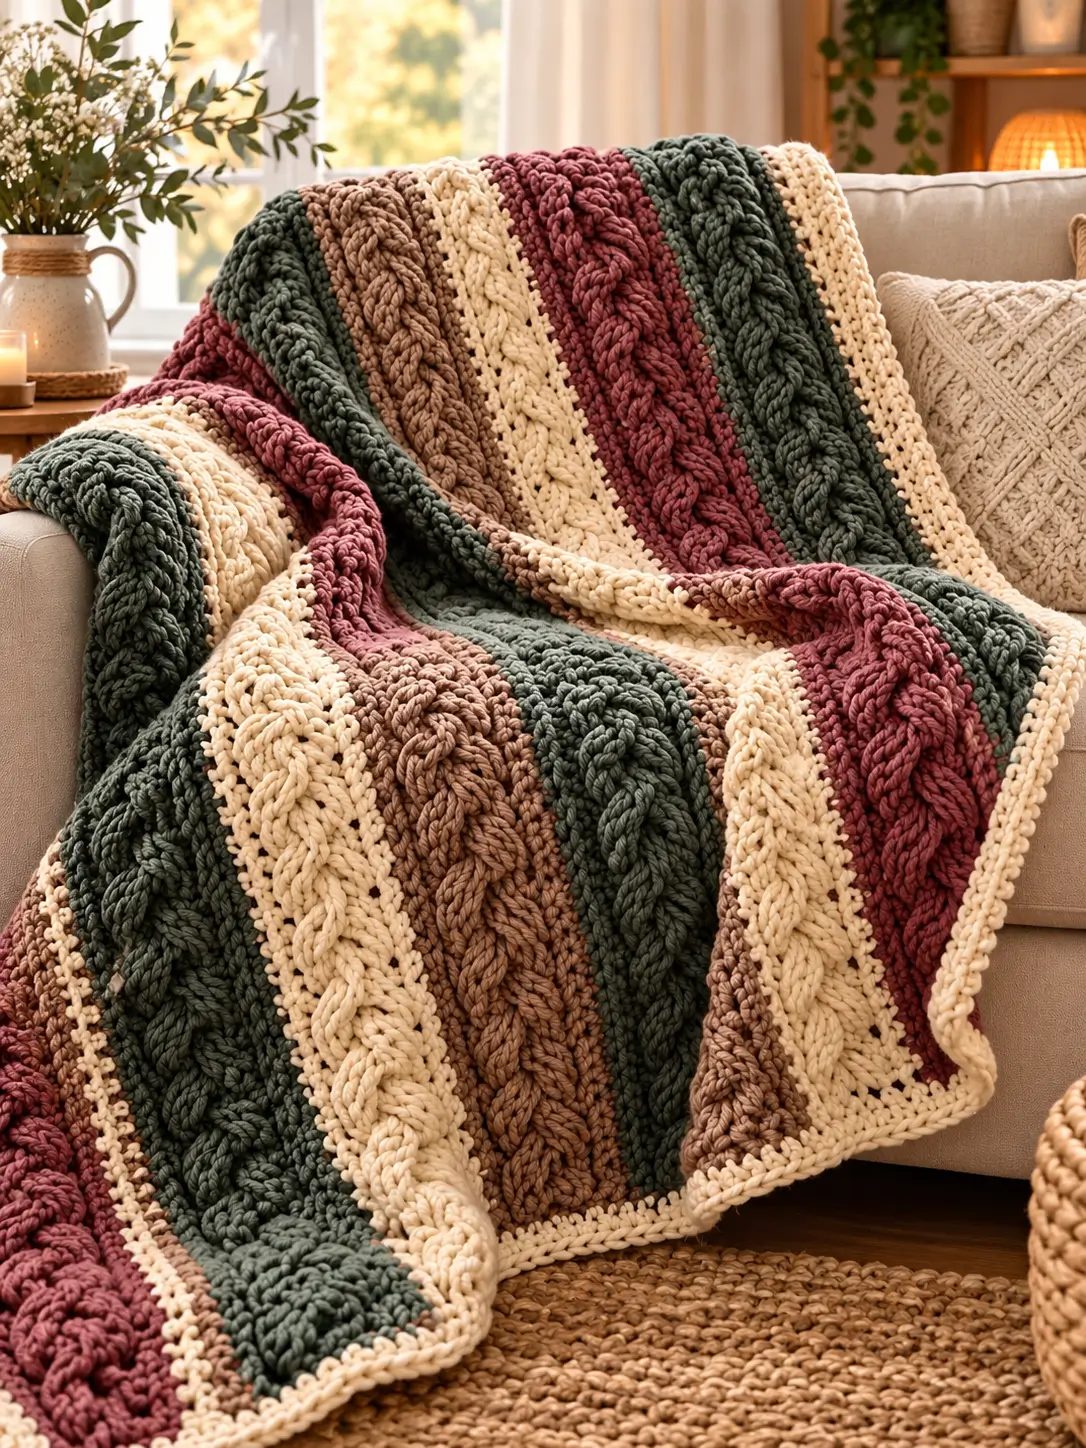
A cable this wide needs enough background fabric to cross without pulling the blanket into an hourglass. This chunky cable crochet blanket uses super bulky yarn, a 10 mm reference hook, raised cable panels, and four-color blocking to build a sofa-scale throw. The project suits intermediate crocheters who can work post stitches. Its panel construction also provides a practical way to distribute several large yarn quantities across one design.
The Design: What Makes This Cable Blanket Different
The photographed blanket combines three elements that need to work together: oversized braided cables, wide vertical color blocking, and narrow separators between the dominant panels. Cable width matters because heavy crossings can contract the fabric; background stitches give each braid room to sit above the surface rather than pulling the entire throw inward.
Color placement does a second job. Instead of treating the chunky crochet blanket pattern as one uninterrupted field, burgundy, green, cream, and brown visually separate neighboring cables.
The third decision is scale. A super bulky crochet blanket needs fewer stitches than the same design worked in worsted yarn, but every post stitch occupies substantially more physical space. A common mistake is selecting the final width from the foundation chain alone. Cable fabric can contract after the crossings are introduced, so the working swatch—not the loose chain—should determine width.
Project Info at a Glance
| Skill Level | Time | Finished Size | Hook | Best For |
|---|---|---|---|---|
| Intermediate | Multi-session project | Reference: 94 × 107 cm | 10 mm N/P | Sofa/lap throw |
The size and hook above are reference specifications from a comparable super-bulky crochet cable blanket, not measurements recovered from the photograph. A comparable published pattern reports a 37 × 42-inch blanket, 10 mm hook, size-6 yarn, and gauge of 6.5 hdc stitches × 5 rows per 4 inches.
Materials and Tools
Yarn
For the closest visual result, choose a plied size 6 super bulky yarn rather than thin worsted yarn.
- Forest green — size 6 super bulky — quantity determined by final dimensions — dominant panel color
- Cream — size 6 super bulky — quantity determined by final dimensions — light cable panels and border
- Warm brown/taupe — size 6 super bulky — quantity determined by final dimensions — secondary panels
- Muted burgundy — size 6 super bulky — quantity determined by final dimensions — contrast panels
A comparable crochet pattern uses about 880 yards of super bulky yarn for a 37 × 42-inch throw. A substantially larger blanket will require more yarn.
For a four-color version, do not automatically divide the total yarn quantity equally. The photographed layout uses green more frequently than some of the accent shades, while cream is also required for the edging. Plan the panel widths before purchasing the final quantities.
Tools
- 10 mm N/P crochet hook as a starting size
- Yarn needle with an eye large enough for super bulky yarn
- Locking stitch markers
- Scissors
- Flexible measuring tape
- Cable-panel swatch
- Blocking mats, optional depending on yarn fiber
Abbreviations
- ch — chain
- sc — single crochet
- hdc — half double crochet
- dc — double crochet
- FPdc — front post double crochet
- FPtr — front post treble crochet
- BPdc — back post double crochet
- sl st — slip stitch
- st/sts — stitch/stitches
- RS — right side
- WS — wrong side
- rep — repeat
Invisible decrease is an amigurumi shaping method and is not required for this flat rectangular cable construction.
Chunky Cable Crochet Blanket Pattern
Before Working the Full Blanket
The exact photographed blanket cannot be reconstructed stitch-for-stitch from a single image because its hidden rows, gauge, yarn specifications, and complete stitch counts are not visible. The instructions below therefore create an original cable-panel blanket inspired by the visible construction rather than claiming to reproduce an unidentified designer’s pattern.
Make a cable swatch before starting the full blanket. Work enough stitches for one background area, one cable, and a second background area. Continue until at least two complete cable crossings are visible.
Measure the relaxed fabric rather than stretching it flat. This measurement matters because raised crochet cables consume horizontal width.
Foundation
With the first panel color, make a foundation chain corresponding to the width calculated from your cable swatch.
Divide the blanket width into repeated modules. Each main module should contain:
Background stitches + cable stitches + background stitches.
Add narrow separator columns between the larger modules where required.
Do not finalize the full-width foundation from the uncrossed chain measurement alone. Measure the completed cable swatch after at least two crossings and use that measurement to calculate the final width.
Setup Row
Work one row of dc across the foundation, keeping the stitches relaxed and consistent.
Turn.
Background Row
Ch 2 without counting it as a stitch. Work hdc or dc across according to the density established by your swatch.
Turn.
This plain row provides a stable series of vertical posts for the raised cable stitches.
Raised Cable Panel
Traditional crochet cables are formed by working around stitch posts and crossing groups of raised stitches. For an image-inspired six-post cable, establish six vertical cable posts surrounded by background stitches.
Cable Row A: Work the background stitches until reaching the six cable posts. Skip the first 3 cable posts. Work 1 FPtr around each of the next 3 posts. Working in front of those stitches, return to the 3 skipped posts and work 1 FPtr around each post. Complete the remaining background stitches.
Return Row: Work across in the established background stitch without crossing the cable.
Cable Row B: Work the six cable posts without crossing them, maintaining the raised structure.
Return Row: Repeat the plain return row.
Repeat the cable sequence at the interval established during swatching.
A crossing does not need to occur on every right-side row. Super bulky yarn requires enough vertical distance between crossings to keep the braid defined rather than compressed.
Forest Green Cable Panels
Use forest green for several dominant cable columns.
The photographed design distributes dark green across the width instead of placing it in one isolated section. Repeating this color creates continuity through the blanket.
Work each green section to the same measured width when creating a regular striped layout. Count stitches rather than relying only on visual width because the cable crossings will contract the fabric.
Cream Cable Panels
Work the cream sections with the same basic cable construction.
The light yarn makes individual stitches highly visible, so check all six cable posts immediately before each crossing. A missing post will alter both the braid shape and the width of the panel.
If cream is also used for narrow separator sections, keep those columns free from oversized crossings. This separates adjacent cable braids visually.
Brown and Taupe Cable Panels
Repeat the established cable module using warm brown or taupe yarn.
Maintain the same number of background stitches on both sides of the braid. Losing a stitch at repeated color transitions can cause an otherwise vertical panel to lean.
Place a locking stitch marker at each panel boundary while establishing the first several rows.
Burgundy Cable Panels
Work the burgundy cable columns according to the same measured repeat.
The photographed blanket uses burgundy as a recurring accent rather than the dominant field color. Space these panels through the width to balance the darker green and neutral sections.
Keep the cable crossing direction consistent throughout the blanket unless you deliberately want alternating mirrored cables.
Vertical Color Changes
On the final yarn-over of the stitch immediately before a new panel, complete the stitch with the incoming color.
Carry yarn only across very narrow separator sections. For broad panels, work from separate balls or yarn bobbins so long floats do not run across the wrong side of the blanket.
At every color change, set the previous stitch back to its normal width before continuing.
Avoid pulling the inactive strand tightly. Excess tension at repeated color changes produces vertical puckering even when the total stitch count remains correct.
Separator Columns
The photographed blanket includes narrow textured areas between several of the larger cable panels.
One option is to work alternating FPdc and BPdc stitches over an even number of posts. Continue those stitches vertically without crossing them.
This creates a ribbed separator that frames the larger braided cables.
A narrow plain-dc section can also be used if the ribbed version makes the blanket too thick. Test both treatments in the swatch before committing to the full width.
Continue the Cable Repeat
Continue working the established cable sequence until the blanket reaches the required length.
Every 15–20 cm, place the blanket on a flat surface without stretching it. Measure both side edges from the foundation row.
If one side begins becoming longer than the other, inspect the first and final stitches of each row. Cable crossings in the center should not change the number of edge stitches.
Final Body Row
Finish the main blanket after completing an entire cable repeat rather than stopping halfway through a crossing sequence.
Work one plain row across all stitches.
The final plain row creates a level foundation for the edging and keeps the uppermost cable crossing from sitting directly against the border.
Fasten off the panel yarns and weave the structural ends before beginning the border.
Cream Border
Join cream yarn at one corner.
Round 1: Work sc evenly around all four sides of the blanket. Place 3 sc in each corner. Along the side edges, distribute stitches according to the actual row height rather than automatically placing one stitch into every row end.
Round 2: Work 1 sc in each stitch around. At each corner, work 3 sc into the center corner stitch from the previous round.
Add one more round if a heavier frame is required.
A narrow cream border works particularly well with this design because it defines the perimeter without competing with the oversized braided cables.
Fasten off and weave the final tail securely through several stitches on the wrong side.
Cable Stitch Construction
Crochet cables can be made with front-post double crochet, front-post treble crochet, or combinations of front- and back-post stitches. The correct choice depends on yarn thickness, desired cable height, and the number of posts being crossed.
For this cable stitch crochet blanket, taller front-post stitches are useful because three stitches must travel across another group of three. A treble-height post provides additional length for the crossing.
If the cable curls sharply toward the front, first check crossing tension. Do not immediately increase the hook size for the entire blanket. The background fabric may already have the correct gauge while only the crossed stitches are being worked too tightly.
When necessary, use the same hook for the background and deliberately draw the FPtr stitches slightly taller before completing them.
Sizing and Yarn Planning
A comparable super bulky cable blanket measures approximately 94 × 107 cm and uses about 880 yards of yarn. Treat those numbers as a reference rather than a fixed requirement because cable density, yarn construction, gauge, and border width all affect consumption.
A larger cable throw can require considerably more. Dense post stitches place more yarn on the surface than a basic flat stitch worked over the same dimensions.
The most reliable calculation starts with the swatch.
Weigh a completed cable swatch after it contains at least two full crossings. Measure its width and height. Calculate the swatch area, then compare that area with the intended blanket dimensions.
Scale the yarn mass proportionally and add extra yarn for the border, swatching, joining, and normal variation in tension.
For a four-color layout like the photographed blanket, calculate each color separately. Green occupies a relatively large proportion of the visible design. Cream also requires additional yardage because it appears in panels and around the outer edge.
Why Gauge Matters With Large Crochet Cables
Cable blankets create a specific gauge problem: uncrossed background fabric and heavily crossed cable fabric do not consume horizontal space at the same rate.
A foundation chain can therefore appear wide enough while the finished cable section ends up several centimeters narrower.
Work the gauge sample in the actual cable pattern rather than using only plain dc or hdc.
The swatch should contain the complete cable cycle. Stopping immediately before the first crossing produces misleading measurements because the stitches have not yet been displaced horizontally.
After completing the sample, treat it using the same washing or blocking method planned for the finished blanket. Allow it to return to its relaxed shape before measuring.
Small differences become significant across a large throw. If each cable module finishes only 5 mm narrower than expected and the module is repeated ten times, the blanket loses 5 cm of planned width.
Assembly and Finishing
- Finish all full-height color panels and complete the final cable repeat.
- Lay the blanket flat without stretching the raised cable columns.
- Compare both side-edge lengths and correct any incomplete row before adding the edging.
- Weave the color-change tails into matching-color sections on the wrong side.
- Secure each tail in more than one direction to reduce movement in the thick yarn.
- Join the cream border yarn at a corner or inconspicuous lower edge.
- Work the first border round evenly around all four sides.
- Check that every corner lies flat before adding another border round.
- Complete the edging and weave the final yarn tail into the wrong side.
- Block according to the yarn manufacturer’s care instructions, concentrating on panel alignment rather than flattening the raised cables.
The completed blanket should remain rectangular while retaining clear relief through each braided cable column.
7 Technical Tips for a Chunky Cable Crochet Blanket
- Check for cable narrowing. Measure the swatch before and after two complete crossings. If a 15 cm uncrossed section contracts to 12 cm, calculate the blanket width from the 12 cm measurement.
- Prevent a skipped cable post. Place locking markers in the first and sixth posts of each major cable before crossing. Finding only five posts or accidentally counting seven indicates an error before the crossed stitches are worked.
- Correct overtight crossings. A front-post treble that cannot move normally along the hook shaft is too tight. Draw each tall stitch to its intended height before completing the final yarn-over.
- Watch panel-boundary puckering. Do not tighten a color change until the first stitch in the incoming color reaches normal width. Repeatedly shortening the transition stitch creates a visible vertical groove.
- Control uneven side edges. Mark the first and last true stitch of each row. Accidentally treating the turning chain as an additional stitch can gradually increase the blanket width.
- Fix border ruffling at the first round. Waves along the edging usually indicate too many side stitches. Remove stitches at regular intervals instead of trying to correct an oversized first round with a tighter second round.
- Leave enough yarn for tail weaving. Keep approximately 15–20 cm of tail when cutting super bulky yarn. Weave through dense same-color stitches in more than one direction before trimming the remaining end.
Conclusion
Before purchasing the full yarn quantity, crochet one complete cable module in the intended super bulky yarn and measure it after at least two crossings. That test establishes panel width, cable tension, hook suitability, and a more reliable basis for estimating yarn. Photograph the finished swatch beside the forest green, cream, brown, and burgundy yarns before scaling the foundation to full blanket width. Save the finished chunky cable crochet blanket to Pinterest and share the completed four-color layout on Instagram with #ChunkyCableCrochetBlanket. For this specific design, which color should carry the widest braided cable: forest green, cream, brown, or burgundy?










Where can I get the patern without all the ads