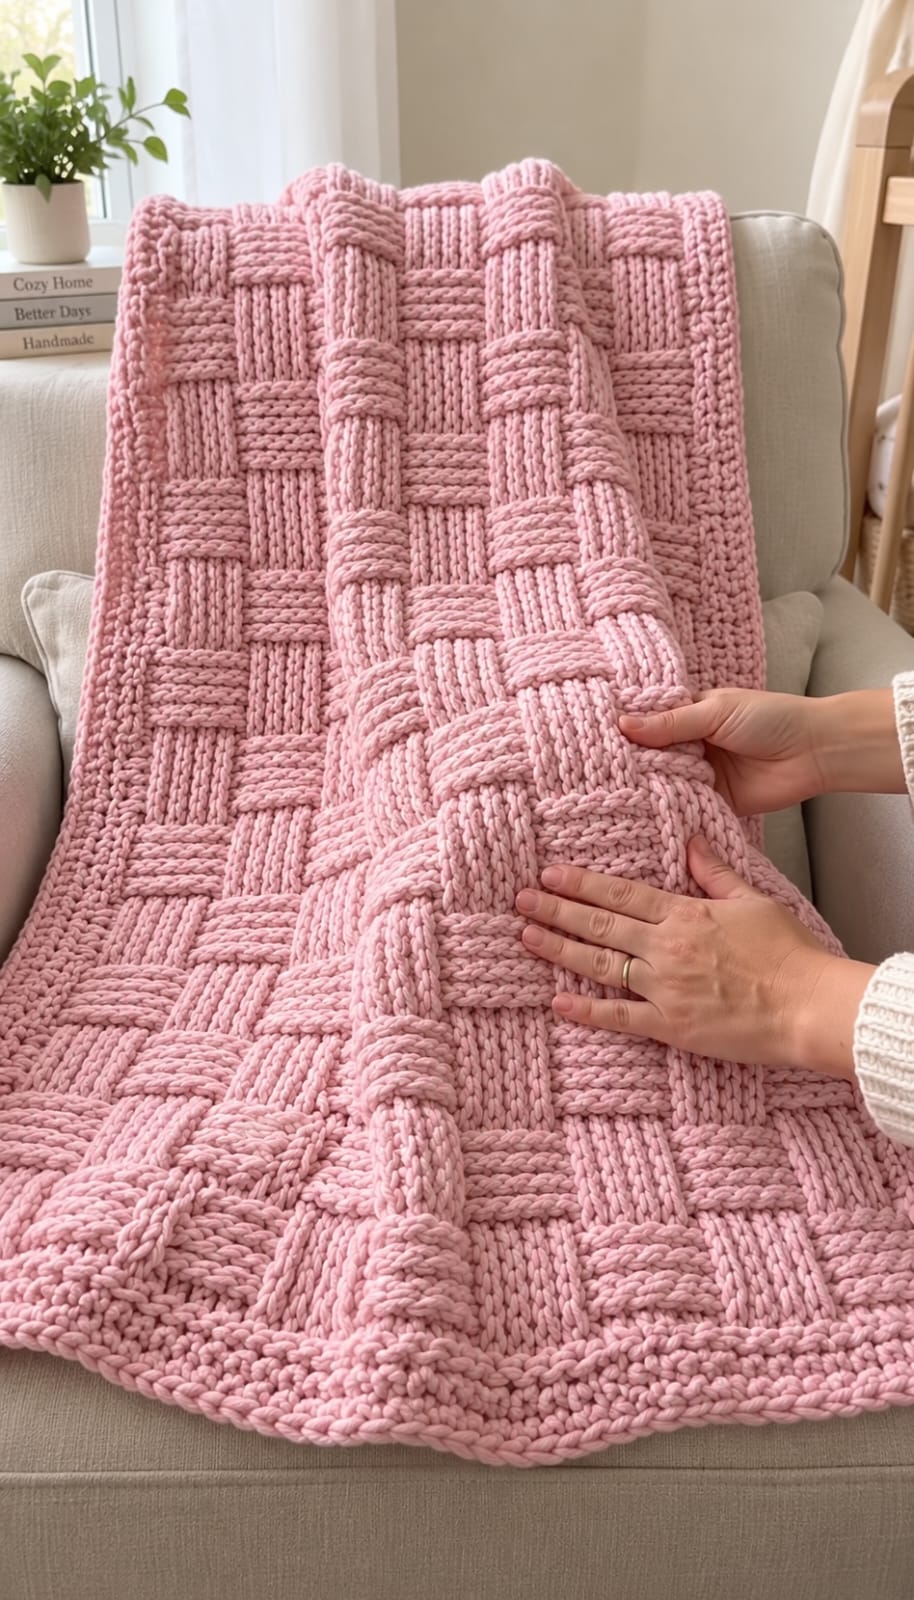
Six-stitch blocks give this basketweave enough width to look like thick strips crossing over and under one another. This chunky basketweave crochet blanket pattern uses super-bulky pink yarn, alternating front-post and back-post double crochet, oversized texture blocks, and a dense matching border. The image-inspired target is approximately 115 × 150 cm, with a 10 mm hook used as the starting size after swatching.
What Makes This Chunky Basketweave Blanket Different
The woven appearance comes from stitch direction rather than separate strips. Groups of front-post double crochet project toward the viewer while neighboring back-post groups recede. After five rows, those positions reverse. The resulting blocks appear to cross even though the blanket remains one continuous piece.
Block scale is the second defining decision. A traditional basket weave crochet blanket often uses smaller post-stitch groups, but this version starts with six-stitch blocks to reproduce the broad texture visible in the reference. Super-bulky yarn magnifies those sections further.
The border remains comparatively simple. Its job is to frame the heavy basketweave field and stabilize the edges without introducing another dominant pattern. A frequent problem with a super bulky crochet blanket is a foundation chain that is too tight. That creates a curved lower edge before the basketweave is established.
Project Information
| Skill Level | Construction | Finished Size | Hook | Yarn |
|---|---|---|---|---|
| Intermediate | One-piece post-stitch rectangle | Approx. 115 × 150 cm | 10 mm starting size | Super bulky / Category 6 |
The 10 mm hook is a starting point rather than a fixed requirement. Super-bulky yarns differ considerably in diameter and compression, so make a complete basketweave swatch before establishing the foundation width.
Materials and Tools
Yarn
- Dusty pink or blush — super bulky/category 6 — approximately 1,600–1,900 yd / 1,460–1,740 m for the image-inspired throw.
- Additional matching pink yarn — reserve part of the total quantity for the perimeter border.
The project is monochromatic, so dye-lot differences can be conspicuous across large sections. For the closest visual match, use one yarn type and one shade throughout the complete blanket.
Tools
- 10 mm crochet hook
- Optional 11–12 mm hook for the foundation chain if needed
- Large tapestry needle
- Scissors
- Locking stitch markers
- Tape measure
Abbreviations
- ch — chain
- sc — single crochet
- hdc — half double crochet
- dc — double crochet
- FPdc — front-post double crochet
- BPdc — back-post double crochet
- sl st — slip stitch
- st/sts — stitch/stitches
- sp — space
Post stitches are worked around the post of the stitch below rather than through the two loops at the top, which is what creates the raised and recessed surfaces.
Chunky Basketweave Crochet Blanket Pattern
The main fabric uses 6-stitch blocks. Six FPdc are followed by six BPdc across a row. After five rows, the stitch positions reverse so the previously raised block becomes recessed and the recessed block projects forward.
Gauge Swatch
Before chaining for the complete blanket, make a swatch containing at least four basketweave blocks.
Chain a multiple of 12 plus the turning-chain allowance.
Work one foundation row of dc.
Then work:
6 FPdc, 6 BPdc
Repeat across.
Work five rows with those positions aligned.
For the next five rows, reverse the groups:
6 BPdc, 6 FPdc
Measure the swatch only after both sections have been completed. A plain dc swatch does not accurately predict the width of compressed post-stitch fabric.
Calculating the Foundation Width
The image-inspired finished width is approximately 115 cm, including the border.
Plan for the unfinished basketweave panel to measure approximately 108–110 cm across.
Measure one complete 12-stitch repeat from the swatch.
Divide the required center-panel width by that measurement.
Round to the nearest complete repeat.
For example, if one 12-stitch repeat measures 12 cm, nine repeats create approximately 108 cm of main-panel width.
That example would require 108 pattern stitches, plus any edge stitches and turning-chain allowance used by the chosen foundation method.
Foundation Row
Use dusty-pink super-bulky yarn.
Chain the calculated number required for the desired width.
For the example above, establish 108 working stitches plus the turning-chain allowance.
Use a hook one size larger for the chain if your foundation tends to tighten.
Row 1: Dc across the foundation, maintaining the calculated number of working stitches.
Ch 2 and turn.
The turning chain does not need to count as a stitch if that method gives a cleaner edge.
Basketweave Block A
Row 2: Work 6 FPdc around the next 6 posts. Work 6 BPdc around the following 6 posts.
Repeat:
(6 FPdc, 6 BPdc)
across the row.
Dc in any dedicated edge stitch if your foundation calculation includes one.
Ch 2 and turn.
Row 3: Repeat the established post-stitch groups so each raised section remains raised and each recessed section remains recessed when viewed from the intended right side.
Row 4: Continue in established pattern.
Row 5: Continue in established pattern.
Row 6: Continue in established pattern.
The first five-row texture block is complete.
Basketweave Block B
The next section reverses the texture.
Row 7: Work BPdc around the posts that previously formed the raised FPdc block. Work FPdc around the posts that previously formed the recessed BPdc block.
The repeat becomes:
(6 BPdc, 6 FPdc)
across the row.
Row 8: Maintain the new post-stitch orientation.
Row 9: Continue in established pattern.
Row 10: Continue in established pattern.
Row 11: Continue in established pattern.
The second five-row block is complete.
Repeating the Basketweave
Repeat Rows 2–11 throughout the main blanket.
Every five rows, the raised and recessed groups exchange positions.
This creates alternating horizontal and vertical-looking blocks even though all stitches are crocheted row by row.
Measure the blanket after every two complete 10-row repeats.
Continue until the main basketweave panel measures approximately 140–144 cm long, depending on the planned border width.
Finish after completing a full five-row block rather than stopping halfway through one section.
Reading the Basketweave Texture
The stitch pattern becomes easier to follow once the first two blocks are complete.
A raised section looks like six vertical columns from the right side. The adjacent recessed group appears flatter and visually travels behind it.
Five rows later, reversing the post stitches changes that relationship.
Use the existing fabric as the guide rather than recounting the complete row every time.
Place a marker at each 12-stitch repeat while learning the pattern. Remove the markers after the block boundaries become easy to identify.
Keeping Six-Stitch Blocks Aligned
Count each group as six before changing from FPdc to BPdc.
A single misplaced post stitch shifts every subsequent block by one stitch.
At the end of each row, inspect the texture from the right side.
The boundaries should form vertical lines until the five-row reversal point.
If one line begins drifting sideways, locate the misplaced post stitch before continuing.
Maintaining Straight Side Edges
Post-stitch blankets can lose edge stitches because the first and final posts are less obvious than ordinary dc stitches.
Place one marker in the first working stitch and another in the final working stitch.
Move both markers upward on every row.
Count the complete row after finishing each five-row section.
The stitch count should remain unchanged from the foundation row.
Do not add stitches to compensate for an edge that looks temporarily narrow. The border will correct small visual irregularities later.
Finishing the Main Blanket Panel
Continue alternating the two five-row basketweave sections until the panel reaches the planned length.
For a finished blanket near 150 cm long, stop the main field at approximately 140–144 cm.
Lay the panel flat before beginning the border.
Check the width at the top, center, and bottom.
Small variations can be corrected while distributing the first border round, but substantial differences indicate a tension or stitch-count problem.
Border Foundation Round
Do not cut the yarn if the final basketweave row ends at a convenient corner.
Ch 1.
Work sc evenly across the top edge.
At the first corner work:
(sc, ch 2, sc)
Continue down the first long side.
Because the side consists of row ends, distribute the sc stitches evenly rather than placing an arbitrary large number into each row.
Work the next corner:
(sc, ch 2, sc)
Continue across the foundation edge, then up the final side.
Join with sl st.
Border Round 2
Ch 1.
Sc in every stitch around.
At each corner ch-2 space work:
(sc, ch 2, sc)
Join with sl st.
This dense round begins forming the substantial pink frame visible around the basketweave field.
Border Round 3
For a slightly taller final edge, work hdc around.
Ch 2.
Hdc in each stitch.
At every corner work:
(2 hdc, ch 2, 2 hdc)
Join with sl st.
Fasten off if the blanket has reached the desired dimensions.
Optional Fourth Border Round
A fourth round can be added when the blanket needs a wider frame.
Join matching pink yarn in any corner.
Ch 1.
Sc in every stitch around.
At each corner work:
(sc, ch 2, sc)
Join and fasten off.
Adding more than four dense rounds can make the perimeter disproportionately heavy compared with the basketweave center.
Alternative Rounded Border
The photographed blanket has a soft, substantial outer edge rather than a sharp narrow line.
For a rounder finish, use hdc for the final two border rounds.
Work one hdc in each established stitch.
Place:
(2 hdc, ch 2, 2 hdc)
in each corner.
On the last round, work slightly relaxed stitches so the perimeter does not pull inward.
Assembly
- Make a complete basketweave swatch using 6 FPdc + 6 BPdc groups and at least two five-row sections.
- Measure the swatch and calculate a foundation width that produces approximately 108–110 cm before the border.
- Work one complete dc foundation row while keeping the lower edge relaxed.
- Crochet five rows of alternating six-stitch FPdc and BPdc groups.
- Reverse the post-stitch positions for the next five rows to establish the woven block effect.
- Repeat the 10-row sequence until the main panel measures approximately 140–144 cm long.
- Finish after a complete five-row block and check that the top, center, and bottom widths remain consistent.
- Work one evenly distributed sc foundation round around the complete perimeter.
- Add two or three dense matching-pink border rounds, increasing only at the four corners.
- Weave the yarn tails through several centimeters of matching stitches and shape the finished blanket to approximately 115 × 150 cm.
The completed blanket should show broad alternating basketweave blocks surrounded by a dense monochromatic frame.
7 Technical Tips for Chunky Basketweave Crochet
- Foundation edge pulling inward: Make the starting chain with a hook approximately 1–2 mm larger than the main hook when necessary. A tight chain can reduce the lower blanket width by several centimeters.
- Basket blocks drifting sideways: Count exactly six post stitches before switching between FPdc and BPdc. One misplaced stitch changes the alignment of every block that follows it.
- Texture becoming too rigid: Check whether a folded swatch bends without excessive resistance. If the fabric behaves like a mat, increase the hook by approximately 1 mm and swatch again.
- Side edges losing stitches: Keep markers in the first and last working stitch of every row. Missing one edge stitch repeatedly can reduce the top width by 5 cm or more across a large throw.
- Five-row blocks becoming inconsistent: Place a marker after every fifth row. Reversing the post stitches after four or six rows creates rectangular blocks of visibly different heights.
- Border developing waves: Reduce the number of stitches distributed along the long sides if the edge ruffles. Excess side stitches add circumference faster than the flat blanket can absorb it.
- Border corners curling inward: Place sufficient stitches into each corner space, such as (2 hdc, ch 2, 2 hdc) on an hdc round. A corner without additional width cannot turn cleanly through 90 degrees.
Why Front-Post and Back-Post Stitches Create Basketweave
A standard double crochet is worked through loops at the top of a stitch. Post stitches change the insertion point.
For FPdc, the hook passes around the post from the front. This pulls the stitch toward the viewer and creates a raised column.
For BPdc, the hook passes around the post from behind. The resulting column sits farther back in the fabric.
Grouping several identical post stitches creates a broad raised or recessed area. Reversing the groups after a fixed number of rows makes those areas appear to pass over and under one another.
Working a Front-Post Double Crochet
Yarn over.
Insert the hook from front to back and then back to front around the post of the next stitch.
Yarn over and pull up a loop.
Yarn over and pull through two loops.
Yarn over again and pull through the remaining two loops.
One FPdc is complete.
Keep the loop height similar to an ordinary dc. Pulling the post stitch excessively tight compresses the basketweave fabric.
Working a Back-Post Double Crochet
Yarn over.
Insert the hook from back to front and then front to back around the post of the next stitch.
Yarn over and pull up a loop.
Yarn over and pull through two loops.
Yarn over and pull through the final two loops.
One BPdc is complete.
The stitch should sit behind the neighboring raised FPdc group when viewed from the right side.
Choosing the Block Width
The image-inspired construction uses six-stitch groups because the visible woven sections are unusually broad.
A smaller basketweave can use four FPdc followed by four BPdc. This creates more blocks across the same blanket width.
For an even finer texture, three-stitch groups can be used.
Changing the block width changes the foundation repeat. A six-plus-six pattern uses a 12-stitch repeat, while a four-plus-four version uses an eight-stitch repeat.
Do not change block size halfway through the blanket.
Changing the Block Height
Five rows create the selected oversized proportions.
Four-row blocks produce a slightly flatter rectangular texture, while six-row blocks create taller sections.
Compare row height with the width of one six-stitch group on the gauge swatch.
For a balanced woven appearance, those two measurements should be reasonably close.
Super-bulky yarn can make five rows surprisingly tall, so swatch before deciding on the final repeat.
Adjusting the Blanket Width
Width should be changed in complete basketweave repeats.
For the selected six-stitch blocks, one full pattern repeat contains 12 stitches.
Measure one repeat from the finished swatch.
Add or subtract complete 12-stitch sections until the calculated width is close to the required measurement.
Remember that the border adds several centimeters to the finished dimensions.
A throw intended for a narrow chair can use fewer repeats, while a bed blanket needs considerably more.
Adjusting the Blanket Length
Length is controlled by the number of five-row blocks.
For the cleanest finish, stop after a complete block rather than ending two or three rows into the next texture section.
Measure the main panel periodically without stretching it.
Stop approximately 6–10 cm before the desired finished length if several border rounds will be added at both ends.
Record the number of completed blocks if a matching second blanket is planned.
Making a Smaller Lap Blanket
A lap blanket can target approximately 90 × 120 cm.
Make the basketweave center several centimeters smaller than those final measurements to leave room for the border.
Calculate the foundation from the measured 12-stitch repeat rather than removing an arbitrary number of chains from the full-size version.
Continue the same five-row reversal sequence until the center reaches the required length.
The texture does not need to be rescaled for a smaller blanket.
Making a Larger Blanket
A larger sofa or bed throw can target approximately 130 × 170 cm or more.
Add complete 12-stitch repeats to the foundation width.
Continue adding complete five-row sections for length.
Large basketweave blankets become heavy because post stitches contain more yarn than a flat open stitch pattern.
Support the growing fabric on a table or lap while crocheting rather than allowing the entire weight to hang from the working row.
Estimating Yarn Requirements
Comparable super-bulky basketweave throws use substantial yardage, with published benchmarks around 1,460–1,760 yards depending on finished dimensions and yarn.
For the image-inspired approximately 115 × 150 cm blanket, start planning around 1,600–1,900 yd / 1,460–1,740 m.
A swatch provides a better project-specific calculation.
Weigh the completed basketweave swatch, calculate its area, and compare that area with the planned blanket center.
Add a separate allowance for the border plus approximately 10 percent for swatching, tails, gauge variation, and repairs.
Choosing Super-Bulky Yarn
A smooth super-bulky yarn makes the post-stitch structure easy to read.
Very fuzzy yarn can soften the boundaries between raised and recessed blocks. Highly elastic yarn can also cause the blanket to contract after the hook is removed.
For the image-inspired appearance, choose a yarn with a rounded strand and enough body to hold the post texture.
Make the gauge swatch using the exact yarn planned for the blanket. Substituting another category 6 yarn can still produce a substantially different block size.
Choosing the Pink Shade
The reference uses a muted blush or dusty pink rather than a highly saturated hot pink.
A single color makes the shadows between post stitches more important. Medium-light pink displays those shadows clearly while retaining the soft monochromatic appearance.
Rose, dusty mauve, pale terracotta, cream, oatmeal, and sage can all be substituted without changing the pattern.
When using multiple dye lots, alternate skeins periodically if the color difference is visible.
Managing the Weight of the Blanket
Post-stitch fabric uses a large amount of yarn and becomes heavy as the blanket grows.
Keep most of the finished fabric supported while working each row.
Turn the project on a table or broad surface instead of twisting it from one narrow corner.
Use a sufficiently long yarn tail when joining a new skein so the ends can be woven securely through the thick post-stitch structure.
Avoid placing every yarn join along the same side edge, where repeated tails can create an uneven border foundation.
Joining a New Skein
Change skeins near the end of a stitch rather than tying a bulky knot in the fabric.
Begin the final yarn-over of the current stitch with the new yarn.
Leave both tails long enough for secure weaving.
Continue the post-stitch pattern normally.
After several rows, weave each tail through dense stitches of the same color.
Change skeins at different locations across the blanket so the joins are distributed rather than concentrated in one vertical line.
Correcting a Misplaced Post Stitch
A post stitch worked in the wrong direction is easier to correct immediately than after several rows.
Inspect each six-stitch group before moving to the next one.
If an FPdc appears inside a BPdc group, undo the row back to that stitch and correct it.
Do not attempt to hide the mistake with the next row. Post-stitch orientation affects the relief of every row above it.
Markers placed at 12-stitch intervals reduce counting errors during the first several repeats.
Preventing the Blanket from Becoming Too Stiff
Basketweave naturally creates thicker fabric than ordinary double crochet.
If the swatch feels rigid, increase the hook size before starting the full blanket.
Do not compensate by pulling the post stitches unusually tall while keeping an undersized hook. That creates inconsistent loops and unstable block boundaries.
The finished fabric should fold over itself without requiring force.
A flexible swatch also makes the completed throw easier to drape despite the super-bulky yarn.
Shaping the Finished Border
Lay the blanket flat after completing the final perimeter round.
Smooth the basketweave blocks into parallel rows and columns.
Shape each corner to approximately 90 degrees.
If the yarn can be wet blocked, dampen according to its care instructions and allow the blanket to dry flat.
For yarns that respond poorly to traditional wet blocking, hand shaping may be sufficient.
Avoid pressing the raised post stitches flat.
Finishing the Chunky Basketweave Crochet Blanket
Inspect every five-row transition before weaving the final tails, particularly where raised FPdc groups reverse into recessed BPdc groups. Check the four border corners for curling, measure the blanket at the top, middle, and bottom, and reshape any section that contracted while the border was added. The image-inspired target is approximately 115 × 150 cm, but the finished measurement should follow the actual basketweave gauge.
This chunky basketweave crochet blanket pattern can be resized in complete 12-stitch width repeats and five-row height blocks without changing the woven structure. Record the final gauge, repeat count, and yarn consumption before making another size. Share the finished pink throw on Pinterest or Instagram with #ChunkyBasketweaveBlanket. Would you keep the oversized six-stitch blocks, or reduce them to four stitches for a finer basket texture?









