Introduction
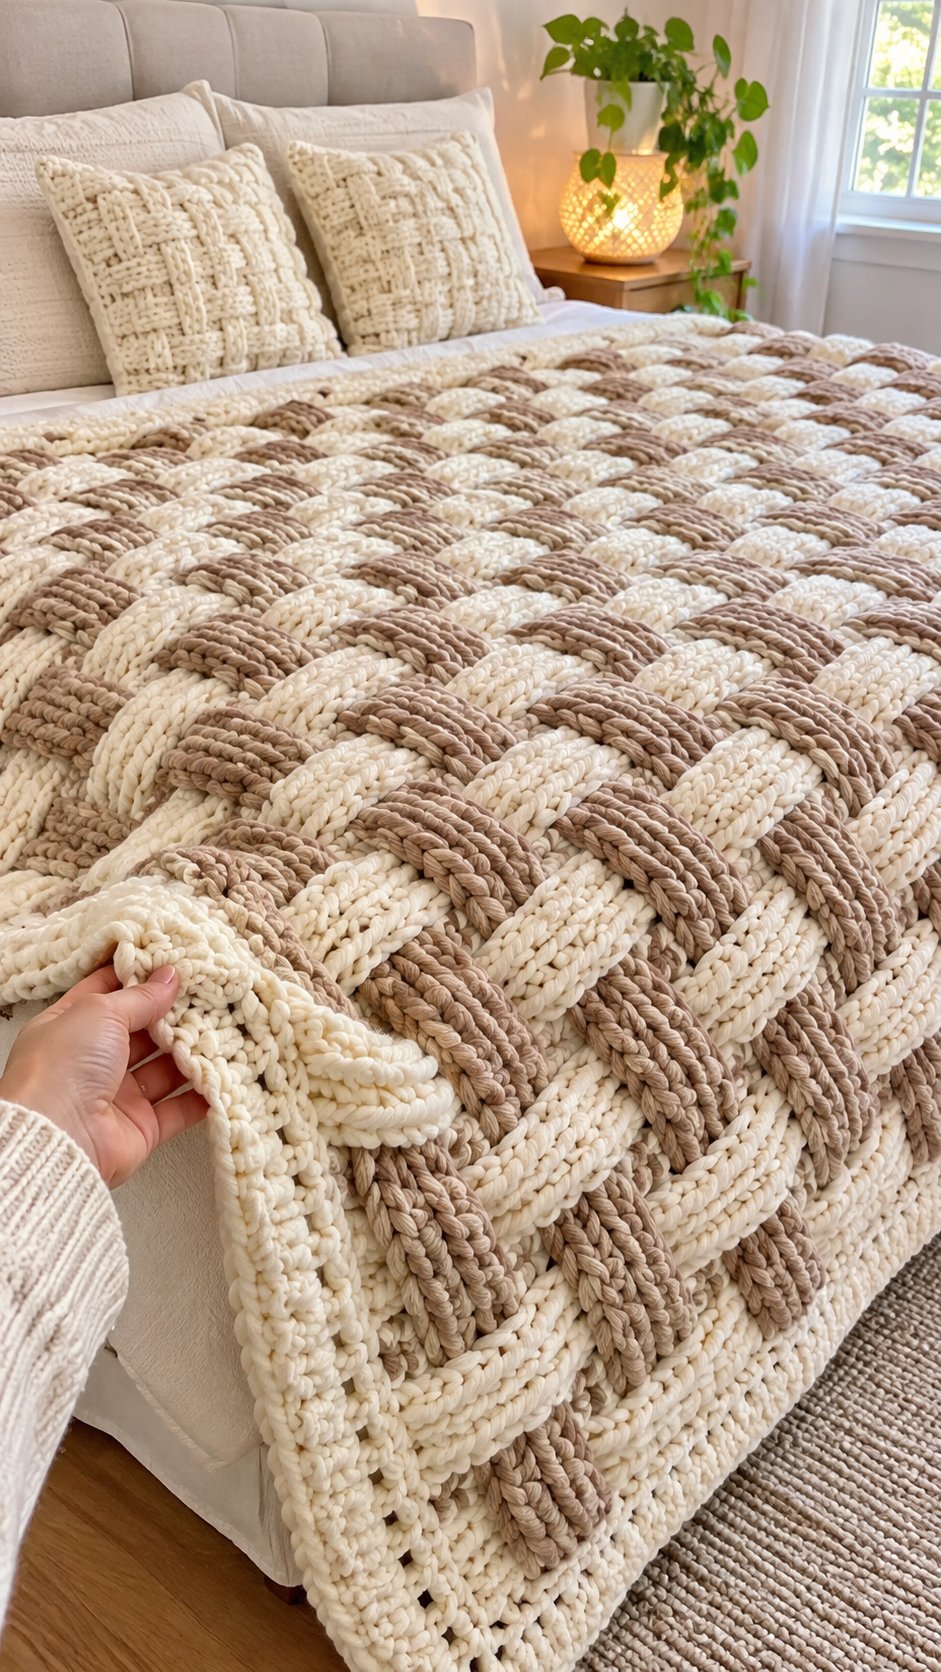
The raised cream and taupe blocks in this blanket form a woven grid without cutting or interlacing separate yarn strips. This chunky basketweave crochet blanket pattern uses super bulky yarn, an 8 mm starting hook, and alternating post stitches to create a thick rectangular throw. Designed for intermediate crocheters, the project targets approximately 120 × 150 cm. Its reversible-looking texture and restrained color palette make it suitable for a bedroom or sofa.
The Design: What Makes This Basketweave Blanket Different
The blanket uses three structural decisions to create depth without assembling separate squares. First, the stitch repeat alternates groups of four front-post and back-post double crochets. Switching their positions every four rows produces raised rectangular blocks resembling woven strips. Second, cream and taupe are arranged in eight-row bands, allowing the colors to change without interrupting the stitch rhythm. This creates a two color crochet blanket with a consistent grid.
Third, a single-crochet foundation border stabilizes the edges before a final half-double-crochet round adds weight and definition. This helps a super bulky yarn blanket hold a rectangular shape.
A common basketweave mistake is working around the top loops instead of the vertical stitch posts. That flattens the surface and changes the texture. Correct post placement is essential throughout the project.
Project Info at a Glance
| Detail | Specification |
|---|---|
| Skill level | Intermediate |
| Estimated time | 18–30 hours |
| Target size | 120 × 150 cm |
| Starting hook | 8 mm |
| Yarn category | Super bulky, weight 6 |
| Construction | Worked flat in rows |
| Main repeat | 8 stitches × 8 rows |
| Best for | Bed throw or sofa blanket |
Gauge target: Approximately 8 pattern stitches and 5 rows per 10 cm after resting the fabric. This is a proposed working gauge, not a tested measurement of the finished design.
At this gauge, 96 stitches produce approximately 120 cm before edging. Eighty-one rows produce approximately 162 cm before edging, so the target 150 cm length requires either a slightly shorter row gauge or fewer repeats. For an accurate 120 × 150 cm blanket, use the resizing calculation later in the tutorial rather than relying on row count alone.
Materials and Tools
Yarn
For the reference-inspired cream and taupe palette, select two shades of the same super bulky yarn line.
- Warm cream / ivory: Weight 6 super bulky chenille — purchase budget 1,800 g (six 300 g balls). Suggested yarn: Bernat Blanket.
- Taupe / mushroom beige: Weight 6 super bulky chenille — purchase budget 1,500 g (five 300 g balls). Suggested yarn: Bernat Blanket.
These quantities provide approximately 2,211 m in total if using 201 m balls. They are purchase allowances, not verified consumption. A smaller blanket may require substantially less yarn.
Bernat Blanket is a 100% polyester chenille yarn sold in 300 g balls, each approximately 201 m long. Its standard recommended crochet hook is 8 mm. Source: LoveCrafts; Source: Michaels.
Tools
- 8 mm crochet hook, with 9 mm and 10 mm available for gauge adjustment
- Tapestry needle with a large eye
- Locking stitch markers, at least six
- Measuring tape
- Sharp scissors
- Digital kitchen scale for checking yarn consumption
- Blocking mats, optional for measuring and shaping
Avoid mixing yarn brands with noticeably different thicknesses. A difference in strand diameter can distort the fabric and make one color band wider than another.
Abbreviations
| Abbreviation | Meaning |
|---|---|
| ch | Chain |
| sc | Single crochet |
| hdc | Half double crochet |
| dc | Double crochet |
| FPdc | Front-post double crochet |
| BPdc | Back-post double crochet |
| sl st | Slip stitch |
| st(s) | Stitch(es) |
| RS | Right side |
| WS | Wrong side |
| rep | Repeat |
| sp | Space |
All instructions use US crochet terminology.
The invisible decrease is not used in this rectangular blanket because the main fabric has no shaping decreases.
How to Crochet the Basketweave Stitch
The basketweave effect depends on where the hook enters the previous row. Ordinary double crochet stitches are made into the top loops. Post stitches are worked around the upright column of a stitch.
Front-Post Double Crochet (FPdc)
- Yarn over.
- Insert the hook from front to back, then forward again, around the vertical post of the indicated stitch.
- Yarn over and pull up a loop.
- Yarn over and pull through two loops.
- Yarn over and pull through the remaining two loops.
The completed stitch projects toward the working side.
Back-Post Double Crochet (BPdc)
- Yarn over.
- Insert the hook from back to front, then toward the back again, around the indicated stitch post.
- Yarn over and pull up a loop.
- Yarn over and pull through two loops.
- Yarn over and pull through the final two loops.
The completed stitch sits behind the working surface.
These methods follow standard post-stitch construction. Source: Crochet.com post-stitch guide.
Pattern — Step by Step
Step 1: Make a Gauge Swatch
Before making the blanket, crochet a sample containing at least 24 working stitches and 12 pattern rows.
With the cream yarn, chain 27. Work a double crochet in the fourth chain from the hook and in every remaining chain, producing 24 double crochets.
Follow the basketweave instructions below, using three groups of eight stitches instead of twelve.
Allow the swatch to rest, then measure the central 10 cm without stretching it. Measure both the width and height, and weigh the sample.
If the stitches are significantly smaller than the target gauge, try a larger hook. If the fabric is too open, try a smaller hook.
The goal is an even grid with distinct raised blocks, not a specific hook number.
Step 2: Make the Foundation Chain
With cream yarn:
Foundation: Ch 99.
Row 1 (RS): Dc in fourth ch from hook and in each remaining ch. Turn. (96 dc)
The three skipped chains form the turning chain and do not count as a separate stitch. Count the 96 double crochets carefully before proceeding.
Place a stitch marker after every 16 stitches. This makes counting easier as the blanket grows.
Step 3: Establish the Basketweave Pattern
The blanket uses 12 repeats of eight stitches across each row. Every row begins with ch 2, which does not count as a stitch. Work the first post stitch around the first double crochet or post stitch of the preceding row.
Eight-row stitch repeat
| Row | Instructions |
|---|---|
| Row 2 | (FPdc 4, BPdc 4) × 12 |
| Row 3 | (BPdc 4, FPdc 4) × 12 |
| Row 4 | Repeat Row 2 |
| Row 5 | Repeat Row 3 |
| Row 6 | (BPdc 4, FPdc 4) × 12 |
| Row 7 | (FPdc 4, BPdc 4) × 12 |
| Row 8 | Repeat Row 6 |
| Row 9 | Repeat Row 7 |
Each row has 96 post stitches. Turn after every row.
The alternation between RS and WS rows maintains the raised blocks on the same face. After four rows, the post-stitch groups switch position, creating the characteristic basketweave grid.
For the full blanket, repeat Rows 2–9 ten times, producing 80 textured rows after the foundation row.
If your gauge produces excessive length, stop after a complete eight-row repeat at the required measurement. The row count is adjustable; the eight-row sequence must remain intact.
Step 4: Add the Two-Color Stripe Sequence
Use cream as Color A and taupe as Color B.
For each eight-row basketweave repeat, follow the color schedule below.
| Textured rows | Color |
|---|---|
| 1–8 | A — Cream |
| 9–16 | B — Taupe |
| 17–24 | A — Cream |
| 25–32 | B — Taupe |
| 33–40 | A — Cream |
| 41–48 | B — Taupe |
| 49–56 | A — Cream |
| 57–64 | B — Taupe |
| 65–72 | A — Cream |
| 73–80 | B — Taupe |
To change colors, work the final post stitch of the current row until two loops remain on the hook. Yarn over with the new color and pull through both loops.
Turn, chain two, and continue the pattern.
Do not carry unused chenille yarn loosely along the side of the blanket. Long floats may snag or become visible between the edge stitches.
Instead, cut the old yarn with a 15–20 cm tail. Secure both tails on the wrong side and weave them into the completed fabric later.
The alternating bands provide a simple color arrangement. They will not recreate the exact interlocking diagonal color placement shown in the photograph, which would require a separate charted construction.
Step 5: Check the Blanket Dimensions
Lay the blanket flat after every two eight-row repeats. Measure the width at the top, middle, and bottom.
The measurements should be reasonably consistent. A small difference is normal, but a progressive increase suggests that extra stitches have been added at the row ends.
Count 96 stitches in each row. Do not work a post stitch around the turning chain.
If the blanket is becoming narrower, check whether the first or last post stitch was missed. The turning chain can resemble a working stitch when made with thick chenille.
For the length, use the eight-row repeat as the adjustment unit. Stop at the nearest complete repeat that leaves enough space for the planned border.
Step 6: Crochet the Stabilizing Border
The border is worked around the outside of the finished blanket. Use cream yarn for both rounds.
Border Round 1:
Join cream yarn with a slip stitch at any corner.
Ch 1 and work single crochet stitches evenly around the perimeter.
Across the top and bottom, work one sc into each of the 96 stitch positions.
Along the vertical edges, begin with approximately two sc for every three row ends, then adjust the spacing so the edge lies flat. The exact side count depends on your row gauge and must be matched on both sides.
Work 3 sc into each corner. Join with a sl st to the first sc.
Border Round 2:
Ch 1 and work hdc in every stitch around, placing 3 hdc in the center stitch of each corner group.
Join with a sl st. Fasten off and leave a 20 cm tail.
If the border ruffles, there are too many stitches along the edge. If it curls inward, the border needs additional stitches or a larger hook.
Step 7: Secure the Yarn Ends
Thread each yarn tail onto a large tapestry needle.
Weave the tail through several neighboring stitches on the wrong side, reverse direction, and weave through another section. For slippery chenille, take care not to pull the strand so tightly that the surrounding stitches distort.
Trim only after the tail is secure.
Do not rely on a single short knot to hold a chenille yarn end. The surface fibers may compress during washing, allowing poorly secured ends to loosen.
Step 8: Shape and Finish
Spread the completed blanket on a clean, flat surface.
Measure the width and length without stretching the fabric. Adjust the corners by hand until the edges form a rectangle.
Steam should not be applied directly to polyester chenille. High heat can permanently change synthetic fibers.
If washing is necessary, follow the care label for the exact yarn used. Bernat Blanket is listed as machine washable and suitable for low-heat tumble drying. Source: LoveCrafts; Source: Michaels.
Allow the blanket to dry fully before taking final measurements.
How to Resize the Blanket
The pattern width must remain a multiple of eight working stitches.
Use this formula:
Foundation chain = (8 × number of pattern repeats) + 3
For the suggested working gauge of 8 stitches per 10 cm, these are approximate widths before the border:
| Working stitches | Foundation chains | Approximate width |
|---|---|---|
| 64 | 67 | 80 cm |
| 80 | 83 | 100 cm |
| 96 | 99 | 120 cm |
| 112 | 115 | 140 cm |
| 128 | 131 | 160 cm |
These estimates depend on achieving the specified stitch gauge.
Blanket width calculatorDesired width: 120 cm Stitches per 10 cm: 8
99
Chains
96
Stitches
120
Width (cm)Copy my stitch counts
For length, work complete eight-row repeats until the blanket approaches the desired measurement. Record the finished size and actual yarn consumption so a second blanket can be reproduced accurately.
Seven Technical Tips for a More Even Basketweave Blanket
- Mark every 16 stitches. A missing post stitch near the center may go unnoticed until the next color band, where the block alignment becomes visibly offset.
- Maintain consistent post-stitch height. If front-post stitches are pulled too tightly, raised sections contract and the blanket develops narrow vertical ridges instead of rectangular blocks.
- Check the edge after every four rows. Accidentally working around a turning chain adds an unwanted stitch and gradually widens the blanket.
- Test the 8 mm hook before committing. If the sample is stiff or the posts are difficult to reach, increase the hook size by 1 mm and measure again.
- Keep color-change tails at least 15 cm long. Short chenille tails can slip out of the woven ends after laundering, leaving exposed joins.
- Measure both diagonals before finishing. A large difference between the corner-to-corner measurements indicates that the blanket is skewed and should be reshaped before final drying.
- Do not overfill the border with stitches. Ruffling at the corners usually indicates excessive increases, while an inward-curving edge indicates too few stitches or overly tight tension.
Common Basketweave Crochet Problems
Why is my blanket curling?
Curling usually results from tight post stitches, an overly small hook, or insufficient edge stitches.
Work a small sample using a larger hook and compare the shape after resting. If the sample lies flat, use the larger hook for the blanket.
Why do my basketweave blocks look uneven?
Each block must contain exactly four stitches. A misplaced FPdc or BPdc changes the texture and interrupts the grid.
Check the stitch sequence before continuing to the next row. It is easier to correct a single misplaced stitch than an entire eight-row repeat.
Can I use jumbo yarn instead?
Yes, but the stitch gauge and final dimensions will change substantially.
Make a sample with the proposed yarn and recalculate the foundation chain using the width formula. Very thick yarn may require a hook larger than 10 mm to accommodate the post stitches.
Is this pattern reversible?
The fabric has texture on both sides, but the two faces are not identical. Front-post stitches on one face correspond to recessed areas on the other.
The pattern is suitable for a blanket that may be viewed from either side, although the raised grid is more prominent on the designated right side.
How much yarn will I actually need?
The most accurate method is to weigh a measured sample worked in the complete basketweave repeat.
Calculate the sample’s area in square centimeters and divide its weight by that area. Multiply the result by the planned blanket area, then add an allowance for the border and color changes.
For example, a 20 × 20 cm sample weighing 60 g represents 0.15 g per square centimeter. A 120 × 150 cm blanket would then require approximately 2,700 g for the main fabric, before the border.
This is a calculation example, not a measured consumption figure for the pattern.
Conclusion
This chunky basketweave crochet blanket pattern combines a 96-stitch foundation, an eight-row post-stitch repeat, and alternating cream and taupe sections. The resulting fabric has a defined rectangular grid and a substantial border, with dimensions controlled by gauge and the number of repeats. Before making a second blanket, record your actual hook size, completed measurements, and yarn consumption. Those figures will make future size adjustments more reliable.
Save the tutorial to Pinterest with a photograph of the finished texture, or share your completed blanket on Instagram using #ChunkyBasketweaveBlanket.
Would you keep the cream-and-taupe stripe sequence, or change the color placement to emphasize the raised basketweave blocks?









