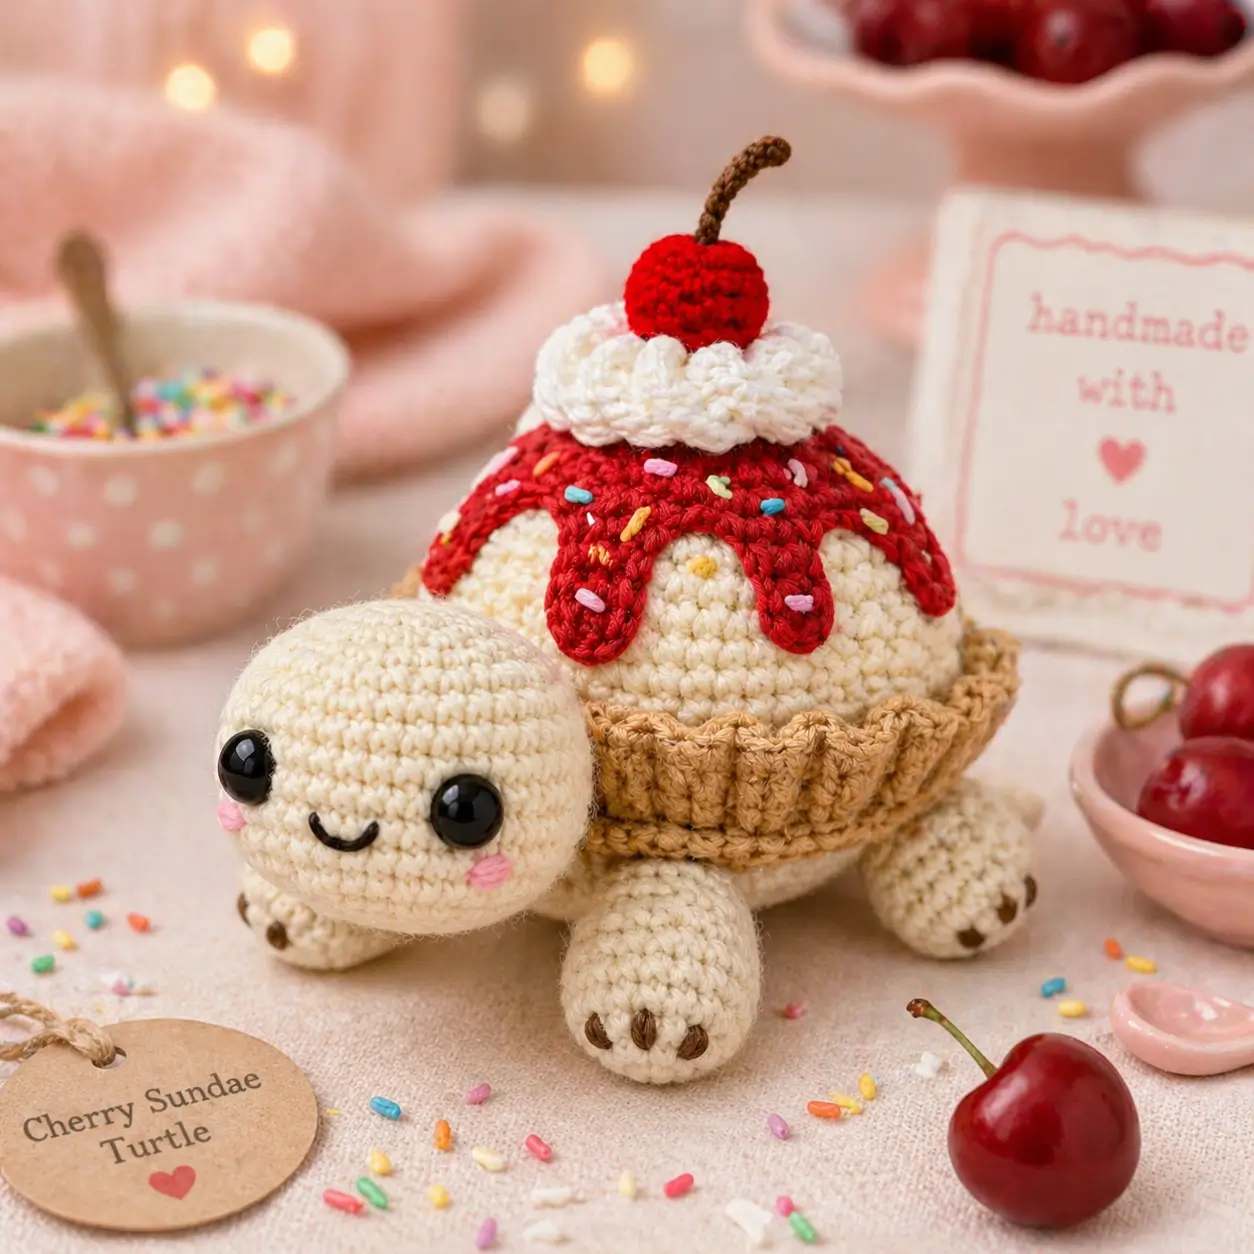
A turtle can carry a sundae only if the shell reads as dessert before it reads as armor. This cherry sundae turtle amigurumi pattern uses worsted yarn, a 3.75 mm hook, and 12 mm safety eyes to make a 15 cm intermediate turtle. Build it when a plain shell needs more structure: waffle rim, syrup drips, whipped cream, and a cherry that stays centered.
The Design: What Makes Cherry Different
You need a turtle body that sits low, then a dessert shell that rises high without pulling the head backward. The maker works the cream body as a closed oval first, then adds a separate sundae dome so the topping weight stays above the center line. A tan waffle band hides the seam and widens the base, which prevents rolling. The red syrup cap is flat enough to read as topping, while the drips are added after sewing so each drip can be placed where the shell curves. This is the main difference between a turtle amigurumi crochet pattern and an ice cream turtle crochet pattern: the anatomy still has to carry the joke. The common mistake is making the cherry too small. On this dessert turtle amigurumi, the cherry must be large enough to balance the oversized eyes.
Project Info at a Glance
| Skill Level | Time | Finished Size | Hook | Best For |
|---|---|---|---|---|
| Intermediate | Multi-session build | Approx. 15 cm long | 3.75 mm | Display pieces, pattern shops, dessert animal collections |
Materials and Tools
Yarn
- Cream / vanilla — worsted weight — 45–50 g — Paintbox Simply Aran, Lion Brand Basic Stitch, or similar smooth acrylic/cotton blend
- Tan waffle — worsted weight — 20–25 g — any firm tan yarn with visible stitch definition
- Red cherry syrup — worsted weight — 15–18 g — cherry red or crimson
- White whipped cream — worsted weight — 10–12 g — clean white or warm white
- Brown stem and claws — worsted or embroidery yarn — under 5 g
- Pink cheeks — worsted or embroidery yarn — under 5 g
- Sprinkle colors — scraps — yellow, blue, green, orange, pink
Tools
- Hook 3.75 mm
- 12 mm black safety eyes
- Polyester stuffing
- Yarn needle
- Stitch markers
- Pins
- Scissors
- Black embroidery floss
Abbreviations
MR = magic ring
sc = single crochet
inc = 2 sc in next stitch
dec = invisible single-crochet decrease
sl st = slip stitch
ch = chain
BLO = back loop only
FLO = front loop only
hdc = half double crochet
dc = double crochet
Invisible decrease is worked through the front loops of the next 2 stitches so the closing rounds do not leave visible gaps.
Pattern — Step by Step
Continuous spiral unless noted.
Head (Make 1)
Yarn: cream
R1: 6 sc in MR (6)
R2: inc ×6 (12)
R3: (sc, inc) ×6 (18)
R4: (2 sc, inc) ×6 (24)
R5: (3 sc, inc) ×6 (30)
R6: (4 sc, inc) ×6 (36)
R7–R12: sc around (36)
R13: (4 sc, dec) ×6 (30)
R14: (3 sc, dec) ×6 (24)
Insert safety eyes between R8 and R9, about 12 stitches apart. Embroider the mouth between the eyes before the opening narrows.
R15: (2 sc, dec) ×6 (18)
R16: (sc, dec) ×6 (12)
Stuff firmly at the forehead and lightly at the neck edge.
R17: dec ×6 (6)
Fasten off. Leave 25 cm tail.
Body (Make 1)
Yarn: cream
R1: 6 sc in MR (6)
R2: inc ×6 (12)
R3: (sc, inc) ×6 (18)
R4: (2 sc, inc) ×6 (24)
R5: (3 sc, inc) ×6 (30)
R6: (4 sc, inc) ×6 (36)
R7: (5 sc, inc) ×6 (42)
R8–R12: sc around (42)
R13: (5 sc, dec) ×6 (36)
R14: (4 sc, dec) ×6 (30)
R15: (3 sc, dec) ×6 (24)
Stuff the body into a low oval, not a ball.
R16: (2 sc, dec) ×6 (18)
R17: (sc, dec) ×6 (12)
R18: dec ×6 (6)
Fasten off. Leave 20 cm tail.
Sundae Shell Dome (Make 1)
Yarn: cream
R1: 6 sc in MR (6)
R2: inc ×6 (12)
R3: (sc, inc) ×6 (18)
R4: (2 sc, inc) ×6 (24)
R5: (3 sc, inc) ×6 (30)
R6: (4 sc, inc) ×6 (36)
R7: (5 sc, inc) ×6 (42)
R8–R11: sc around (42)
R12: (5 sc, dec) ×6 (36)
Do not close. Add a thin layer of stuffing only under the top center.
Fasten off. Leave 50 cm tail for sewing to the body.
Waffle Cup Rim
Yarn: tan
Join tan yarn to the front edge of the shell dome.
R1: sc around the 36-stitch shell edge (36)
R2: BLO sc around (36)
R3: (sc, hdc, dc, hdc, sc, sl st) ×6 (36)
Surface stitch six vertical waffle ribs from R1 to R3, spacing each rib 6 stitches apart. Add diagonal ribs between them if the yarn is smooth enough to show texture.
Fasten off. Leave 30 cm tail.
Red Syrup Cap
Yarn: red
R1: 6 sc in MR (6)
R2: inc ×6 (12)
R3: (sc, inc) ×6 (18)
R4: (2 sc, inc) ×6 (24)
R5: (3 sc, inc) ×6 (30)
R6: (4 sc, inc) ×6 (36)
R7: sc around (36)
Fasten off. Leave 40 cm tail.
Syrup Drips
Yarn: red
Make one long front drip.
Row 1: attach yarn to cap edge, sc 5, ch 1, turn (5)
Row 2: dec, sc, dec, ch 1, turn (3)
Row 3: sc 3, ch 1, turn (3)
Row 4: dec, sc, ch 1, turn (2)
Row 5: dec (1)
Fasten off. Leave 15 cm tail.
Make three shorter side drips.
Row 1: attach yarn to cap edge, sc 4, ch 1, turn (4)
Row 2: dec ×2, ch 1, turn (2)
Row 3: dec (1)
Fasten off. Leave 15 cm tail on each drip.
Whipped Cream Puffs (Make 7)
Yarn: white
R1: 6 sc in MR (6)
R2: inc ×6 (12)
R3: (sc, inc) ×6 (18)
R4: sc around (18)
R5: (sc, dec) ×6 (12)
Stuff each puff lightly. Overstuffing makes the ring look like beads instead of whipped cream.
R6: dec ×6 (6)
Fasten off. Leave 20 cm tail on each puff.
Cherry (Make 1)
Yarn: red
R1: 6 sc in MR (6)
R2: inc ×6 (12)
R3: (sc, inc) ×6 (18)
R4: (2 sc, inc) ×6 (24)
R5: (3 sc, inc) ×6 (30)
R6–R7: sc around (30)
R8: (3 sc, dec) ×6 (24)
R9: (2 sc, dec) ×6 (18)
R10: (sc, dec) ×6 (12)
Stuff firmly so the cherry does not collapse under the stem.
R11: dec ×6 (6)
Fasten off. Leave 20 cm tail.
Cherry Stem
Yarn: brown
Ch 12.
Row 1: sl st in second ch from hook and each ch across (11)
Curve the stem before sewing. A single pass of brown yarn through the chain core helps it hold shape.
Fasten off. Leave 15 cm tail.
Front Legs (Make 2)
Yarn: cream
R1: 6 sc in MR (6)
R2: inc ×6 (12)
R3: (sc, inc) ×6 (18)
R4–R6: sc around (18)
R7: (sc, dec) ×6 (12)
Stuff the paw end only. Flatten the open edge before sewing.
Fasten off. Leave 25 cm tail.
Back Legs (Make 2)
Yarn: cream
R1: 6 sc in MR (6)
R2: inc ×6 (12)
R3: (sc, inc) ×6 (18)
R4–R5: sc around (18)
R6: (sc, dec) ×6 (12)
Back legs should sit lower than the front legs so the turtle rests level.
Fasten off. Leave 25 cm tail.
Tail (Make 1)
Yarn: cream
R1: 6 sc in MR (6)
R2: inc ×6 (12)
R3–R4: sc around (12)
R5: dec ×6 (6)
Use minimal stuffing. The tail should taper under the back of the shell.
Fasten off. Leave 18 cm tail.
Cheek Patches (Make 2)
Yarn: pink
R1: 6 sc in MR (6)
R2: inc ×6 (12)
Sl st to first stitch.
Fasten off. Leave 15 cm tail.
Sprinkles and Claws
Yarn: assorted scraps and brown
For each sprinkle, stitch one straight embroidery bar over 1–2 crochet stitches on the red syrup. Place 18–24 sprinkles across the cap and drips. For each foot, sew three brown vertical claw stitches, each about 6 mm long.
Fasten off each embroidery strand on the underside of the work.
Assembly
- Pin the head to the front of the body between R7 and R11, then sew through both layers twice around the neck opening.
- Center the sundae shell dome on top of the body, keeping the lower edge just behind the head seam.
- Sew the shell dome to the body with small stitches every 1–2 body stitches.
- Attach the waffle cup rim around the shell edge, then tack the scalloped points down where they flare.
- Sew the red syrup cap to the top of the cream shell, placing the long drip at the front center.
- Sew the whipped cream puffs into a ring around the top center, then stitch the cherry inside that ring.
- Attach the cherry stem to the cherry top and bend it slightly backward.
- Sew the front legs forward and low, then sew the back legs farther out to widen the stance.
- Attach the tail under the rear edge of the waffle band.
- Sew cheek patches beside the eyes, embroider the mouth, add sprinkles, and add three claws to each visible foot.
The completed turtle measures about 15 cm long when worked at the listed gauge and stuffing density.
7 Technical Tips
- A drifting stitch marker will twist the syrup drips off center. Move the marker every round and keep the long drip aligned with the center of the face.
- Loose stuffing in the body causes the waffle rim to sag. Pack the body to firm resistance, then add only a thin layer under the shell dome.
- Visible decrease gaps appear on the forehead when the hook is too large. Use the 3.75 mm hook with worsted yarn and pull each invisible decrease snug before the next stitch.
- Eye placement must be done before Head R15. Set the 12 mm eyes between R8 and R9 with 12 stitches between posts, then check the smile before locking washers.
- The waffle band fails when the scallops are too long. Keep each scallop to 6 stitches so the tan edge supports the dome instead of curling under it.
- Pinning prevents a tilted cherry. Pin all seven whipped cream puffs first, place the cherry in the center, then sew only after the ring forms a level circle.
- Tail weaving can leave bumps under the turtle. Run each yarn end through the body center, pull lightly, and trim only after the surface relaxes flat.
Conclusion
Check the turtle from the side before weaving the last ends. The head should sit lower than the cherry, the waffle band should cover the shell seam, and the red drip should land at the front center. Photograph it at eye level so the sundae reads first and the turtle shape reads second. Save the finished piece to Pinterest with a close-up of the whipped cream ring, then post the side view on Instagram with #CherrySundaeTurtle. For the next sample, test one change: make the syrup chocolate brown, strawberry pink, or caramel tan. Which topping should sit on this cherry sundae turtle amigurumi pattern next?









