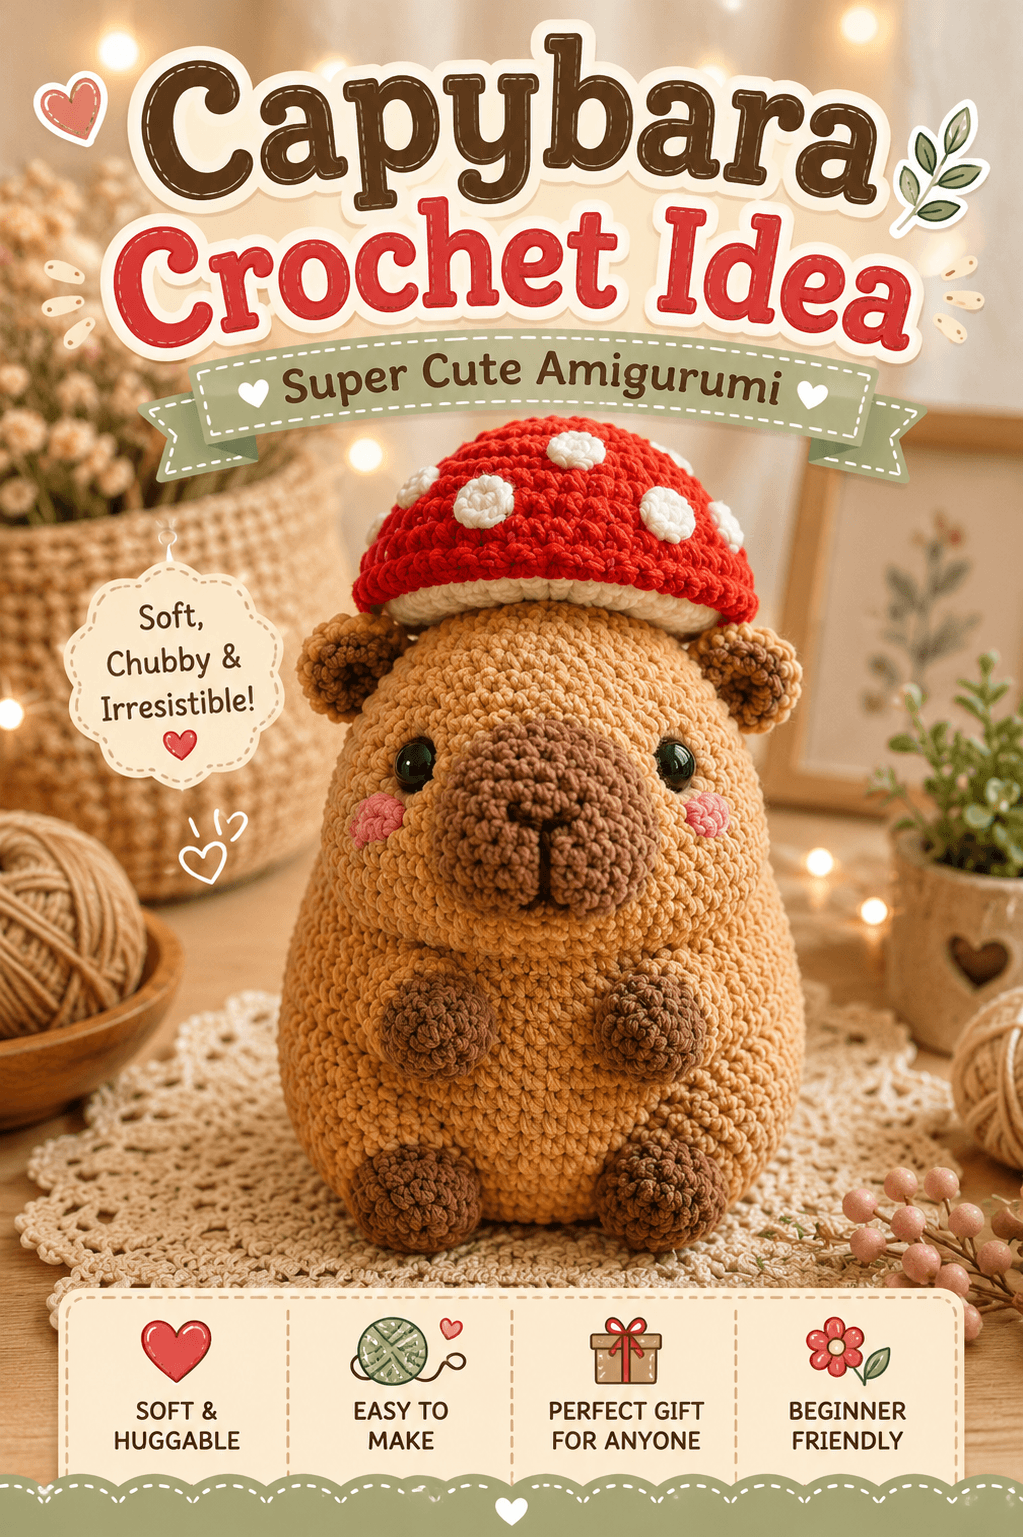
A capybara stops reading as a capybara when the snout is too small for the face. This capybara crochet pattern keeps the muzzle broad, the body barrel-shaped, and the mushroom cap shallow enough to sit like a hat rather than a helmet. It uses compact amigurumi shaping, a seated structure, and a separate toadstool topper for an intermediate project that works as decor, a gift, or market stock.
The Design: What Makes This Capybara Different
This version is built around the head-to-snout ratio first. Capybaras have blunt noses, small ears, and a body that reads more like a rounded barrel than a teddy-bear torso. Those proportions matter. Reduce the muzzle too far and the animal turns generic. The seated body is drafted wide at the base and narrower through the top so the plush can sit upright without a tail prop. That shape also leaves a clear landing area for the front paws, which are placed high enough to read as tucked rather than dangling.
The second structural choice is the mushroom hat. Current capybara pattern demand already includes themed hat and accessory versions, including mushroom-based options on Etsy, so the topper is not an isolated novelty. :contentReference[oaicite:18]{index=18} Here the hat stays shallow with a clear brim and spaced white spots. A common failure in a mushroom hat capybara crochet design is making the cap too deep. Then the ears disappear and the face loses its outline.
Project Info at a Glance
| Skill Level | Time | Finished Size | Hook | Best For |
|---|---|---|---|---|
| Intermediate | 5–7 hours | Approx. 12–15 cm | 2.5–4.0 mm, depending on yarn | Shelf decor, gift plush, market display |
Comparable capybara patterns currently range from about 10.5 cm to 12 cm in small builds, while plush versions scale larger depending on yarn weight and hook choice. :contentReference[oaicite:19]{index=19}
Materials and Tools
Yarn
- Main body tan — DK or light worsted cotton — about 45 g — Paintbox Cotton DK, Ricorumi DK, or similar
- Dark brown — DK cotton — about 15 g — snout, ears, paws, feet
- Red — DK cotton — about 20 g — mushroom cap
- Cream / white — DK cotton — about 10 g — mushroom underside and spots
- Pink — scrap amount — blush cheeks
- Black embroidery thread — scrap amount — nose and mouth line
Tools
- Hook 3.0 mm
- Safety eyes 8–10 mm
- Polyester stuffing
- Yarn needle
- Stitch markers
- Scissors
Current capybara references span both fine cotton and plush yarn builds. One small cotton Etsy capybara uses a 2.5 mm hook and 3 mm eyes, while newer free plush patterns scale up with bulkier yarn. This photographed medium capybara sits between those extremes, so a 3.0 mm hook with 8–10 mm eyes is a workable match. :contentReference[oaicite:20]{index=20}
Abbreviations
- MR = magic ring
- sc = single crochet
- inc = increase
- dec = decrease
- sl st = slip stitch
- ch = chain
- BLO = back loop only
- FO = fasten off
Use invisible decrease on all closing rounds. The face and mushroom edge stay cleaner when the decreases do not stack visible ridges.
Pattern — Step by Step
Continuous spiral unless noted. Counts follow standard amigurumi math. This capybara is a medium build, so the head plateaus at 36 stitches and the body at 42 stitches.
Head (Make 1)
Yarn: tan — Source: standard amigurumi math
R1: 6 sc in MR (6)
R2: inc x6 (12)
R3: (sc, inc) x6 (18)
R4: (2 sc, inc) x6 (24)
R5: (3 sc, inc) x6 (30)
R6: (4 sc, inc) x6 (36)
R7-R12: sc around (36)
R13: (4 sc, dec) x6 (30)
R14: (3 sc, dec) x6 (24)
R15: (2 sc, dec) x6 (18)
R16: (sc, dec) x6 (12)
Insert safety eyes between R9 and R10, about 9 stitches apart. Stuff firmly before the last shaping round closes the lower face.
FO. Leave 30 cm tail.
Body (Make 1)
Yarn: tan — Source: standard amigurumi math
R1: 6 sc in MR (6)
R2: inc x6 (12)
R3: (sc, inc) x6 (18)
R4: (2 sc, inc) x6 (24)
R5: (3 sc, inc) x6 (30)
R6: (4 sc, inc) x6 (36)
R7: (5 sc, inc) x6 (42)
R8-R14: sc around (42)
R15: (5 sc, dec) x6 (36)
R16-R17: sc around (36)
R18: (4 sc, dec) x6 (30)
R19: (3 sc, dec) x6 (24)
R20: (2 sc, dec) x6 (18)
Stuff the lower half firmly and the upper half moderately. The base should stay weighty so the plush sits upright.
FO. Leave 30 cm tail.
Snout (Make 1)
Yarn: dark brown — Source: standard amigurumi math
R1: 6 sc in MR (6)
R2: inc x6 (12)
R3: (sc, inc) x6 (18)
R4-R5: sc around (18)
R6: (sc, dec) x6 (12)
Stuff lightly. Embroider the vertical nose split and nostril line before sewing to the head.
FO. Leave 20 cm tail.
Ears (Make 2)
Yarn: dark brown — Source: standard amigurumi math
R1: 6 sc in MR (6)
R2: inc x6 (12)
R3-R4: sc around (12)
Flatten lightly. Do not overstuff.
FO. Leave 15 cm tail.
Front Paws (Make 2)
Yarn: dark brown — Source: standard amigurumi math
R1: 6 sc in MR (6)
R2: inc x6 (12)
R3-R4: sc around (12)
R5: (sc, dec) x4 (8)
Stuff only the front half of each paw.
FO. Leave 18 cm tail.
Back Feet (Make 2)
Yarn: dark brown — Source: standard amigurumi math
R1: 6 sc in MR (6)
R2: inc x6 (12)
R3-R5: sc around (12)
R6: dec x6 (6)
These act as seated feet, not standing legs.
FO. Leave 18 cm tail.
Cheek Patches (Make 2)
Yarn: pink — Source: photo proportions
R1: 6 sc in MR (6)
Flatten completely. Keep them small.
FO. Leave 10 cm tail.
Mushroom Cap Top (Make 1)
Yarn: red — Source: standard amigurumi math
R1: 6 sc in MR (6)
R2: inc x6 (12)
R3: (sc, inc) x6 (18)
R4: (2 sc, inc) x6 (24)
R5: (3 sc, inc) x6 (30)
R6: (4 sc, inc) x6 (36)
R7: (5 sc, inc) x6 (42)
R8-R11: sc around (42)
R12: BLO sc around (42)
R13: (5 sc, dec) x6 (36)
R14: sc around (36)
Stuff very lightly only in the crown if you want a domed hat. Keep the brim flexible.
FO. Leave 30 cm tail.
Mushroom Underside Brim (Make 1)
Yarn: cream — Source: standard flat-circle math
R1: 6 sc in MR (6)
R2: inc x6 (12)
R3: (sc, inc) x6 (18)
R4: (2 sc, inc) x6 (24)
R5: (3 sc, inc) x6 (30)
R6: (4 sc, inc) x6 (36)
Sew to the inside of the red hat at the BLO round to create a neat mushroom underside.
FO. Leave 25 cm tail.
Mushroom Spots (Make 6)
Yarn: cream — Source: photo proportions
Large spot x2:
R1: 6 sc in MR (6)
R2: inc x6 (12)
Medium spot x2:
R1: 6 sc in MR (6)
Small spot x2:
R1: 5 sc in MR (5)
Flatten all spots. Vary spacing so the hat does not look gridded.
FO. Leave short tails.
Assembly
- Sew the snout to the lower front of the head, centered and slightly broad rather than tall.
- Attach the cheek patches under the eye line, placed outward from the snout edges.
- Sew the ears to the top sides of the head, leaving enough space for the hat brim.
- Join the head to the body with the face angled very slightly forward.
- Sew the front paws high on the front body so they read as tucked against the chest.
- Attach the back feet low on the front underside, spaced evenly for seated balance.
- Sew the cream underside circle inside the mushroom cap.
- Attach the white spots across the red cap with irregular spacing.
- Set the mushroom cap onto the head and sew it down at the brim only, leaving the crown lightly domed.
- Reshape the body base by hand and add final hidden stuffing if the plush leans backward.
The finished piece should sit flat, with the mushroom brim visible above the ears and the snout projecting clearly in front of the face.
7 Technical Tips
- Mark the first stitch of every round. A missed increase on the 42-stitch hat round will skew the brim and make the cap sit off-center.
- Keep the snout wider than it is tall. A tall muzzle makes the capybara read more like a bear or hamster from the front.
- Stuff the lower body firmer than the upper body. This seated shape needs ballast at the base or the plush tips backward under the hat.
- Insert the eyes before sewing the snout in place. Once the muzzle is attached, checking equal eye spacing becomes harder on a compact face.
- Use invisible decrease on head rounds 13 to 16 and body rounds 15, 18, 19, and 20. Standard decreases leave visible ridges on smooth tan yarn.
- Pin the mushroom cap after the ears are sewn. If you attach the hat first, the ear placement often ends up too low and disappears under the brim.
- Weave each white-spot tail through at least three internal turns. Small appliqués loosen quickly when they sit on a curved hat surface.
Conclusion
This capybara crochet pattern works because the blunt snout, small ears, and heavy lower body stay in proportion under the mushroom topper. Build the face first, test the side profile next, and only then lock the hat placement. Share the finished plush on Pinterest and Instagram with one straight-on photo to show the snout width and one side view to show the hat brim. Hashtag: #MushroomCapybaraPlush. Did your mushroom cap sit level above both ears, or did you tilt it slightly forward like the sample?









