Introduction
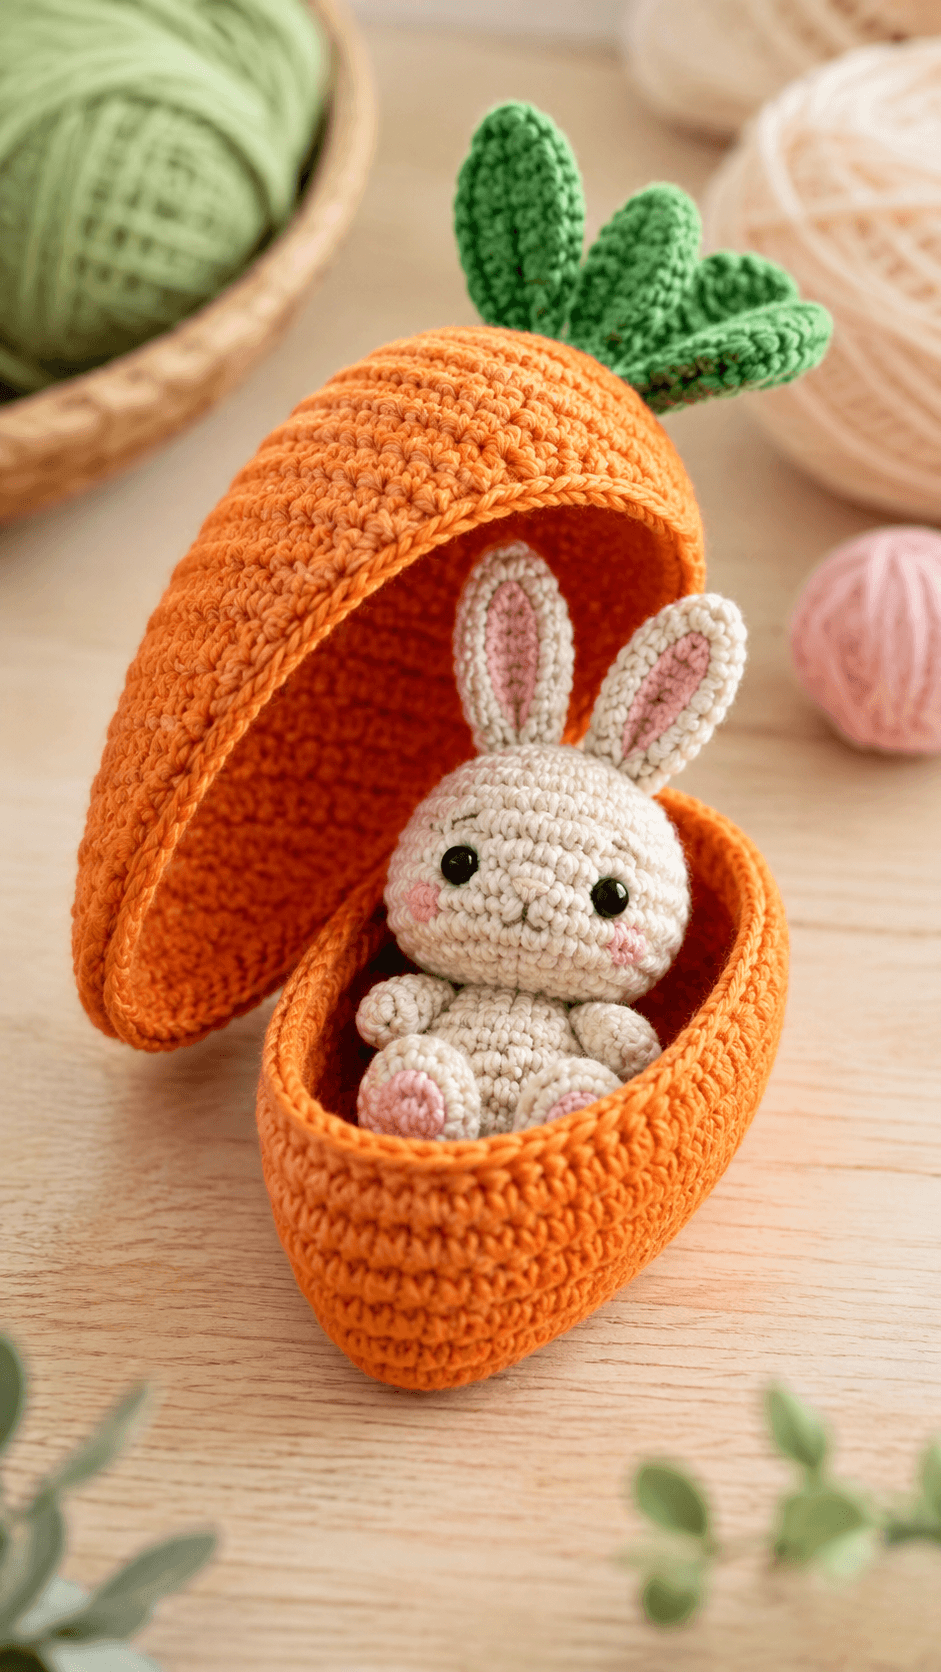
A rabbit’s ears must fit beneath a carrot lid without folding across its eyes. This bunny in carrot amigurumi pattern uses worsted cotton yarn, a 3.5 mm hook and 10 mm safety eyes to make a 12–13 cm bunny inside an approximately 23 cm carrot cradle. The advanced-intermediate project includes layered ears, paw pads, five leaves and a hinged shell. The container also provides structured Easter display storage.
The Design: What Makes Pip the Bunny Different
Pip is made separately from the carrot, allowing the rabbit to be removed without distorting the orange shell. His 36-stitch head is wider than the 30-stitch body, which creates enough room for the long ears, eyes and muzzle while preserving a compact seated pose. The carrot is divided lengthwise into a deep lower cradle and a rounded lid. Both sections are worked three-dimensionally rather than as flat appliqués, so their rims hold an oval opening after assembly. Five stuffed leaves counterbalance the lid and identify the wide end of the carrot. A frequent mistake in a crochet bunny in carrot project is positioning the hinge before testing the ears. The lid then closes against the ear tips instead of behind them. This carrot cradle crochet pattern attaches the hinge only after the bunny, lid and leaf crown have been pinned together.
Project Info at a Glance
| Skill Level | Time | Finished Size | Hook | Best For |
|---|---|---|---|---|
| Advanced intermediate | 11–15 hours | Approximately 23 cm overall | 3.5 mm | Easter displays and removable character sets |
The bunny measures approximately 12–13 cm while seated. The full measurement includes the carrot shell and upright leaves; individual gauge can change both dimensions.
Materials and Tools
Yarn
- Warm ivory — worsted/category 4 — approximately 35 g — Paintbox Yarns Cotton Aran, Scheepjes Catona held double or a similar cotton blend.
- Carrot orange — worsted/category 4 — approximately 90 g — select a firm, low-fuzz yarn for the lower cradle and lid.
- Leaf green — worsted/category 4 — approximately 25 g — required for the five stuffed leaves.
- Pale pink — DK or worsted yarn — approximately 6 g — required for inner ears, cheeks, nose and paw pads.
- Black embroidery thread — a small amount — required for the mouth.
- Orange sewing yarn — approximately 3 g — required for the hinge and reinforced rim seams.
Tools
- 3.5 mm crochet hook
- Two 10 mm safety eyes
- Polyester stuffing, approximately 55–70 g
- Blunt yarn needle
- Locking stitch markers
- Straight pins
- Scissors
- Optional plastic canvas, one oval approximately 8 × 12 cm, for a firmer cradle base
Plastic safety eyes can detach under force and are not suitable for children under three. Use firmly embroidered eyes when the finished rabbit will be handled by a young child.
Abbreviations
- MR — magic ring
- sc — single crochet
- inc — two single crochet in one stitch
- dec — single crochet two stitches together
- sl st — slip stitch
- ch — chain
- hdc — half double crochet
- dc — double crochet
- BLO — back loop only
- FLO — front loop only
For an invisible decrease, insert the hook beneath the front loops of the next two stitches and complete one single crochet through both loops.
Pattern — Step by Step
Work stuffed components in continuous spirals unless a section states otherwise. Mark the first stitch of each round and recount after every increase or decrease round.
Bunny Head
Yarn: warm ivory — original shaping based on standard six-stitch amigurumi expansion.
R1: 6 sc in MR (6)
R2: inc ×6 (12)
R3: (sc, inc) ×6 (18)
R4: (2 sc, inc) ×6 (24)
R5: (3 sc, inc) ×6 (30)
R6: (4 sc, inc) ×6 (36)
R7–R11: sc around (36)
R12: (4 sc, dec) ×6 (30)
R13: sc around (30)
R14: (3 sc, dec) ×6 (24)
Insert the 10 mm eyes between R9 and R10, leaving six visible stitches between their inner edges. Attach both washers before decreasing further.
R15: (2 sc, dec) ×6 (18)
R16: (sc, dec) ×6 (12)
R17: dec ×6 (6)
R18: dec ×3 (3)
Stuff the forehead firmly and keep the lower face slightly softer for muzzle shaping.
Fasten off. Leave a 25 cm tail and close the opening.
Bunny Body
Yarn: warm ivory — small 30-stitch plateau.
R1: 6 sc in MR (6)
R2: inc ×6 (12)
R3: (sc, inc) ×6 (18)
R4: (2 sc, inc) ×6 (24)
R5: (3 sc, inc) ×6 (30)
R6–R10: sc around (30)
R11: (3 sc, dec) ×6 (24)
R12–R13: sc around (24)
R14: (2 sc, dec) ×6 (18)
R15: (sc, dec) ×6 (12)
R16: dec ×6 (6)
R17: dec ×3 (3)
Pack the lower body firmly enough to retain a seated oval. Keep the shoulder area moderately filled.
Fasten off. Leave a 25 cm tail for attaching the head.
Outer Ears (Make 2)
Yarn: warm ivory — worked flat in turning rows.
Row 1: ch 12, sc in second ch from hook and across (11)
Row 2: ch 1, turn, sc across (11)
Row 3: ch 1, turn, inc, 9 sc, inc (13)
Row 4–R7: ch 1, turn, sc across (13)
Row 8: ch 1, turn, dec, 9 sc, dec (11)
Row 9: ch 1, turn, dec, 7 sc, dec (9)
Row 10: ch 1, turn, dec, 5 sc, dec (7)
Row 11: ch 1, turn, dec, 3 sc, dec (5)
Row 12: ch 1, turn, dec, sc, dec (3)
Row 13: ch 1, turn, dec, sc (2)
Fasten off. Leave a 25 cm sewing tail.
Inner Ears (Make 2)
Yarn: pale pink — worked flat.
Row 1: ch 9, sc in second ch from hook and across (8)
Row 2–R5: ch 1, turn, sc across (8)
Row 6: ch 1, turn, dec, 4 sc, dec (6)
Row 7: ch 1, turn, dec, 2 sc, dec (4)
Row 8: ch 1, turn, dec ×2 (2)
Row 9: ch 1, turn, dec (1)
Fasten off. Leave a 15 cm tail. Sew each pink panel to an ivory ear, leaving an even cream border around the sides and tip.
Ear Edging
Yarn: warm ivory.
Join yarn at the lower corner of one layered ear. Work sc through both layers up the first side, place 3 sc in the tip, then sc down the second side. Leave the flat lower edge unworked.
Fasten off. Leave a 20 cm tail and repeat for the second ear.
Bunny Arms (Make 2)
Yarn: warm ivory.
R1: 6 sc in MR (6)
R2: inc ×6 (12)
R3–R4: sc around (12)
R5: (sc, dec) ×4 (8)
R6–R8: sc around (8)
R9: dec ×4 (4)
Stuff the paw section lightly. Leave the upper half flat so each arm rests against the body.
Fasten off. Leave a 20 cm sewing tail.
Back Legs and Feet (Make 2)
Yarn: warm ivory — compact seated feet.
R1: 6 sc in MR (6)
R2: inc ×6 (12)
R3: (sc, inc) ×6 (18)
R4: BLO sc around (18)
R5–R6: sc around (18)
R7: (sc, dec) ×6 (12)
R8–R9: sc around (12)
R10: dec ×6 (6)
Fill the toe area firmly and the ankle lightly. Flatten the upper opening before attachment.
Fasten off. Leave a 25 cm tail.
Paw Pads (Make 2)
Yarn: pale pink — flat circles.
R1: 6 sc in MR (6)
R2: inc ×6 (12)
Join with a sl st. Fasten off and leave a 15 cm sewing tail. Keep both circles flat.
Muzzle
Yarn: warm ivory — shallow oval.
R1: ch 5; starting in second ch, 3 sc, 3 sc in final ch, 2 sc along the opposite side, inc (10)
R2: inc, 2 sc, inc ×3, 2 sc, inc ×2 (16)
R3: sc around (16)
Place a thin layer of stuffing beneath the center during attachment.
Fasten off. Leave a 20 cm tail.
Cheek Patches (Make 2)
Yarn: pale pink — small flat circles.
R1: 6 sc in MR (6)
Join with a sl st. Fasten off and leave a 12 cm tail.
Bunny Tail
Yarn: warm ivory.
R1: 6 sc in MR (6)
R2: inc ×6 (12)
R3: (sc, inc) ×6 (18)
R4: sc around (18)
R5: (sc, dec) ×6 (12)
R6: dec ×6 (6)
Stuff firmly to create a round pom-pom shape.
Fasten off. Leave a 20 cm tail.
Lower Carrot Cradle
Yarn: carrot orange — work from the narrow tip toward the open rim.
R1: 6 sc in MR (6)
R2: sc around (6)
R3: inc ×6 (12)
R4: sc around (12)
R5: (sc, inc) ×6 (18)
R6: sc around (18)
R7: (2 sc, inc) ×6 (24)
R8: sc around (24)
R9: (3 sc, inc) ×6 (30)
R10: sc around (30)
R11: (4 sc, inc) ×6 (36)
R12: sc around (36)
R13: (5 sc, inc) ×6 (42)
R14: sc around (42)
R15: (6 sc, inc) ×6 (48)
R16–R20: sc around (48)
Do not stuff the cradle. Press the narrow end forward to form the carrot point and shape the 48-stitch opening into an oval approximately 11 × 8 cm.
Join with a sl st. Fasten off and weave in the tail.
Lower Cradle Rim
Yarn: carrot orange — joined round.
R1: Join at the rear center, ch 1 and sc around (48)
R2: BLO sc around; join (48)
R3: sc around; join (48)
Insert an optional trimmed plastic-canvas oval beneath the bunny’s seating area before the rim is reinforced. Cover every cut canvas edge with yarn or fabric tape.
Fasten off. Leave a 30 cm tail for reinforcing the back rim.
Carrot Lid
Yarn: carrot orange — work from the crown toward the open edge.
R1: 6 sc in MR (6)
R2: inc ×6 (12)
R3: (sc, inc) ×6 (18)
R4: (2 sc, inc) ×6 (24)
R5: (3 sc, inc) ×6 (30)
R6: (4 sc, inc) ×6 (36)
R7: (5 sc, inc) ×6 (42)
R8: (6 sc, inc) ×6 (48)
R9: (7 sc, inc) ×6 (54)
R10–R15: sc around (54)
R16: (7 sc, dec) ×6 (48)
Leave the lid hollow. Shape it into a broad dome with an oval opening matching the lower cradle rim.
Join with a sl st. Fasten off and weave in the tail.
Lid Rim
Yarn: carrot orange.
R1: Join at the rear center and sc around (48)
R2: BLO sc around (48)
R3: sc around (48)
Join with a sl st. Fasten off and leave a 40 cm tail for forming the hinge.
Carrot Leaves (Make 5)
Yarn: leaf green — make two long, two medium and one short leaf.
R1: 6 sc in MR (6)
R2: inc ×6 (12)
R3–R5: sc around (12)
R6: (4 sc, dec) ×2 (10)
R7–R9: sc around (10)
R10: (3 sc, dec) ×2 (8)
R11–R12: sc around (8)
For medium leaves, stop after R10. For the short leaf, stop after R8. Stuff each piece lightly and flatten its opening.
Fasten off. Leave a 25 cm tail on every leaf.
Carrot Hinge
Yarn: orange sewing yarn or the lid’s remaining tail.
Align twelve stitches at the rear center of the lid with twelve stitches on the lower cradle. Whipstitch the two rims together through their inner loops. Return across the same twelve stitches in the opposite direction to form a reinforced flexible hinge.
Do not weave in the hinge tail until the lid has been tested with the bunny inside.
Assembly
- Sew the bunny head to the body with the eye line centered above the front of the torso. Pass around the neck seam twice.
- Attach the muzzle below the eyes, add its final stuffing and embroider a small pink nose with two black mouth lines.
- Sew one cheek patch beside each lower edge of the muzzle. Keep both patches on the same head round.
- Fold the lower 1 cm of each layered ear inward and sew the ears across the crown, leaving approximately four stitches between their inner edges.
- Attach the back legs to the lower front of the body and sew one pink paw pad to each foot.
- Sew the arms to the upper body with both paws angled inward, then attach the stuffed tail to the lower back.
- Arrange the five green leaves over the crown of the carrot lid. Sew through each flattened base twice and cluster the long leaves toward the rear.
- Place the bunny inside the lower cradle and support its back against the wide end. Add two removable yarn ties beneath the arms when a fixed position is required.
- Align the lid behind the bunny’s ears and sew the twelve-stitch hinge. Open and close the lid several times before knotting the hinge tail.
- Reinforce the lower rear rim with the remaining orange tail and reshape the carrot point, lid dome and leaf crown by hand.
The completed carrot should remain open at the chosen angle without pressing its lid against either bunny ear.
7 Technical Tips
- Round-marker drift: Losing the first stitch can rotate the bunny’s eye placement by three or more stitches. Count every 36-stitch head round before continuing.
- Uneven head stuffing: A fiber gap wider than 2 cm can create a hollow area beside an eye washer. Add small pieces around both posts before filling the center.
- Visible decrease bars: Standard decreases form horizontal ridges across the lower face. Work all head and body decreases through the front loops only.
- Late eye installation: After R14, the opening falls to 24 stitches and washer access becomes restricted. Fit both eyes immediately after completing R14.
- Ear collapse: Stuffing the ears makes them too thick for the carrot lid. Keep both ears flat and reinforce only their outer edges.
- Misaligned rims: A difference greater than two stitches between the lid and cradle hinge makes the shell twist. Mark the rear-center stitch and count six stitches in each direction before sewing.
- Weak hinge tails: One seam pass can loosen after repeated opening. Sew across all twelve hinge stitches twice and bury the tail through at least 4 cm of the lid fabric.
Conclusion
Test the carrot from the front, side and rear before trimming the hinge and leaf tails. The bunny’s ears should remain inside the lid perimeter, both feet must stay visible above the lower rim, and the carrot point should rest flat without rolling. Record the completed rim circumference, hinge width and ear height before repeating the project because cotton yarn varies in thickness. The next step is to photograph the bunny in carrot amigurumi pattern with the lid fully open and half closed. Save the project to Pinterest and share the finished cradle on Instagram with #PipCarrotCradle. Did twelve hinge stitches give your lid enough clearance behind both ears?









