Introduction
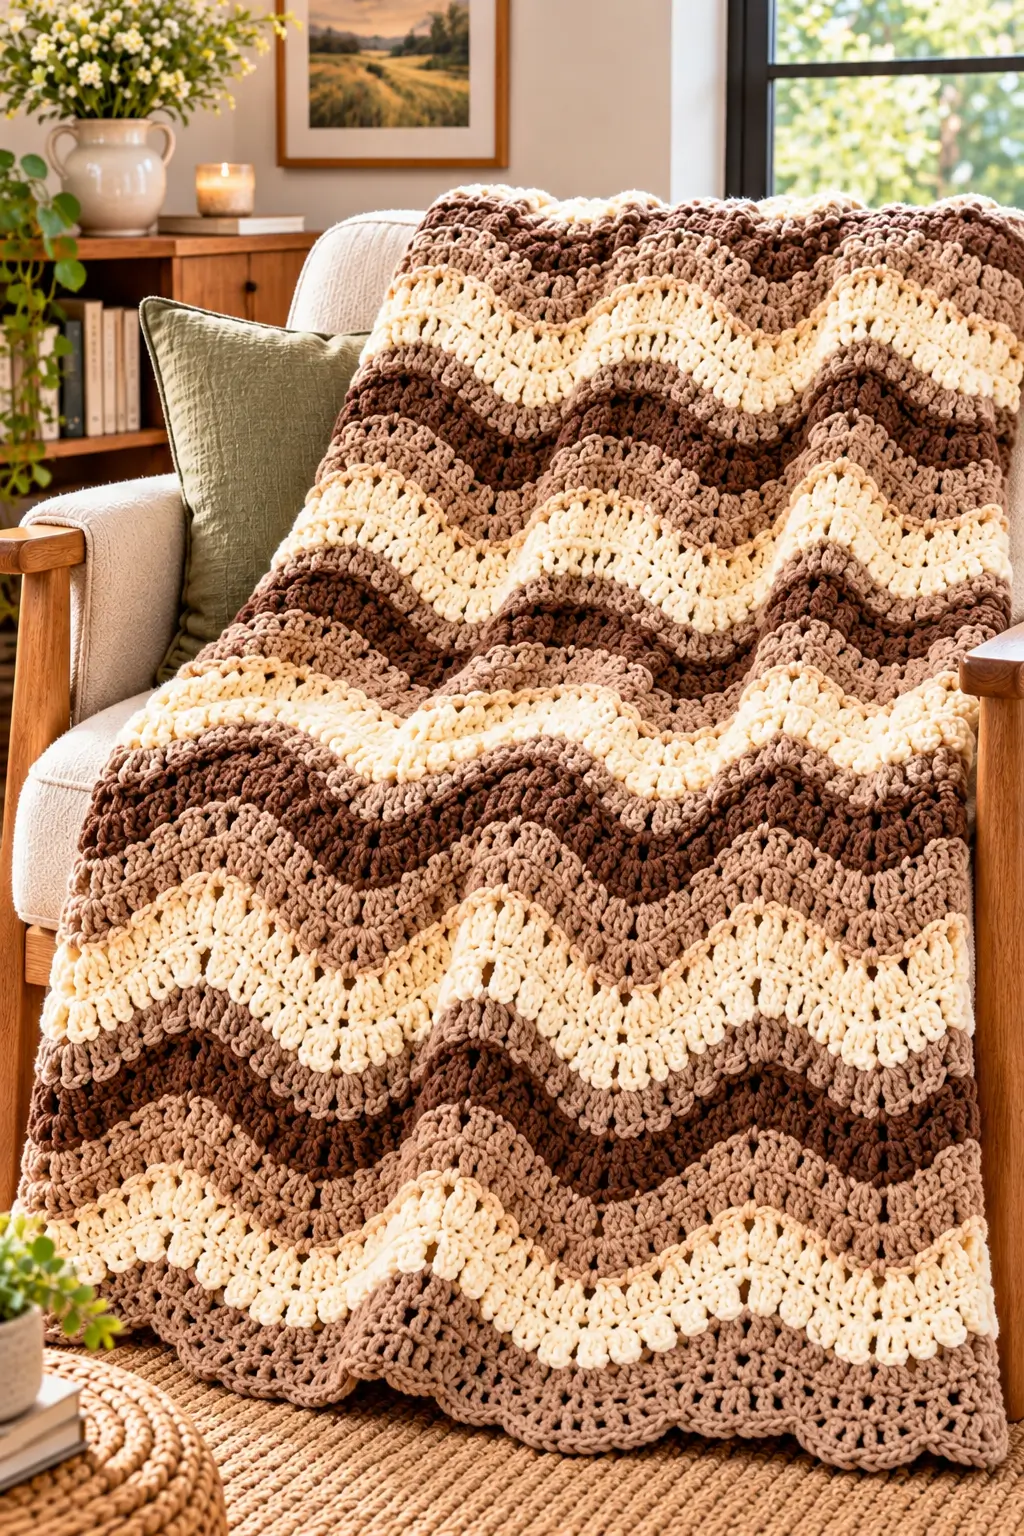
Three coffee-brown shades cradle each ivory crest across the throw draped over the wooden-arm chair. This chunky ripple crochet blanket uses bulky acrylic yarn, an 8 mm hook, and a 14-stitch chevron repeat to make a sofa throw with a target size of roughly 120 × 155 cm. The instructions suit a confident beginner familiar with double crochet increases and decreases. A fixed four-color sequence makes an incorrect valley easier to detect before the next stripe begins.
The Design: What Makes This Coffee-Toned Ripple Different
The photographed throw has a repeated wave silhouette, not the flat horizontal bands of a basic striped afghan. First, paired double-crochet decreases draw each valley inward, while paired increases widen the crest. That shaping produces the rising and falling stripe edges visible across the chair seat. Second, three brown values separate the ivory bands. Taupe softens the transition between dark espresso and cream; cocoa stops adjacent light sections from merging when the blanket folds. Third, three-row sections make every stripe readable without a constant supply of loose ends. The closest reconstruction is a bulky yarn chevron blanket with a flexible, unframed top and bottom. A common error in a brown and cream crochet throw is increasing at the peaks but missing one decrease at a valley. Edges widen by one stitch per mistake.
Project Info at a Glance
| Skill Level | Time | Finished Size | Hook | Best For |
|---|---|---|---|---|
| Confident beginner | Not independently timed | 120 × 155 cm target, not photo-measured | 8 mm, within Brava Bulky’s published range | Sofa throw, chair drape, adult lap blanket |
The 120 × 155 cm benchmark is the published size of Melu Crochet’s Chunky Chevron design, not a verified result of these instructions. Measure your swatch before deciding on the final width and row count. Hobbii size reference.
Materials and Tools
Yarn
Use a category #5 bulky, plied acrylic with a consistent meterage across the four colors. Knit Picks Brava Bulky is a reference option: 100 g = 124 m, with a published crochet-hook range of 6.5–9 mm. The weights below are a shopping allowance, not a measured bill of materials for the pictured piece. Yarn specification.
- Taupe (A) — bulky #5 — 300 g, approximately 372 m — Brava Bulky or equivalent.
- Espresso (B) — bulky #5 — 300 g, approximately 372 m — Brava Bulky or equivalent.
- Ivory (C) — bulky #5 — 300 g, approximately 372 m — Brava Bulky or equivalent.
- Cocoa (D) — bulky #5 — 300 g, approximately 372 m — Brava Bulky or equivalent.
Total allowance: 1,200 g / approximately 1,488 m, or 12 × 100 g balls with the cited meterage. A published bulky chevron throw of 135 × 152 cm specifies about 1,400 m; use that as a comparison, not proof of this sample’s consumption. Keep a spare ball in the color you will use on the edges if your swatch is larger. Comparable yardage.
Tools
- 8 mm crochet hook, plus a 9 mm hook if the foundation chain pulls tight.
- Locking stitch markers, at least 12, for counting each wave and both edges.
- Blunt tapestry needle with an eye large enough for bulky yarn.
- Scissors, flexible measuring tape, and digital kitchen scale for tracking remaining yarn.
- Blocking mats or a clean flat surface for checking the final chevron alignment.
No safety eyes, stuffing, seams between motifs, or amigurumi components are needed. This blanket is crocheted as one continuous piece, back and forth in rows.
Abbreviations
| Term | Meaning |
|---|---|
| ch | Chain |
| dc | Double crochet, US terminology |
| sc | Single crochet |
| inc | Work 2 dc into the same stitch |
| dc2tog | Double crochet two together over the next 2 stitches |
| sl st | Slip stitch |
| st / sts | Stitch / stitches |
| RS / WS | Right side / wrong side |
| rep | Repeat |
| BLO | Back loop only; used for an optional raised-ridge variation |
Double crochet decrease: Yarn over, draw up a loop in the first stitch, yarn over and pull through two loops; repeat the partial double crochet in the next stitch, then yarn over and pull through all three remaining loops.
The invisible decrease used in tightly stuffed amigurumi is not substituted here: this open fabric needs a standard dc2tog.
Gauge, Sizing, and Construction Notes
Work a 31-chain trial strip before buying more yarn: that is two 14-stitch waves plus three turning chains. Follow Row 1 with the same shaping logic described below, reducing the number of complete interior repeats to one and keeping the edge sections. Continue for at least six rows, then measure from peak to peak and across the relaxed fabric. This small sample is a construction test, not a reliable blanket-width gauge; for precise sizing, make a wider sample with at least four waves.
The chain formula is 14n + 3, where n is the number of complete wave units. This edition uses n = 10, so the foundation is 143 chains. The first three chains provide the edge height and count as one double crochet in the first row. All later turning chains count as the first double crochet as well.
Important count rule: Every completed row has 140 stitches, including the turning chain counted as one stitch. Do not work an additional stitch into a turning chain unless the row explicitly directs it. An increase creates one extra stitch; a dc2tog removes one stitch. Across a complete interior wave, two increases and two decreases cancel.
The photo’s exact hook, fiber, original stitch, and measurements cannot be determined visually. This is a technically counted photo-inspired adaptation, not a claim to reproduce the photographed designer’s original instructions.
Pattern — Step by Step
Work flat in turned rows. Color changes happen at the end of each third row, not in the middle of a wave.
Foundation Chain
Color A: Taupe. Ch 143 loosely. Place a marker after each group of 14 chains counted from the working portion, leaving the three turning chains at one end. Check the total twice; a missing foundation chain cannot be corrected by stretching the first row.
Row 1 — Establish the Chevron Valleys and Peaks
Dc in the 4th ch from hook, then dc in each of the next 4 ch. The unworked three-chain segment at the starting edge counts as the first dc. (6 sts at this point, including the chain.)
Repeat the following complete wave 9 times:
- Dc2tog across the next 2 chains twice.
- Dc in each of the next 4 chains.
- Work 2 dc into each of the next 2 chains.
- Dc in each of the next 4 chains.
Final edge: Dc2tog twice over the next 4 chains, dc into the next 4 chains, then work 2 dc into the last chain. (140 sts.)
Count check: opening edge 6 + nine interior waves × 14 + closing edge 8 = 140 stitches. Turn.
Row 2 — Repeating Ripple Row
Ch 3; this counts as the first dc. Work 1 dc into the same first stitch, dc into each of the next 4 stitches, then dc2tog twice across the next 4 stitches.
Repeat the following wave 9 times:
- Dc in each of the next 4 stitches.
- Work 2 dc in each of the next 2 stitches.
- Dc in each of the next 4 stitches.
- Dc2tog across the next 2 stitches twice.
Final edge: Dc into the next 4 stitches, then work 2 dc into the top of the previous row’s turning ch-3. (140 sts.)
Count check: first segment 8 + nine interior waves × 14 + final segment 6 = 140 stitches. Turn. The first dc in the base of the turning chain is required; omitting it distorts the half-peak.
Rows 3–72 — Continue the Pattern
Rows 3–72: Repeat Row 2, maintaining 140 stitches in every row. The turning chain counts as a stitch each time. At the end of a three-row stripe, finish the last double crochet with the next color on the final yarn-over. Leave a 15 cm tail of both colors for weaving.
Every third row, lay the work down without stretching it. Confirm that the new valley sits above the earlier valleys and the two long sides are not spreading apart. If the count rises to 141, the usual cause is a double crochet accidentally added into the base of a turning chain.
Four-Color Stripe Schedule
| Cycle | Taupe A | Espresso B | Ivory C | Cocoa D |
|---|---|---|---|---|
| 1 | Rows 1–3 | 4–6 | 7–9 | 10–12 |
| 2 | Rows 13–15 | 16–18 | 19–21 | 22–24 |
| 3 | Rows 25–27 | 28–30 | 31–33 | 34–36 |
| 4 | Rows 37–39 | 40–42 | 43–45 | 46–48 |
| 5 | Rows 49–51 | 52–54 | 55–57 | 58–60 |
| 6 | Rows 61–63 | 64–66 | 67–69 | 70–72 |
This chart specifies 24 stripes of 3 rows each. If your measured length reaches 155 cm earlier than Row 72, finish at the end of a complete color stripe and record the actual number of rows. For a shorter blanket, add another complete twelve-row color cycle, subject to available yarn.
Optional Textured Ridge and Side Edge
The photographed blanket appears strongly textured, but the exact stitch cannot be confirmed from the image. For a slightly raised ridge on an experimental swatch, work BLO on the first row of each new color, using both loops for all other rows. Confirm that the wave shape is unchanged before applying this to the full piece.
The top and bottom should retain their wave profiles. For a tidier long side, join taupe at one corner and work approximately 2 sc into the side of each dc row, adjusting to avoid a ruffle; fasten off at the opposite corner. Repeat on the second side. Do not force a tight single-crochet border over the peaks and valleys, because it may pull the blanket out of shape.
Assembly and Finishing
- Place the blanket flat with the intended front facing upward; identify the original foundation edge.
- Check 140 stitches across the final row before fastening off, counting the turning chain as one.
- Compare the first and last wave profiles; both should repeat the same peak-and-valley sequence.
- Measure the width at three places, between equivalent points, without stretching the fabric.
- Measure the length from the highest top peak to the corresponding bottom peak; record the result.
- Use a tapestry needle to weave each 15 cm color-change tail through matching-color stitches.
- Reverse direction for at least 5 cm on each woven tail to reduce the chance of ends slipping.
- Add the optional single-crochet side treatment only if the long edges show gaps or irregular loops.
- Lay the fabric flat and lightly shape each peak and valley by hand; follow the yarn label before wet blocking.
- Inspect all 24 stripe sections, trim yarn ends only after testing that the woven sections hold, and fold the throw.
The completed piece is a single-panel, four-color ripple throw with no joined motifs.
Seven Technical Tips
- Marker drift: A misplaced marker can conceal a missing group of 14 foundation chains. Count from the same edge after every third row and reposition markers only after the full row reaches 140 stitches.
- Overtight foundation: A chain made with the 8 mm hook may draw the first edge inward by several centimeters. Make the foundation with 9 mm if the chain is shorter than the trial-strip edge.
- Incomplete decrease: Working only one dc2tog at a valley adds a stitch to the finished row. There must be two consecutive dc2tog stitches at each interior valley.
- Extra edge stitch: Treating the turning ch-3 as both a stitch and a separate space can increase the width. Mark the top of that chain and follow the specified 140-stitch count.
- Velvet substitution: Chenille or velvet yarn can hide the top loops and cause an accidental insertion below the stitch. Test at least six rows with the replacement before switching the whole project to plush yarn.
- Skewed color changes: Joining the next color in the middle of a row leaves a visible jog. Change only at a row end and leave a tail of at least 15 cm.
- Loose ends: Weaving a tail in only one direction can let slippery bulky yarn work free during washing. Reverse direction and travel back through the matching-color fabric for 5 cm before trimming.
Troubleshooting and Adjustments
Why is the throw widening? Count the whole row, then inspect each valley. The two increases at a peak must be offset by the two dc2tog decreases in the same repeat; adding an increase without its decrease changes the edge. If the final count is already wrong, rip back to the last correct row rather than hiding the extra stitch in a later stripe.
Why do my cream arches look flatter than the photograph? The photo appears to use pronounced, possibly clustered or plush stitches. A basic double-crochet chevron describes the geometry but cannot establish the original texture. Try a BLO sample, or use a separately published cluster-chevron technique if the raised-shell effect matters more than this article’s exact stitch count.
How do I change the width? Add or remove 14 foundation chains per wave. The sample uses ten wave units; nine units require 129 chains, while eleven require 157 chains. Adjust color quantities after measuring a larger swatch, because zigzag take-up varies with tension.
Why is the top edge wavy? A ripple should have a wavy top and bottom. The changes of height are produced by the same increases and decreases that shape the colored stripes, so an undulating edge is intentional rather than a finishing defect.
How should the blanket be washed? Refer to the selected yarn’s care label instead of assuming every bulky acrylic behaves identically. For Brava Bulky, the Ravelry yarn entry lists machine wash and machine dry care, but a completed blanket should still be handled according to the specific ball band and any added trim.
Related Patterns
- Mocha Ripple Throw — An earth-tone half-double-crochet chevron design with a different stitch structure. Compare the mocha palette. [INTERNAL LINK NEEDED: mocha ripple throw]
- Chunky Chevron Blanket — A three-color super-bulky cluster design by Nicky Jones. See a cluster-stitch alternative. [INTERNAL LINK NEEDED: chunky chevron blanket]
- Clara Crochet Ripple Blanket — A multicolor ripple with bobble-stitch options and multiple sizes. Explore decorative ripple rows. [INTERNAL LINK NEEDED: ripple blanket with bobbles]
- Ripple Stitch Blanket — A different 14-plus-3 technique with optional straightening rows. Read the edge-treatment guide. [INTERNAL LINK NEEDED: ripple blanket edging]
Conclusion
A finished brown-and-cream throw depends on consistent valley decreases, correctly placed edge increases, and an intentional stripe plan. Record the actual dimensions, finished weight, and number of rows after completing the last cocoa stripe; those details will make a second version reproducible. Compare the photographed curved bands with your sample before committing to all 72 rows, particularly if your yarn has a plush surface. This chunky ripple crochet blanket is designed as a measured adaptation rather than a claim of exact reconstruction. Save a photograph and a close-up of one ivory crest to Pinterest, then share the stripe sequence on Instagram with #CoffeeRippleBlanket. Which of the three brown shades gives the ivory wave the strongest definition in your finished fabric?









