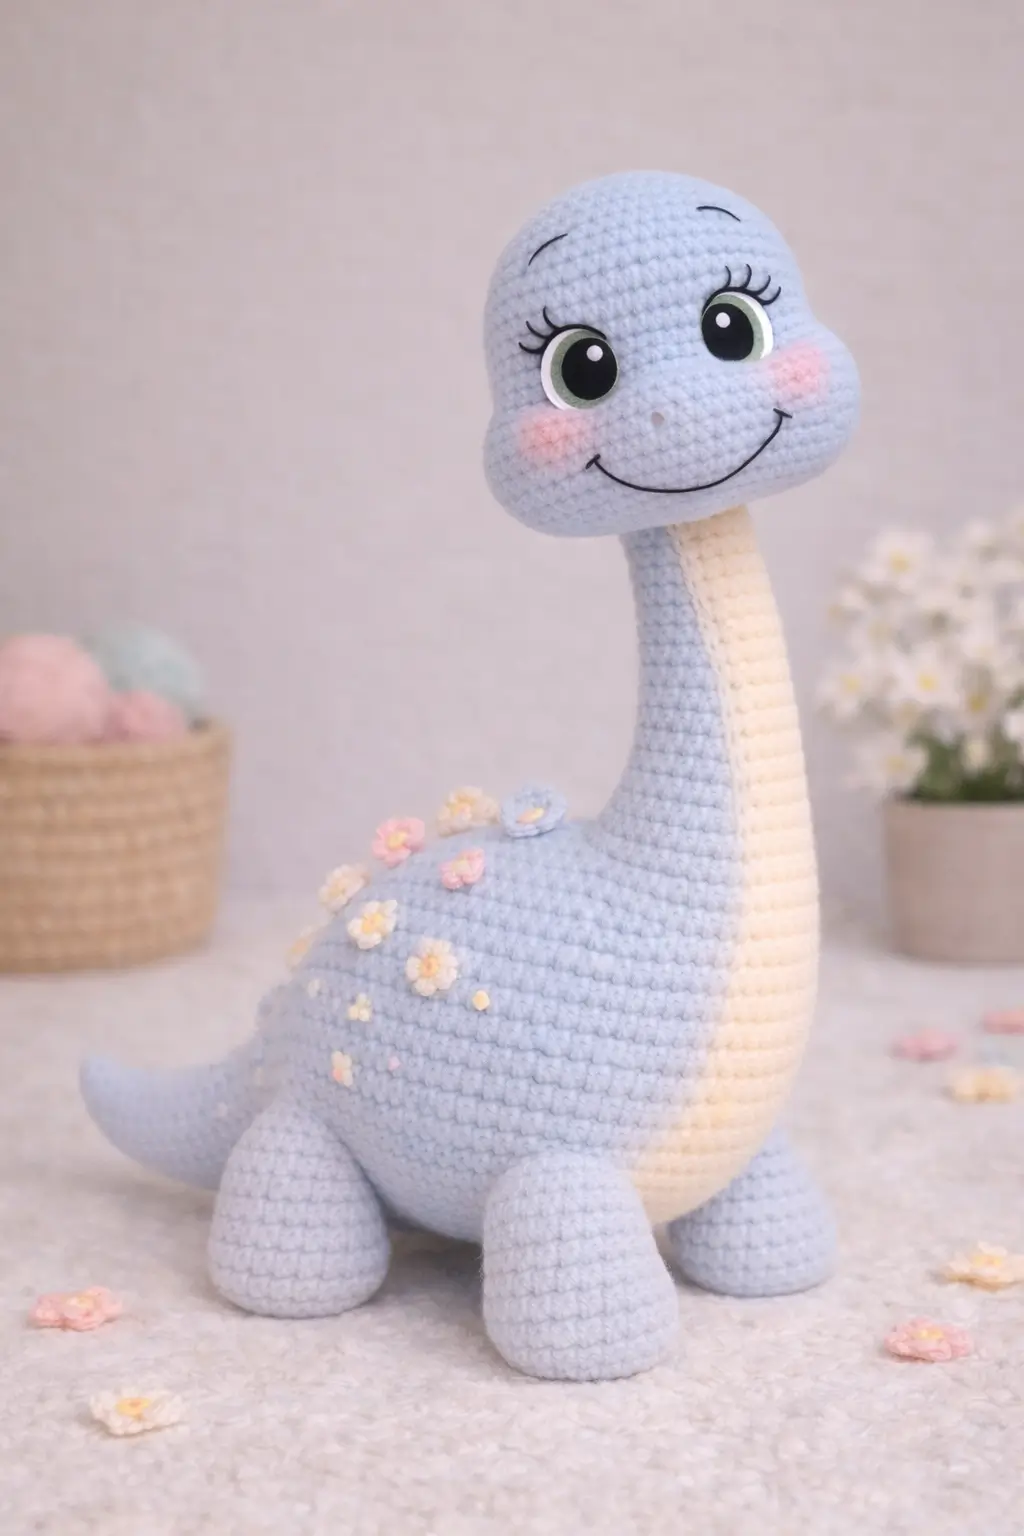
A brontosaurus fails at the neck before it fails anywhere else. This brontosaurus amigurumi crochet pattern solves that with a narrow tube neck, a low rounded body, worsted yarn, a 3.75–4.0 mm hook, and a four-leg stance that suits an intermediate maker. The result lands near 24 cm tall in comparable patterns and works well as nursery décor or a shelf plush.
The Design: What Makes This Brontosaurus Different
The photographed dinosaur uses three structural moves that matter. First, the head is wider than the neck and pushes visual weight forward, so the body has to read low and full rather than upright. Second, the cream front panel lengthens the neck visually, which keeps the silhouette recognizable as a long neck dinosaur amigurumi instead of a generic dinosaur plush. Third, the legs are short cylinders with broad bottoms. That choice is about stance, not speed.
A common mistake with this character type is overstuffing the neck and underweighting the body. The plush then tips forward, especially once large eyes and a broad smile pull attention to the face. Many search results cover a crochet dinosaur pattern in general terms, but fewer explain how head size, neck width, and leg placement work together in a brontosaurus crochet pattern.
Project Info at a Glance
| Skill Level | Time | Finished Size | Hook | Best For |
|---|---|---|---|---|
| Intermediate | 6–8 hours | 24 cm tall | 3.75–4.0 mm | Nursery shelf plush, handmade gift |
Comparable brontosaurus patterns cluster around 24 cm tall with medium/worsted yarn and a 3.75–4.0 mm hook.
Materials and Tools
Yarn
- Pale blue — worsted / medium — about 85–100 g — matte cotton-acrylic blend works well for clear stitch definition
- Cream — worsted / medium — scrap to small partial skein for belly panel
- Pink — worsted / medium — small scrap for cheek patches
- Pastel flower colors — tiny scraps for appliqués
- Black embroidery floss — smile, brows, nostrils
Tools
- Hook 3.75 mm or 4.0 mm
- 12 mm safety eyes as the standard structural reference; scale up only if your gauge stays firm
- Stuffing
- Yarn needle
- Stitch markers
- Blush or pink pastel for cheeks
Abbreviations
MR = magic ring
sc = single crochet
inc = 2 sc in one stitch
dec = invisible decrease
sl st = slip stitch
ch = chain
BLO = back loop only
FO = fasten off
Invisible decrease keeps the front of the fabric flatter than a standard decrease and reduces the gap that often appears on light-colored yarn.
Pattern — Step by Step
Continuous spiral unless noted. This is an original pattern drafted from the supplied photo and standard amigurumi stitch math; verified external sources informed the sizing, yarn class, hook range, and eye baseline.
Head (Make 1)
Yarn: pale blue — Standard amigurumi math
R1: 6 sc in MR (6)
R2: inc x6 (12)
R3: [sc, inc] x6 (18)
R4: [2 sc, inc] x6 (24)
R5: [3 sc, inc] x6 (30)
R6: [4 sc, inc] x6 (36)
R7–11: sc around (36)
R12: [4 sc, dec] x6 (30)
R13: [3 sc, dec] x6 (24)
Insert eyes between R8 and R9, about 8 stitches apart. Add light stuffing as you work so the cheek area stays rounded rather than hard.
FO. Leave a tail for joining.
Neck (Make 1)
Yarn: pale blue — Standard amigurumi math
R1: 6 sc in MR (6)
R2: [sc, inc] x3 (9)
R3: [2 sc, inc] x3 (12)
R4: [3 sc, inc] x3 (15)
R5: [4 sc, inc] x3 (18)
R6–18: sc around (18)
Stuff lightly. A packed neck buckles less, but a rigid neck makes the head sit too high and look mechanical.
FO. Leave 20 cm tail.
Body (Make 1)
Yarn: pale blue — Standard amigurumi math
R1: 6 sc in MR (6)
R2: inc x6 (12)
R3: [sc, inc] x6 (18)
R4: [2 sc, inc] x6 (24)
R5: [3 sc, inc] x6 (30)
R6: [4 sc, inc] x6 (36)
R7–12: sc around (36)
R13: [4 sc, dec] x6 (30)
R14: [3 sc, dec] x6 (24)
R15: [2 sc, dec] x6 (18)
Stuff the lower body firmly. Keep the top third slightly softer so the neck seam can be shaped.
FO, leaving a long tail.
Belly Panel (Make 1)
Yarn: cream — Photo-based adaptation
Ch 14.
R1: Starting in 2nd ch from hook, sc 12, 3 sc in last ch; work on opposite side, sc 11, inc in last ch (28)
R2: inc, 11 sc, inc x3, 11 sc, inc x2 (34)
R3: sc around (34)
R4: [16 sc, inc] x2 (36)
R5–10: sc around (36)
This panel should run from lower chest into the front body. Block it lightly if the edges curl.
FO. Leave a long tail.
Front Legs (Make 2)
Yarn: pale blue — Standard amigurumi math
R1: 6 sc in MR (6)
R2: inc x6 (12)
R3: [sc, inc] x6 (18)
R4–8: sc around (18)
R9: [sc, dec] x6 (12)
Stuff the foot firmly and the top third lightly so the leg can flatten slightly where it meets the body.
FO. Leave 25 cm tail.
Back Legs (Make 2)
Yarn: pale blue — Standard amigurumi math
R1: 6 sc in MR (6)
R2: inc x6 (12)
R3: [sc, inc] x6 (18)
R4–7: sc around (18)
R8: [sc, dec] x6 (12)
Back legs can be 1 round shorter than the front to keep the body angle level once stuffed.
FO. Leave 25 cm tail.
Ear Bumps (Make 2)
Yarn: pale blue — Photo-compatible optional micro detail
R1: 6 sc in MR (6)
R2: sc around (6)
These are tiny and partly hidden in this style. Skip them if the face already reads cleanly.
FO.
Tail (Make 1)
Yarn: pale blue — Tail shaping modeled on verified brontosaurus tail counts
R1: 6 sc in MR (6)
R2: sc around (6)
R3: [sc, inc] x3 (9)
R4: sc around (9)
R5: [2 sc, inc] x3 (12)
R6: sc around (12)
R7: [3 sc, inc] x3 (15)
R8: sc around (15)
R9: [4 sc, inc] x3 (18)
R10–12: sc around (18)
Stuff only the first half. A fully packed tail lifts and can push the toy off balance.
FO. Leave 20 cm tail.
Snout Shaping / Nose Dot (Make 1)
Yarn: pale blue or matching sewing thread
Make one tiny French knot or one stitched nose dot centered between the eyes and 2 rounds lower.
Cheek Patches (Make 2)
Yarn: pink — Flat circle
R1: 6 sc in MR (6)
R2: inc x6 (12)
Keep them flat. Do not stuff.
FO. Leave tail for sewing.
Flower Appliqués (Make 7–10 mixed sizes)
Yarn: pastel pink, cream, yellow, lilac — Photo-based adaptation
Small flower
R1: 5 sc in MR (5)
R2: [sl st, ch 2, 2 dc in same st, ch 2, sl st in same st] x5 petals
Tiny center
With yellow, make 6 sc in MR. FO.
Sew small flowers across the upper back and one near the shoulder base, as shown in the photo.
Smile and Brows
With black embroidery floss, stitch a long upward smile across the lower face. Add two short curved brows above the eyes.
Assembly
- Sew the head to the top of the neck, keeping the face centered.
- Sew the neck to the front third of the body, not dead center, so the chest reads vertical.
- Attach the belly panel from lower jaw area to the front body, easing the edges evenly.
- Sew on the front legs under the body slightly forward of center.
- Sew on the back legs so the plush stands with all four feet touching the surface.
- Attach the tail low on the back body and angle it slightly upward.
- Add the cheek patches below the eyes and slightly outward from the smile line.
- Stitch the smile, brows, and nose dot after the cheeks are in place.
- Add the ear bumps if using, then pin and sew the flower appliqués across the back.
- Check stance from front and side, then adjust stuffing by needle if one shoulder sits lower than the other.
The finished brontosaurus should stand with a mild forward head tilt and a broad front profile.
7 Technical Tips
- Mark the first stitch of every round. Losing the start point on the neck tube shifts the face seam and the head will twist a few degrees off center.
- Stuff the body firmer than the neck. A body that compresses under finger pressure more than the neck will sag at the front once the head is attached.
- Use invisible decreases on the head. Standard decreases leave tiny holes, and those gaps show fastest on pale blue yarn around rounds 11–14.
- Place the eyes before the final head shaping. Waiting until after closure usually pulls the cheeks inward and shrinks the eye spacing by 1 to 2 stitches.
- Pin all four legs before sewing any of them permanently. Even a 3 mm height mismatch at the foot base can make a long-neck plush rock on a shelf.
- Weave tails back through the seam line, not into open stuffing. Loose weaving inside fiberfill lets the smile or cheeks drift after handling.
- Keep the tail half-stuffed only. A dense tail behaves like a fifth leg in theory, but in practice it can lever the back upward and tilt the brontosaurus forward.
Conclusion
This brontosaurus amigurumi crochet pattern works because the silhouette stays disciplined: broad head, narrow neck, low body, stable legs. The floral back detail changes the finish without altering the underlying structure, which makes the project easy to customize for a nursery palette or gift theme. Next, swatch one leg and the neck first, then compare the firmness before starting the full plush. Share the finished piece on Pinterest and Instagram with the side profile visible, since that angle proves the proportions fastest. #BrontosaurusBloomPlush What flower colors would you place on the back of this long-neck dinosaur: pastel daisies, tiny roses, or one single shoulder bloom?









