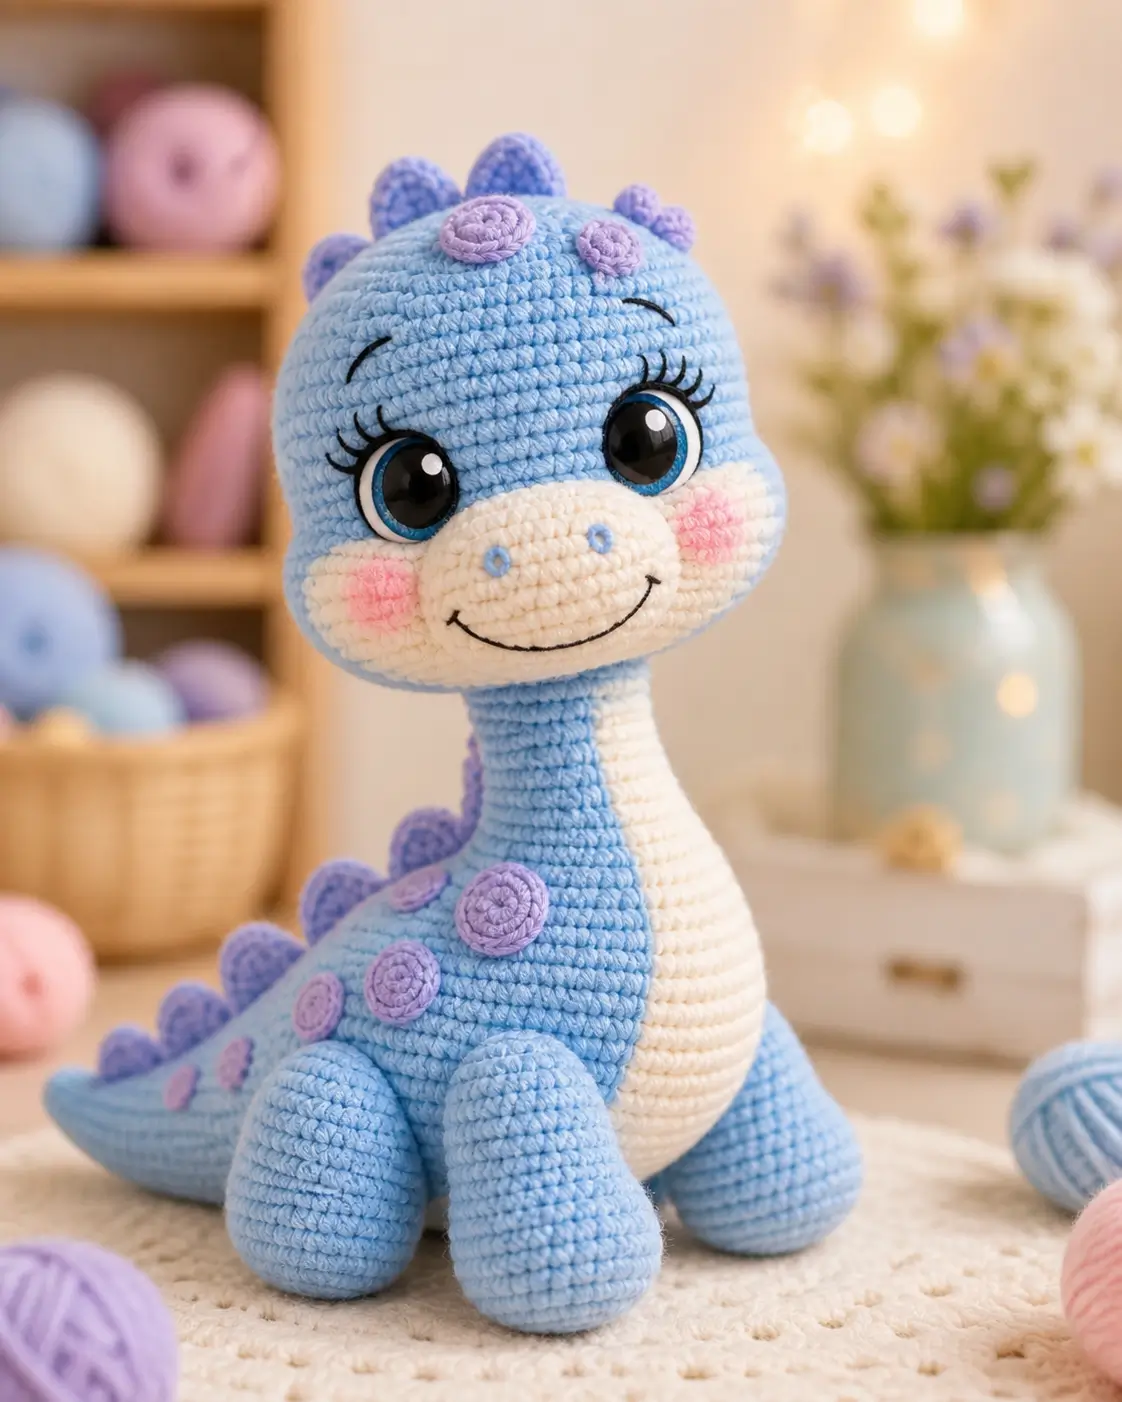
A sauropod only looks right when the neck carries the head without dragging the body forward. This brontosaurus amigurumi crochet pattern uses worsted yarn, a 3.75–4.0 mm hook, and a medium 24 cm seated build aimed at intermediate makers. The project produces a shelf-size dinosaur with enough visual structure for gift photography, nursery display, or a market sample.
The Design: What Makes Brontosaurus Different
You need three structural choices to make a long-neck dinosaur read correctly. First, the head stays spherical while the muzzle is added as a separate plate; that keeps the eye line high and leaves room for oversized eye surrounds. Second, the neck remains narrow and nearly cylindrical, because a cute dinosaur amigurumi looks younger when the throat rises cleanly from the chest instead of flaring outward. Third, the body sits low between four stuffed legs so the finished long neck dinosaur crochet piece can hold a seated pose without wire. The common failure point is not the tail. It is leg spacing. When the front pair is sewn too high or too close, the toy pitches forward, and the sauropod profile collapses.
Project Info at a Glance
| Skill Level | Time | Finished Size | Hook | Best For |
|---|---|---|---|---|
| Intermediate | A few hours | 24 cm tall | 3.75–4.0 mm | Seated display plush |
Materials and Tools
Comparable published brontosaurus patterns use medium/worsted or light-worsted/DK yarn, 3.75–4.0 mm hooks, and safety eyes around 10–12 mm. One free pattern lists about 50 g main yarn, while a kit version lists 10 g contrast yarn.
Yarn
- Sky blue — worsted — 50 g — Brava Worsted or similar
- Cream/white — worsted — 20 g — any smooth contrast yarn
- Lavender — worsted — 10 g — scrap or mini skein
- Pink — worsted — 5 g — scrap quantity
- Black — small length — embroidery details
- Bright blue — small length — iris patches
Tools
- Hook 3.75 or 4.0 mm
- 12 mm safety eyes
- Polyester stuffing
- Tapestry needle
- Stitch markers
- Pins
- Small scissors
Abbreviations
MR / sc / inc / dec / sl st / ch / BLO / FO / hdc / dc
Use invisible decrease on visible shaping rounds; standard decrease leaves a ridge on the head and body.
Pattern — Step by Step
Continuous spiral unless noted.
Head (Make 1)
Yarn: sky blue — Source: Standard amigurumi math
R1: 6 sc in MR (6)
R2: inc x6 (12)
R3: (sc, inc) x6 (18)
R4: (2 sc, inc) x6 (24)
R5: (3 sc, inc) x6 (30)
R6: (4 sc, inc) x6 (36)
R7: sc around (36)
R8: sc around (36)
R9: sc around (36)
R10: sc around (36)
R11: sc around (36)
R12: sc around (36)
R13: (4 sc, dec) x6 (30)
R14: (3 sc, dec) x6 (24)
R15: (2 sc, dec) x6 (18)
R16: (sc, dec) x6 (12)
R17: dec x6 (6)
Attach the eye whites and iris patches before inserting the safety eyes. Place the eyes between R9 and R10, spaced 12 stitches apart. Stuff firmly after R14.
Fasten off. Leave 20 cm tail.
Muzzle / Snout (Make 1)
Yarn: cream — Source: Standard amigurumi math
R1: 6 sc in MR (6)
R2: inc x6 (12)
R3: (sc, inc) x6 (18)
R4: (2 sc, inc) x6 (24)
Flatten lightly. This piece sits low on the head and gives room for nostrils and smile embroidery.
Fasten off. Leave 25 cm tail.
Body (Make 1)
Yarn: sky blue — Source: Standard amigurumi math
R1: 6 sc in MR (6)
R2: inc x6 (12)
R3: (sc, inc) x6 (18)
R4: (2 sc, inc) x6 (24)
R5: (3 sc, inc) x6 (30)
R6: (4 sc, inc) x6 (36)
R7: sc around (36)
R8: sc around (36)
R9: sc around (36)
R10: sc around (36)
R11: sc around (36)
R12: (4 sc, dec) x6 (30)
R13: sc around (30)
R14: sc around (30)
R15: sc around (30)
R16: (3 sc, dec) x6 (24)
R17: sc around (24)
R18: sc around (24)
R19: sc around (24)
R20: (2 sc, dec) x6 (18)
R21: sc around (18)
Stuff very firmly at the base and moderately through the upper body. The opening remains open for sewing to the head.
Fasten off. Leave 30 cm tail.
Belly Panel (Make 1)
Yarn: cream — Source: Standard amigurumi math
Row 1: Ch 7, starting in 2nd ch from hook, sc 6 (6)
Row 2: Ch 1, turn, inc, sc 4, inc (8)
Row 3: Ch 1, turn, inc, sc 6, inc (10)
Row 4: Ch 1, turn, sc across (10)
Row 5: Ch 1, turn, sc across (10)
Row 6: Ch 1, turn, sc across (10)
Row 7: Ch 1, turn, sc across (10)
Row 8: Ch 1, turn, sc across (10)
Row 9: Ch 1, turn, sc across (10)
Row 10: Ch 1, turn, sc across (10)
Row 11: Ch 1, turn, sc across (10)
Row 12: Ch 1, turn, sc across (10)
Row 13: Ch 1, turn, dec, sc 6, dec (8)
Row 14: Ch 1, turn, dec, sc 4, dec (6)
Row 15: Ch 1, turn, sc across (6)
This panel runs from the throat to the lower belly. Pin first; do not stretch it during sewing.
Fasten off. Leave 30 cm tail.
Front Legs (Make 2)
Yarn: sky blue — Source: Standard amigurumi math
R1: 6 sc in MR (6)
R2: inc x6 (12)
R3: (sc, inc) x6 (18)
R4: sc around (18)
R5: sc around (18)
R6: sc around (18)
R7: (sc, dec) x6 (12)
R8: sc around (12)
R9: sc around (12)
R10: sc around (12)
R11: sc around (12)
R12: sc around (12)
Stuff the lower two-thirds only. A softer upper section helps the seated angle.
Fasten off. Leave 25 cm tail.
Back Legs (Make 2)
Yarn: sky blue — Source: Standard amigurumi math
R1: 6 sc in MR (6)
R2: inc x6 (12)
R3: sc around (12)
R4: sc around (12)
R5: sc around (12)
R6: sc around (12)
R7: sc around (12)
R8: sc around (12)
Stuff firmly. Flatten the opening before sewing.
Fasten off. Leave 25 cm tail.
Tail (Make 1)
Yarn: sky blue — Source: Standard amigurumi math
R1: 6 sc in MR (6)
R2: sc around (6)
R3: (inc, sc) x3 (9)
R4: sc around (9)
R5: (inc, sc 2) x3 (12)
R6: sc around (12)
R7: (inc, sc 3) x3 (15)
R8: sc around (15)
R9: (inc, sc 4) x3 (18)
R10: sc around (18)
R11: sc around (18)
R12: sc around (18)
Stuff the last 4 rounds lightly and leave the tip softer. That keeps the tail from acting like a kickstand.
Fasten off. Leave 25 cm tail.
Eye Whites (Make 2)
Yarn: white — Source: Standard amigurumi math
R1: 6 sc in MR (6)
R2: inc x6 (12)
R3: (sc, inc) x6 (18)
Punch the safety-eye stem through the center after stitching the blue iris patch on top.
Fasten off. Leave 15 cm tail.
Iris Patches (Make 2)
Yarn: bright blue — Source: Standard amigurumi math
R1: 6 sc in MR (6)
R2: inc x6 (12)
Center on the eye whites before installing the eyes.
Fasten off. Leave 15 cm tail.
Cheek Patches (Make 2)
Yarn: pink — Source: Standard amigurumi math
R1: 6 sc in MR (6)
R2: inc x6 (12)
These stay flat. Steam is not needed; pinning is enough.
Fasten off. Leave 15 cm tail.
Small Dorsal Plates (Make 4)
Yarn: lavender — Source: Standard amigurumi math
Row 1: Ch 4, starting in 2nd ch from hook, sl st, sc, hdc (3)
Row 2: Ch 1, turn, sl st in next 3 stitches (3)
Use these along the crown and upper neck.
Fasten off. Leave 12 cm tail.
Medium Dorsal Plates (Make 5)
Yarn: lavender — Source: Standard amigurumi math
Row 1: Ch 5, starting in 2nd ch from hook, sl st, sc, hdc, dc (4)
Row 2: Ch 1, turn, sl st in next 4 stitches (4)
Use these from the shoulder line to the tail base.
Fasten off. Leave 12 cm tail.
Forehead Spiral Spots (Make 2)
Yarn: lavender — Source: Standard amigurumi math
Row 1: Ch 8, starting in 2nd ch from hook, 2 sc in each ch across (14)
Roll each strip into a flat spiral and tack the underside with sewing thread or yarn tail.
Fasten off. Leave 15 cm tail.
Body Spiral Spots (Make 5)
Yarn: lavender — Source: Standard amigurumi math
Large spots (make 2)
Row 1: Ch 8, starting in 2nd ch from hook, 2 sc in each ch across (14)
Small spots (make 3)
Row 1: Ch 6, starting in 2nd ch from hook, 2 sc in each ch across (10)
Roll each strip into a spiral before sewing. Keep the flatter side facing out.
Fasten off. Leave 15 cm tail.
Assembly
- Sew the muzzle to the lower front of the head, centering it between R8 and R14.
- Stitch the iris patches onto the eye whites, insert the 12 mm safety eyes through both layers, then attach them between R9 and R10, 12 stitches apart.
- Embroider the nostrils on the muzzle, add the smile one round below center, and stitch the eyebrows two rounds above the eye line with lashes at the outer corners.
- Sew the head to the body with the chin pitched slightly forward, not straight up, so the neck line reads as a sauropod profile.
- Pin and sew the belly panel from the underside of the muzzle down the center front of the body.
- Attach the front legs low on the body, spacing them about 8 stitches apart across the chest.
- Attach the back legs 6 stitches behind the front pair, keeping both bottoms level so the body sits flat.
- Sew the tail low on the rear body and let it sweep out behind the dinosaur instead of holding weight.
- Stitch the small dorsal plates from the top of the head to the upper neck, then add the medium plates down the back.
- Sew the forehead spirals, body spirals, and cheek patches after all structural parts are fixed in place. The toy is complete when it sits without the head pulling the body forward.
7 Technical Tips
- Use one stitch marker on the head and one on the body. A one-stitch drift by the time you reach Head R12 will shift the eye line and the muzzle will look off-center.
- Pack the head 15–20% firmer than the body. Loose stuffing above the muzzle seam makes the face crease inward and turns the neck into a hinge.
- Work invisible decreases on Head R13–R17 and Body R12, R16, and R20. Standard decreases leave a six-point ridge that shows under smooth worsted yarn.
- Install the safety eyes before Head R15. Waiting longer compresses the eye whites and makes the washers hard to seat cleanly inside the head.
- Pin the front legs 8 stitches apart and the back legs 6 stitches behind them. Wider spacing lets the chest dip and narrower spacing pushes the body upward into a wobble.
- Keep the tail lightly stuffed and sew it across about 8 body stitches. A hard tail base lifts the rear and changes the pose from seated to tipped forward.
- Weave every appliqué tail through at least 3 stitch columns and back again. Short tails surface first on the cheek patches and spiral spots because those pieces are handled at the edge.
Conclusion
This build is about proportion control more than stitch novelty. Start with the head, test the eye stack before closing the round, and dry-pin the legs before any sewing. That sequence keeps the brontosaurus upright and keeps the belly panel centered. Save your finished toy to Pinterest under your dinosaur board, then post a side view and front view on Instagram so the neck angle and plate spacing are visible. Use #BlueBrontoPattern when you share. One useful follow-up is a smaller backpack version using the same muzzle and eye system. Did you place the tail low for a seated sauropod silhouette or lift it for a walking look in your brontosaurus amigurumi crochet pattern?










This is SOOOOOO cute I love this. I hope I can make this just like this