Introduction
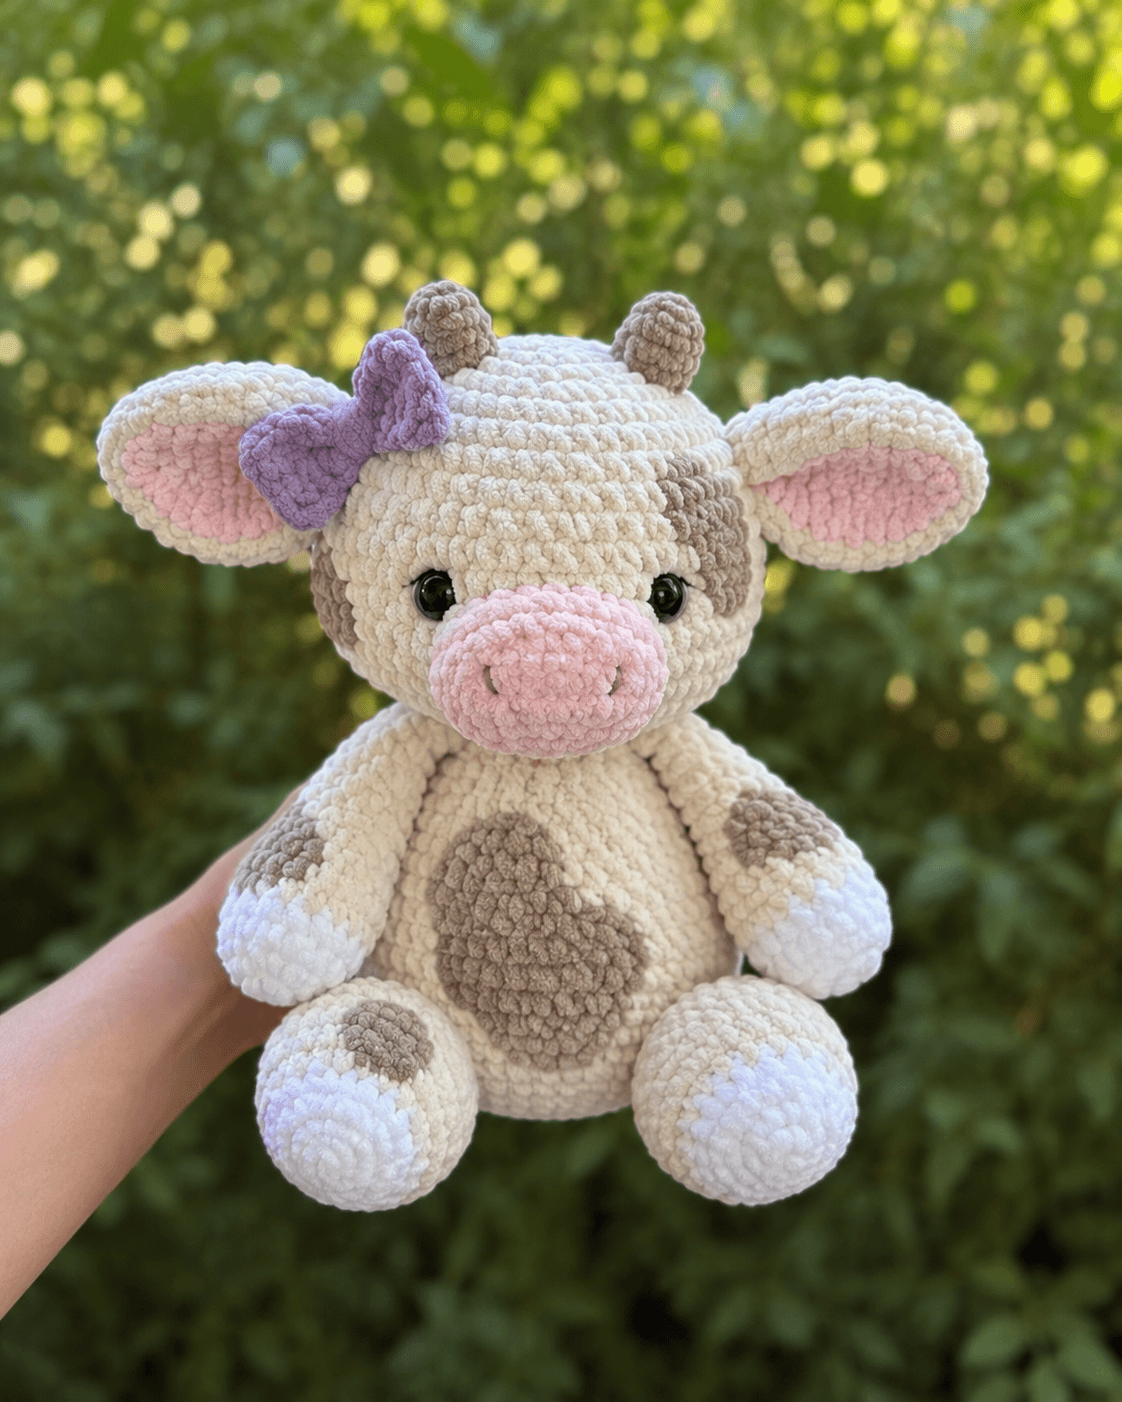
A calf’s muzzle is wider than the space between its eyes, which makes the pink oval the first proportion that has to be solved correctly. This cow amigurumi crochet pattern uses chunky yarn, a 4.5 mm hook and 15 mm safety eyes to make a seated cow about 30–33 cm tall. The intermediate project includes broad ears, short horns, contrasting hooves, surface spots and a lavender bow.
The Design: What Makes This Spotted Cow Different
The head reaches a 42-stitch plateau because the supplied cow has a broad forehead and substantial cheek volume around its muzzle. Its pink snout is crocheted separately, lightly stuffed and sewn below the eye line; this gives the plush cow amigurumi a projecting bovine profile without stretching the entire head into an oval. Wide ears extend horizontally while the two horns sit higher and closer to the center, separating those anatomical features clearly. The body also reaches 42 stitches so the large head has enough support when the toy is seated. A frequent mistake in a spotted cow crochet pattern is placing both ears and horns on one horizontal axis. That flattens the crown. The horns need to sit above the ear attachment line, and the lavender bow should overlap only one horn area rather than covering the complete forehead.
Project Info at a Glance
| Skill Level | Time | Finished Size | Hook | Best For |
|---|---|---|---|---|
| Intermediate | 8–10 hours | Approximately 30–33 cm seated | 4.5 mm | Farm-animal collections, display toys and photographed plush projects |
Materials and Tools
Yarn
- Warm cream — chunky/plush yarn — approximately 150 g — use a yarn with enough stitch definition to retain the muzzle and ear shaping.
- Taupe brown — matching chunky yarn — approximately 35–45 g — used for horns, ear details and surface patches.
- Pale pink — matching chunky yarn — approximately 15–20 g — used for the muzzle and inner ears.
- White — matching chunky yarn — approximately 15–20 g — used for the four hoof tips.
- Lavender — matching chunky or heavy worsted yarn — approximately 10–15 g — used for the bow.
- Black — embroidery floss — under 1 g — used for the nostrils and optional eyebrow details.
Tools
- 4.5 mm crochet hook
- 15 mm safety eyes
- Polyester stuffing, approximately 80–100 g
- Yarn needle
- Embroidery needle
- Locking stitch markers
- Dressmaking pins
- Scissors
Replace plastic safety eyes with securely embroidered eyes when the completed toy is intended for a child under three.
Abbreviations
- MR — magic ring
- sc — single crochet
- inc — two single crochet stitches in one stitch
- dec — invisible single crochet decrease
- sl st — slip stitch
- ch — chain
- hdc — half double crochet
- dc — double crochet
- BLO — back loop only
- FLO — front loop only
An invisible decrease is worked through the front loops of the next two stitches before completing one single crochet through both loops.
Pattern — Step by Step
Work in a continuous spiral unless a joined round or row is specified. Mark the first stitch and move the marker only after the complete round has been counted.
Head
Yarn: warm cream — Source: original six-stitch amigurumi arithmetic based on a large 42-stitch plateau.
R1: 6 sc in MR (6)
R2: inc ×6 (12)
R3: (sc, inc) ×6 (18)
R4: (2 sc, inc) ×6 (24)
R5: (3 sc, inc) ×6 (30)
R6: (4 sc, inc) ×6 (36)
R7: (5 sc, inc) ×6 (42)
R8–R13: sc around (42)
R14: (5 sc, dec) ×6 (36)
R15: (4 sc, dec) ×6 (30)
R16: (3 sc, dec) ×6 (24)
R17: (2 sc, dec) ×6 (18)
R18: (sc, dec) ×6 (12)
R19: dec ×6 (6)
Insert the 15 mm safety eyes between R10 and R11 with approximately nine visible stitches between the posts. Begin stuffing after R14, placing small pieces around the washers before filling the center.
Fasten off. Leave a 25 cm tail and draw it through the remaining six front loops.
Body
Yarn: warm cream — Source: original 42-stitch large-body arithmetic.
R1: 6 sc in MR (6)
R2: inc ×6 (12)
R3: (sc, inc) ×6 (18)
R4: (2 sc, inc) ×6 (24)
R5: (3 sc, inc) ×6 (30)
R6: (4 sc, inc) ×6 (36)
R7: (5 sc, inc) ×6 (42)
R8–R14: sc around (42)
R15: (5 sc, dec) ×6 (36)
R16–R17: sc around (36)
R18: (4 sc, dec) ×6 (30)
R19: (3 sc, dec) ×6 (24)
R20: sc around (24)
R21: (2 sc, dec) ×6 (18)
R22: (sc, dec) ×6 (12)
R23: dec ×6 (6)
Pack the lower half firmly enough to maintain a seated base. Use slightly less stuffing around R19–R23 so the upper torso does not create a hard ridge beneath the head.
Fasten off. Leave a 35 cm sewing tail and close the final opening.
Muzzle
Yarn: pale pink — Source: original broad muzzle shaping.
R1: 6 sc in MR (6)
R2: inc ×6 (12)
R3: (sc, inc) ×6 (18)
R4: (2 sc, inc) ×6 (24)
R5: (3 sc, inc) ×6 (30)
R6–R8: sc around (30)
R9: (3 sc, dec) ×6 (24)
Add enough stuffing to create a rounded front but keep the 24-stitch sewing edge flexible. Flatten the opening into a horizontal oval before pinning it to the head.
Fasten off. Leave a 35 cm tail.
Front Legs (Make 2)
Yarn: begin with white, then change to warm cream.
R1: 6 sc in MR with white (6)
R2: inc ×6 (12)
R3: (sc, inc) ×6 (18)
R4–R5: sc around (18)
R6: change to cream, BLO sc around (18)
R7: (sc, dec) ×6 (12)
R8–R16: sc around (12)
Stuff the white hoof firmly and the cream section moderately. Keep the final three rounds lightly filled so each arm can rest beside the belly.
Fasten off. Leave a 30 cm sewing tail.
Back Legs (Make 2)
Yarn: begin with white, then change to warm cream.
R1: 6 sc in MR with white (6)
R2: inc ×6 (12)
R3: (sc, inc) ×6 (18)
R4: (2 sc, inc) ×6 (24)
R5–R7: sc around (24)
R8: change to cream, BLO sc around (24)
R9: (2 sc, dec) ×6 (18)
R10–R12: sc around (18)
R13: (sc, dec) ×6 (12)
R14–R15: sc around (12)
Stuff the hoof and lower leg firmly. Leave the upper 2 cm softer so the finished leg can turn outward into the seated position.
Fasten off. Leave a 35 cm tail.
Ears (Make 2)
Yarn: pale pink and warm cream — Source: original two-color ear construction.
R1: 6 sc in MR with pink (6)
R2: inc ×6 (12)
R3: (sc, inc) ×6 (18)
R4: change to cream, (2 sc, inc) ×6 (24)
R5–R6: sc around (24)
R7: (2 sc, dec) ×6 (18)
Do not stuff. Flatten each ear horizontally and fold the lower edge inward by approximately 1 cm to create the shallow cup visible in the photograph.
Fasten off. Leave a 30 cm sewing tail.
Horns (Make 2)
Yarn: taupe brown — Source: original short horn construction.
R1: 6 sc in MR (6)
R2: inc ×6 (12)
R3–R5: sc around (12)
R6: dec ×6 (6)
Stuff firmly before R6. The completed horn should form a short rounded cylinder rather than a pointed cone.
Fasten off. Leave a 25 cm tail.
Cheek Patches (Make 2)
Yarn: pale pink — Source: standard flat-circle construction.
R1: 6 sc in MR (6)
R2: inc ×6 (12)
Do not stuff. Flatten each patch completely before sewing.
Join with a sl st. Fasten off and leave a 15 cm tail.
Large Belly Spot
Yarn: taupe brown — Source: original irregular appliqué construction.
R1: 6 sc in MR (6)
R2: inc ×6 (12)
R3: (sc, inc) ×6 (18)
R4: (2 sc, inc) ×6 (24)
R5: (3 sc, inc) ×6 (30)
Replace four evenly spaced sc stitches in the last round with hdc stitches to break the circular outline. Stretch the finished spot slightly vertically when pinning it to the belly.
Fasten off. Leave a 30 cm sewing tail.
Large Face Spot
Yarn: taupe brown.
R1: 6 sc in MR (6)
R2: inc ×6 (12)
R3: (sc, inc) ×6 (18)
R4: (2 sc, inc) ×6 (24)
Shape this patch into an irregular oval during sewing. It should sit around the outer side of one eye rather than covering the eye opening itself.
Fasten off. Leave a 25 cm sewing tail.
Medium Body Spots (Make 4)
Yarn: taupe brown.
R1: 6 sc in MR (6)
R2: inc ×6 (12)
R3: (sc, inc) ×6 (18)
Rotate each spot differently when pinning it to the limbs and torso so the markings do not form a repeated grid.
Fasten off. Leave a 20 cm tail on every spot.
Small Spots (Make 3)
Yarn: taupe brown.
R1: 6 sc in MR (6)
R2: inc ×6 (12)
Join with a sl st. Fasten off and leave a 15 cm sewing tail.
Lavender Bow — First Loop
Yarn: lavender — Source: original flat-loop accessory.
Row 1: ch 11, sc in second ch from hook and across (10)
Rows 2–6: ch 1, turn, sc across (10)
Round the outer corners slightly with the fingers before assembly.
Fasten off. Leave a 20 cm tail.
Lavender Bow — Second Loop
Yarn: lavender.
Repeat Rows 1–6 of the first loop.
Fasten off. Leave a 20 cm tail.
Bow Center
Yarn: lavender.
Row 1: ch 5, sc in second ch from hook and across (4)
Rows 2–4: ch 1, turn, sc across (4)
Wrap this piece around the inner ends of both loops and stitch its short edges together at the back.
Fasten off. Leave a 25 cm tail for head attachment.
Nostrils
Yarn: black or dark taupe embroidery floss.
Place two vertical nostril stitches on the muzzle, each approximately 5–7 mm long. Position them symmetrically about one-third of the muzzle width inward from each side.
Secure the thread inside the muzzle and bury the ends beneath the stuffing.
Assembly
- Center the completed head above the body and sew through one head stitch and one body stitch at a time, adding a narrow amount of stuffing inside the neck area before closing.
- Pin the pink muzzle below the eye centers with its widest dimension horizontal, then sew around the complete 24-stitch opening.
- Attach the cheek patches beside the muzzle, check the nostrils from the front and secure the facial spot around the outer side of one eye.
- Pin both front legs to the upper body with the white hoof sections pointing downward and their inner edges approximately four stitches apart.
- Attach the back legs low on each side, then place the cow on a level surface before tightening the final sewing stitches.
- Sew the ears around the side of the head near R7–R9, keeping both lower folds horizontal and level with one another.
- Attach the two short horns around R4–R6, placing them closer to the center line and approximately 2–3 cm above the ear bases.
- Sew the large belly patch first, then distribute the medium and small taupe spots asymmetrically over the arms, legs and visible sides.
- Assemble the lavender bow, position it beside the left horn and stitch through both the bow center and several head stitches so the loops remain free.
- Weave every structural tail through at least 4 cm of dense crochet, reverse direction once and trim only after the yarn retracts beneath the plush surface.
The completed cow should sit on its lower body and two back legs with both front hooves hanging at equal heights and the broad ears extending laterally.
7 Technical Tips
- Muzzle rotation: An oval snout sewn only from one side can shift several millimeters off center as the seam tightens. Pin the top, bottom, left and right quarter points first and compare each side with the nearest eye before sewing between them.
- Head collapse: A 42-stitch plush head can dent around large eye washers when stuffing is inserted in one mass. Add filling in pieces smaller than approximately 3 cm and pack the cheek areas before filling the center.
- Visible decrease holes: Ordinary decreases can expose pale stuffing through chunky yarn. Work each decrease through the two front loops and maintain the same tension used for the neighboring single crochet stitches.
- Late eye placement: Waiting beyond R14 makes 15 mm washers difficult to seat without distorting the head. Install both eyes after R13 and confirm approximately nine visible stitches between their posts before beginning the decrease section.
- Flattened ears: Sewing the complete ear surface against the head removes the open oval shape. Attach only the folded lower 2–3 cm and leave the outer portion free so the pink center remains visible.
- Uneven seated base: Permanently attaching one back leg before pinning its partner can raise one white hoof by 5–10 mm. Pin both legs, place the cow on a hard level surface and compare the front edges before stitching.
- Puckered spots: Pulling an appliqué tail too tightly compresses the stuffing beneath the patch. Catch only the outer loop of the taupe spot and a shallow cream surface strand, then check the fabric after every four or five stitches.
Conclusion
Check the horizontal line formed by the ears before fixing the lavender bow because the accessory can conceal a slightly misplaced horn but cannot correct uneven ear height. Next, place the cow on a level surface and photograph the front, side and three-quarter views before securing the last body spots. Those angles expose a rotated muzzle, unequal hoof positions or a head that leans away from the torso. Share the completed cow amigurumi crochet pattern project on Pinterest with a vertical full-body photograph, then post the finished face on Instagram using #BowTieSpottedCow. For this calf specifically, would you keep the lavender bow beside one horn or move it down to the neck?









