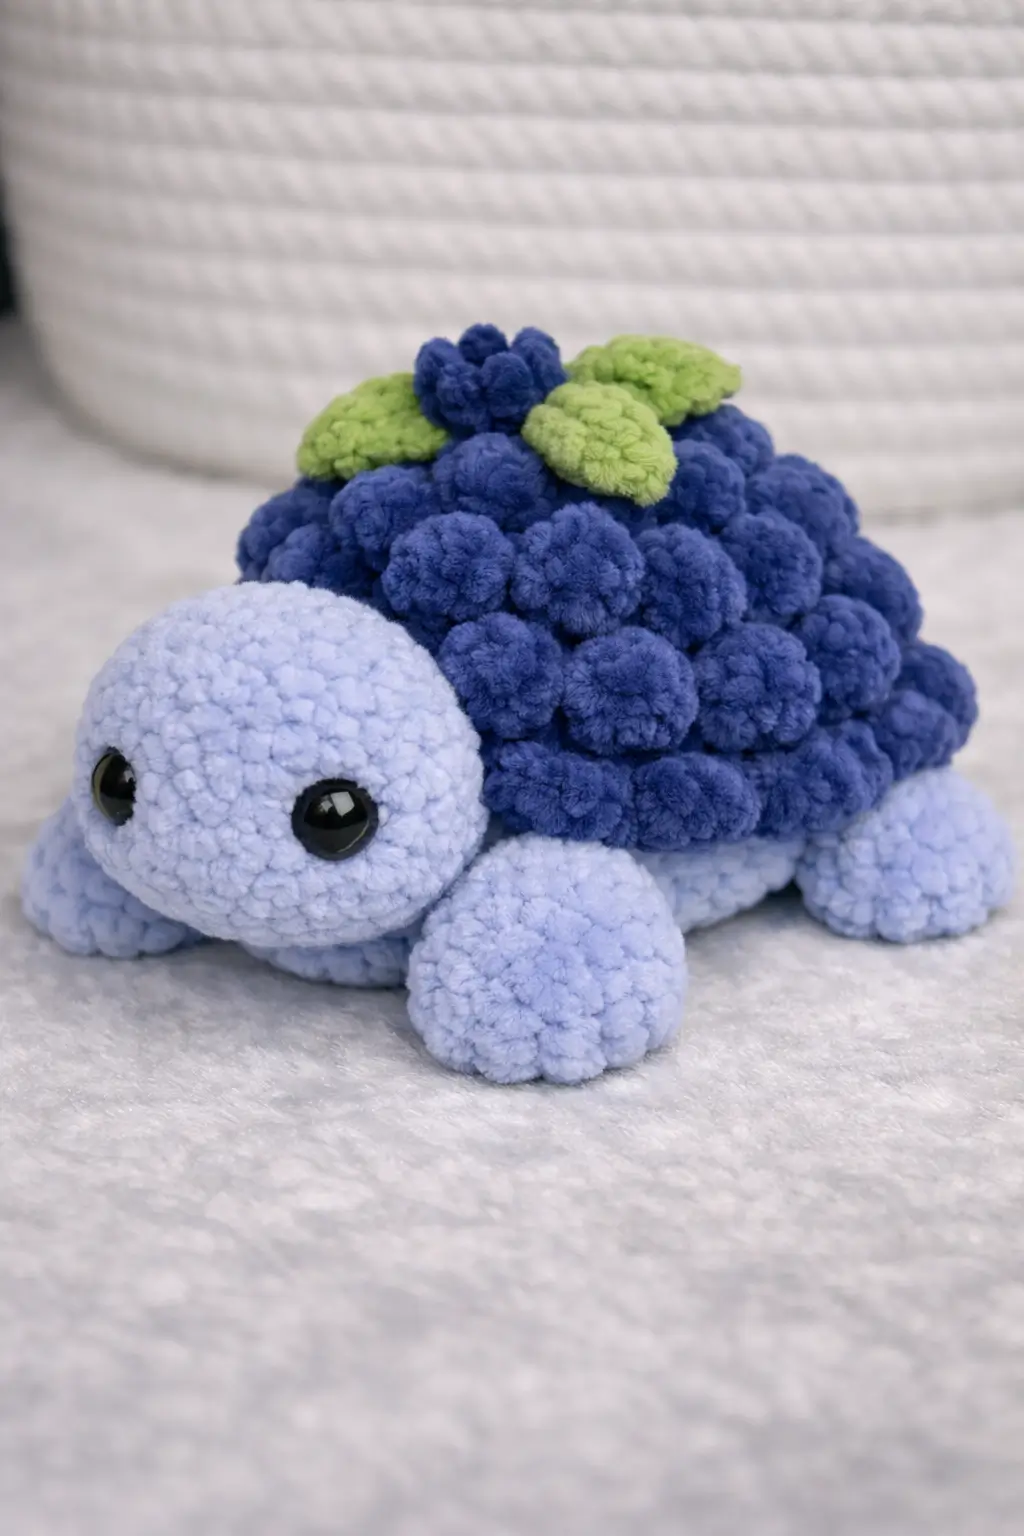
A blueberry shell is not a dome. It is a field of raised spheres that has to stay level on four stubby legs. This blueberry turtle amigurumi crochet pattern builds that texture with plush yarn, a 5 mm hook, and a compact 10.2 cm format suited to intermediate makers who want a quick market item, desk plush, or fruit-animal shelf sample.
The Design: What Makes Blueberry Turtle Different
The first structural decision is the shell surface. A standard turtle dome reads flat once plush yarn blooms, so the blueberry version needs separate rounded bumps or puffed berries to break the outline. That choice changes everything: weight shifts upward, the shell edge thickens, and the legs must sit wider than they would on a smooth-shell turtle. That is why a low body and broad stance matter here. Public turtle patterns often plateau the body around 32 to 36 stitches, which is the useful range for this silhouette.
The second decision is head proportion. In a blueberry turtle crochet pattern, the head usually reads larger than anatomically correct because the berry shell already occupies so much visual space. Reduce the head too much and the front disappears. The third decision is leaf placement. Three leaves at the crown work better than two because they interrupt the blue mass and give the eye a clear top point, something many fruit turtle crochet pattern listings show in product photos. A common mistake is packing the shell with berries all the way to the rim; that makes assembly harder and lifts the turtle off the surface at the sides.
Project Info at a Glance
| Skill Level | Time | Finished Size | Hook | Best For |
|---|---|---|---|---|
| Intermediate | 2–3 hours | Approx. 10.2 cm x 10.2 cm | 5.0 mm | Markets, shelf decor, gift add-ons |
Verified size, hook, and yarn references come from public blueberry turtle and turtle pattern listings; time is a working estimate based on the project scale and multi-part shell assembly.
Materials and Tools
Yarn
- Pale blue plush chenille — bulky / size 6 — about 35–40 g — Big Twist Posh or similar plush yarn style matches the photographed look most closely. Public blueberry turtle listings also mention Himalaya Dolphin Baby and bulky plush yarn.
- Dark blueberry plush chenille — bulky / size 6 — about 30–35 g — use for shell cap and berry clusters. The public two-color chenille benchmark is about 75 g total.
- Light green plush chenille — bulky / size 6 — scrap amount, about 5 g — for leaves, based on the photographed sample and the small leaf area.
Tools
- Hook 5.0 mm
- Safety eyes 14–16 mm for a plush version close to the photo; smaller public mini versions use 12 mm
- Polyfill stuffing
- Yarn needle
- Stitch markers
- Pins or locking markers for shell layout
Abbreviations
MR = magic ring
sc = single crochet
inc = increase
dec = invisible decrease
sl st = slip stitch
ch = chain
BLO = back loop only
FLO = front loop only
Invisible decrease trims bulk at the closing rounds and matters more with chenille, where a standard decrease leaves a visible seam line.
Pattern — Step by Step
Continuous spiral unless noted. Counts are original pattern math built on the standard 6-stitch increase/decrease system. The photographed plush is interpreted as a medium-format turtle, so the main rounded pieces plateau at 36 stitches.
Head (Make 1)
Yarn: pale blue plush chenille — standard amigurumi math
R1: 6 sc in MR (6)
R2: inc x6 (12)
R3: (sc, inc) x6 (18)
R4: (2 sc, inc) x6 (24)
R5: (3 sc, inc) x6 (30)
R6: (4 sc, inc) x6 (36)
R7-9: sc around (36)
Insert safety eyes between R7 and R8, 8 stitches apart.
R10: (4 sc, dec) x6 (30)
R11: (3 sc, dec) x6 (24)
Stuff firmly at the snout and lightly at the back.
R12: (2 sc, dec) x6 (18)
R13: (sc, dec) x6 (12)
R14: dec x6 (6)
Fasten off. Leave a 20 cm tail.
Body Underside (Make 1)
Yarn: pale blue plush chenille — standard amigurumi math
R1: 6 sc in MR (6)
R2: inc x6 (12)
R3: (sc, inc) x6 (18)
R4: (2 sc, inc) x6 (24)
R5: (3 sc, inc) x6 (30)
R6: (4 sc, inc) x6 (36)
R7-8: sc around (36)
Fasten off. Leave a 25 cm tail.
Shell Cap (Make 1)
Yarn: dark blueberry plush chenille — standard amigurumi math
R1: 6 sc in MR (6)
R2: inc x6 (12)
R3: (sc, inc) x6 (18)
R4: (2 sc, inc) x6 (24)
R5: (3 sc, inc) x6 (30)
R6: (4 sc, inc) x6 (36)
R7: BLO sc around (36)
R8-9: sc around (36)
Fasten off. Leave a 30 cm tail.
Front Legs (Make 2)
Yarn: pale blue plush chenille — standard amigurumi math
R1: 6 sc in MR (6)
R2: inc x6 (12)
R3-4: sc around (12)
R5: (sc, dec) x4 (8)
Light stuffing only in the toe area.
Flatten slightly. Fasten off. Leave a 15 cm tail.
Back Legs (Make 2)
Yarn: pale blue plush chenille — standard amigurumi math
R1: 6 sc in MR (6)
R2: inc x6 (12)
R3: sc around (12)
R4: (sc, dec) x4 (8)
Flatten slightly. Fasten off. Leave a 15 cm tail.
Tail (Make 1)
Yarn: pale blue plush chenille — standard amigurumi math
R1: 4 sc in MR (4)
R2: sc around (4)
R3: sc around (4)
Fasten off. Leave a 10 cm tail.
Blueberry Bumps (Make 22–26)
Yarn: dark blueberry plush chenille — adapted for shell texture
R1: 6 sc in MR (6)
R2: inc x6 (12)
R3: sc around (12)
R4: dec x6 (6)
Stuff with a pinch of filling or leave unstuffed for a softer, flatter berry.
Fasten off. Leave a 12 cm tail.
Leaves (Make 3)
Yarn: light green plush chenille
Ch 6.
Row 1: Starting in 2nd ch from hook: sc, hdc, dc, hdc, sc.
Ch 1, rotate to work opposite side of chain: sc, hdc, dc, hdc, sc.
Sl st to base.
Fasten off. Leave a 12 cm tail.
Top Blueberry Cluster (Make 1)
Yarn: dark blueberry plush chenille
Make 5 tiny nubs, then join them into one cluster.
Each nub, make 5:
R1: 6 sc in MR (6)
R2: sc around (6)
Fasten off first 4 nubs. Keep the 5th live.
Join nub 2 with 3 sc, nub 3 with 3 sc, nub 4 with 3 sc, nub 5 with 3 sc, nub 1 with 3 sc to form a small crown ring (15).
R3: sc around the joined ring (15)
R4: (3 sc, dec) x3 (12)
R5: (2 sc, dec) x3 (9)
Stuff lightly if desired.
Fasten off. Leave an 18 cm tail.
Cheek Patches (Make 2, Optional)
Yarn: pale blue or slightly lighter blue
R1: 6 sc in MR (6)
R2: inc x6 (12)
Fasten off. Leave a 10 cm tail.
Assembly
- Sew the head to the front of the body underside, centered over rounds 1–4 of the underside piece.
- Sew the front legs slightly behind the head, aligned so the turtle sits low rather than upright.
- Sew the back legs near the rear third of the body underside, matching the front-leg width.
- Sew the tail between the back legs.
- Arrange the blueberry bumps on the shell cap, leaving a clean edge of about 0.5 to 1 cm around the shell rim.
- Sew the bumps in staggered rows so no four bumps meet at one point; that spacing keeps the shell surface balanced.
- Attach the top blueberry cluster at the highest point of the shell cap.
- Sew the three leaves under and around the top cluster, overlapping them slightly.
- Place the shell cap onto the body underside, pin thoroughly, stuff the center, then sew around the rim.
- Add the cheek patches if used, then weave in every tail through separate internal paths.
The finished turtle should rest on all four legs with the shell weight centered above the body.
7 Technical Tips
- Mark round starts from R1 on the shell cap. Chenille hides stitch posts, and one missed increase before the 36-stitch plateau shifts the whole berry grid off center.
- Do not overstuff the head past the eye line. On this shape, a hard-packed head pushes the eyes outward and makes the face look spherical instead of broad.
- Keep the underside softer than the shell. A firmer shell with a softer belly helps the plush settle flat instead of rocking corner to corner.
- Insert eyes before the final third of head closure. With plush yarn and 14–16 mm eyes, waiting too long compresses the fabric and distorts spacing.
- Leave a bare shell border. Stop the berry bumps short by at least 0.5 cm from the shell edge, or the turtle will sit on the shell texture instead of the legs.
- Pin all four legs before sewing even one of them. The failure mode here is a diagonal stance, where one back leg sits farther out and the turtle twists when placed on a table.
- Weave berry tails inward, then sideways. A single straight tail path can telegraph through plush fabric, especially on dark blueberry yarn under strong light.
Conclusion
This build works because the shell is treated as texture first and turtle anatomy second. That is the adjustment most listings hint at but rarely explain. Use the verified size and hook data as the baseline, keep the body low, and resist the urge to crowd the rim with too many berries. This blueberry turtle amigurumi crochet pattern also scales well for batch making once the berry spacing is fixed. The next move is practical: make one shell layout on pins before sewing anything. Then photograph the result flat from above, share it to Pinterest and Instagram, and tag it with #BlueberryTurtlePattern. One question matters here: did your top berry cluster sit centered, or did the shell start pulling toward the head?









