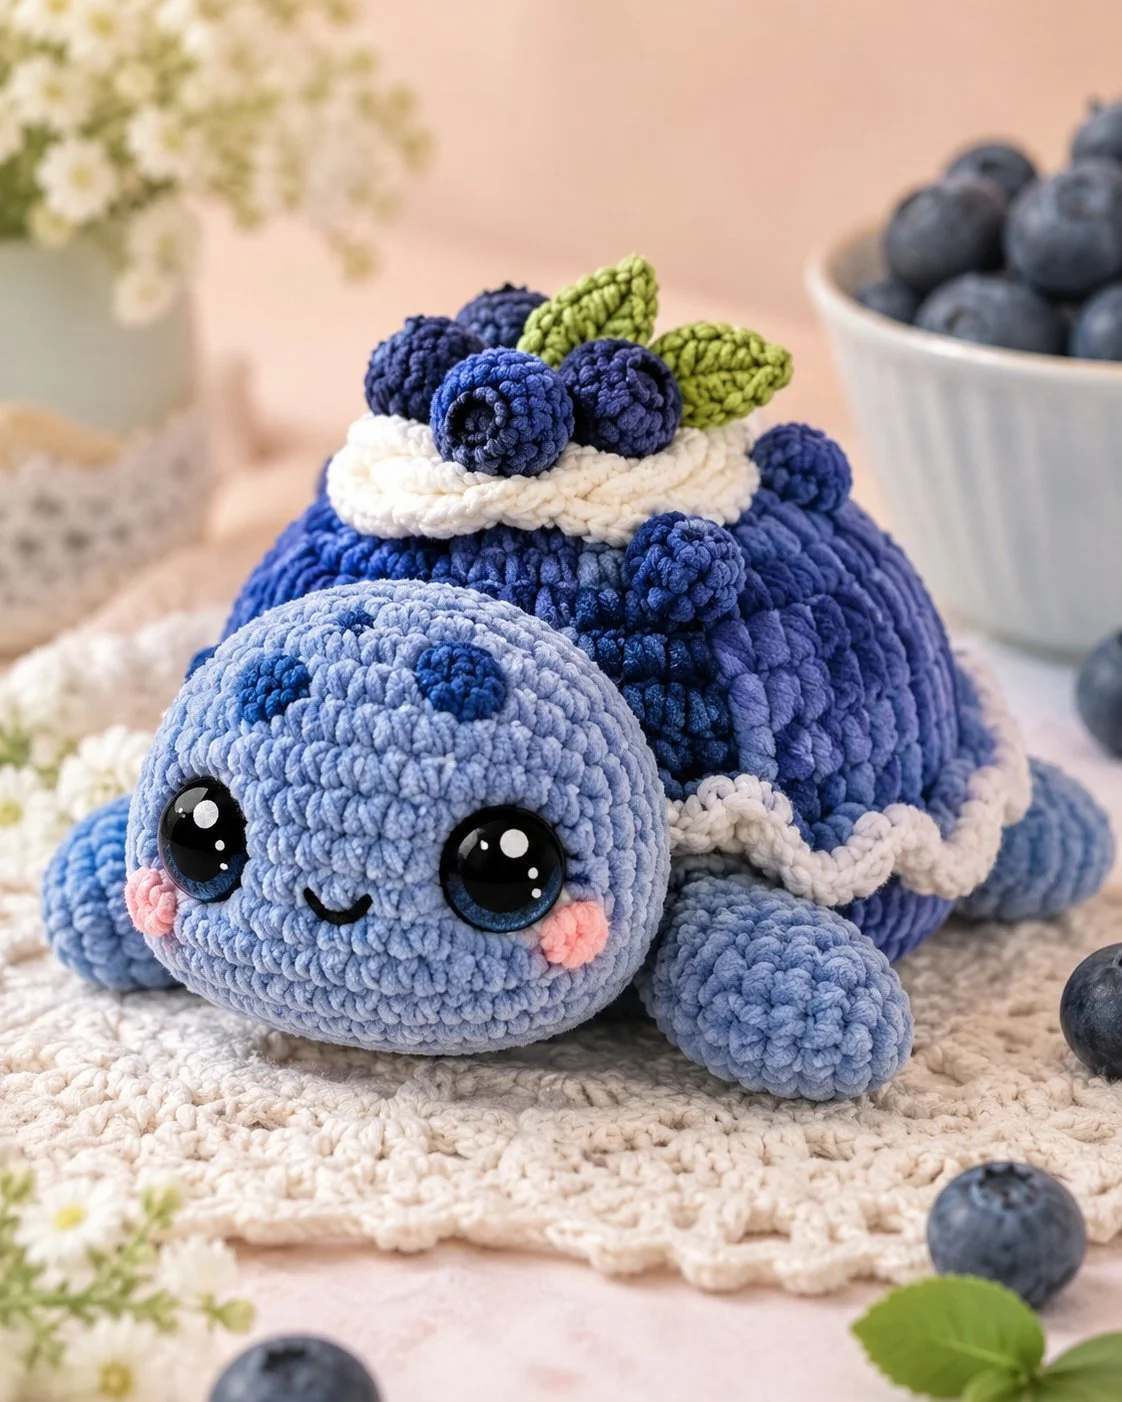
Blueberries grow in uneven clusters. That is the shell problem this blueberry turtle amigurumi crochet pattern has to solve. This plush uses chenille-style yarn, a medium plush body scale, and beginner-to-intermediate construction with simple spiral rounds plus a few shaped details. The result is useful as market stock, nursery decor, or a themed summer plush that reads clearly from a distance.
The Design: What Makes Blueberry Turtle Different
A blueberry pie turtle is not just a blue sea turtle with dots. The shell has to carry three separate signals at once: berry color, pie filling volume, and cream contrast. First, the head is oversized relative to the body. That choice pushes the plush into kawaii proportions and gives room for large safety eyes, which is standard in market-friendly turtle plush formats. Second, the shell needs a higher dome than a flat sea turtle pattern. That added depth makes the blueberry bobbles sit above the cream trim instead of getting lost against it. Third, the topping must break the shell outline. Leaves and upper berries change the silhouette, which is why blueberry pie turtle crochet pattern results stand out more than plain fruit turtles in search and social pins. A common mistake is placing the cream ruffle too low, which makes the shell read as a skirt instead of pie filling. This matters in fruit turtle amigurumi designs.
Project Info at a Glance
Skill LevelTimeFinished SizeHookBest ForBeginner / Intermediate3–5 hours10–14 cm typical verified range2.0 mm DK or 3.0 mm bulky; photo style reads closer to plush chenilleMarket plush, gift plush, display sample
Verified public references show a blueberry sea turtle at about 14 x 10 cm in sport/DK cotton with a 2 mm hook, and a mini fruit turtle format at about 10 x 10 cm with size 6 bulky yarn and a 3.0 mm hook. The plush in the photo appears larger and softer because the yarn is velvet/chenille and the eyes are oversized.
Materials and Tools
Yarn
- Light blue — plush chenille / velvet style — about 80–100 g — similar look to blanket or parfait-style plush yarn
- Dark blue — plush chenille / velvet style — about 50–70 g — for shell and berries
- White — plush chenille / velvet style — about 20–30 g — for whipped cream trim and top
- Green — plush chenille / velvet style — about 5–10 g — for leaves
- Pink — plush chenille / velvet style — scraps — for cheek patches
- Black embroidery thread — scraps — for smile
Public blueberry turtle references show two main material directions: sport/DK cotton with a 2 mm hook and size 6 bulky yarn with a 3.0 mm hook. A free Ribblr mini blueberry turtle also lists a 6.0 mm hook and 6 mm eyes for another plushier format. The photo here aligns more closely with the bulky plush category than the cotton one.
Tools
- Hook 4.5–5.5 mm for plush chenille photo look
- Safety eyes 18–22 mm to match the photo scale
- Stuffing
- Tapestry needle
- Stitch markers
- Scissors
Note: verified public blueberry turtle listings commonly use 12 mm or 6 mm eyes on smaller builds. The larger eye estimate here is based on the supplied image only.
Abbreviations
MR = magic ring
sc = single crochet
inc = increase
dec = invisible decrease
sl st = slip stitch
ch = chain
BLO = back loop only
FO = fasten off
Invisible decrease reduces bulk on plush yarn and keeps the front fabric cleaner than a standard decrease.
Pattern — Step by Step
Continuous spiral unless noted. This draft is built from standard amigurumi math and photo matching, because public search previews did not expose the full proprietary stitch maps for commercial blueberry turtle patterns. Verified size and materials are from the live sources cited above.
Head (Make 1)
Yarn: light blue — Source: Standard amigurumi math + photo reference
R1: 6 sc in MR (6)
R2: inc x6 (12)
R3: (sc, inc) x6 (18)
R4: (2 sc, inc) x6 (24)
R5: (3 sc, inc) x6 (30)
R6: (4 sc, inc) x6 (36)
R7–R12: sc around (36)
R13: (4 sc, dec) x6 (30)
R14: (3 sc, dec) x6 (24)
Place safety eyes between R9 and R10. In the photo, they sit low and wide.
R15: (2 sc, dec) x6 (18)
Stuff firmly, especially under the eye line.
R16: (sc, dec) x6 (12)
R17: dec x6 (6)
Fasten off. Leave a 20 cm tail.
Body (Make 1)
Yarn: dark blue — Source: Standard amigurumi math + photo reference
R1: 6 sc in MR (6)
R2: inc x6 (12)
R3: (sc, inc) x6 (18)
R4: (2 sc, inc) x6 (24)
R5: (3 sc, inc) x6 (30)
R6: (4 sc, inc) x6 (36)
R7: BLO sc around (36)
R8–R11: sc around (36)
R12: (4 sc, dec) x6 (30)
R13: (3 sc, dec) x6 (24)
Stuff the front half first, then the back crown so the shell keeps height.
R14: (2 sc, dec) x6 (18)
R15: (sc, dec) x6 (12)
R16: dec x6 (6)
Fasten off. Leave a 25 cm tail.
Front Flippers (Make 2)
Yarn: light blue — Source: Standard amigurumi math
R1: 6 sc in MR (6)
R2: inc x6 (12)
R3–R4: sc around (12)
Flatten.
R5: 6 sc through both sides (6)
Fasten off. Leave a 15 cm tail.
Back Flippers (Make 2)
Yarn: light blue — Source: Standard amigurumi math
R1: 6 sc in MR (6)
R2: inc x6 (12)
R3: sc around (12)
Flatten.
R4: 6 sc through both sides (6)
Fasten off. Leave a 15 cm tail.
Tail (Make 1)
Yarn: light blue — Source: Standard amigurumi math
R1: 4 sc in MR (4)
R2: sc around (4)
R3: sc around (4)
Fasten off. Leave a 12 cm tail.
Shell Base / Pie Filling Panel (Make 1)
Yarn: medium-dark blue if you want more tonal variation — Source: Standard amigurumi math + photo reference
R1: 6 sc in MR (6)
R2: inc x6 (12)
R3: (sc, inc) x6 (18)
R4: (2 sc, inc) x6 (24)
R5: (3 sc, inc) x6 (30)
R6: (4 sc, inc) x6 (36)
R7–R8: sc around (36)
Fasten off. Leave a 30 cm tail.
Side Cream Ruffle (Make 1)
Yarn: white — Source: photo reference + standard edging logic
Ch 31.
Row 1: Starting in 2nd ch from hook, sc across (30), ch 1, turn.
Row 2: (inc, sc) across to end (45), ch 1, turn.
Row 3: sl st loosely across all 45 sts.
Wrap around the lower shell edge and test length before sewing.
Fasten off. Leave a 25 cm tail.
Top Cream Ring (Make 1)
Yarn: white — Source: photo reference + standard edging logic
Ch 25, join without twisting.
Rnd 1: sc around (24)
Rnd 2: (sc, inc) around (36)
Rnd 3: (2 sc in next st, sl st in next st) around to create a soft piped edge
Fasten off. Leave an 18 cm tail.
Blueberry Bobbles for Shell Sides (Make 4)
Yarn: dark blue — Source: standard mini sphere math
R1: 6 sc in MR (6)
R2: sc around (6)
Fasten off. Leave a 10 cm tail.
Top Blueberries (Make 5)
Yarn: dark blue — Source: standard mini sphere math
R1: 6 sc in MR (6)
R2: inc x6 (12)
R3: sc around (12)
R4: dec x6 (6)
Lightly stuff two or three of them only. Leave the rest soft for a clustered look.
Fasten off. Leave a 12 cm tail.
Leaves (Make 3)
Yarn: green — Source: photo reference + standard leaf shaping
Ch 6.
Row 1: Starting in 2nd ch from hook, sl st, sc, hdc, sc, sl st.
Working on the opposite side of the chain: sl st, sc, hdc, sc, sl st.
Fasten off. Leave a 12 cm tail.
Cheek Patches (Make 2)
Yarn: pink — Source: standard flat circle math
R1: 6 sc in MR (6)
R2: inc x6 (12)
Fasten off. Leave a 10 cm tail.
Blueberry Spots for Head (Make 3)
Yarn: dark blue — Source: photo reference
R1: 6 sc in MR (6)
Fasten off. Leave a short tail for sewing.
Assembly
- Sew the head to the front of the body so the face sits slightly lower than center.
- Attach the tail to the back center seam.
- Sew the two front flippers to the lower front quarter of the body.
- Sew the two back flippers slightly behind the midpoint, angled outward.
- Attach the shell base panel to the top of the body.
- Sew the side cream ruffle around the lower shell edge.
- Attach the top cream ring to the crown of the shell.
- Cluster the five top blueberries on the cream ring, with the tallest berry near the center.
- Sew three leaves behind the top berries, then add the four small shell-side bobbles and the three flat head spots.
- Attach the cheek patches, embroider the smile, then shape the face with a little extra stuffing if needed.
The plush is complete when the shell reads as a blueberry pie from side view and as a turtle from front view.
7 Technical Tips
- Mark the first stitch of every round. Plush yarn hides the round break fast, and one missed start point will shift the eye line off center by a full stitch column.
- Do not underfill the head below the eyes. A soft lower face makes large eyes tilt inward, which changes the expression and can wrinkle the muzzle area.
- Use invisible decreases on visible shell curves. Standard decreases leave a ridge that catches light on chenille yarn and makes the dome look faceted.
- Install eyes before the final third of the head close. Waiting too long on plush yarn makes washer placement difficult and can stretch the fabric around the eye posts.
- Keep berry cluster stuffing inconsistent on purpose. Fully stuffed top berries look like marbles; two firm and three soft gives the topping a more natural fruit-cluster profile.
- Pin the cream ruffle in four compass points first. If the trim is attached from one side only, it will creep upward and the pie-shell line will look slanted.
- Weave tails at least 4 cm through internal stuffing paths. Short buried tails work loose in velvet yarn because the pile reduces friction between the strand and the fill.
Conclusion
This blueberry turtle amigurumi crochet pattern works because the silhouette does two jobs at once. From the front, it reads as a turtle. From the top and side, it reads as blueberry pie with whipped cream and fruit garnish. That dual read is what many search previews and product listings show but rarely explain in construction terms. Your next step is simple: choose either the verified smaller cotton setup or a plush chenille setup closer to the photo, then build the head first and test eye scale before committing to the shell. Share the finished result on Pinterest and Instagram with #BlueberryTurtlePattern. One question remains: did your berry cluster sit higher on the shell center, or drift toward the tail?
Sources for verified market data and public competition review: Ravelry blueberry sea turtle, Etsy mini blueberry/strawberry turtle bundle, Ribblr mini blueberry turtle, Etsy blueberry pie turtle, YouTube blueberry turtle tutorial.









