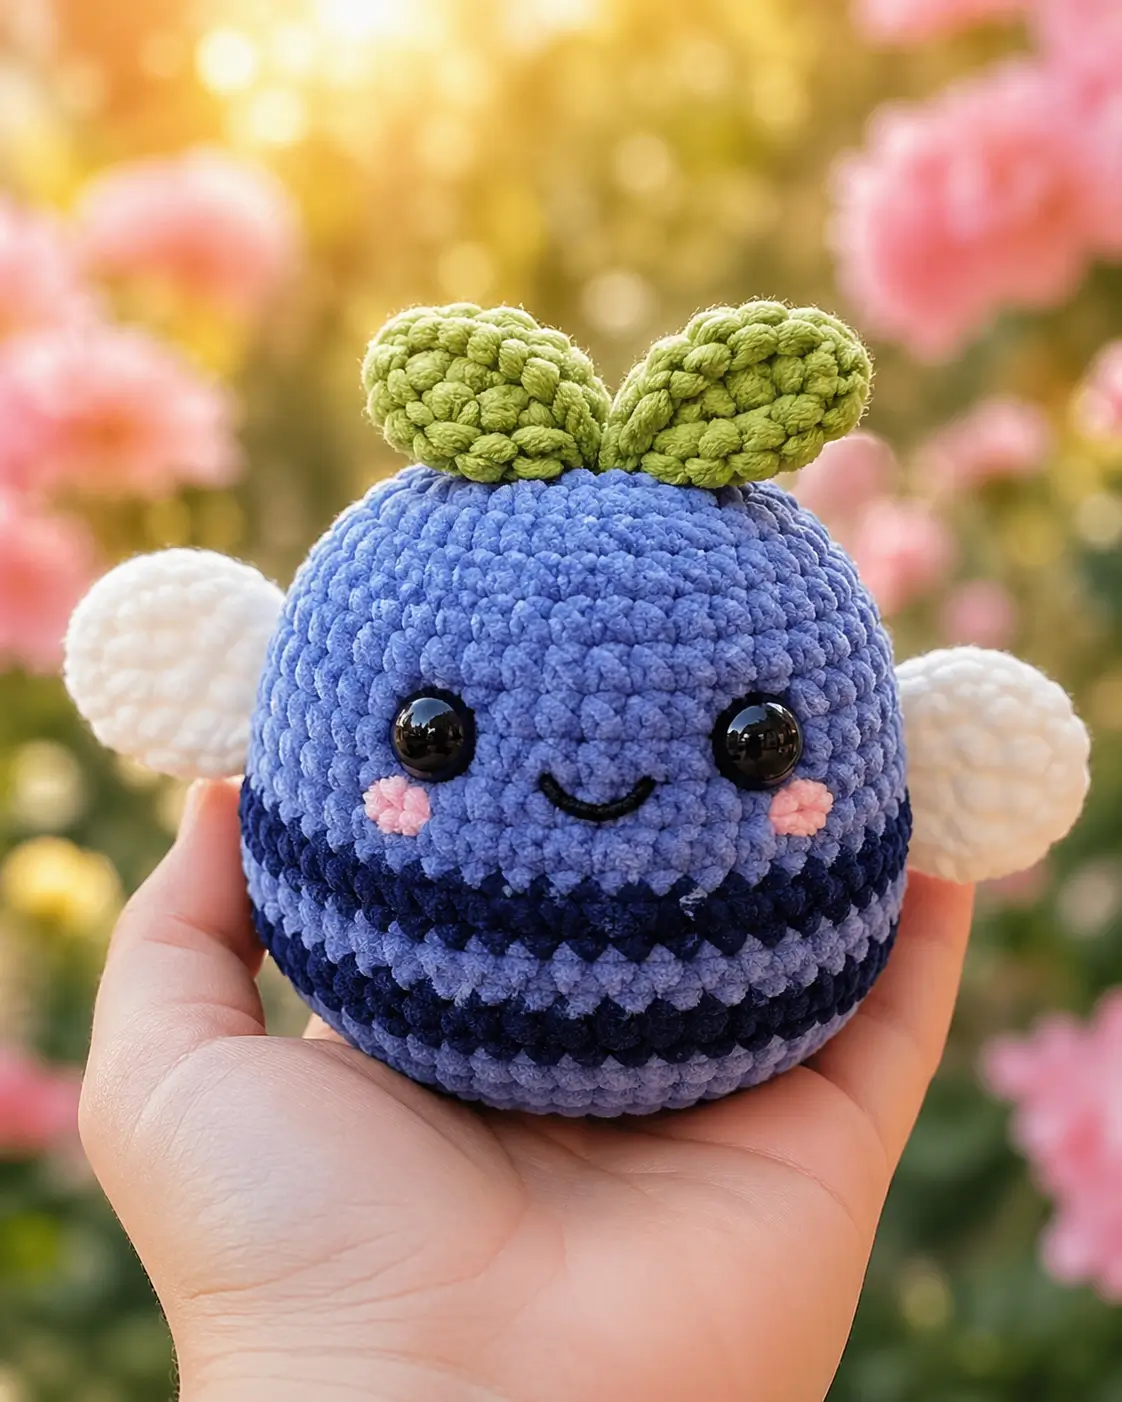
The blueberry calyx sits on the head, not the abdomen. This blueberry bee amigurumi uses that plant detail as the top anchor: two green leaves, a round blue face, navy bee bands, white wings, and 14 mm eyes. You will need chunky chenille yarn, a 3 mm hook, stuffing, and basic amigurumi skills. The finished bee is about 13 cm tall, sized for market-table baskets.
The Design: What Makes Blueberry Bee Different
You are building a fruit bee, not a plain oval insect. The first decision is a separate head and body, even though the photo reads as one round plush. That seam hides under the first navy stripe and gives the face a stable front plane. The second decision is the top leaf crown. It marks the piece as a blueberry before the wings identify it as a bee. The third decision is eye scale: 14 mm eyes fit chunky chenille at this size, while smaller 10 mm eyes suit tighter blue bee amigurumi versions. The maker should not place stripes too high. That common mistake turns a blueberry bee crochet pattern into a blue bumblebee with random leaves.
Project Info at a Glance
| Skill Level | Time | Finished Size | Hook | Best For |
|---|---|---|---|---|
| Advanced beginner | 1/2 day | 13 cm high | 3.0 mm | Plush markets, desk décor, fruit-bee collections |
Materials and Tools
Yarn
- Periwinkle blue — chunky chenille / size 6 — approx. 45 g — Premier Parfait Chunky or similar
- Navy blue — chunky chenille / size 6 — approx. 18 g — Premier Parfait Chunky or similar
- White — chunky chenille / size 6 — approx. 10 g — Premier Parfait Chunky or similar
- Leaf green — chunky chenille / size 6 — approx. 8 g — Premier Parfait Chunky or similar
- Pale pink — chunky chenille / size 6 — approx. 2 g — scrap yarn
Tools
- Hook 3.0 mm
- 14 mm black safety eyes
- Polyester stuffing
- Yarn needle
- Locking stitch markers
- Sewing pins
- Scissors
- Black embroidery thread for the smile
Abbreviations
MR = magic ring; sc = single crochet; inc = 2 sc in one stitch; dec = single crochet decrease; sl st = slip stitch; ch = chain; BLO = back loop only; FO = fasten off.
An invisible decrease works through front loops only to remove two stitches without a raised ridge.
Pattern — Step by Step
Continuous spiral unless noted. This pattern uses a 42-stitch large plateau for the head and body, matching the round chunky form in the photo.
Head
Yarn: periwinkle blue — Source: Standard amigurumi math.
R1: 6 sc in MR (6)
R2: inc ×6 (12)
R3: (sc, inc) ×6 (18)
R4: (2 sc, inc) ×6 (24)
R5: (3 sc, inc) ×6 (30)
R6: (4 sc, inc) ×6 (36)
R7: (5 sc, inc) ×6 (42)
R8: sc around (42)
R9: sc around (42)
R10: sc around (42)
R11: sc around (42)
R12: sc around (42)
R13: sc around (42)
R14: sc around (42)
Insert 14 mm safety eyes between R11 and R12, 8 stitches apart. Place the smile center between the eyes, one round lower.
R15: (5 sc, dec) ×6 (36)
R16: sc around (36)
R17: (4 sc, dec) ×6 (30)
R18: (3 sc, dec) ×6 (24)
R19: (2 sc, dec) ×6 (18)
Stuff firmly, with extra filling behind the eye washers.
R20: (sc, dec) ×6 (12)
R21: dec ×6 (6)
Fasten off. Leave a 20 cm tail and close the opening.
Body
Yarn: periwinkle blue and navy blue — Source: Standard amigurumi math.
Start in periwinkle blue.
R1: 6 sc in MR (6)
R2: inc ×6 (12)
R3: (sc, inc) ×6 (18)
R4: (2 sc, inc) ×6 (24)
R5: (3 sc, inc) ×6 (30)
R6: (4 sc, inc) ×6 (36)
R7: (5 sc, inc) ×6 (42)
R8: sc around in periwinkle blue (42)
R9: sc around in periwinkle blue (42)
Change to navy blue.
R10: sc around (42)
R11: sc around (42)
Change to periwinkle blue.
R12: sc around (42)
R13: sc around (42)
Change to navy blue.
R14: sc around (42)
R15: sc around (42)
Change to periwinkle blue.
R16: sc around (42)
R17: sc around (42)
R18: (5 sc, dec) ×6 (36)
R19: (4 sc, dec) ×6 (30)
R20: (3 sc, dec) ×6 (24)
R21: (2 sc, dec) ×6 (18)
R22: (sc, dec) ×6 (12)
Stuff firmly enough that the lower stripe does not collapse.
R23: dec ×6 (6)
Fasten off. Leave a 25 cm tail for sewing to the head.
Front Feet
Yarn: navy blue — Source: Standard amigurumi math.
Make 2.
R1: 6 sc in MR (6)
R2: inc ×6 (12)
R3: sc around (12)
R4: sc around (12)
R5: dec ×6 (6)
Do not overstuff. Fasten off and leave a 15 cm tail.
Back Feet
Yarn: navy blue — Source: Standard amigurumi math.
Make 2.
R1: 6 sc in MR (6)
R2: inc ×6 (12)
R3: sc around (12)
R4: sc around (12)
R5: dec ×6 (6)
Flatten the base slightly before sewing. Fasten off and leave a 15 cm tail.
Wings
Yarn: white — Source: Standard amigurumi math.
Make 2.
R1: 6 sc in MR (6)
R2: inc ×6 (12)
R3: (sc, inc) ×6 (18)
R4: (2 sc, inc) ×6 (24)
R5: sc around (24)
R6: sc around (24)
R7: (2 sc, dec) ×6 (18)
R8: (sc, dec) ×6 (12)
Do not stuff. Flatten the wing and close the edge with 6 sc through both layers (6). Fasten off and leave a 20 cm tail.
Top Leaves
Yarn: leaf green — Source: Standard amigurumi math.
Make 2.
R1: 6 sc in MR (6)
R2: inc ×6 (12)
R3: (sc, inc) ×6 (18)
R4: sc around (18)
R5: sc around (18)
R6: (sc, dec) ×6 (12)
R7: dec ×6 (6)
Flatten each leaf, pinch the base, and sew through both layers to make a raised oval leaf. Fasten off and leave a 25 cm tail.
Cheek Patches
Yarn: pale pink — Source: Standard amigurumi math.
Make 2.
R1: 6 sc in MR (6)
R2: inc ×6 (12)
Sl st to the next stitch (12)
Fasten off. Leave a 12 cm tail and do not stuff.
Embroidered Smile
Yarn: black embroidery thread — Source: photo-based face detail.
Thread a needle with black embroidery thread. Enter behind the head, come out one round below the eye line, make a shallow U-shaped smile across 4 stitches, then return through the same back exit point. Tie the ends inside the head seam area before assembly.
Photo Accessory Note
No separate prop or removable accessory is visible in the photo. The green top leaves are treated as the character-specific feature.
Assembly
- Sew the body to the underside of the head, placing the body’s first navy stripe just below the cheek level.
- Add extra stuffing into the neck join before closing the final 3 cm of seam.
- Sew the pink cheek patches under the eyes, one round below the eye centers.
- Embroider the smile after the cheeks are pinned, not before.
- Pin the wings to the back of the body across R10–R14, with 4 stitches between their inner edges.
- Sew each wing through both flattened layers so the white shapes sit upright.
- Attach the front feet under the first navy stripe, angled 20 degrees forward.
- Attach the back feet near the lower curve, 3 stitches behind the front feet on each side.
- Sew the two green leaves to the top of the head across R2–R5, with their bases touching at the center.
- Weave every tail through at least 3 cm of dense chenille fabric before trimming.
The completed bee measures about 13 cm tall when worked with the listed hook, yarn, and eye size.
7 Technical Tips
- Stitch marker drift: If the marker shifts more than 2 stitches from the rear center by R12, the stripes will spiral across the face. Move the color-change jog to the back before each navy round.
- Stuffing firmness: A loose body creates a flat lower band at R18–R23. Add stuffing in pea-sized pieces until the 42-stitch plateau feels rounded, not hollow.
- Invisible decrease pits: Chenille can expose holes on R20–R23 if the decrease is pulled too hard. Keep the working loop 2–3 mm tall and close the last 6 stitches with a needle.
- Eye placement timing: Install the 14 mm eyes after R14 of the head, before the opening narrows. If eyes are added after R18, the washers distort the face from inside.
- Velvet tension: Plush yarn hides skipped stitches, especially in navy rounds. Count every 42-stitch stripe before changing color, because one missing stitch makes the band tilt.
- Wing pinning: Wings sewn too low make the bee read as a blueberry with side bumps. Pin wing tops at the head-body seam and keep the inner wing gap at 4 stitches.
- Tail weaving: Short chenille tails can slip back out after handling. Weave each tail in three direction changes over at least 3 cm before trimming close.
Conclusion
Block the wings with pins before the final seam dries into position, then photograph the bee from the front and side to check leaf height. The next concrete step is to make one test body in scrap chenille and confirm that the 42-stitch plateau gives the same palm-sized width. This blueberry bee amigurumi works best when the leaf crown, cheeks, and wings are all visible in one front-facing view. Share the finished test on Pinterest and Instagram with the hashtag #BlueberryBeeAmigurumi. Which detail makes the character read as blueberry first: the green leaves or the navy fruit-banding?









