Introduction
A blue pumpkin loses its recognizable silhouette unless the vertical grooves are deep enough to divide the body into separate lobes. This blue crochet pumpkin pattern uses worsted or Aran yarn, a 4 mm hook, eight sculpted sections, and a curved olive-green stem. The finished pumpkin measures approximately 20–23 cm across. Its one-piece stuffed body is suitable for tabletop October displays, shelf arrangements, and coordinated fall decor.
The Design: What Makes This Blue Pumpkin Different
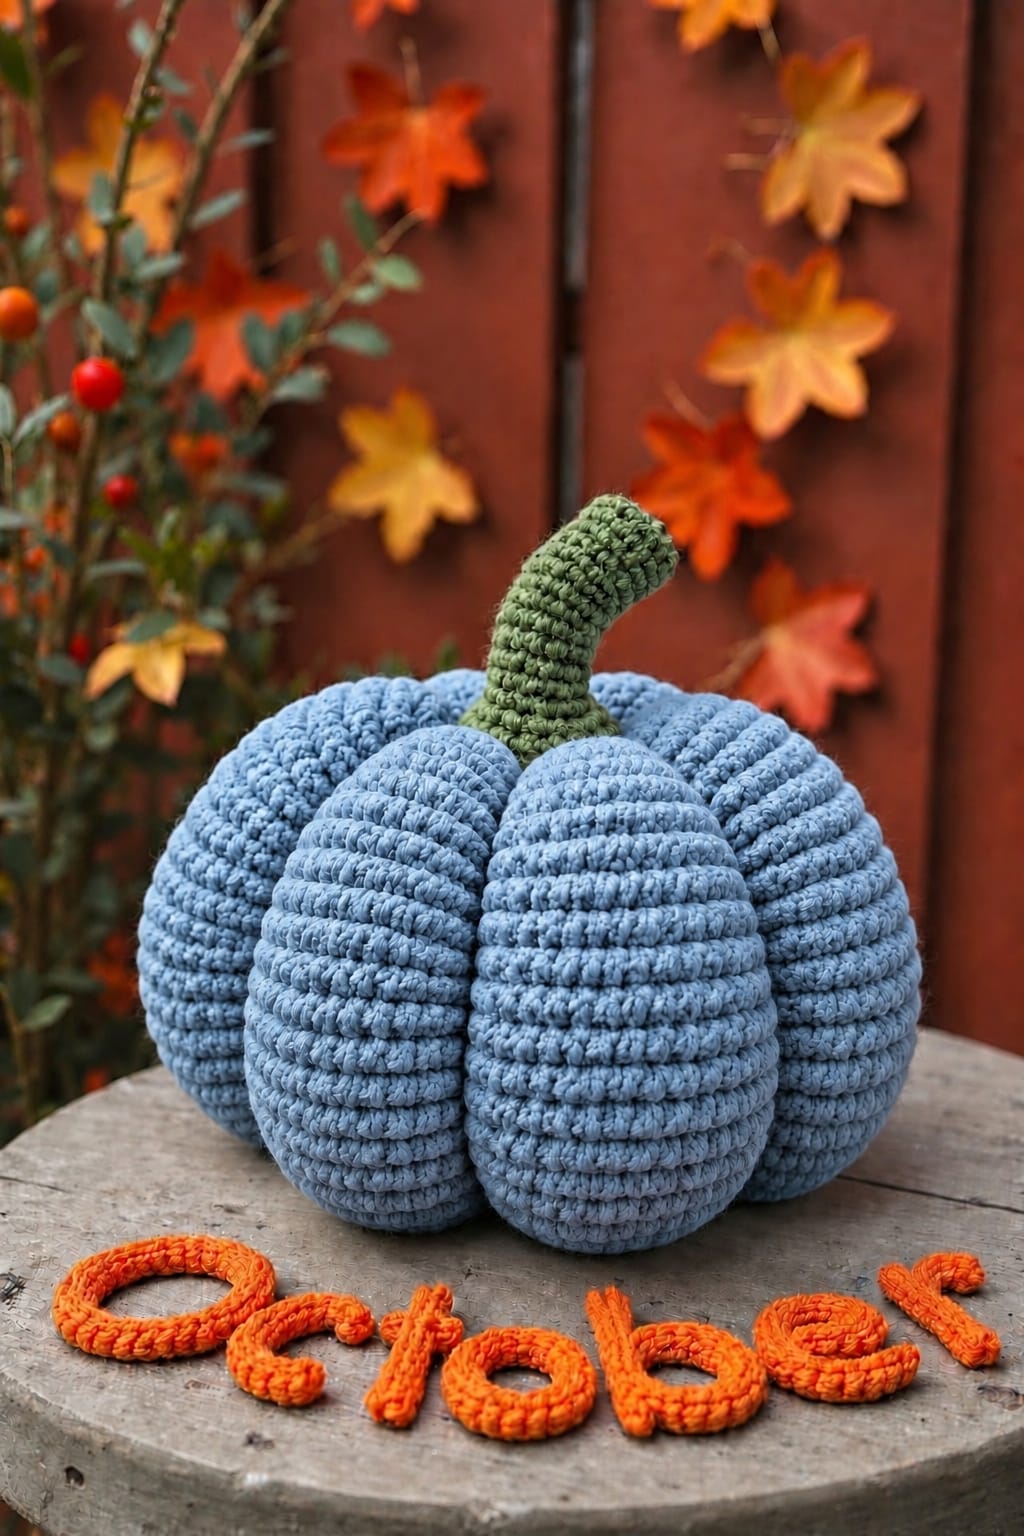
The photographed pumpkin combines a low, broad body with eight strongly separated lobes. That proportion matters. A taller center would produce an oval ball rather than the compressed pumpkin profile visible in the reference. External sculpting strands pull the top and bottom toward one another while simultaneously defining the vertical channels.
The surface also shows pronounced horizontal crochet ridges. Selected back-loop rounds reproduce that texture without interfering with the deeper vertical shaping. A long olive stem supplies contrast against the blue crochet pumpkin and bends gradually rather than standing as a straight cylinder.
The most common construction error is excessive stuffing. A tightly packed body resists compression, so the shaping strands remain on the surface instead of sinking into distinct grooves. This ribbed crochet pumpkin needs firm outer lobes but a slightly compressible center.
Project Info at a Glance
| Skill Level | Estimated Time | Finished Size | Hook | Best For |
|---|---|---|---|---|
| Intermediate | 4–6 hours | Approx. 20–23 cm wide | 4 mm | Fall displays, shelves, tables, pumpkin arrangements |
The dimensions are a photograph-based target rather than a measurement taken from the physical object. Published crochet pumpkin patterns span a wide range of yarn weights and finished sizes, so yarn diameter, stuffing density, and sculpting tension will affect the final measurement.
Materials and Tools
Yarn
- Dusty blue — worsted/Aran weight — approximately 180–230 g
- Olive green — worsted/Aran weight — approximately 20–30 g
- Blue shaping yarn — reserve approximately 8–10 m from the main yarn
A smooth cotton, cotton-acrylic blend, or tightly spun acrylic makes the horizontal ridges easier to see. Avoid yarn with a heavy halo if the goal is to reproduce the clearly defined stitch texture shown in the photograph.
Tools
- 4 mm crochet hook
- Polyester fiberfill
- Long tapestry or doll needle
- Locking stitch marker
- Eight temporary stitch markers
- Scissors
- Tape measure
Abbreviations
- MR — magic ring
- sc — single crochet
- inc — two single crochets in one stitch
- dec — invisible decrease
- sl st — slip stitch
- ch — chain
- BLO — back loop only
- FLO — front loop only
- st/sts — stitch/stitches
An invisible decrease is worked through the front loops of the next two stitches before completing one single crochet. It reduces the bump that a conventional decrease can leave on a stuffed surface.
Pattern — Step by Step
Use US crochet terminology. Work the pumpkin body in a continuous spiral. Move the stitch marker after every completed round.
Blue Pumpkin Body
Yarn: dusty blue.
R1: 6 sc in MR (6)
R2: inc ×6 (12)
R3: (1 sc, inc) ×6 (18)
R4: (2 sc, inc) ×6 (24)
R5: (3 sc, inc) ×6 (30)
R6: (4 sc, inc) ×6 (36)
R7: (5 sc, inc) ×6 (42)
The 42-stitch plateau produces the large body required for the photographed proportions.
R8: sc BLO around (42)
R9: sc around (42)
R10: sc BLO around (42)
R11: sc around (42)
R12: sc BLO around (42)
R13: sc around (42)
R14: sc BLO around (42)
R15: sc around (42)
R16: sc BLO around (42)
The alternating BLO rounds create horizontal surface ridges. They are secondary to the later vertical sculpting but help reproduce the strongly textured appearance of the reference.
R17: (5 sc, dec) ×6 (36)
R18: (4 sc, dec) ×6 (30)
R19: (3 sc, dec) ×6 (24)
Begin stuffing the pumpkin. Use small pieces rather than one compact mass.
R20: (2 sc, dec) ×6 (18)
Add stuffing around the outside of the body. Leave the central vertical axis slightly softer.
R21: (1 sc, dec) ×6 (12)
Complete the stuffing before the opening becomes smaller.
R22: dec ×6 (6)
Fasten off, leaving approximately 25 cm. Thread the tail through the front loops of the remaining six stitches and pull the opening closed.
Creating Eight Deep Pumpkin Ribs
The vertical channels are added after the body has been stuffed and closed. They create most of the pumpkin silhouette.
Cut approximately 150 cm of dusty-blue yarn.
Thread it through a long tapestry needle.
Insert the needle through the top center and bring it out through the bottom center.
Carry the yarn up the exterior of the pumpkin.
Insert the needle into the top center again and pass through to the bottom.
Pull the strand until it sinks approximately 8–12 mm into the stuffed body.
The first groove is complete.
Create the second groove directly opposite it.
Add a third and fourth groove at approximately 90-degree angles to the first pair.
The pumpkin is now divided into four large sections.
Add one new groove halfway between every existing pair.
This creates eight approximately equal lobes.
Do not tighten one groove completely before establishing the others. Moderate tension across all eight positions makes it easier to correct uneven segment widths.
Compressing the Pumpkin Shape
The reference has a broad body with a recessed top rather than a spherical center.
Pass a long blue strand through the top and bottom centers.
Pull the two centers toward one another by approximately 1–2 cm.
Check the pumpkin from the side.
The body should become wider relative to its height while the lobes remain rounded.
Secure the strand inside one of the vertical grooves.
Stop tightening if the lower surface becomes sharply concave. A modestly flattened base is preferable because the pumpkin needs to stand without rolling.
Curved Olive-Green Stem
Yarn: olive green.
R1: 6 sc in MR (6)
R2: sc BLO around (6)
R3: sc around (6)
R4: sc around (6)
R5: sc around (6)
R6: sc around (6)
R7: sc around (6)
R8: sc around (6)
R9: 2 sl st, 4 sc (6)
R10: 2 sl st, 4 sc (6)
R11: sc around (6)
R12: 2 sl st, 4 sc (6)
R13: sc around (6)
Fasten off, leaving approximately 35 cm for attachment.
The repeated slip stitches shorten one side of the tube. This creates the gradual bend visible in the photographed stem.
Leave the stem unstuffed if the yarn is sufficiently firm. For softer yarn, insert a narrow amount of fiberfill without packing it tightly.
Green Stem Base
Yarn: olive green.
R1: 6 sc in MR (6)
R2: inc ×6 (12)
Fasten off, leaving a 25 cm tail.
The 12-stitch disc covers the central blue closure and gives the six-stitch stem a wider attachment area.
Optional Stronger Horizontal Ridges
The photograph shows numerous raised horizontal lines across every lobe. Alternating BLO rounds creates a moderate version of this texture.
For deeper ridges, work surface slip stitches into selected unused front loops after the body has been completed but before sculpting.
Keep each surface stitch loose.
A tight decorative round can reduce the body circumference and create an unwanted horizontal indentation.
Do not cover every round with surface crochet. The eight vertical channels should remain the dominant shaping feature.
Assembly
- Close the blue body completely and identify the exact top and bottom centers before beginning the sculpting process.
- Create the first vertical groove and pull only until the shaping strand begins to sink into the surface.
- Add the directly opposite groove, followed by two perpendicular grooves to divide the body into four sections.
- Add four additional grooves midway between the first four so the pumpkin has eight approximately equal lobes.
- Pass a shaping strand through the center and compress the top and bottom toward one another by approximately 1–2 cm.
- Place the 12-stitch olive stem-base disc over the recessed blue crown and sew around its perimeter.
- Position the curved stem in the center of the green disc with its bend facing the intended front or side.
- Sew through all six stem stitches, the green base, and several blue body stitches so the tall stem cannot pivot.
- Massage the stuffing inside each blue lobe until the eight sections appear similar in width and remain rounded.
- Set the pumpkin on a flat surface, correct any lean, then weave all remaining tails through at least 5 cm of matching stitches.
The finished pumpkin should have eight rounded dusty-blue lobes, strong vertical channels, horizontal crochet ridges, a recessed crown, and one curved olive-green stem.
7 Technical Tips
- The pumpkin becomes too tall: Do not add extra plateau rounds after R16 without measuring the body. Additional straight rounds increase height but do little to improve the broad pumpkin silhouette.
- Vertical grooves remain shallow: Keep the central stuffing flexible enough for the shaping strands to sink approximately 8–12 mm. Packing the center firmly prevents meaningful compression.
- One lobe becomes narrower than the others: Mark all eight groove positions before final tightening. Correct any spacing difference greater than approximately 1 cm while the sculpting strands are still loose.
- White stuffing shows through blue stitches: Move down approximately 0.5 mm in hook size or reduce stuffing pressure. Increasing fiberfill will widen the existing gaps rather than hide them.
- Stem remains straight: Work two slip stitches on the same side during R9, R10, and R12. Alternating short and normal-height stitches produces the bend without folding the finished stem manually.
- Stem falls sideways: Attach through the complete six-stitch base and several surrounding body stitches. Sewing through only two opposite points creates a hinge beneath the long stem.
- Horizontal ridges overpower the lobes: Limit BLO texture to alternating rounds or selected surface lines. Closely stacked ridges can visually interrupt the eight vertical channels that define the pumpkin.
Why the Pumpkin Uses a 42-Stitch Plateau
The reference shows a relatively large decorative pumpkin with broad lobes. A 42-stitch maximum gives enough circumference to divide the surface into eight visible sections while keeping the pattern manageable in worsted or Aran yarn.
Stopping at 30 stitches produces a substantially smaller pumpkin. A 36-stitch plateau creates a medium version. Moving to 42 stitches gives the large format used here.
The number does not create the ribs by itself. Those are formed after stuffing with the external shaping strands.
For that reason, the 42 stitches can remain evenly distributed around the body rather than being mathematically divided into eight stitch groups during crochet.
The sculpting stage provides more control over the final width of each lobe.
Why the Pumpkin Needs External Sculpting
Ordinary increase and decrease rounds create a smooth stuffed form. They cannot independently produce channels as deep as those shown in the reference.
External shaping yarn solves the problem by compressing the stuffing along selected vertical lines.
The yarn travels from the top center through the body, around the outside, and back through the center. Tightening that loop pulls the surface inward.
Eight loops divide the circumference into eight rounded lobes.
The technique also compresses the top and bottom centers, which helps transform a round amigurumi form into a recognizable pumpkin.
Use the same blue yarn as the body. A contrasting sculpting strand would remain visible inside the channels.
Choosing the Blue Yarn
The photographed body sits between dusty blue, slate blue, and pale denim. A muted shade works particularly well with an olive-green stem because both colors have restrained saturation.
Choose a smooth yarn with visible stitch definition. The horizontal ridges are an important part of the design and become less distinct with brushed or heavily fuzzy fibers.
Cotton produces firm lobes and crisp ridges. Acrylic reduces finished weight and rebounds more readily after storage.
A cotton-acrylic blend provides characteristics between those two options.
Keep the body and shaping yarn identical. Even a slightly different blue can appear as eight visible stripes when pulled tightly into the grooves.
Choosing the Green Stem Color
The reference uses a muted natural green rather than a bright leaf shade.
Olive, moss, sage, or lichen green will reproduce the contrast effectively.
The stem should remain clearly darker or more saturated than the blue body so its narrow shape does not disappear against the crown.
Use the same yarn weight for the body and stem unless a deliberately thinner stalk is required.
If using a finer green yarn, hold it double or move down in hook size. A loose six-stitch tube can become too soft to maintain the photographed curve.
Making a Smaller Blue Pumpkin
For a smaller version, stop the increase sequence at 30 stitches.
R1: 6 sc in MR (6)
R2: inc ×6 (12)
R3: (1 sc, inc) ×6 (18)
R4: (2 sc, inc) ×6 (24)
R5: (3 sc, inc) ×6 (30)
R6–R11: sc around (30)
R12: (3 sc, dec) ×6 (24)
R13: (2 sc, dec) ×6 (18)
R14: (1 sc, dec) ×6 (12)
R15: dec ×6 (6)
Stuff before completing the final decrease rounds.
Use six deep grooves for a simpler small pumpkin or retain eight grooves when working with a relatively fine worsted yarn.
Reduce the stem by approximately three rounds so it remains proportional to the smaller body.
Making a Medium Blue Pumpkin
A 36-stitch plateau produces a useful intermediate size.
Increase normally from 6 to 36 stitches:
R6: (4 sc, inc) ×6 (36)
Work approximately seven or eight straight rounds.
Then reverse the shaping:
Decrease 1: (4 sc, dec) ×6 (30)
Decrease 2: (3 sc, dec) ×6 (24)
Decrease 3: (2 sc, dec) ×6 (18)
Decrease 4: (1 sc, dec) ×6 (12)
Decrease 5: dec ×6 (6)
Shape the finished body with six or eight grooves depending on the visual width of each section.
Making a Larger Pumpkin
Continue the six-stitch increase sequence beyond 42 stitches.
Next Increase Round: (6 sc, inc) ×6 (48)
Next Increase Round: (7 sc, inc) ×6 (54)
Maintain the maximum circumference until the body reaches the required height.
Then reverse the sequence:
54 → 48 → 42 → 36 → 30 → 24 → 18 → 12 → 6 stitches.
Large versions require significantly more fiberfill. Keep the central axis less densely packed than the outer circumference or the sculpting yarn will be difficult to tighten.
Increase the shaping-strand length as well. A pumpkin above 30 cm diameter may require more than 2 m for a continuous sculpting strand.
How Firmly to Stuff the Pumpkin
The correct stuffing density is a compromise between structural firmness and compressibility.
Push small pieces of fiberfill toward the outer walls first.
Rotate the pumpkin while stuffing so one side does not become denser than another.
Keep the central vertical area comparatively soft.
Before closing the final rounds, press a finger into the top center. It should move inward slightly without leaving a permanent cavity.
If the surface feels rigid, remove a small quantity of stuffing before completing R22.
If the fabric collapses after light pressure, add more around the outer lobes while leaving the center unchanged.
Keeping the Eight Lobes Even
Establish the groove positions geometrically rather than guessing around the circumference.
Make the first groove.
Place the second directly opposite it.
Add two more halfway between those positions. The body now has four equal quarters.
Add the final four grooves halfway between the existing lines.
Viewed from above, the shaping strands should resemble eight evenly spaced spokes.
Only after the spacing is correct should the grooves be tightened to full depth.
If one lobe remains visibly larger, loosen the two grooves bordering that section and reposition them slightly toward its center.
Making the Pumpkin Stand Flat
A heavily sculpted pumpkin can develop a rounded lower center that causes rocking.
Keep slightly less stuffing directly against the bottom closure.
After all eight grooves are established, press the pumpkin onto a flat surface.
Massage stuffing outward from the lower center into the surrounding lobes.
Check the base again after attaching the stem because the stem adds weight above the center.
If the pumpkin leans, adjust the stuffing rather than tightening one shaping groove excessively. Unequal sculpting tension can correct the lean temporarily but distort the lobe proportions.
How the Curved Stem Works
A straight six-stitch tube naturally stands upright. The photographed stalk requires one side to be shorter.
Slip stitches provide that difference in height.
Two slip stitches followed by four single crochets make one side of the round shorter than the other. Repeating the sequence in selected rounds gradually pulls the stem toward the short side.
Spacing the shaping rounds apart creates a gentle bend.
Working the asymmetric sequence in every round would create a much sharper curve.
Before sewing the stem in place, rotate it until its most attractive curve faces the intended viewing direction.
Creating a Coordinated Pumpkin Set
The blue version can form the largest piece in a three-pumpkin arrangement.
Make the main pumpkin with the 42-stitch body.
Use the 36-stitch variation for the second piece and the 30-stitch version for the third.
Keep all stems olive green to connect the set visually.
For body colors, combine dusty blue with cream, rust, charcoal, muted mustard, or brown.
Maintain comparable rib depth across all sizes. A small pumpkin with shallow grooves can look unrelated to a larger strongly sculpted version even when the yarn palette matches.
Care and Shape Maintenance
Follow the washing instructions for the selected yarn. Stuffed crochet decor can take considerably longer to dry than a flat swatch.
Spot cleaning is often practical for decorative pumpkins because it limits the amount of moisture entering the fiberfill.
If the entire piece is washed, reshape all eight lobes while damp.
Check the stem curve before drying. Support it temporarily if the wet yarn becomes too flexible to hold the intended bend.
Allow the pumpkin to dry completely before storing it.
During seasonal storage, avoid placing heavy objects on top. Long-term compression can flatten the lobes and alter the sculpted channels.
Conclusion
The eight grooves determine whether this blue form reads as a pumpkin rather than a round stuffed object. Build the body to 42 stitches, keep the central stuffing slightly flexible, and establish opposite sculpting lines before tightening the full set of ribs. The alternating BLO rounds add the horizontal texture visible in the reference, while the olive stem supplies a contrasting vertical element. Record the finished diameter before resizing a coordinated set. Save this blue crochet pumpkin pattern to Pinterest or share the finished October display on Instagram with #BlueCrochetPumpkin. For this specific pumpkin, would you keep all eight lobes equal or make two of them deliberately wider?









