Introduction
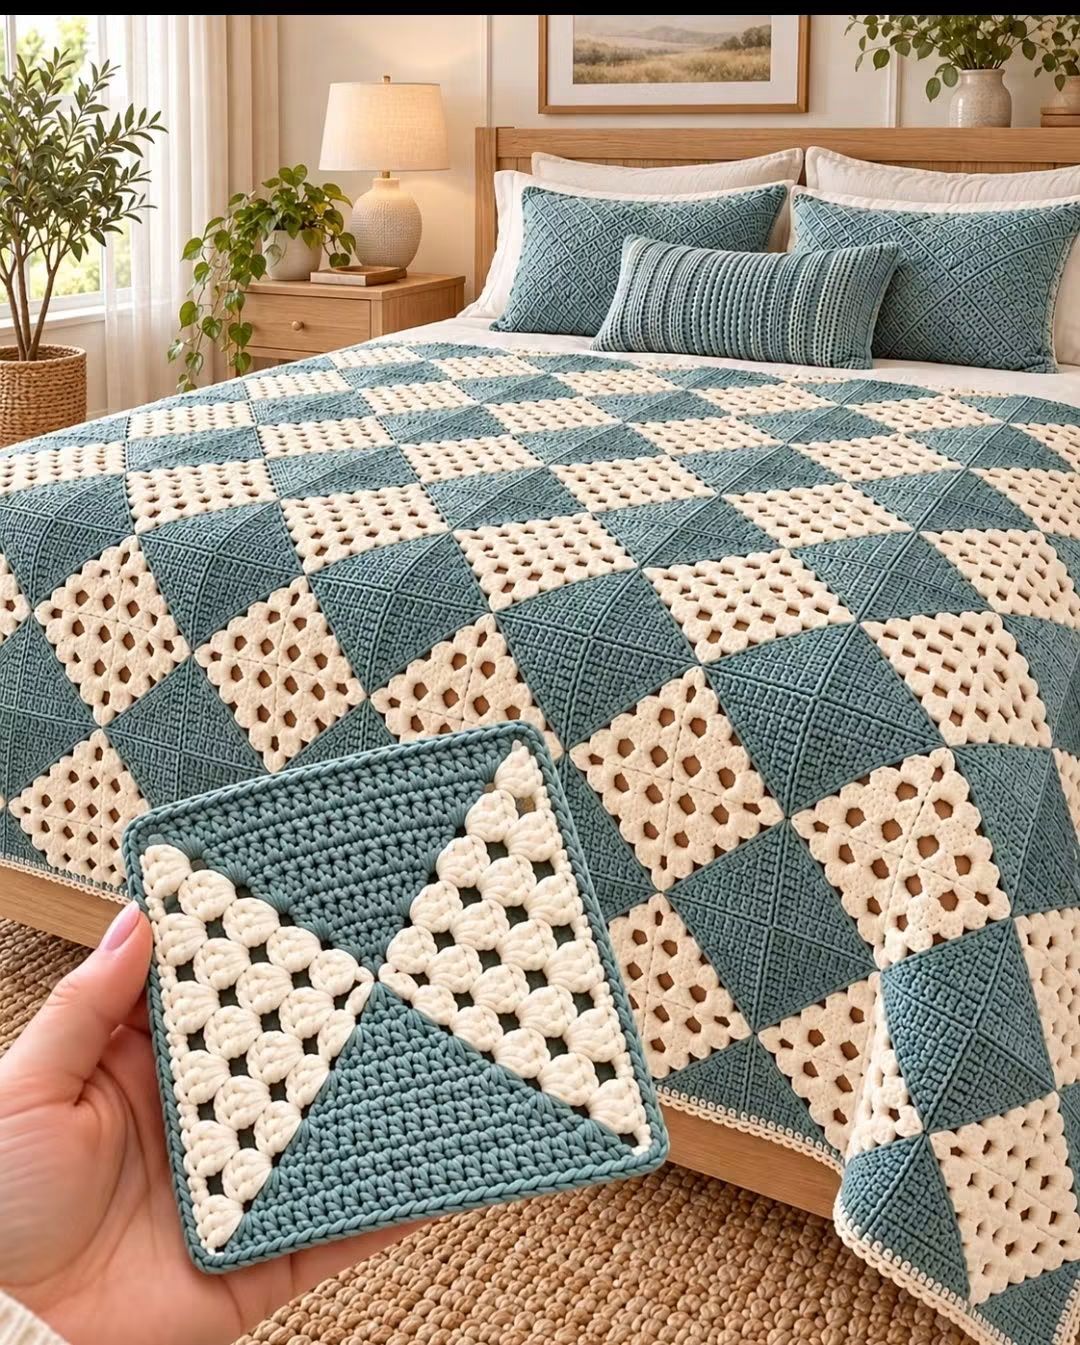
The diagonal divisions in this bedspread make its blue and cream squares look like a continuous geometric quilt. This blue and cream crochet patchwork blanket pattern combines solid textured crochet with traditional openwork granny squares to create a coordinated bed covering. Using DK yarn and a 4.5 mm crochet hook, the project can be adapted to different mattress sizes. The modular construction makes it possible to measure, arrange, and join individual sections before completing the blanket.
The Design: What Makes This Crochet Blanket Different
The photographed blanket uses two contrasting stitch textures. Dusty teal sections contain dense stitches and diagonal raised lines, while cream sections use open granny-style clusters. Their arrangement creates a geometric patchwork pattern across the entire bed.
The most distinctive detail is the diagonal division within individual blocks. Rather than using only ordinary square motifs, the reference combines triangular areas that meet at central points, creating a pinwheel effect.
For this accessible variation, solid crochet squares alternate with openwork granny squares. The result retains the main color contrast and modular structure, although it does not reproduce the exact triangular construction.
A common mistake when making a crochet patchwork bedspread is joining squares with different finished measurements. Even a small difference can create distorted seams across a large blanket.
Project Information
| Feature | Details |
|---|---|
| Skill Level | Intermediate |
| Estimated Time | Several weeks, depending on size and working speed |
| Suggested Square Size | 15 × 15 cm after blocking |
| Suggested Hook | 4.5 mm |
| Yarn Weight | DK / Light Worsted #3 |
| Construction | Individual squares joined into a rectangular blanket |
| Best Uses | Bedspread, throw blanket, bedroom decoration |
The square measurement is a design target rather than a verified measurement from the photograph. Comparable published granny-square blankets use DK yarn and hooks ranging from approximately 3.75 mm to 5.5 mm.
Materials and Tools
Yarn
Choose two smooth DK-weight yarns with similar thickness and fiber composition.
- Dusty teal yarn: DK weight for the solid textured squares.
- Warm cream yarn: DK weight for the openwork granny squares.
- Joining yarn: Additional teal or cream yarn for sewing the squares together.
- Border yarn: Cream yarn for the final decorative edging.
Do not purchase the complete yarn quantity until you have made and weighed one square of each type. Solid squares generally consume a different amount of yarn than openwork squares of the same dimensions.
Tools
- 4.5 mm crochet hook
- Tapestry needle
- Scissors
- Stitch markers
- Measuring tape
- Digital kitchen scale
- Blocking mats
- Rust-resistant pins
Crochet Abbreviations
- ch: Chain
- sc: Single crochet
- hdc: Half double crochet
- dc: Double crochet
- sl st: Slip stitch
- st: Stitch
- sp: Space
- RS: Right side
- WS: Wrong side
- FO: Fasten off
All instructions use US crochet terminology.
Understanding the Patchwork Construction
The simplified blanket consists of two square types.
Square A is a solid dusty-teal square worked in rows of half double crochet.
Square B is a cream granny square worked in rounds using groups of three double crochet stitches.
Both types must finish at the same blocked width and height.
Arrange the squares in alternating rows to create a checkerboard pattern.
The photographic reference uses a more elaborate diagonal arrangement. A closer version would require individually constructed triangular motifs or specially designed diagonal-color squares.
Square A: Solid Dusty Teal Crochet Square
Yarn: dusty teal.
This square provides the dense areas of the blanket.
Foundation
Ch 31.
Row 1: Beginning in the second chain from the hook, work 1 hdc in each chain across. (30 hdc)
Ch 1 and turn.
Row 2: Work 1 hdc in each stitch across. (30 hdc)
Ch 1 and turn.
Row 3: Work 1 hdc in each stitch across. (30 hdc)
Ch 1 and turn.
Rows 4 onward: Repeat Row 2 until the square’s height matches its width.
Fasten off, leaving a 20 cm tail for joining.
The number of rows required depends on your gauge. Do not assume that 30 rows will produce a square simply because the foundation contains 30 stitches.
Checking the Solid Square
Place the completed square on a flat surface.
Measure its width across the center.
Measure its height from the foundation edge to the final row.
Adjust the row count until the two measurements match.
For the suggested blanket layout, aim for approximately 15 × 15 cm after blocking.
If the square is substantially wider than 15 cm, make another sample using fewer foundation chains or a smaller hook.
If it is too narrow, increase the foundation length or adjust the hook size.
Adding Texture to the Teal Squares
The photographed teal sections contain diagonal raised lines.
A simple half-double-crochet square does not create this detail automatically.
For a decorative variation, add surface slip stitches after completing the square.
Thread the working yarn behind the fabric.
Insert the hook through the front surface near one corner.
Draw the yarn through to form a loop.
Move diagonally across the fabric, working loose surface slip stitches along the selected line.
Keep the stitches relaxed to avoid gathering the square.
Repeat in the opposite diagonal direction if you want a crossed texture.
This surface treatment is optional and will not reproduce the exact woven-looking stitch pattern in the reference image.
Square B: Cream Granny Square
Yarn: warm cream.
The cream squares use the classic granny-square construction.
Each round contains four corner spaces, and the number of three-double-crochet groups increases as the square expands.
Round 1
Make a magic ring.
Ch 3, counting as the first dc.
Work 2 dc into the ring.
Ch 2.
Repeat [3 dc, ch 2] three more times.
Join with a slip stitch into the top of the beginning ch-3.
Stitch count: 12 dc and four ch-2 corner spaces.
Round 2
Slip stitch into the next corner space.
Ch 3 and work 2 dc into the same corner.
Ch 2 and work 3 dc into the same corner.
Ch 1.
In each remaining corner, work:
(3 dc, ch 2, 3 dc), ch 1.
Join with a slip stitch.
Stitch count: 24 dc, four corner spaces, and four side spaces.
Round 3
Slip stitch into a corner space.
Work:
(3 dc, ch 2, 3 dc) into the corner.
Ch 1.
Work 3 dc into the next side space.
Ch 1.
Repeat the same sequence around the remaining three sides, working the corner group into each corner space.
Join with a slip stitch.
Stitch count: 36 dc and four corner spaces.
Round 4
Slip stitch into a corner space.
Work:
(3 dc, ch 2, 3 dc) into the corner.
Ch 1.
Work 3 dc into each side space, placing ch 1 between neighboring groups.
Continue around the square.
Join with a slip stitch.
Stitch count: 48 dc and four corner spaces.
Round 5
Repeat the same granny-square construction.
Work:
(3 dc, ch 2, 3 dc) into each corner space.
Work 3 dc into every side space, separated by ch 1.
Join with a slip stitch.
Stitch count: 60 dc and four corner spaces.
Fasten off.
Measure the square after blocking.
If it does not match the teal square, adjust the number of rounds or remake the sample with a different hook size.
Granny Square Stitch Count Reference
| Round | Double Crochet Stitches | Corner Spaces |
|---|---|---|
| 1 | 12 | 4 |
| 2 | 24 | 4 |
| 3 | 36 | 4 |
| 4 | 48 | 4 |
| 5 | 60 | 4 |
Each additional round adds four groups of three double crochet stitches, increasing the total by 12 dc.
This progression follows the standard granny-square structure.
Planning the Blanket Size
Measure your mattress before deciding how many squares to make.
Record the mattress width and length.
Determine the desired overhang along both sides and the foot of the bed.
For example, a blanket measuring approximately 180 × 210 cm can be planned using 15 cm squares.
At that size, the layout requires:
- 12 squares across for approximately 180 cm of width.
- 14 squares down for approximately 210 cm of length.
- 168 squares total before adding the border.
With a balanced alternating layout, make 84 teal squares and 84 cream squares.
These measurements assume the joined squares retain their blocked dimensions. The joining method and final border can change the completed size.
Arranging the Squares
Lay the completed squares on a clean floor or large table.
Begin the first row with a teal square.
Alternate teal and cream across the row.
Begin the second row with a cream square.
Continue alternating the starting color for each row.
This arrangement produces a checkerboard layout.
Before joining, photograph the complete arrangement.
The photograph provides a useful reference if the squares become mixed during assembly.
Check that no two squares of the same color touch along a horizontal or vertical edge.
How to Join the Crochet Squares
A flat joining method works well for this design because it allows the different stitch textures to remain visible.
Mattress stitch is one option for creating a nearly invisible seam.
Step 1: Prepare Two Squares
Place two completed squares beside each other with their right sides facing upward.
Align the corners.
Use stitch markers to hold the edges in position.
Step 2: Thread the Needle
Cut a length of joining yarn approximately three times the seam length.
Thread it through a tapestry needle.
Begin at one corner.
Step 3: Sew the Edges Together
Insert the needle through an edge loop of the first square.
Pass it through the corresponding edge loop of the second square.
Continue alternating between the two squares.
Keep the stitches evenly spaced.
Draw the yarn snug enough to close the gap without pulling the fabric into a ridge.
Step 4: Complete the Rows
Join the squares into horizontal strips.
Lay the strips flat and compare their lengths.
Next, join the strips together to form the complete blanket.
At four-square intersections, align all corners before tightening the seam.
A flat join prevents the intersections from becoming excessively bulky.
Adding a Cream Crochet Border
A narrow cream border provides a clean finish and visually connects the openwork squares.
Attach cream yarn at one corner of the completed blanket.
Work single crochet stitches evenly around the perimeter.
At each outer corner, work:
(sc, ch 2, sc).
Continue around the entire blanket.
Join with a slip stitch.
For a slightly wider border, work another round of single crochet.
Keep the corner increases consistent.
Do not add excessive stitches along the straight edges because they can produce unwanted rippling.
Creating a Decorative Final Edge
The reference blanket has a relatively narrow outer finish.
A simple edging allows the geometric pattern to remain the main feature.
For a decorative variation, work a final round of slip stitches.
Use cream yarn and maintain relaxed tension.
At the corners, preserve the existing corner spaces.
If the border begins pulling inward, use a slightly larger hook for the slip-stitch round.
Fasten off and weave in the remaining yarn tail.
Making Matching Crochet Pillow Covers
The photograph includes two large textured teal pillows and a smaller rectangular cushion.
The pillow covers coordinate with the blanket but use denser stitch patterns.
For a simplified matching cover, crochet two solid teal panels using half double crochet.
Measure the intended pillow insert before determining the foundation length.
Work each panel until it reaches the required dimensions.
Add diagonal surface slip stitches to the front panel if desired.
Place the panels together with the wrong sides facing.
Join three sides using single crochet or mattress stitch.
Add an envelope opening or another removable closure to the final side.
The long rectangular cushion can use vertical textured rows instead of diagonal lines.
Assembly and Finishing
- Measure the mattress and calculate the desired finished blanket dimensions.
- Make one teal sample square and one cream granny square.
- Block both samples and adjust their dimensions until they match.
- Weigh the samples to estimate the required yarn quantity.
- Complete the planned number of teal squares.
- Complete the matching number of cream granny squares.
- Arrange the squares in alternating rows and photograph the layout.
- Join the squares into strips, then connect the strips into a rectangular blanket.
- Work the cream outer border and check that all four corners lie flat.
- Weave in the yarn tails, finish the matching pillow covers, and measure the completed blanket.
The completed blanket should contain evenly sized alternating squares, flat seams, and a consistent cream perimeter.
7 Technical Tips for Better Patchwork Blankets
- Match the square dimensions. A 5 mm difference between neighboring squares can accumulate across a long row. Block the sample squares to the same measurement before beginning the full blanket.
- Count every granny-square round. Round 5 must contain 60 double crochet stitches and four corner spaces. Missing a cluster can distort the square and complicate joining.
- Measure solid squares by width and height. Thirty half double crochet stitches do not automatically produce thirty rows of equal height. Stop working when the panel forms a true square.
- Keep surface stitches loose. Tight diagonal slip stitches can pull the teal squares out of shape. Check the panel after each decorative line.
- Align the corners before joining. A misplaced corner creates visible distortion at four-square intersections. Use locking markers to hold corresponding points together.
- Weigh both square types separately. Dense teal squares may use more yarn than cream openwork squares. Calculate the required yarn quantity from the weight of each finished sample.
- Check the border tension. Too many stitches along the perimeter produce waves, while too few make the edges curl inward. Lay the blanket flat after each border round.
Choosing the Best Yarn
DK yarn is a practical starting point for a blanket containing both solid and openwork crochet.
It produces relatively lightweight motifs while allowing the stitch textures to remain visible.
Acrylic is commonly used for blankets because it is available in many colors and is generally easy to maintain.
Cotton can provide sharper stitch definition but may increase the overall weight of a large bedspread.
Choose two yarns with comparable thickness and similar washing instructions.
Significant differences in yarn weight can make the teal and cream squares behave differently after cleaning.
How Much Yarn Will You Need?
The total yarn requirement depends on the blanket size and the weight of the finished squares.
Make one square of each type.
Weigh each sample using a digital kitchen scale.
Multiply the teal square weight by the total number of teal squares.
Repeat the calculation for the cream squares.
Add the estimated joining and border requirements.
Include an allowance for gauge differences and finishing.
For example, if a teal square weighs 20 g and the blanket requires 84 teal squares, the teal sections alone would require approximately 1,680 g.
This example is a calculation, not a measured yarn requirement for the photographed bedspread.
How to Make a Smaller Throw Blanket
The same two-square arrangement can be adapted for a sofa throw.
Using 15 cm squares, a layout of eight squares across and ten squares down produces approximately 120 × 150 cm before the border.
This requires 80 squares total.
Make 40 teal squares and 40 cream squares.
Arrange them in alternating rows.
Join and finish using the same method as the larger blanket.
How to Make a Larger Bedspread
For a larger bed, increase the number of squares rather than enlarging only the outer border.
Keep the square dimensions consistent.
Calculate the desired finished width and length before starting.
Remember to account for the side overhang and any additional drop at the foot of the bed.
A larger blanket may become heavy, especially when worked with dense cotton yarn.
Support the fabric on a table while joining to prevent its weight from stretching the seams.
Color Variations
Dusty teal and warm cream create a restrained geometric palette.
The same construction can be worked in other two-color combinations.
- Sage green and ivory for a botanical-inspired bedroom.
- Navy blue and white for a stronger geometric contrast.
- Terracotta and cream for a warmer palette.
- Charcoal and oatmeal for a neutral contemporary design.
- Dusty rose and beige for a softer color arrangement.
Keep the dense squares in the darker color and the openwork squares in the lighter color when you want the texture difference to remain prominent.
Blocking the Completed Squares
Blocking is particularly important when combining different crochet stitches.
Solid half-double-crochet fabric and open granny clusters may relax differently.
Block each square according to the yarn manufacturer’s care instructions.
Use a measuring template to maintain consistent dimensions.
Pin the four corners first.
Adjust the sides until they are straight.
Allow the squares to dry completely before removing the pins.
Do not stretch a significantly undersized square to compensate for incorrect gauge.
Care and Storage
Follow the care instructions for the selected yarn.
Large crochet blankets can become heavy when wet, so support the fabric during washing and drying.
Dry flat when recommended.
Avoid hanging a wet blanket from a narrow line because the weight can stretch the seams.
For storage, fold the blanket loosely along its natural square divisions.
Keep it in a dry location away from prolonged direct sunlight.
Conclusion
The alternating solid and openwork squares make this blue-and-cream blanket a practical modular project for a coordinated bedroom. Begin with one sample of each square type, confirm their blocked measurements, and calculate yarn consumption before producing the complete set. The simplified checkerboard arrangement captures the main color contrast of the reference, while the original photograph uses more complex diagonal and triangular sections. Join the finished squares with flat seams and add a narrow cream border. Save this blue and cream crochet patchwork blanket pattern to Pinterest and share your finished project on Instagram using #BlueCreamCrochetBlanket. Would you prefer the simplified checkerboard layout or the diagonal pinwheel construction shown in the photograph?









