Introduction
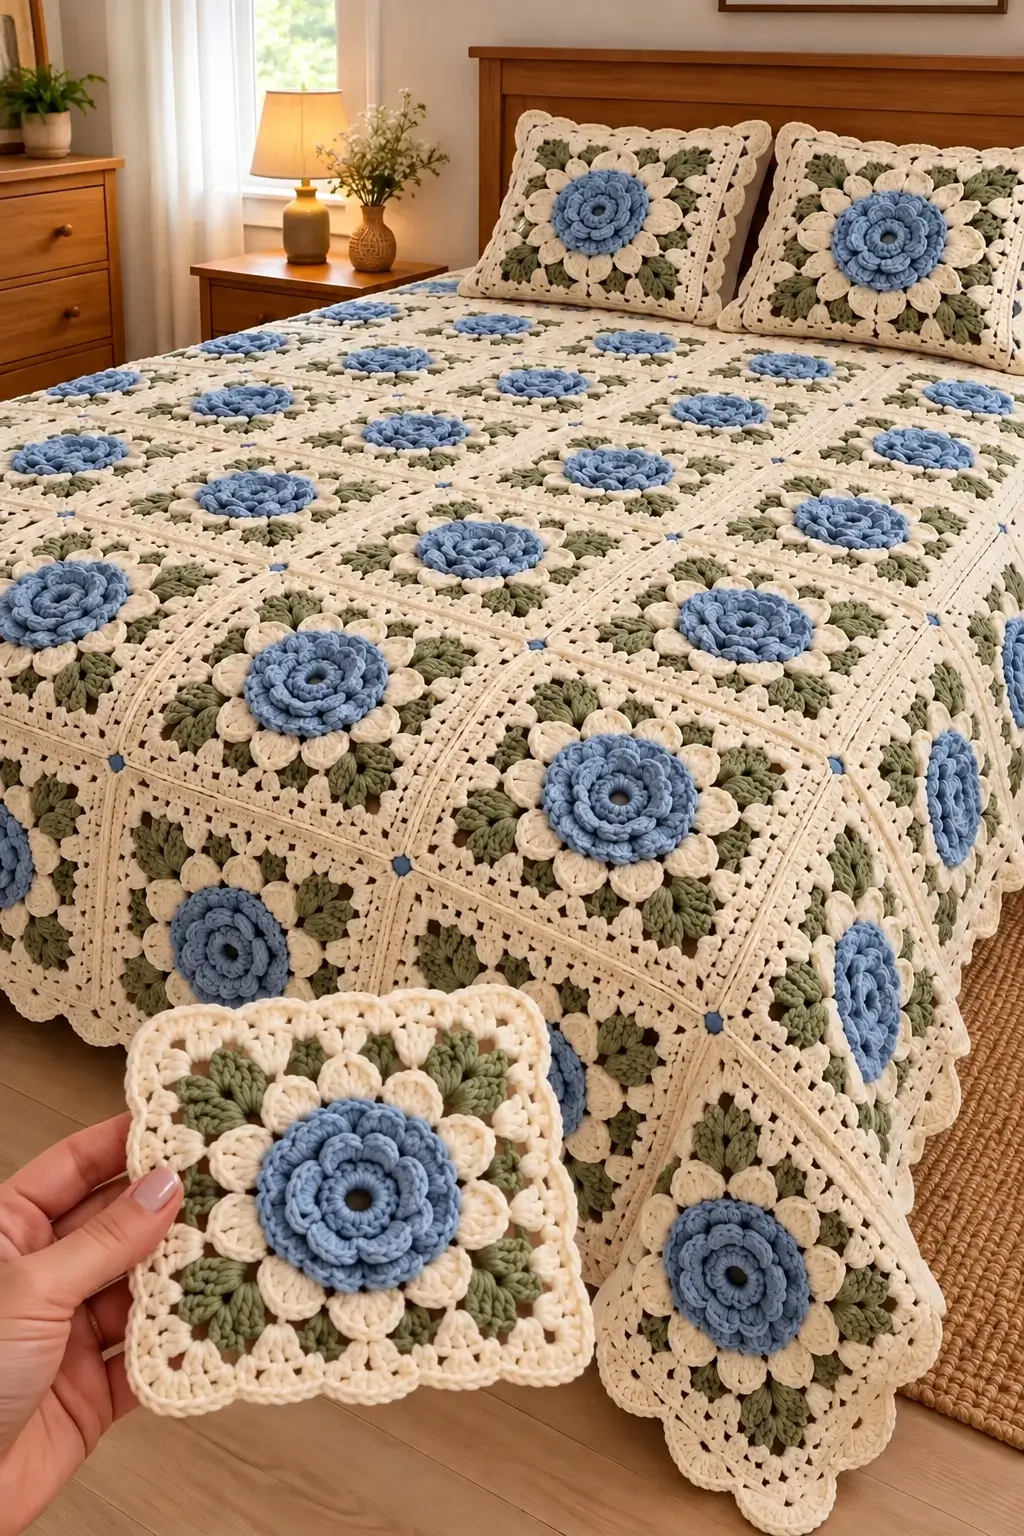
A raised blue rose needs enough depth to dominate the square without pulling its four cream corners inward. This blue 3D rose granny square crochet bedspread pattern separates the layered flower, cream petals, sage leaves and structural square frame so each component can be shaped independently. Use medium-weight yarn with a 5.0 mm hook and target approximately 18–20 cm for each blocked motif.
The Design: What Makes This Flower Square Different
The square is organized in concentric layers. A dimensional dusty-blue rose forms the center. Cream petals create a second floral ring, sage-green leaves fill the spaces between them, and a warm-cream openwork frame converts the circular flower into a stable square.
The central rose is intentionally raised rather than pressed into the background. Its petals become progressively larger from the center outward, producing the stacked appearance visible in the reference. The leaves sit lower so they do not compete with the flower.
The structural cream rounds are worked behind the decorative elements. That separation matters when dozens of motifs are joined: seams carry the weight of the bedspread while the rose petals remain free. The most common failure is adding too many stitches behind the flower, which causes the square to ripple before joining.
Project Info at a Glance
| Skill Level | Construction | Target Square | Hook | Best For |
|---|---|---|---|---|
| Intermediate | Layered flower with structural square frame | 18–20 cm | 5.0 mm | Bedspreads, throws and matching pillow covers |
Materials and Tools
Yarn
- Dusty blue — worsted/Aran #4 — layered rose center
- Warm cream — worsted/Aran #4 — outer petals, square frame, joining and border
- Sage green — worsted/Aran #4 — decorative leaves
A smooth cotton blend or low-fuzz acrylic keeps the raised petals and leaves defined. All three colors should have comparable thickness and elasticity.
Tools
- 5.0 mm crochet hook
- Yarn needle
- Scissors
- Locking stitch markers
- Tape measure
- Blocking mats
- Rust-resistant pins
- Digital scale for yarn calculations
Abbreviations
- MR — magic ring
- ch — chain
- sl st — slip stitch
- sc — single crochet
- hdc — half double crochet
- dc — double crochet
- tr — treble crochet
- BLO — back loop only
- FLO — front loop only
- sp — space
- st/sts — stitch/stitches
- RS — right side
- WS — wrong side
- FO — fasten off
Pattern — Step by Step
This is an original photo-inspired construction. Make one complete motif first, block it and use its actual measurement as the master size for the complete bedspread.
Blue Rose Center
With dusty blue, make a MR.
Round 1
Ch 1.
Work 12 sc into MR.
Join with a sl st. (12)
Round 2
Ch 1.
Work 2 sc in every stitch.
Join. (24)
Round 3 — Inner Petal Foundation
Working FLO, repeat:
sl st in next st, ch 3, skip 1 st
around.
Join.
This creates 12 small petal loops.
Inner Blue Petals
Into each ch-3 loop work:
(sc, hdc, 2 dc, hdc, sc).
Repeat around.
Join with a sl st.
The petals should overlap slightly rather than lying completely flat.
Second Rose Layer Foundation
Working behind the first petal layer, join blue into the unused loops from Round 2.
Repeat:
sl st, ch 4, skip 1 structural stitch
around.
Keep every loop behind the first row of petals.
Second Blue Petal Layer
Into each ch-4 loop work:
(sc, hdc, 3 dc, hdc, sc).
Repeat around.
Push the first petal layer forward as you work.
Third Rose Layer Foundation
Join blue behind the second layer.
Create larger loops using:
ch 5, sl st into the next structural attachment point.
Repeat around.
The exact number of loops may be adjusted to the available structural stitches, but keep them evenly distributed.
Third Blue Petal Layer
Into each ch-5 loop work:
(sc, hdc, 2 dc, 2 tr, 2 dc, hdc, sc).
Repeat around.
Join.
FO blue.
Shaping the Blue Rose
Use your fingers to lift the innermost petals toward the center.
Allow the middle layer to overlap the first.
Spread the largest petals slightly farther outward.
Do not block the rose flat. The center should retain approximately 1.5–2.5 cm of relief.
Cream Petal Foundation
Turn the flower to the wrong side.
Join warm cream into the structural loops behind the largest blue petals.
Create 8 evenly spaced loops around the flower:
ch 6, sl st into the next attachment point.
Repeat until eight loops have been formed.
Cream Petals
Turn to the right side.
Into each ch-6 loop work:
sc, hdc, 2 dc, 3 tr, 2 dc, hdc, sc.
Repeat for all eight petals.
Join.
FO cream.
Defining the Cream Petals
The cream petals should extend beyond the blue rose but remain lower than the outer blue petals.
If a petal folds beneath the rose, pull its point outward before beginning the sage leaves.
Keep all eight petals approximately equal in length.
Sage Leaf Foundation
Turn the motif to the wrong side.
Join sage green behind the cream petals.
Create 8 ch-6 loops, positioning one between each pair of cream petals.
Join.
Sage Leaves
Into each ch-6 loop work:
sc, hdc, dc, 2 tr, dc, hdc, sc.
At the center of each leaf, add a small point with:
ch 2, sl st into the first ch.
Continue down the opposite side of the leaf.
Repeat around.
Optional Double-Leaf Effect
For a fuller version closer to the dense foliage visible in the reference, divide the sage section into paired leaves.
At every second attachment area, work one leaf angled clockwise and a second leaf angled counterclockwise.
Keep both leaves shorter than the cream petals.
Structural Cream Foundation
Turn the motif to the wrong side.
Join cream behind the sage leaves.
Create 8 evenly distributed ch-5 spaces around the motif.
Mark every second space.
The four marked spaces will become the square corners.
First Squaring Round
Turn to the right side.
In each marked corner space work:
(2 hdc, 2 dc, 2 tr, ch 3, 2 tr, 2 dc, 2 hdc).
In each unmarked side space work:
(2 hdc, 4 dc, 2 hdc).
Join.
Lay the motif flat before continuing.
Second Cream Square Round
Ch 3.
Dc in every stitch across the first side.
At each corner ch-3 space work:
(2 dc, ch 2, 2 dc).
Continue around.
Join.
Openwork Cream Round
Ch 1.
Sc in the first stitch.
Across each side repeat:
ch 2, skip 1 st, sc in next st.
At each corner work:
(sc, ch 3, sc).
Continue around and join.
Textured Cream Frame
Sl st into the first ch-2 space.
Work 2 hdc into each side ch-2 space.
At each corner ch-3 space work:
(2 hdc, ch 2, 2 hdc).
Join.
Solid Structural Round
Ch 1.
Sc in every stitch.
At each corner work:
(2 sc, ch 2, 2 sc).
Join.
Raised Frame Round
Ch 2.
Working BLO, hdc in every stitch.
At each corner work:
(2 hdc, ch 2, 2 hdc).
Join.
The unused front loops form a narrow raised line around the square.
Final Cream Round
Ch 1.
Sc in every stitch.
At each corner work:
(sc, ch 2, sc).
Join and FO.
Optional Scalloped Square Edge
If the square will be used independently for a pillow rather than joined directly into a bedspread, add a decorative edge.
Join cream in any side stitch.
Repeat:
skip 1 st, 5 dc in next st, skip 1 st, sl st in next st.
Adjust spacing near the corners so one shell is centered at each corner.
Target Motif Size
Block the structural square to approximately 18–20 cm.
Do not include the height of the blue rose when measuring.
Measure only the flat square from edge to edge.
Keep both diagonals within approximately 5 mm of one another.
Why the Rose Is Not Blocked Flat
The square frame carries the dimensional accuracy required for joining.
The flower is decorative relief.
Pin the cream corners, frame and sage leaves during blocking, but leave the blue petal layers free.
Flattening the complete rose removes the layered structure visible in the reference.
Making a Master Square
Complete one motif before beginning production.
Record:
- Blocked square width
- Blocked square height
- Diagonal A
- Diagonal B
- Rose diameter
- Rose relief height
- Total motif weight
Producing Multiple Squares
Work in color batches.
Make all blue rose centers first.
Complete the cream petals as a second batch.
Add the sage leaves next.
Finish with the structural cream rounds.
Compare every fifth motif with the blocked master square.
Bedspread Layout
If the blocked square measures 19 cm, approximate motif-field dimensions are:
| Grid | Squares | Approximate Size Before Border |
|---|---|---|
| 5 × 6 | 30 | 95 × 114 cm |
| 6 × 8 | 48 | 114 × 152 cm |
| 8 × 10 | 80 | 152 × 190 cm |
| 9 × 11 | 99 | 171 × 209 cm |
| 10 × 12 | 120 | 190 × 228 cm |
| 11 × 13 | 143 | 209 × 247 cm |
Add the final outer border measurement separately.
Calculating Bed Coverage
Measure the actual mattress width.
Add the required drop on both sides.
For example, a 160 cm mattress with a 30 cm drop on each side requires:
160 + 30 + 30 = 220 cm.
With 19 cm squares:
220 ÷ 19 = approximately 11.6.
Twelve motifs across would produce approximately 228 cm before the final border.
Estimating Yarn
Weigh the finished master square.
Suppose one complete motif weighs 75 g.
For 80 motifs:
75 × 80 = 6,000 g.
Add yarn for seams and the outer border, followed by approximately 10% for gauge differences, swatching and repairs.
The 75 g value is a calculation example only. Use the actual measured weight of your motif.
Estimating Yarn by Color
Weigh each yarn ball before and after making one master square.
For example, if one motif uses:
- Dusty blue — 18 g
- Sage green — 12 g
- Warm cream — 45 g
multiply each value by the number of squares required.
Add extra cream for joining and the complete bedspread border.
These quantities illustrate the calculation method and should be replaced by the measured consumption of the finished master square.
Arranging the Motifs
Block every square before assembly.
Arrange the motifs on a large flat surface.
Rotate them so the sage leaves and cream petals create a consistent rhythm.
Check that all blue roses face the same way if the petal construction has a visible direction.
Photograph the arrangement before stacking the squares.
Joining the Squares
Use warm cream.
Place two motifs side by side with right sides facing upward.
Match the corner spaces.
Insert the hook through corresponding inner loops of the structural edges.
Work relaxed sl sts from one corner to the next.
Testing the Seam
Stop after approximately 5 cm.
Lay the joined motifs flat.
The seam should remain the same length as the blocked square edge.
If it contracts, use looser tension or move up approximately 0.5 mm for joining.
Keeping the Flowers Out of the Seams
Move all blue petals, cream petals and sage leaves away from the joining edge before inserting the hook.
The seam should pass only through the structural cream frame.
Decorative elements caught in a seam create uneven thickness and flatten the flower near the square boundary.
Joining Horizontal Rows
Join the squares into complete horizontal rows first.
Measure each row after joining.
Rows containing the same number of motifs should remain within approximately 1 cm of one another.
Joining Vertical Rows
Place two completed rows side by side.
Match every square intersection.
Join from one outer edge to the other.
At each four-square intersection, keep the joining stitches compact rather than adding extra chains.
Outer Border — Foundation Round
Join warm cream at one outer corner.
Work sc evenly around the complete bedspread.
At each outer corner work:
(2 sc, ch 2, 2 sc).
Join.
Border Round 2
Ch 2.
Hdc in every stitch.
At each corner work:
(2 hdc, ch 2, 2 hdc).
Join.
Border Round 3 — Openwork
Ch 1.
Sc in the first stitch.
Repeat:
ch 2, skip 1 st, sc in next st.
At each corner work:
(sc, ch 3, sc).
Join.
Border Round 4
Work 2 hdc into each ch-2 space.
At each corner ch-3 space work:
(3 hdc, ch 2, 3 hdc).
Join.
Scalloped Border
Ch 1.
Sl st in the first stitch.
Repeat along each side:
skip 1 st, 5 dc in next st, skip 1 st, sl st in next st.
At each corner, work a larger shell:
7 dc in the corner space.
Continue around.
Join and FO.
Optional Sage Accent Border
Before the final cream scallops, add one narrow sage-green round.
Join sage at any corner.
Work sc in every stitch with:
(sc, ch 2, sc)
at each corner.
FO sage and return to cream for the final scallops.
Matching Floral Pillow Square
The same motif can be enlarged for the matching pillow fronts shown in the reference.
Make one standard flower square.
Continue adding cream framing rounds until the panel reaches the required cushion size.
Alternate solid hdc rounds with openwork rounds to maintain the visual language of the bedspread.
45 cm Pillow Front
For a 45 cm cushion insert, continue the square until the blocked front measures approximately 44–45 cm.
Keep the rose centered.
Add a scalloped cream round only after the structural panel reaches the correct dimension.
Plain Pillow Back
With warm cream, chain to the width of the blocked front panel.
Row 1: Hdc in the third chain from the hook and across.
Row 2: Ch 2, turn, hdc across.
Repeat Row 2 until the back matches the front.
FO.
Assembling the Pillow
Place the flower front and plain back together.
Sc through both layers around three sides.
Insert the cushion form.
Close the fourth side or use an envelope-style back if the cover needs to be removable.
Alternative Colorway — Dusty Rose
Replace blue with dusty rose.
Keep the cream petals and sage leaves unchanged.
This preserves the same floral structure while producing a warmer palette.
Alternative Colorway — Lavender
Use muted lavender for all three rose layers.
Keep warm cream for the outer petals and frame.
Use gray-green or sage for the leaves.
Alternative Colorway — Burgundy
Use deep burgundy for the rose.
Replace warm cream with soft oatmeal if less contrast is preferred.
Keep the sage leaves muted so the dark flower remains dominant.
Alternative Colorway — All Cream
Work the rose, petals and square frame in different shades of ivory and cream.
Keep the leaves sage green.
The flower remains visible through relief even when color contrast is reduced.
Smaller Throw Version
Use a 6 × 8 layout of 19 cm squares.
This requires 48 motifs and produces a field approximately 114 × 152 cm before the border.
Large Bedspread Version
A 10 × 12 layout requires 120 motifs.
At 19 cm per square, the motif field measures approximately 190 × 228 cm before adding the outer border.
Assembly
- Make one complete dusty-blue rose and check that the three petal layers remain progressively larger without closing the central opening completely.
- Add eight cream petals behind the rose, keeping their tips visible beyond the outer blue layer and distributing them evenly around the center.
- Work the sage leaves between the cream petals and keep them lower than the flower so the decorative layers remain distinct.
- Add the structural cream foundation, mark four corners independently of the flower petals and complete the square framing rounds.
- Block the master motif to approximately 18–20 cm, keeping both diagonals within 5 mm while leaving the blue rose unflattened.
- Make the remaining motifs in batches and compare every fifth completed square with the blocked master before beginning assembly.
- Arrange the complete bedspread, photograph the layout and join the squares through their structural cream edges without catching petals or leaves.
- Join the horizontal rows first, measure them, then connect the rows vertically while matching every four-square intersection.
- Work the structural outer border before adding openwork and scallops, correcting any perimeter waves before the decorative final round.
- Weave all structural tails through dense cream stitches, complete a light final blocking and reshape every blue rose after the bedspread is dry.
The finished bedspread should form a regular cream lattice of square motifs with raised dusty-blue roses, cream petals and sage foliage remaining clearly separated from the joining seams.
7 Technical Tips
- Keep both square diagonals within approximately 5 mm. A square can have four equal sides and still be skewed enough to distort long joined rows.
- Maintain approximately 1.5–2.5 cm of rose relief. Flattening the blue petals during blocking removes the layered structure that distinguishes the central flower.
- Place markers in all four structural corners before the first squaring round. Do not use the cream petal positions alone to determine corners because decorative spacing can shift slightly.
- Test every joining seam after approximately 5 cm. A contracted cream seam pulls adjacent squares upward and makes the raised flowers lean toward one another.
- Keep every petal and leaf outside the seam allowance. Catching even one decorative element in a join produces a visibly flattened section beside the surrounding flowers.
- Check the outer border every 30–40 cm while working the foundation round. Excess stitches create waves, while insufficient stitches pull the bedspread edge inward.
- Weave structural yarn tails through at least 6–8 cm of dense crochet. Avoid carrying long tails behind the openwork spaces because they remain visible from the front.
Care and Final Blocking
Follow the washing instructions for the selected yarn. Support the bedspread fully when wet because the dimensional flowers and joined square structure add considerable weight.
Lay the project flat and align the cream square grid first. Measure the upper, center and lower widths, then check both long edges.
Shape the cream corners and sage leaves while the fabric is damp. Leave the blue roses free of pins whenever possible. Once the structural fabric is dry, lift and arrange the individual rose layers by hand.
Conclusion
The structural square and the dimensional flower perform different jobs in this blue 3D rose granny square crochet bedspread pattern. Keep the blue rose raised, place the cream petals and sage leaves behind it, then establish four independent structural corners before building the joining frame. Make one 18–20 cm master square first and use its blocked dimensions and actual weight to calculate the full project. Join only through the cream structural edges and add the scalloped perimeter after the complete square field lies flat. Save the finished bedspread to Pinterest or share it on Instagram with #BlueRoseGrannySquareBedspread. Your next step is to crochet one three-layer blue rose and check its diameter before adding the cream petals.









