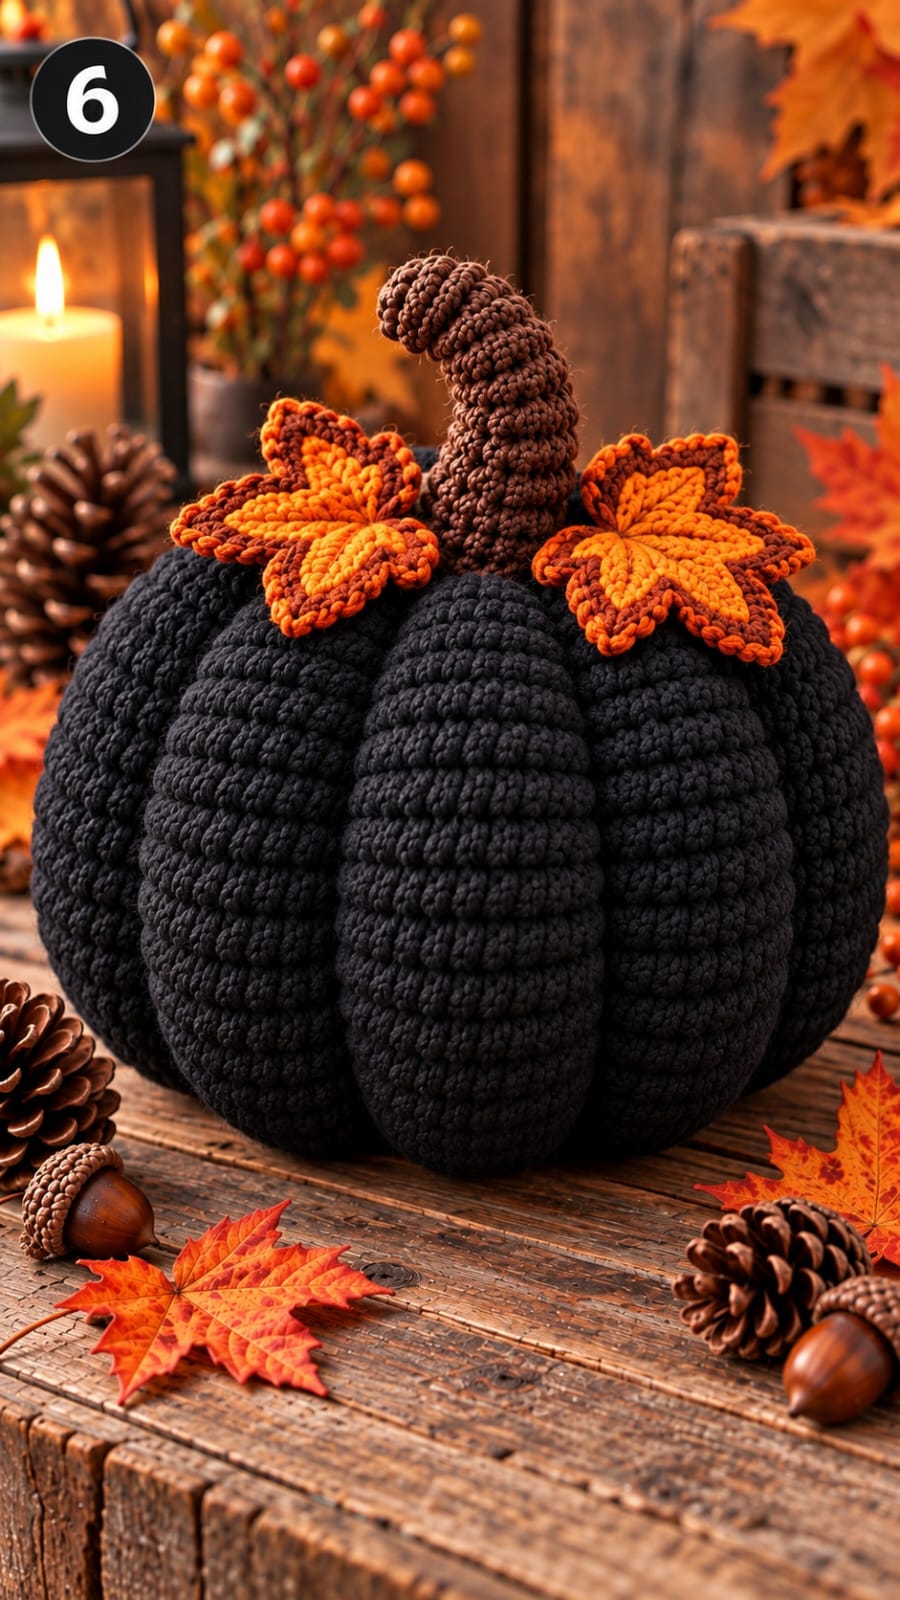
A black pumpkin needs deeper ribs than an orange one because dark yarn hides shallow surface shaping. This black crochet pumpkin pattern solves that problem with a stuffed spherical body, eight external shaping lines and an oversized curved stem. Worked in chunky yarn with a 6.5 mm hook, the finished pumpkin measures approximately 25–30 cm across. The project is intermediate level and works as structured Halloween or autumn table décor.
What Makes This Black Crochet Pumpkin Different
The photographed pumpkin depends on three structural decisions. First, the body is deliberately over-rounded before segmentation. Tight external strands then compress that sphere into eight pronounced ribs instead of trying to crochet every groove directly into the fabric.
Second, the stem is oversized. A small straight stalk would look undersized against such a broad chunky crochet pumpkin, so this version uses a stuffed tubular stem that can be bent into a curved shape.
Finally, two orange maple-style leaves sit against the black body. Their brown edging connects visually with the stem while the orange centers provide separation from the dark pumpkin.
A common failure is stuffing the body too firmly before sculpting. Excess stuffing makes the segmentation strands difficult to tighten and produces shallow grooves.
Project Info at a Glance
| Skill Level | Time | Finished Size | Hook | Best For |
|---|---|---|---|---|
| Intermediate | 5–8 hours | Approx. 25–30 cm wide | 6.5 mm | Halloween and autumn décor |
Materials and Tools
Yarn
- Black — chunky/bulky #5 yarn — approximately 200–300 g
- Dark brown — chunky/bulky #5 yarn — approximately 20–30 g
- Burnt orange — chunky/bulky #5 yarn — approximately 30–40 g
- Brown accent yarn — approximately 10–15 g for leaf edging
The quantities are working estimates for the large photo-inspired version. Yarn consumption changes with fiber density, hook size and stuffing firmness.
Tools
- 6.5 mm crochet hook
- Polyester fiberfill
- Long upholstery or doll needle
- Tapestry needle
- Locking stitch marker
- Scissors
- Rust-resistant pins
Abbreviations
- MR — magic ring
- sc — single crochet
- inc — 2 sc in one stitch
- dec — single crochet decrease
- sl st — slip stitch
- ch — chain
- hdc — half double crochet
- dc — double crochet
- tr — treble crochet
- BLO — back loop only
For an invisible decrease, insert the hook through the front loops of the next two stitches, yarn over and complete one single crochet through both loops.
Black Crochet Pumpkin Pattern
Work the pumpkin body in a continuous spiral. Place a stitch marker in the first stitch of every round and move it upward as each round is completed.
Large Pumpkin Body
Yarn: black chunky/bulky yarn.
R1: 6 sc in MR. (6)
R2: Inc ×6. (12)
R3: (1 sc, inc) ×6. (18)
R4: (2 sc, inc) ×6. (24)
R5: (3 sc, inc) ×6. (30)
R6: (4 sc, inc) ×6. (36)
R7: (5 sc, inc) ×6. (42)
R8–R11: Sc around. (42)
R12: (6 sc, inc) ×6. (48)
R13–R18: Sc around. (48)
R19: (6 sc, dec) ×6. (42)
R20–R22: Sc around. (42)
R23: (5 sc, dec) ×6. (36)
R24: Sc around. (36)
R25: (4 sc, dec) ×6. (30)
Begin stuffing. Fill the lower and outer edges first, then add stuffing toward the center. Keep the body firm enough to hold its shape but compressible enough for segmentation.
R26: (3 sc, dec) ×6. (24)
R27: (2 sc, dec) ×6. (18)
Add the final stuffing before the opening becomes too small.
R28: (1 sc, dec) ×6. (12)
R29: Dec ×6. (6)
Fasten off, leaving approximately 40 cm of yarn. Thread the tail through the front loops of the remaining six stitches and pull the opening closed.
How to Make the Deep Pumpkin Ribs
The deep vertical grooves are added after the body has been stuffed. Cut a length of strong black yarn approximately 180–220 cm long and thread it through a long needle.
Insert the needle through the bottom center and bring it out through the top center. Run the yarn down the outside of the pumpkin and return through the bottom center.
Pull until the strand compresses the body and creates a visible groove.
Repeat on the opposite side. Divide each half again, then divide those sections until the pumpkin has eight approximately equal segments.
Check the pumpkin from above after every two ribs. Unequal spacing becomes much more difficult to correct once all eight strands are tight.
Tie the sculpting yarn securely at the bottom and bury the tails inside the body.
Curved Brown Pumpkin Stem
Yarn: dark brown.
R1: 6 sc in MR. (6)
R2: Inc ×6. (12)
R3–R5: Sc around. (12)
R6: (2 sc, dec) ×3. (9)
R7–R16: Sc around. (9)
Begin stuffing the stem lightly as it grows. Do not pack the fiberfill firmly.
R17: 4 sc, sl st in next 2 sts, 3 sc. (9)
R18: 3 sc, sl st in next 3 sts, 3 sc. (9)
R19–R23: Sc around. (9)
R24: (1 sc, dec) ×3. (6)
R25: Sc around. (6)
Fasten off and close the upper end. Leave a 30 cm tail at the base for attachment.
The lighter stuffing allows the stem to curve without forming a hard crease. Shape it gradually before sewing it to the pumpkin.
Autumn Maple Leaf — Make 2
Yarn: burnt orange with brown edging.
R1: With orange, 6 sc in MR. Join. (6)
R2: Inc ×6. (12)
R3: (1 sc, inc) ×6. (18)
The five leaf points are worked outward from this center.
Point 1: Ch 8. Starting in second ch from hook, work sc, hdc, dc, tr, tr, dc, hdc. Sl st into the next available stitch of R3.
Point 2: Ch 6. Starting in second ch, work sc, hdc, dc, tr, dc. Sl st into the next available stitch.
Center Point: Ch 10. Starting in second ch, work sc, hdc, dc, tr, tr, tr, dc, hdc, sc. Sl st into the next available stitch.
Point 4: Repeat Point 2.
Point 5: Repeat Point 1.
Work slip stitches through the unused center stitches to stabilize the spaces between the lobes.
Change to brown. Work sc evenly around the entire leaf. Place 3 sc into the tip of each lobe so the points remain defined.
Fasten off, leaving a 25 cm tail for sewing.
Leaf Veins
Thread brown yarn onto a tapestry needle. Embroider one line from the center to the tip of each leaf lobe.
Add two shorter diagonal stitches on each side of the central vein. Keep the embroidery loose enough that the leaf remains flat.
Assembly
- Place the completed pumpkin on a flat surface and identify the top and bottom centers.
- Sculpt eight ribs with black yarn before attaching any decorative components.
- Compare all eight segments from above and adjust any shaping strand that is visibly off-center.
- Position the brown stem directly over the top closing point.
- Sew around the bottom two rounds of the stem, passing through the pumpkin fabric rather than only the sculpting strands.
- Bend the upper portion of the stem gradually until it forms the curved profile.
- Position the first orange leaf beside the stem with one lobe extending over the pumpkin body.
- Place the second leaf on the opposite side, rotating it so the two leaves are not mirror images.
- Sew only the center and inner portions of each leaf to the pumpkin so the outer lobes remain raised.
- Weave all remaining yarn tails into the body and redistribute the stuffing with your fingers if any rib becomes uneven.
The finished pumpkin should have eight defined body segments, a curved brown stem and two independently positioned autumn leaves.
7 Technical Tips for a Large Crochet Pumpkin
- Weak rib definition: sculpt the pumpkin only after stuffing is complete. Tightening the shaping strands against an empty or half-filled body creates folds rather than rounded segments.
- Stuffing showing through: use a hook small enough to create dense single crochet fabric. If visible holes appear when the body is stretched, reduce the hook by 0.5 mm.
- Unequal segments: make the first four shaping lines at 90-degree intervals before adding the remaining four. Trying to estimate all eight sections consecutively increases spacing errors.
- Flattened pumpkin: do not pull every sculpting strand to maximum tension. Stop tightening when the groove is defined but the neighboring ribs remain rounded.
- Stem collapse: place small amounts of stuffing every 2–3 cm instead of inserting one dense plug. Dense stuffing prevents the stem from holding a controlled curve.
- Twisted leaves: pin both leaves to the body before sewing. Attach the center first and check each lobe before adding the next stitch.
- Loose finishing tails: weave sculpting and assembly yarn at least 5 cm through the stuffed body before trimming. Short tails can pull free when the pumpkin is lifted by the stem.
How to Adjust the Pumpkin Size
The easiest way to resize this crochet Halloween pumpkin is to change yarn weight while preserving the same construction. Published pumpkin patterns demonstrate a large size range from the same general technique.
For a smaller pumpkin, use worsted yarn and a hook around 4–4.5 mm. For a larger pumpkin with pronounced ribs similar to the photographed version, chunky yarn with approximately a 6.5 mm hook provides more volume.
Super bulky yarn can produce an even larger body. Keep in mind that thicker yarn requires substantially more stuffing and stronger sculpting strands.
Getting Deep Pumpkin Segments
External shaping determines the final appearance more than the basic sphere. Before inserting the needle, divide the top opening visually into quarters. Create those four primary grooves first.
Next, place another shaping strand halfway between each existing groove. This produces eight ribs with more consistent spacing.
Each strand should travel through the same top and bottom center points. If the needle exits several stitches away from the center, the groove will lean diagonally instead of running vertically.
Black yarn makes this particularly important. Shadows between the ribs provide most of the visible definition, so uneven segmentation is easier to notice than minor stitch variations.
Positioning the Autumn Leaves
Do not sew the two leaves flat against the pumpkin. Attach the central portion and approximately the first 2–3 cm of selected lobes. The remaining points should sit independently over the curved surface.
Rotate one leaf roughly 20–40 degrees relative to the other. Identical positioning produces a symmetrical bow shape rather than the scattered autumn-leaf arrangement shown in the reference design.
The brown border should remain visible against both the orange center and black pumpkin. If the edging disappears into the body, use a slightly lighter brown for the final round.
Finishing the Black Crochet Pumpkin
Set the completed pumpkin on a flat surface before trimming the final yarn tails. Check that it rests on several ribs rather than balancing on the bottom closing point. Massage the stuffing outward if the base is too narrow.
Check the stem next. Its lower section should remain relatively vertical while the upper section bends to one side. Reposition the stuffing inside the stem rather than forcing a sharp fold into the crochet fabric.
The two leaves should cover part of the upper pumpkin without concealing the stem attachment completely. Their contrasting orange centers provide the strongest color break against the black body.
Final Notes
Make the body first and delay the decorative pieces until the final pumpkin diameter is known. That measurement determines the correct scale for the stem and leaves more accurately than an assumed gauge.
For an especially large version, increase yarn thickness before adding extra body rounds. Maintaining a compact stitch structure helps the deep ribs keep their shape after stuffing.
When the black crochet pumpkin pattern is complete, photograph it from slightly above the stem so all eight segments remain visible. Save the finished version to Pinterest or share the color combination on Instagram with #BlackCrochetPumpkin. For a second pumpkin, which detail would you change: orange leaves to rust red, or the brown stem to charcoal gray?









