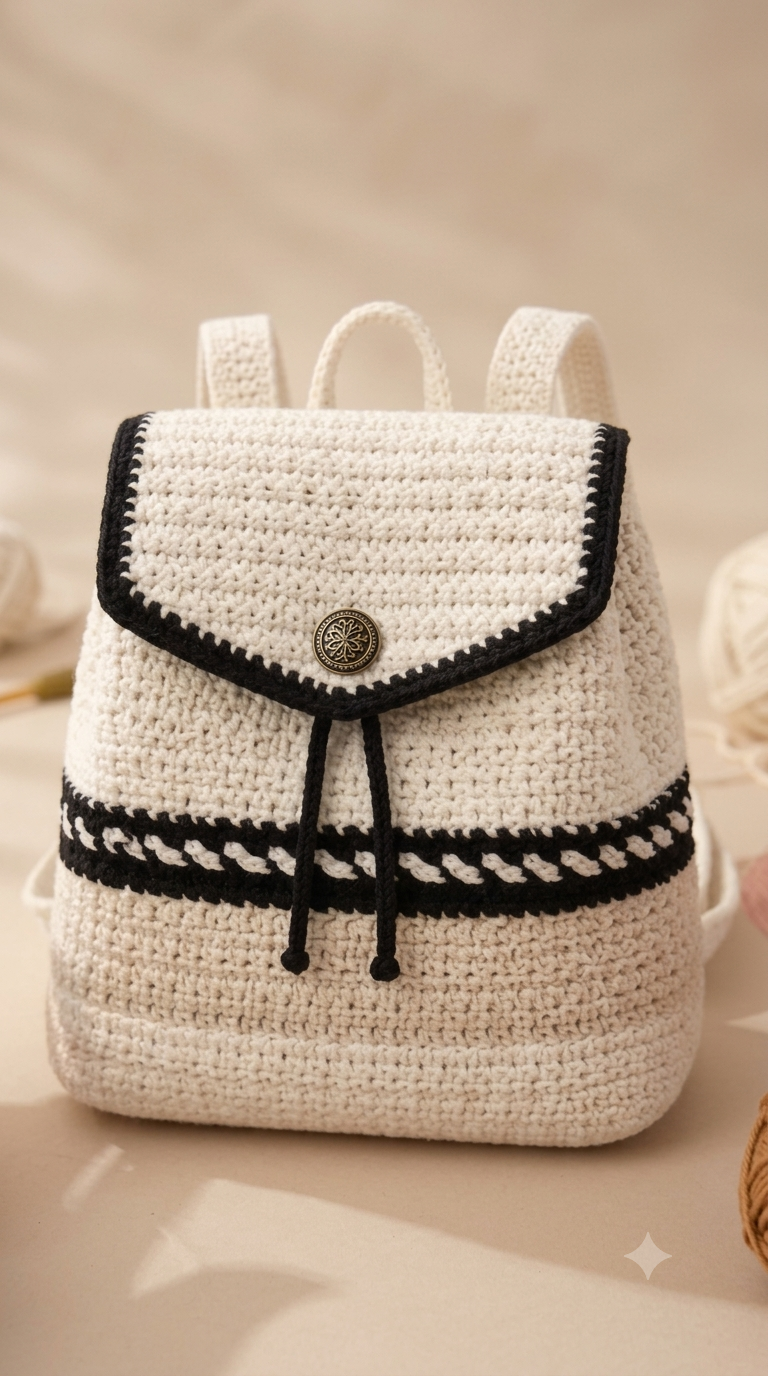
A pointed ivory flap edged in black changes the geometry of this backpack before the first strap is attached. This crochet backpack pattern recreates that contrast using medium-weight yarn, a 4 mm hook and a finished target near 38 × 33 cm. It suits an intermediate maker comfortable with rows, rounds and decreases. The dense fabric also makes the finished bag practical for everyday storage.
The Design: What Makes This Backpack Different
Three structural choices define this version. First, the main body stays relatively rectangular instead of narrowing sharply toward the opening; that preserves usable internal volume and gives the flap a broad attachment edge. Second, the flap decreases toward its center to reproduce the envelope-like point visible in the photograph. A black final border makes that outline much clearer.
The crochet drawstring backpack also separates decoration from structure. Its horizontal black-and-ivory band sits above the lower body rather than functioning as the closure, while two cords close the opening underneath the flap. Finally, broad crocheted shoulder straps distribute load better than thin cords.
A common mistake with a crochet bag with flap is making the flap exactly as wide as the unstretched body. Crochet stretches under use, so pin the flap against the filled bag before completing the border.
Project Info at a Glance
| Skill Level | Time | Finished Size | Hook | Best For |
|---|---|---|---|---|
| Intermediate | 10–14 hours estimated | Approx. 38 × 33 cm | 4 mm | Day bag, light everyday carry |
Materials and Tools
Yarn
- Ivory/cream: Aran or medium-worsted cotton/cotton blend — 300–350 g recommended. Choose a firm, low-stretch bag yarn.
- Black: Matching Aran or medium-worsted yarn — approximately 100 g. Use the same fiber family where possible.
Tools
- 4 mm crochet hook
- Approximately 28 mm decorative button
- Tapestry needle
- Locking stitch markers
- Scissors
- Pins or removable markers
- Optional fabric lining
- Optional plastic canvas for the base
Abbreviations
- MR — magic ring
- sc — single crochet
- inc — 2 sc in one stitch
- dec — single-crochet decrease
- sl st — slip stitch
- ch — chain
- BLO — back loop only
- st/sts — stitch/stitches
- RS/WS — right side/wrong side
An invisible decrease is worked through the front loops of the next two stitches before completing one single crochet; it reduces bulk where shaping is visible.
Pattern — Step by Step
The photographed object is a backpack, so its body is built from an oval foundation rather than the six-stitch magic ring used for spherical amigurumi pieces. Check the dimensions against your gauge as you work.
Backpack Base and Body
Yarn: ivory
Foundation: Ch 51.
R1: Starting in second ch from hook, sc 49, 3 sc in final ch; working along opposite side of foundation chain, sc 48, 2 sc in final space (102).
R2: inc, sc 48, inc ×3, sc 48, inc ×2 (108).
R3: (sc, inc), sc 48, (sc, inc) ×3, sc 48, (sc, inc) ×2 (114).
R4: (2 sc, inc), sc 48, (2 sc, inc) ×3, sc 48, (2 sc, inc) ×2 (120).
R5: BLO sc around (120).
R6–R18: sc around (120).
Keep the beginning-of-round marker aligned. The BLO round creates a visible base hinge and encourages the side wall to turn upward.
R19: sc around in black (120).
R20: sc around in black (120).
R21: Change to ivory. sc around (120).
R22: Change to black. sc around (120).
R23: sc around in black (120).
R24: Change to ivory. sc around (120).
R25–R42: sc around (120).
R43: (8 sc, ch 2, skip 2) around as evenly as possible, adjusting the final repeat so the openings remain paired across the front and back.
R44: sc in every sc and 2 sc in each ch-2 space (120).
R45–R47: sc around (120).
Fasten off. Leave a 20 cm tail for securing the final round.
The black-and-ivory sequence creates the strong horizontal visual break seen in the design. For a closer braided appearance, add surface slip stitches over the contrast section after completing the body.
Front Flap
Yarn: ivory
Foundation: Ch 61.
Row 1: sc in second ch and across (60).
Rows 2–18: ch 1, turn, sc across (60).
Row 19: dec, sc 56, dec (58).
Row 20: dec, sc 54, dec (56).
Row 21: dec, sc 52, dec (54).
Row 22: dec, sc 50, dec (52).
Row 23: dec, sc 48, dec (50).
Row 24: dec, sc 46, dec (48).
Row 25: dec, sc 44, dec (46).
Row 26: dec, sc 42, dec (44).
Row 27: dec, sc 40, dec (42).
Row 28: dec, sc 38, dec (40).
Fasten off ivory.
Join black at the upper right corner. Work sc evenly down the side, across the shaped lower edge and back up the opposite side. Work 2 sc at each angled transition if the border begins to pull.
Border Round 2: sl st or sc around in black.
Fasten off. Leave a 25 cm tail if the border will be incorporated into the body seam.
Shoulder Straps — Make 2
Yarn: ivory
Foundation: Ch 91.
Row 1: sc in second ch from hook and across (90).
Rows 2–7: ch 1, turn, sc across (90).
Fasten off. Leave 30 cm tails at both ends for attachment.
Check each strap against the intended wearer before permanent attachment. The final length depends on yarn, gauge and the amount of stretch produced when the backpack is loaded.
Top Carry Handle
Yarn: ivory
Foundation: Ch 41.
Row 1: sc in second ch and across (40).
Rows 2–5: ch 1, turn, sc across (40).
Fasten off, leaving 25 cm at each end.
For a thicker handle, fold the strip lengthwise and seam the long edges together. Do not stuff it.
Drawstring Cords — Make 2
Yarn: black
Foundation: Ch 121.
Row 1: sl st loosely into the second chain and every chain across (120).
Fasten off, leaving a 10 cm tail.
Repeat for the second cord.
Thread one cord through the opening row from left to right and back toward the left. Thread the second cord from the opposite direction. Pulling the two cords should gather the opening symmetrically.
Tie a compact overhand knot at each cord end or sew the end back on itself.
Decorative Contrast Band
Yarn: black and ivory
The body already contains the foundation stripes at R19–R23. To reproduce the broken ivory marks across the dark band, add surface crochet after completing the body.
With ivory yarn, insert the hook around R21.
Surface Round 1: (sl st around one stitch, ch 1, skip approximately one stitch) around.
Keep each surface stitch relaxed. A tight surface round will contract the circumference and create a ridge.
Fasten off and weave the yarn tails into the black section.
Lower Reinforcement
Yarn: ivory
The lower section needs enough structure to resist sagging when the backpack contains everyday items.
Foundation: Ch 47.
Row 1: sc in second ch and across (46).
Rows 2–10: ch 1, turn, sc across (46).
Fasten off with a 40 cm tail.
Position the panel flat against the inside bottom. Sew around its perimeter with small whip stitches that catch internal loops without passing visibly through the exterior fabric.
A removable plastic-canvas insert can be cut slightly smaller than the reinforcement panel for additional structure.
Button Loop
Yarn: black
Foundation: Ch 16.
Row 1: sl st across (15).
Fasten off with two 15 cm tails.
Fold the strip into a loop and position it on the underside of the flap point. Check that the loop passes over the selected button without pulling the flap downward before sewing it permanently.
Decorative Button
The reference design uses one round ornamental button centered directly above the pointed flap edge. A button around 28 mm gives similar visual proportions, although the exact diameter should be adjusted to the finished flap.
Sew the button to the backpack body rather than to the flap.
Pass the sewing yarn through the body several times. For a heavy metal button, place a small piece of felt or crocheted fabric behind the attachment point inside the backpack to distribute the load.
Assembly
- Place the finished body upright and identify its exact front and back centers with removable markers.
- Center the straight upper edge of the flap on the back wall approximately one to two rounds below the opening. Pin it across the full width.
- Sew the flap to the back with two passes of whip stitch. Keep the attachment line horizontal so the pointed edge lands on the front center.
- Fold the flap closed, mark the button-loop position and sew the decorative button directly beneath it on the front body.
- Position both shoulder straps on the back. Place their upper ends symmetrically below the flap seam and their lower ends near the bottom corners.
- Sew each strap attachment over a rectangular area rather than one narrow line. This distributes pulling force across several stitches.
- Center the carry handle between the shoulder straps and stitch both ends securely to the upper back wall.
- Thread the two black cords through the eyelet round from opposite directions. Test that the opening gathers evenly without trapping either shoulder strap.
- Add the interior reinforcement panel and, if required, a fabric lining or removable base insert before hiding the remaining yarn tails.
- Block according to the yarn fiber, reshape the pointed flap and allow every component to dry completely before loading the backpack.
The completed backpack should have a centered flap, independently working drawstring closure and symmetrical shoulder-strap placement.
7 Technical Tips for a Better Crochet Backpack
- Control marker drift: A spiral body can move the apparent beginning of a round several centimeters sideways. Mark the true front center independently every five rounds instead of depending only on the beginning-of-round marker.
- Correct a soft base: If the bottom bows more than about 2 cm when the empty bag stands upright, add a plastic-canvas insert or second base layer. Adding more loose fabric will not correct the deformation.
- Hide visible decreases: Standard flap decreases can create raised bumps along both edges. Work invisible decreases or position them one stitch inside the edge so the black border covers small irregularities.
- Center the closure: A button positioned even 10 mm away from the center becomes noticeable because the pointed flap creates a strong vertical reference line. Pin the filled backpack closed before marking the button location.
- Check fabric density: If a 4 mm hook produces gaps large enough for a fingertip to push through easily, reduce the hook by 0.5 mm and make another gauge sample. Backpack fabric requires more lateral resistance than garment fabric.
- Prevent twisted straps: Pin every shoulder strap at four points and check that the right side remains outward before sewing. A single half-turn near the lower attachment creates a permanent twist when the bag is worn.
- Secure structural tails: Leave at least 15 cm of yarn for structural seams and weave each tail in three directions. Strap, handle and flap attachments receive repeated tension, making short tails more likely to work loose.
Finishing the Backpack
Check the finished body width before attaching the flap; that measurement controls the placement of almost every remaining component. Next, pin the flap, button, handle and both shoulder straps simultaneously and inspect the backpack upright before sewing any structural seam.
This crochet backpack pattern can be adjusted through strap length, lining choice or base reinforcement without changing its black-and-ivory geometry. Save the finished project to Pinterest and share front and back views on Instagram with #MonochromeFlapBackpack.
For comparison between finished versions, record your yarn, hook size and final dimensions when posting. Which detail would you keep most prominent: the pointed black-edged flap or the broken ivory stripe across the black band?









