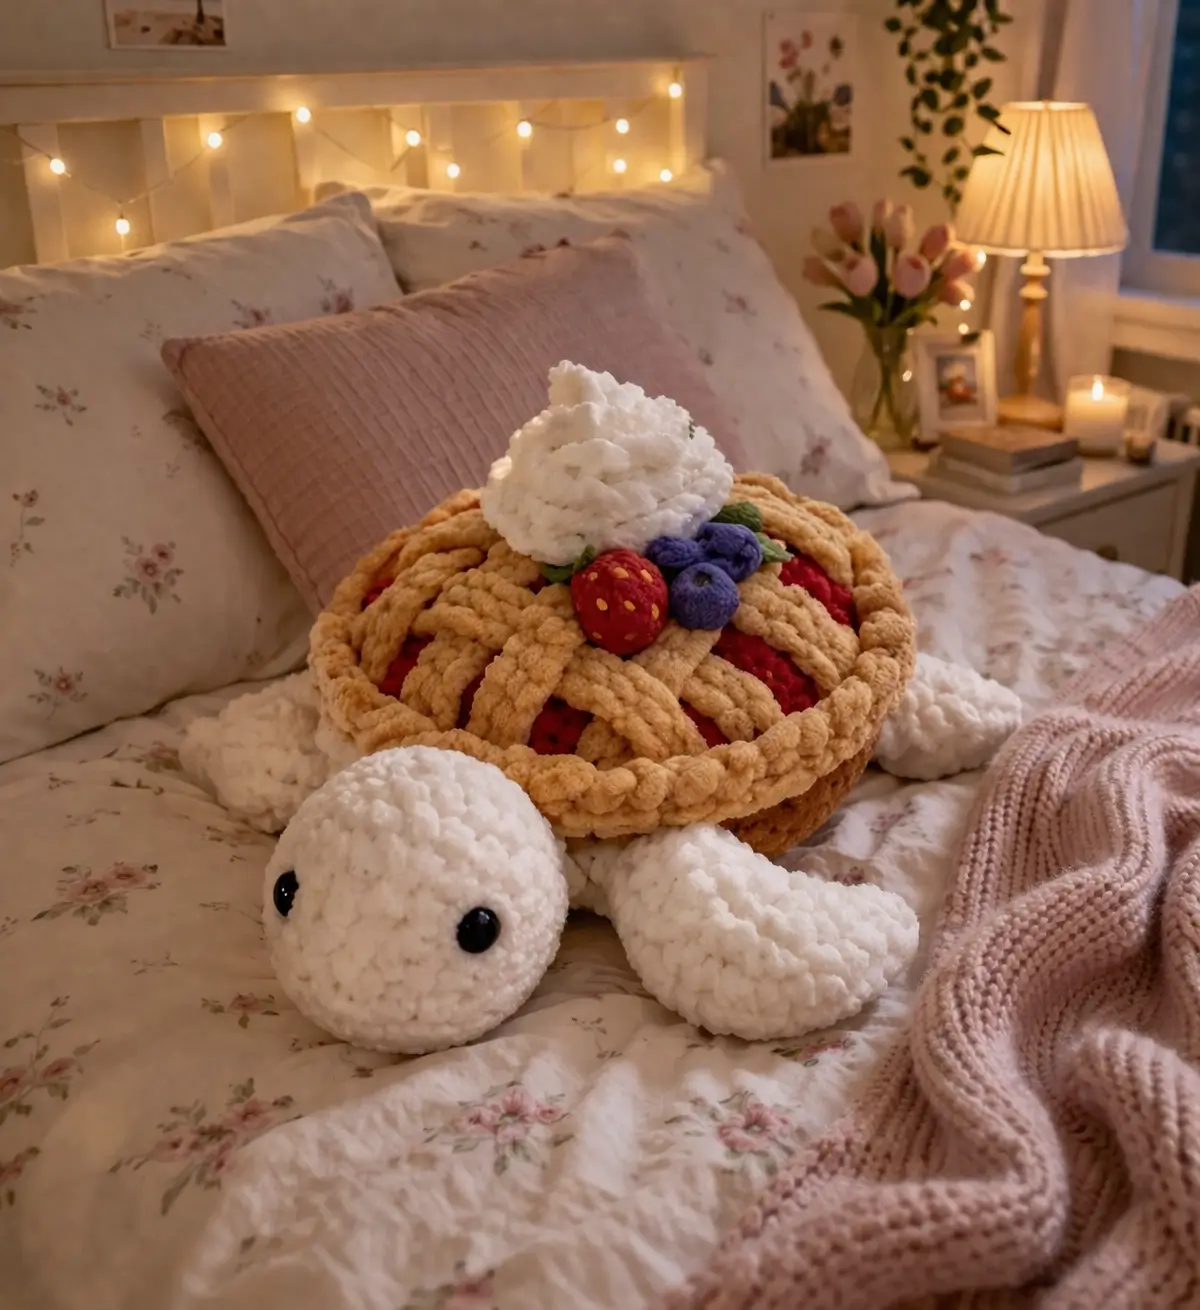
A pie shell changes one thing about a turtle and breaks three others: back curve, shell edge, and topping weight. This berry pie turtle amigurumi solves those problems with plush yarn, a medium shell, and a low body profile. The project suits an intermediate maker, finishes as a display plush, and works well for market tables because the silhouette reads from a distance.
The Design: What Makes Berry Pie Turtle Different
A standard sea turtle shell rises in a dome. A lattice pie cannot. That shift matters immediately. The shell has to stay broad enough to show the red filling, but shallow enough that the lattice strips do not slide inward. For that reason, this version uses a flatter upper shell and a separate underside that closes later.
The head also needs different proportioning. A berry pie turtle amigurumi looks wrong when the head is too small, because the shell visually dominates the whole toy. Here the head is enlarged to a medium plateau so the face remains visible from front angles.
One mistake appears often in pie turtle crochet pattern builds: makers overstuff the body and force the shell upward. The result stops reading as pie and starts reading as tortoise. Keep the filling low. Let the lattice and whipped cream do the visual work.
Comparable pie-turtle patterns on Ravelry and Etsy confirm the category standard: aran to bulky yarn, a pie-themed shell swap, and an easy-to-moderate plush structure rather than anatomical realism.
Project Info at a Glance
| Skill Level | Time | Finished Size | Hook | Best For |
|---|---|---|---|---|
| Intermediate | 5–7 hours | approx. 18 cm long x 12 cm wide x 12 cm high | 4.5 mm plush main / 2.5–3 mm details | market plush, shelf decor, food-animal collections |
Why these specs: comparable pie-turtle and fruit-turtle patterns commonly land between small desk plush and larger cuddle plush, with 3.25 mm to 8 mm hooks depending on yarn weight; this photo sits in the middle visually.
Materials and Tools
Yarn
- White plush yarn — bulky/chunky — about 45 g — body, head, flippers
- Tan plush yarn — bulky/chunky — about 35 g — crust, shell rim, lattice
- Deep red plush yarn — bulky/chunky — about 20 g — pie filling
- White plush or smooth bulky yarn — 8 g — whipped cream
- Blue smooth yarn — small scrap — blueberries
- Red smooth yarn — small scrap — strawberry
- Green smooth yarn — small scrap — leaves
- Cream or blush yarn — small scrap — cheek patches
Comparable sources for fruit and pie turtles use aran through bulky yarn, with small scrap amounts for leaves and fruit, and roughly 10 g per major small-color section on compact turtles.
Tools
- Hook 4.5 mm for plush body pieces
- Hook 2.5 or 3 mm for fruit details
- Safety eyes 10 mm for this plush scale; verified comparable patterns often use 8–9 mm on smaller fruit turtles
- Stuffing
- Yarn needle
- Stitch markers
- Scissors
- Sewing pins
Abbreviations
MR / sc / inc / dec / sl st / ch / BLO / FLO / hdc
Invisible decrease joins the front loops of two stitches before closing them, which keeps the head and body smoother than a standard decrease. A comparable pie pattern tutorial also recommends tighter decreases to prevent stuffing from showing.
Pattern — Step by Step
Continuous spiral unless noted.
Head (Make 1)
Yarn: white plush — source basis: medium plush turtle heads commonly enlarge beyond the 18-st stitch count used in smaller fruit-turtle patterns; this version is scaled to a 36-st medium plateau from standard amigurumi math and photo proportion.
R1: 6 sc in MR (6)
R2: inc x6 (12)
R3: (1 sc, inc) x6 (18)
R4: (2 sc, inc) x6 (24)
R5: (3 sc, inc) x6 (30)
R6: (4 sc, inc) x6 (36)
R7-R11: sc around (36)
Insert safety eyes between R8 and R9, 9 stitches apart.
R12: (4 sc, dec) x6 (30)
R13: (3 sc, dec) x6 (24)
R14: (2 sc, dec) x6 (18)
Stuff firmly but keep the neck edge soft enough for sewing.
R15: (1 sc, dec) x6 (12)
R16: sc around (12)
Fasten off. Leave 25 cm tail.
Body (Make 1)
Yarn: white plush — source basis: medium turtle body adapted from verified plush turtle closure logic, scaled for a flatter pie-shell seat.
R1: 6 sc in MR (6)
R2: inc x6 (12)
R3: (1 sc, inc) x6 (18)
R4: (2 sc, inc) x6 (24)
R5-R7: sc around (24)
R8: (2 sc, dec) x6 (18)
Stuff lightly. The body should stay low.
R9: (1 sc, dec) x6 (12)
R10: dec x6 (6)
Fasten off. Leave 20 cm tail.
Front Flippers (Make 2)
Yarn: white plush.
R1: 6 sc in MR (6)
R2: inc x6 (12)
R3: (1 sc, inc) x6 (18)
R4-R6: sc around (18)
R7: (1 sc, dec) x6 (12)
R8-R10: sc around (12)
Flatten lightly. Do not overstuff.
Fasten off. Leave 18 cm tail.
Back Flippers (Make 2)
Yarn: white plush.
R1: 6 sc in MR (6)
R2: inc x6 (12)
R3: (1 sc, inc) x6 (18)
R4-R5: sc around (18)
R6: (1 sc, dec) x6 (12)
R7-R8: sc around (12)
Fasten off. Leave 18 cm tail.
Tail (Make 1)
Yarn: white plush.
R1: 4 sc in MR (4)
R2: sc around (4)
R3: (1 sc, inc) x2 (6)
R4: sc around (6)
Fasten off. Leave 10 cm tail.
Upper Pie Filling Shell (Make 1)
Yarn: deep red plush.
R1: 6 sc in MR (6)
R2: inc x6 (12)
R3: (1 sc, inc) x6 (18)
R4: (2 sc, inc) x6 (24)
R5: (3 sc, inc) x6 (30)
R6: (4 sc, inc) x6 (36)
R7-R8: sc around (36)
Fasten off. Weave end.
Lower Shell Base (Make 1)
Yarn: tan plush.
R1: 6 sc in MR (6)
R2: inc x6 (12)
R3: (1 sc, inc) x6 (18)
R4: (2 sc, inc) x6 (24)
R5: (3 sc, inc) x6 (30)
R6: (4 sc, inc) x6 (36)
R7: BLO sc around (36)
R8: sc around (36)
R9: (4 sc, dec) x6 (30)
Fasten off. Leave 35 cm tail.
Pie Rim / Crust Edge (Make 1)
Yarn: tan plush.
Join yarn in FLO of R7 from Lower Shell Base.
R1: sc around (36)
R2: (1 sl st, 2 hdc in next st) x18 (54 motions across edge; decorative round)
Fasten off. Weave end carefully so the rim stays even.
Lattice Strips (Make 6)
Yarn: tan plush.
Ch 16.
Row 1: Starting in 2nd ch from hook, 15 sc (15)
Row 2-3: ch 1, turn, 15 sc (15)
Fasten off. Leave 12 cm tail on both ends.
Whipped Cream (Make 1)
Yarn: white plush or smooth bulky white.
R1: 6 sc in MR (6)
R2: inc x6 (12)
R3: sc around (12)
R4: (1 sc, dec) x4 (8)
R5: sc around (8)
R6: dec x4 (4)
Stuff very lightly to keep a swirled top rather than a ball.
Fasten off. Leave 20 cm tail. Spiral the piece upward while sewing the base to hold the whipped shape.
Blueberries (Make 3)
Yarn: blue smooth yarn.
R1: 6 sc in MR (6)
R2: BLO sc around (6)
R3: sc around (6)
Fasten off. Leave 10 cm tail.
Strawberry (Make 1)
Yarn: red smooth yarn.
R1: 6 sc in MR (6)
R2: inc x6 (12)
R3: (1 sc, inc) x6 (18)
R4-R5: sc around (18)
R6: (1 sc, dec) x6 (12)
Stuff lightly.
R7: dec x6 (6)
Fasten off. Leave 12 cm tail. Add yellow seed stitches if desired.
Strawberry Leaves (Make 1 set)
Yarn: green smooth yarn.
R1: 5 sc in MR (5)
R2: (sl st, ch 3, sl st) x5
Fasten off. Leave 10 cm tail.
Extra Small Leaves (Make 2)
Yarn: green smooth yarn.
Ch 4.
Row 1: sl st in 2nd ch from hook, sc, sl st.
Fasten off. Leave 8 cm tail.
Cheek Patches (Make 2)
Yarn: cream or blush smooth yarn.
R1: 6 sc in MR (6)
R2: inc x6 (12)
Fasten off. Leave 10 cm tail.
Assembly
- Sew the head to the front of the body with the neck centered low, not upright.
- Attach the front flippers at the body sides, slightly forward under the future shell line.
- Attach the back flippers slightly behind the midpoint and angle them outward.
- Sew the tail to the rear center of the body.
- Place the Upper Pie Filling Shell on top of the body and tack it in four points only.
- Position the six lattice strips across the red shell in alternating directions. Sew strip ends under the future rim.
- Place the Lower Shell Base under the body and seam it to the upper shell edge, adding a small amount of stuffing between body and shell only where needed.
- Work the crust edge into shape with your fingers, then tack down any lifted rim sections.
- Sew the whipped cream at the shell center. Attach the strawberry, blueberries, and leaves around it.
- Sew the cheek patches below the eyes if using them, then weave in all tails and flatten the shell gently by hand.
The finished plush should sit low, with the shell reading as a pie rather than a dome.
7 Technical Tips
- Marker drift on the head causes the eye line to tilt. Move the marker every round and count from the start stitch, not from the previous eye hole.
- Overstuffing the body lifts the shell center by 1 to 2 cm. Keep the body soft and add firmness to the head instead.
- Visible decreases on plush yarn can create dents along R12-R15 of the head. Work invisible decreases tightly and pinch the round flat after every second decrease set.
- Eye placement timing matters more than eye size. Insert eyes before the last two decrease rounds, and keep them between the middle head rounds so the face stays forward.
- Lattice sag happens when strips are too long. Each strip should cross the shell with a mild curve only; trim one row off if it buckles at the center.
- Pinning failure usually shows at the crust rim first. Pin all six strip ends before sewing anything permanent, then check that red filling stays visible between every strip.
- Tail weaving on toppings gets bulky fast. Split the yarn plies on berry details and bury tails sideways inside the shell top rather than straight down into the whipped cream.
Related Patterns
Conclusion
This berry pie turtle amigurumi works because the proportions stay disciplined. The shell remains flat, the rim stays visible, and the toppings sit as garnish rather than extra bulk. That is the whole build. Start with the head and body first, dry-fit the shell before closing it, and correct the lattice length before attaching the fruit. After finishing, post one top view and one front view to Pinterest and Instagram so the pie profile reads clearly. Use #BerryPieTurtlePattern. One question remains useful for the next version: would you keep the mixed berries, or switch this turtle to a single-fruit topping so the shell theme reads faster?









