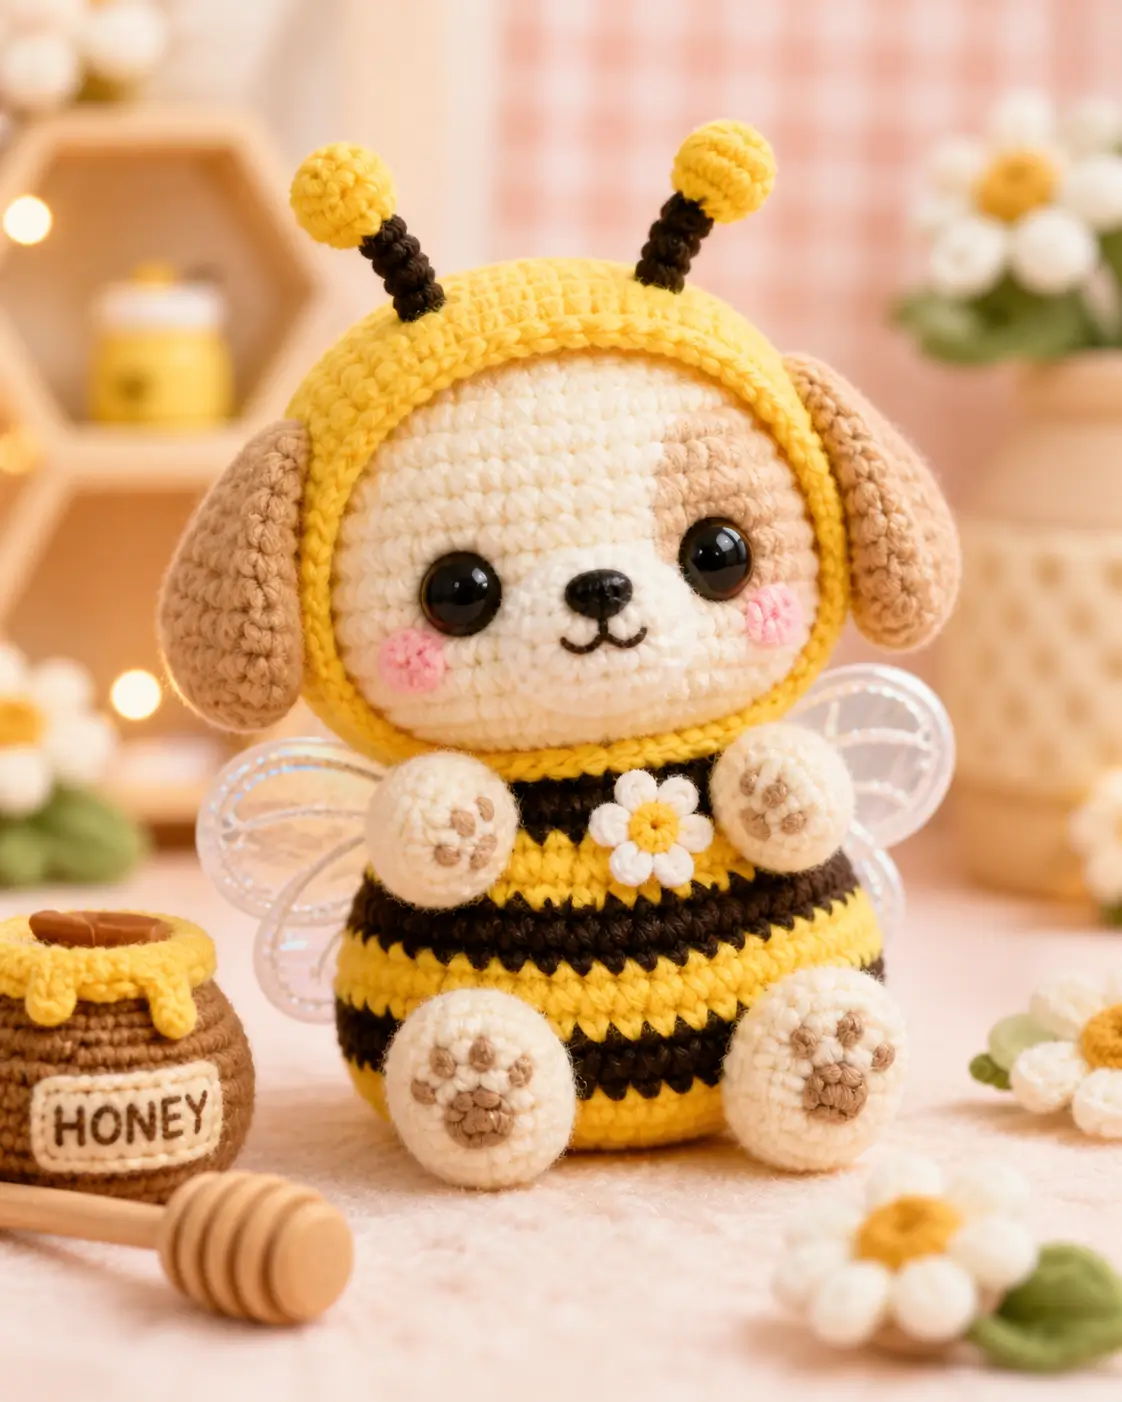
Bee antennae do not grow from puppy ears, so the hood has to carry the signal without swallowing the floppy side shapes. This bee puppy amigurumi crochet pattern uses worsted yarn, a 3.5 mm hook, and 10–12 mm eyes to make an 18–20 cm sitter for advanced-beginner makers. The structure suits nursery decor because the striped body sits flat.
The Design: What Makes This Bee Puppy Different
A bee puppy amigurumi crochet pattern fails when the maker treats the hood like a hat and the ears like afterthoughts. Here, the yellow hood is a separate cap so the cream face stays round, while the tan ears are sewn outside the hood seam. That preserves the dog silhouette. The striped body uses a 36-stitch medium plateau because a bee costume needs width, but the sitter still has to balance under a large head. Wings sit high on the back, angled into a shallow V, so they read as bee wings without pushing the toy forward. Many crochet puppy in bee costume patterns skip paw pads, yet the pads are the fastest way to keep the character canine. For this bumble bee dog amigurumi, the main mistake is placing antennae too wide; that makes them compete with the ears instead of framing the hood.
Project Info at a Glance
| Skill Level | Time | Finished Size | Hook | Best For |
|---|---|---|---|---|
| Advanced beginner to intermediate | 5–7 hours | 18–20 cm sitting | 3.5 mm | Shelf sitter, nursery display, photo prop |
Materials and Tools
Yarn
- Cream — worsted / aran — 35 g — smooth cotton or acrylic yarn.
- Yellow — worsted / aran — 40 g — clear bee yellow.
- Black — worsted / aran — 25 g — matte black for stripes and antenna stems.
- Tan — worsted / aran — 15 g — warm beige for floppy ears, face patch, and paw pads.
- White — worsted / aran — 10 g — wings, daisy petals, and honey label.
- Pink — scraps — 2 g — cheek patches.
- Brown — worsted / aran — 10 g — honey pot and honey dipper.
Tools
- Hook 3.5 mm
- Safety eyes 10–12 mm
- Polyester stuffing
- Tapestry needle
- Locking stitch markers
- Straight pins
- Black embroidery thread
- Small scissors
Abbreviations
- MR = magic ring
- sc = single crochet
- inc = increase, 2 sc in one stitch
- dec = invisible decrease
- sl st = slip stitch
- ch = chain
- BLO = back loop only
- FO = fasten off
Invisible decrease is worked through the front loops of the next two stitches to reduce visible gaps.
Pattern — Step by Step
Continuous spiral unless noted. Use a stitch marker at the first stitch of every round.
Head
Yarn: cream
R1: 6 sc in MR (6)
R2: inc ×6 (12)
R3: (sc, inc) ×6 (18)
R4: (2 sc, inc) ×6 (24)
R5: (3 sc, inc) ×6 (30)
R6: (4 sc, inc) ×6 (36)
R7–R13: sc around (36)
R14: (4 sc, dec) ×6 (30)
R15: (3 sc, dec) ×6 (24)
R16: (2 sc, dec) ×6 (18)
Insert safety eyes between R10 and R11, 7 stitches apart. Do not attach washers until the hood and face patch are tested with pins.
R17: (sc, dec) ×6 (12)
R18: dec ×6 (6)
Fasten off. Leave a 20 cm tail and close the opening.
Tan Face Patch
Yarn: tan
R1: 6 sc in MR (6)
R2: inc ×6 (12)
R3: (sc, inc) ×6 (18)
R4: (2 sc, inc) ×6 (24)
Fasten off. Leave a 25 cm tail. Sew to the viewer’s right side of the face, partly under the eye.
Muzzle and Nose
Yarn: cream, black embroidery thread
R1: 6 sc in MR (6)
R2: inc ×6 (12)
R3: sc around (12)
R4: dec ×6 (6)
Stuff very lightly. Embroider a small black oval nose across R2, then stitch a short vertical line and two mouth curves.
Fasten off. Leave a 20 cm tail.
Bee Hood
Yarn: yellow
R1: 6 sc in MR (6)
R2: inc ×6 (12)
R3: (sc, inc) ×6 (18)
R4: (2 sc, inc) ×6 (24)
R5: (3 sc, inc) ×6 (30)
R6: (4 sc, inc) ×6 (36)
R7–R10: sc around (36)
R11: BLO sc around (36)
R12: sc around (36)
Place over the head like a cap. Fold the BLO ridge forward to form the raised face rim.
Fasten off. Leave a 35 cm tail. Sew around the back half only, leaving the face open.
Antennae
Yarn: black stems, yellow tips
Stem, make 2 in black:
R1: 6 sc in MR (6)
R2–R6: sc around (6)
Fasten off. Leave a 15 cm tail.
Tip ball, make 2 in yellow:
R1: 6 sc in MR (6)
R2: inc ×6 (12)
R3: sc around (12)
R4: dec ×6 (6)
Stuff with a pea-sized amount only.
Fasten off. Sew each ball to one stem. Sew stems to hood R4–R5, 8 stitches apart.
Floppy Ears
Yarn: tan
Make 2.
R1: 6 sc in MR (6)
R2: inc ×6 (12)
R3: (sc, inc) ×6 (18)
R4–R7: sc around (18)
R8: (sc, dec) ×6 (12)
R9–R11: sc around (12)
Do not stuff. Flatten the ear.
R12: sc through both layers across the top (6)
Fasten off. Leave a 25 cm tail. Sew ears outside the hood rim, level with eye height.
Body
Yarn: yellow and black
Start in yellow.
R1: 6 sc in MR (6)
R2: inc ×6 (12)
R3: (sc, inc) ×6 (18)
R4: (2 sc, inc) ×6 (24)
R5: (3 sc, inc) ×6 (30)
R6: (4 sc, inc) ×6 (36)
R7: sc around in yellow (36)
R8: sc around in black (36)
R9: sc around in yellow (36)
R10: sc around in yellow (36)
R11: sc around in black (36)
R12: sc around in black (36)
R13: sc around in yellow (36)
R14: sc around in yellow (36)
R15: (4 sc, dec) ×6 in black (30)
R16: (3 sc, dec) ×6 in yellow (24)
Stuff firmly. Keep the base flat against the table while filling.
R17: (2 sc, dec) ×6 in yellow (18)
R18: (sc, dec) ×6 in yellow (12)
R19: dec ×6 in yellow (6)
Fasten off. Leave a 25 cm tail and close.
Arms / Front Legs
Yarn: cream
Make 2.
R1: 6 sc in MR (6)
R2: inc ×6 (12)
R3–R5: sc around (12)
R6: dec ×6 (6)
R7–R9: sc around (6)
Stuff paw only. Leave upper arm soft for sewing.
Fasten off. Leave a 20 cm tail.
Back Legs
Yarn: cream
Make 2.
R1: 6 sc in MR (6)
R2: inc ×6 (12)
R3: (sc, inc) ×6 (18)
R4–R5: sc around (18)
R6: (sc, dec) ×6 (12)
R7: sc around (12)
Stuff the foot, then flatten the top edge slightly.
Fasten off. Leave a 25 cm tail.
Paw Pads and Toe Dots
Yarn: tan
Large pads, make 4:
R1: 6 sc in MR (6)
R2: inc ×6 (12)
Fasten off. Leave a 15 cm tail.
Toe dots, make 16:
R1: 6 sc in MR (6)
Fasten off. Leave a 10 cm tail.
Sew one large pad to each paw center. Sew four toe dots above each pad.
Wings
Yarn: white or clear-luster yarn
Make 2.
R1: 6 sc in MR (6)
R2: inc ×6 (12)
R3: (sc, inc) ×6 (18)
R4: (2 sc, inc) ×6 (24)
R5: sc around (24)
R6: (2 sc, dec) ×6 (18)
R7: sc around (18)
R8: (sc, dec) ×6 (12)
R9: dec ×6 (6)
Do not stuff. Flatten, then stitch two white vein lines from base to outer edge.
Fasten off. Leave a 30 cm tail.
Cheek Patches
Yarn: pink
Make 2.
R1: 6 sc in MR (6)
R2: inc ×6 (12)
Fasten off. Leave a 15 cm tail. Sew under the eyes, one round below the lower eye edge.
Daisy Chest Flower
Yarn: yellow center, white petals
Center in yellow:
R1: 6 sc in MR (6)
R2: inc ×6 (12)
Fasten off. Leave a 15 cm tail.
Petals in white:
Join white to any stitch of R2.
R1: (ch 3, sl st in second ch from hook, sl st in next ch, sl st into next center stitch) ×12 (12 petals)
Fasten off. Leave a 20 cm tail. Sew to the upper body between the front paws.
Honey Pot
Yarn: brown, yellow, white
Pot in brown:
R1: 6 sc in MR (6)
R2: inc ×6 (12)
R3: (sc, inc) ×6 (18)
R4: BLO sc around (18)
R5–R7: sc around (18)
R8: (sc, dec) ×6 (12)
R9: sc around (12)
Fasten off. Leave a 20 cm tail.
Honey rim in yellow:
R1: 6 sc in MR (6)
R2: inc ×6 (12)
R3: (sc, inc) ×6 (18)
Fasten off. Sew to pot opening. Add three short yellow stitches down the side for drips.
Label in white:
R1: ch 8, sc in second ch from hook and across (7)
R2–R3: ch 1, turn, sc across (7)
Fasten off. Embroider HONEY in brown, then sew to the pot front.
Honey Dipper
Yarn: brown
Handle:
R1: ch 12, sl st in second ch from hook and across (11)
Fasten off.
Dipper head:
R1: 6 sc in MR (6)
R2: inc ×6 (12)
R3–R4: sc around (12)
R5: dec ×6 (6)
Fasten off. Sew head to handle.
Assembly
- Pin the head to the body with the face centered over the yellow front stripe.
- Sew the head to the body using the head tail, adding stuffing at the neck before closing the seam.
- Place the hood on the head, roll the BLO rim forward, and sew only the back and side edges.
- Sew the tan ears outside the hood rim, with the lower ear edge ending near the cheek line.
- Attach the muzzle, embroider the nose and mouth, then sew the tan face patch and pink cheeks.
- Sew the antennae to the hood, keeping the stems vertical and 8 stitches apart.
- Sew the front legs to the upper body over R10–R13, angled toward the daisy.
- Sew the back legs to the lower front body so the toy sits without rolling.
- Attach the wings to the back across R9–R12 in a shallow V.
- Sew on the daisy, place the honey pot beside the body, and position the honey dipper in front.
The finished piece is a seated puppy in a bee costume with separate prop pieces.
7 Technical Tips
- Stitch marker drift: Move the marker at the end of every round on the striped body. A one-stitch drift at R11 makes the black band spiral visibly across the front.
- Stuffing firmness: The body should resist light thumb pressure before R17 closes. An under-stuffed base collapses under the head and makes the back legs lift.
- Invisible decrease: Work every dec through front loops only. Full-loop decreases leave raised knots on the cream face and yellow hood.
- Eye placement timing: Test the eyes after Head R13 and before attaching washers. A 7-stitch gap suits 10–12 mm eyes on a 36-stitch face.
- Worsted tension: Use the 3.5 mm hook with firm tension, not a loose fabric hook. Gaps between yellow and black stripes will show stuffing first.
- Pinning accuracy: Use at least four pins per wing before sewing. If the wing tops differ by more than 0.5 cm, remove the higher wing and reset it.
- Tail weaving: Leave 20–35 cm sewing tails on structural parts. Tails shorter than 8 cm can work loose after the paws and ears are handled.
Conclusion
This bee puppy amigurumi crochet pattern holds its shape because the hood, ears, wings, and paws are treated as separate engineering problems, not decorative afterthoughts. Block the wings flat, pin every limb before sewing, and photograph the sitter from the front before weaving tails. That single photo will show uneven antennae faster than the table view. For the next step, make one test head in scrap yarn and confirm eye spacing before cutting the yellow hood yarn. Share the finished puppy on Pinterest and Instagram with #BeePuppyAmigurumi. Which detail changes the character more on your version: the tan ear length, or the height of the bee antennae?









