Introduction
Basketweave blocks only look woven because neighboring squares reverse the direction of their knit and purl texture. This basketweave blanket knitting pattern recreates that large-scale geometry with worsted/Aran yarn, 6 mm needles, and an integrated border, targeting approximately 127 × 152 cm after blocking. It suits a confident beginner who can knit and purl. The repeat-based construction also makes the dimensions easy to modify for a bed or sofa.
The Design: What Makes This Basketweave Blanket Different
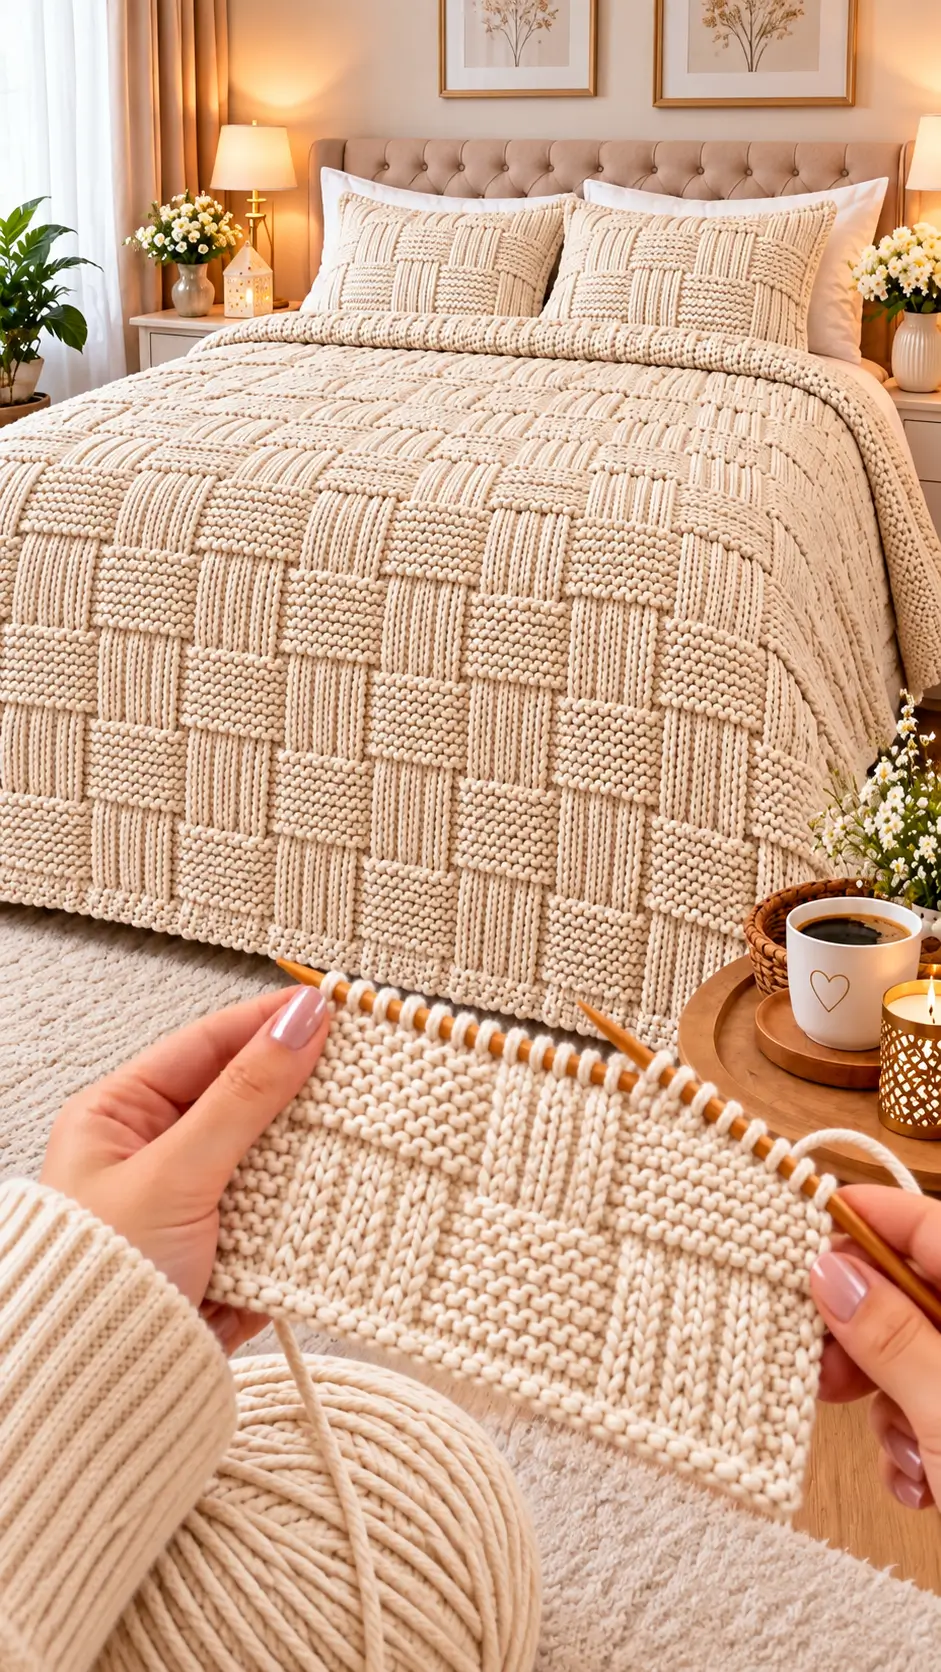
The photographed blanket uses unusually large visual blocks rather than tiny basketweave checks. This version therefore works 12-stitch blocks across 12-row sections, producing stronger proportions in a full-size textured knitted blanket.
A garter border is knitted simultaneously with the main fabric. That decision removes a later seaming step and gives the rectangle a defined perimeter. The central pattern alternates knit-facing and purl-facing blocks; after 12 rows, their positions reverse. The resulting knit and purl blanket pattern creates its geometry without cables.
The common failure is losing the block sequence after turning the work. A knitter sees the reverse side and accidentally repeats the previous texture instead of maintaining the established columns. Marking each 12-stitch boundary makes that error much easier to detect before an entire section has been knitted.
Project Info at a Glance
| Skill Level | Time | Finished Size | Needle | Best For |
|---|---|---|---|---|
| Confident beginner | Approx. 30–45 hours | Approx. 127 × 152 cm | 6 mm circular | Large throw / bed layer |
The finished dimensions are a design target based on the 50 × 60 inch format documented for a published basketweave throw. Final dimensions depend on the knitter’s gauge.
Materials and Tools
Yarn
- Warm ivory/cream — worsted/Aran (#4) — approximately 2,000–2,400 yd / 1,830–2,195 m. Choose a smooth, plied wool, acrylic, or washable wool-blend yarn with enough stitch definition to expose the knit and purl blocks.
The yardage is a planning estimate for this version rather than a measurement of the yarn shown in the photograph. Actual yarn consumption changes with fiber, gauge, dimensions, and individual tension.
Tools
- 6 mm circular knitting needle, preferably with a 100–120 cm cable
- 12 removable stitch markers
- Tapestry needle
- Scissors
- Tape measure
- Blocking mats or a clean flat blocking surface
A long circular needle carries the blanket’s weight more comfortably than short straight needles even though the project is knitted back and forth.
Abbreviations
- CO — cast on
- BO — bind off
- K — knit
- P — purl
- st/sts — stitch/stitches
- RS — right side
- WS — wrong side
- rep — repeat
- PM — place marker
- SM — slip marker
MR, sc, inc, dec, sl st, ch and BLO are crochet/amigurumi abbreviations and do not apply to this knitted construction.
Gauge and Finished Size
Target approximately 16 sts and 22 rows = 10 cm / 4 inches in basketweave pattern after blocking.
Work a swatch larger than 10 cm square. A basketweave swatch matters because alternating knit and purl fields contract differently from plain stockinette.
At 16 stitches per 10 cm, 204 stitches measure roughly 127.5 cm before considering minor border and blocking differences:
204 ÷ 16 × 10 = 127.5 cm
The pattern uses 204 stitches total: 12 border stitches plus 192 central stitches. Those 192 stitches divide exactly into sixteen 12-stitch blocks.
For a wider or narrower blanket, change the central count only in multiples of 24 stitches if you want complete pairs of alternating blocks. Keep the six-stitch border at each side.
Basketweave Blanket Knitting Pattern
This blanket is worked flat from the bottom edge upward.
Bottom Border
Yarn: warm ivory worsted/Aran.
CO 204 sts.
Rows 1–12: K all sts. (204)
The 12-row garter section forms the lower border.
On the final border row, place a marker after the first 6 sts and before the final 6 sts. Additional markers can be positioned every 12 stitches across the central 192 stitches.
Basketweave Section A
The six stitches at each edge remain in garter stitch on every row.
Row 1 (RS): K6, *K12, P12; rep from * 8 times, K6. (204)
Row 2 (WS): K6, *P12, K12; rep from * 8 times, K6. (204)
Rows 3–12: Repeat Rows 1–2 five more times. (204 each row)
The same physical blocks must remain stockinette-facing or reverse-stockinette-facing throughout all 12 rows. The written WS instruction reverses K and P so those textures remain consistent when viewed from the front.
Basketweave Section B
Reverse the block positions for the next section.
Row 13 (RS): K6, *P12, K12; rep from * 8 times, K6. (204)
Row 14 (WS): K6, *K12, P12; rep from * 8 times, K6. (204)
Rows 15–24: Repeat Rows 13–14 five more times. (204 each row)
One complete basketweave repeat consists of Sections A and B: 24 rows.
Main Blanket
Repeat the 24-row basketweave sequence until the patterned portion reaches approximately 142–144 cm, or until the blanket is roughly 8–10 cm shorter than the intended finished length.
Do not stop halfway through a 12-row block. Ending at a complete Section A or Section B keeps the top row of squares geometrically complete.
For the target 152 cm length, row gauge will determine the exact number of repeats. Measure the actual work rather than forcing a fixed repeat count when the measured row gauge differs from the target.
Top Border
After completing a full 12-row basket section:
Rows 1–12: K all sts. (204)
BO all 204 sts loosely in knit.
A tight bind-off can pull the upper edge inward by several centimeters. If the standard bind-off is visibly narrower than the cast-on edge, work it with a needle 0.5–1 mm larger.
Optional Larger Basket Blocks
The reference image visually suggests broad, prominent rectangles. Makers wanting an even more exaggerated architectural effect can substitute 16-stitch × 16-row blocks, but the total cast-on count must then be recalculated.
Keep the following structure:
6 edge sts + complete pattern repeats + 6 edge sts.
Do not insert partial blocks simply to hit an arbitrary width. Changing the repeat geometry produces uneven end panels.
Understanding the Basketweave Structure
Basketweave knitting is not literal weaving. Every stitch remains attached to the row below it in normal knitted construction.
The illusion comes from light interacting differently with vertical knit columns and horizontal-looking purl texture. Place those surfaces beside one another in squares, then reverse their positions after a fixed number of rows. The eye reads the alternating fields as strips passing above and below each other.
Basketweave patterns can use many different block sizes. Smaller repeats create a compact checkerboard effect, while larger stitch and row groups produce the oversized architectural blocks visible in the reference image.
This pattern intentionally enlarges the modules to 12 stitches. That scale better matches the broad blocks in the photographed blanket.
How to Resize the Blanket
First determine the gauge in basketweave.
Suppose the measured gauge is 16 stitches per 10 cm and the desired width is approximately 150 cm:
150 × 16 ÷ 10 = 240 stitches.
The pattern needs 12 border stitches, leaving 228 stitches for the central field. Because 228 is not divisible by 24, adjust the number rather than breaking a repeat.
A central count of 240 stitches gives ten 24-stitch pairs. Add 12 border stitches:
240 + 12 = 252 stitches.
At 16 stitches per 10 cm, 252 stitches produce an approximate width of 157.5 cm.
Alternatively, use 216 central stitches plus 12 border stitches for 228 total stitches, approximately 142.5 cm at the same gauge.
The resizing rule is simple: preserve complete pattern modules first, then choose the nearest practical finished dimension.
Maintaining Straight Edges
Basketweave fabric contains alternating zones with different tendencies to contract. Purl-dominant areas can appear slightly wider or shorter than adjacent knit-dominant areas, particularly before blocking.
The integrated six-stitch garter borders stabilize both sides. Keep those six stitches independent from the 12-stitch blocks. Moving a border marker by even one stitch shifts every later block and eventually makes the two edges visually asymmetric.
Do not slip the first stitch unless you intentionally want a chain selvedge. This version keeps all six border stitches in garter, providing enough width for the edge to remain visually substantial beside the large center blocks.
Finishing the Basketweave Blanket
Weave yarn ends horizontally through the wrong-side structure rather than pulling them vertically through several basket blocks. A tightly woven vertical tail can shorten one localized area.
Wet-block according to the yarn manufacturer’s care instructions. Lay the blanket flat and square the corners without aggressively stretching the textured blocks.
Measure diagonally from opposite corners. Repeat across the other diagonal. Similar diagonal measurements indicate that the rectangle is square.
Allow the fabric to dry completely before removing it from the blocking surface.
Why Yarn Choice Changes the Result
A smooth worsted or Aran yarn makes the alternating stitch direction easy to read. Highly fuzzy fibers obscure the boundary between adjacent blocks. Very stiff yarn can exaggerate the transitions and reduce drape.
Basketweave blankets can be knitted successfully in several yarn weights, from medium worsted yarn through bulky and jumbo fibers. Needle size therefore needs to follow the selected yarn and measured gauge rather than the appearance of the reference photograph alone.
For the reference-image appearance, medium-weight cream yarn gives visible stitch definition without turning each block into an extremely thick panel. Use the swatch to decide whether 6 mm needles produce the required combination of definition and drape with the chosen yarn.
Finishing Sequence
- Complete the final full 12-row basketweave section before beginning the upper border.
- Knit all 12 rows of the upper garter border without changing the 204-stitch count.
- Bind off loosely and compare the top-edge width with the cast-on edge.
- Thread each yarn tail onto a tapestry needle.
- Weave the tails through matching-color wrong-side stitches without crossing a block boundary unnecessarily.
- Trim the tails only after they are secure.
- Wash or dampen the blanket according to the yarn label.
- Lay the blanket flat and align all four edges.
- Match the two diagonal measurements as closely as the fabric permits.
- Dry the blanket fully before folding or placing it on a bed.
The completed piece is a single rectangular blanket with an integrated garter border and alternating 12-stitch basketweave blocks.
7 Technical Tips for Better Basketweave Knitting
- Lost block boundary: Place a marker every 12 center stitches during the first pattern section. A one-stitch error at one boundary otherwise displaces every block after it.
- Narrow bind-off edge: Compare the top edge with the cast-on width after binding off roughly 20 stitches. If it contracts visibly, restart the bind-off using a needle approximately 0.5–1 mm larger.
- Uneven purl tension: Measure a basketweave swatch rather than a stockinette swatch. A difference of even one stitch per 10 cm changes the width of a 204-stitch blanket by several centimeters.
- Wrong texture on the WS: Inspect the RS every two rows during the first 12-row section. A mistaken K12/P12 reversal is much faster to correct after two rows than after an entire block.
- Curling side edge: Retain all six garter stitches at each side. Accidentally absorbing one border stitch into a stockinette block weakens the anti-curling edge.
- Distorted blocking: Compare both diagonal measurements before leaving the blanket to dry. Pulling one corner farther than the opposite corner turns the intended rectangle into a parallelogram.
- Visible woven-in tails: Weave each tail through at least 5–7 cm of wrong-side structure before trimming. Avoid pulling the tail tight enough to gather the surrounding block.
Conclusion
Large basket blocks work best when their stitch width, row height, and border proportions are planned as one system. Before casting on the full 204 stitches, knit a basketweave swatch, block it, and measure both stitch and row gauge. That measurement determines whether the finished throw will reach the intended 127 × 152 cm dimensions. Save this basketweave blanket knitting pattern to Pinterest for later reference, and share the finished version on Instagram with #BasketweaveBlanket. The next practical step is choosing a smooth worsted/Aran yarn and testing it on 6 mm needles. Would you keep the photographed blanket’s large 12-stitch blocks, or make the basket squares smaller?









