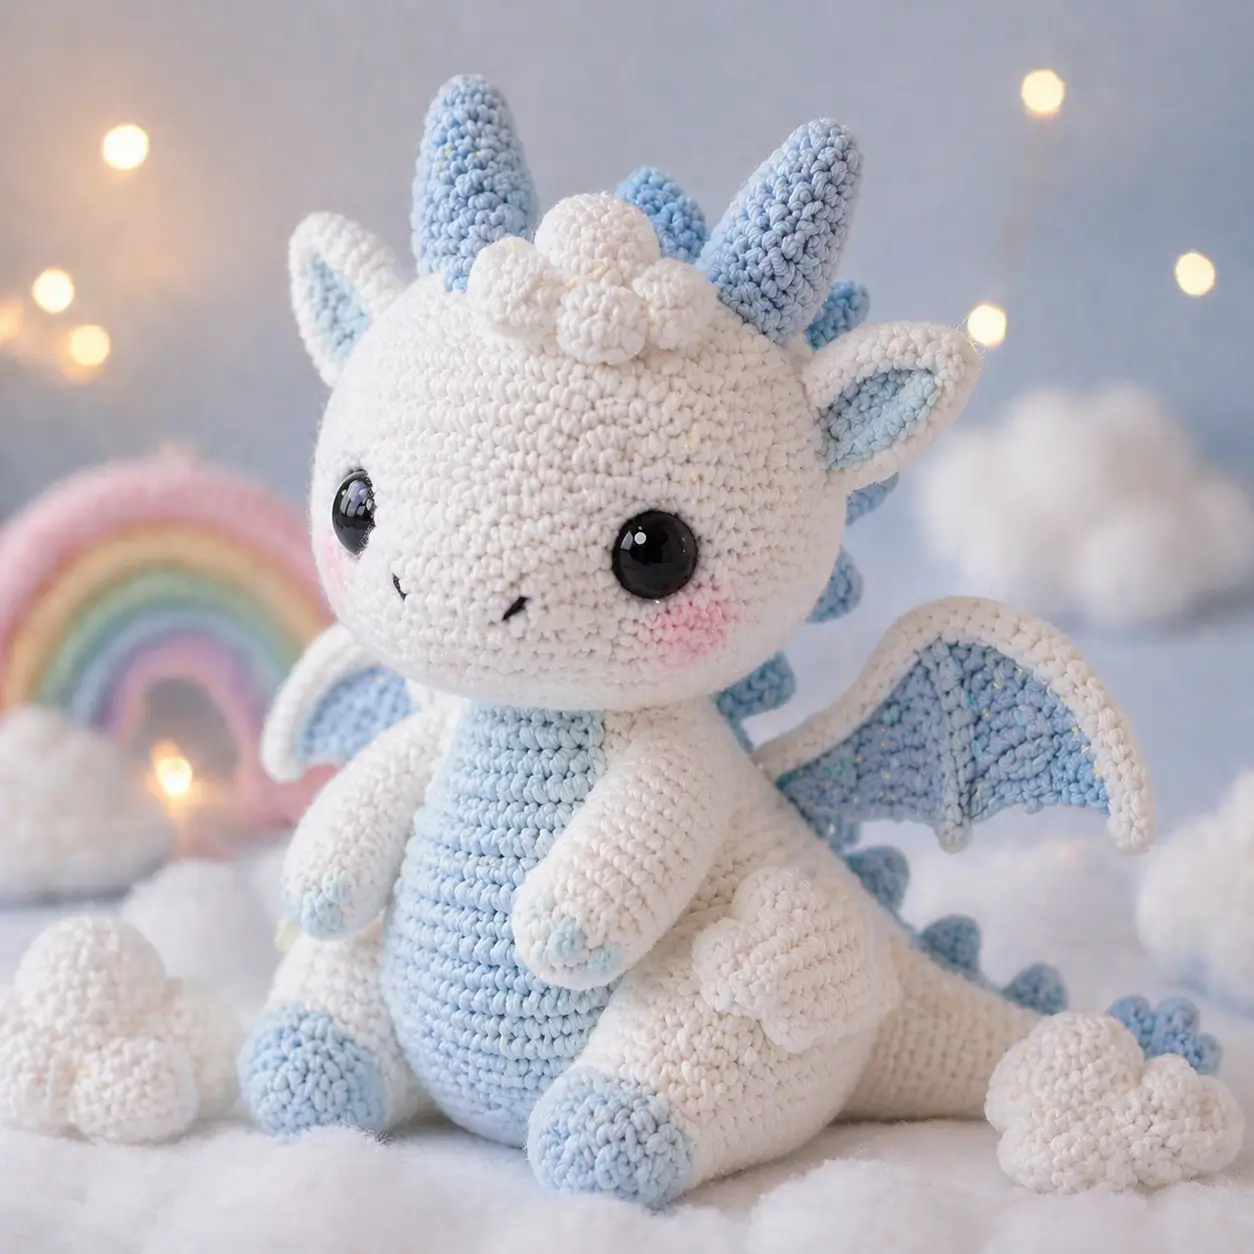
A dragon without a tail ridge reads like a lizard in plush form. This baby dragon amigurumi crochet pattern uses DK-to-light-worsted cotton, a 3.5 mm hook, and a finished size near 22 cm, with the seated build suited to a compact display plush. The shape also works well for nursery shelves, market tables, and themed photo props because the wings stay visible in profile.
The Design: What Makes This Dragon Different
The head has to dominate. That is the first proportion call, because the photo reads as juvenile only when the face sits visibly wider than the neck and torso. A large head paired with a medium seated body keeps the silhouette stable and avoids the longer western-dragon outline seen in many search results. Color blocking matters too. The pale blue belly strip and wing membrane break up the white yarn mass, which keeps the form readable in photos and pushes the piece toward an ice dragon amigurumi rather than a generic dragon crochet pattern with wings. Then there is the forehead treatment: short horns alone were not enough, so soft curls sit between and ahead of them. A common maker mistake with this type is dropping the wings too low, which makes the shoulders look sunken and the tail look heavy.
Project Info at a Glance
| Skill Level | Time | Finished Size | Hook | Best For |
|---|---|---|---|---|
| Intermediate | 1+ day | Approx. 22 cm | 3.5 mm | Photo prop / shelf plush |
Materials and Tools
Yarn
- White — DK / light worsted cotton — about 92 g — Hobbii Friends Cotton 8/8 or similar
- Pale blue — matching cotton — about 20 g — Hobbii Rainbow Cotton 8/8 or similar
- Soft pink — scrap amount — cheek circles
- Black — scrap embroidery thread — nostrils and smile
Tools
- Hook 3.5 mm
- Safety eyes 10–12 mm
- Stuffing
- Yarn needle
- Stitch markers
- Pins
Abbreviations
MR / sc / inc / dec / sl st / ch / st
Use invisible decrease on all shaping rounds; it keeps the cheeks, belly edge, and seated body from showing diagonal gaps.
Pattern — Step by Step
Continuous spiral unless noted. The pattern below is original and photo-matched, built with standard amigurumi math at the 22 cm benchmark scale.
Head (Make 1)
Yarn: white — Standard amigurumi math
R1: 6 sc in MR (6)
R2: inc x6 (12)
R3: (sc, inc) x6 (18)
R4: (sc 2, inc) x6 (24)
R5: (sc 3, inc) x6 (30)
R6: (sc 4, inc) x6 (36)
R7: (sc 5, inc) x6 (42)
R8: sc around (42)
R9: sc around (42)
R10: sc around (42)
R11: sc around (42)
R12: sc around (42)
R13: sc around (42)
R14: sc around (42)
R15: sc around (42)
R16: sc around (42)
R17: (sc 5, dec) x6 (36)
R18: (sc 4, dec) x6 (30)
R19: (sc 3, dec) x6 (24)
R20: (sc 2, dec) x6 (18)
R21: (sc, dec) x6 (12)
R22: dec x6 (6)
Insert 10–12 mm safety eyes between R12 and R13, spaced 10 sts apart. Stuff firmly from R17 onward.
Fasten off. Leave 35 cm tail.
Muzzle (Make 1)
Yarn: white — Standard amigurumi math
R1: 6 sc in MR (6)
R2: inc x6 (12)
R3: (sc, inc) x6 (18)
R4: sc around (18)
Do not overstuff. Flatten slightly before sewing so the snout stays broad rather than bulbous.
Fasten off. Leave 25 cm tail.
Body (Make 1)
Yarn: white — Standard amigurumi math
R1: 6 sc in MR (6)
R2: inc x6 (12)
R3: (sc, inc) x6 (18)
R4: (sc 2, inc) x6 (24)
R5: (sc 3, inc) x6 (30)
R6: (sc 4, inc) x6 (36)
R7: sc around (36)
R8: sc around (36)
R9: sc around (36)
R10: sc around (36)
R11: sc around (36)
R12: (sc 4, dec) x6 (30)
R13: sc around (30)
R14: sc around (30)
R15: (sc 3, dec) x6 (24)
R16: sc around (24)
R17: (sc 2, dec) x6 (18)
Stuff the lower half more firmly than the upper half so the body keeps a seated base.
Fasten off. Leave 45 cm tail.
Front Arms (Make 2)
Yarn: pale blue and white — Standard amigurumi math
R1: 6 sc in MR in pale blue (6)
R2: inc x6 (12)
R3: change to white, sc around (12)
R4: sc around (12)
R5: sc around (12)
R6: sc around (12)
R7: sc around (12)
R8: sc around (12)
R9: sc around (12)
Stuff only the paw end. Keep the top flat for easier shoulder placement.
Fasten off. Leave 20 cm tail.
Back Legs (Make 2)
Yarn: pale blue and white — Standard amigurumi math
R1: 6 sc in MR in pale blue (6)
R2: inc x6 (12)
R3: (sc, inc) x6 (18)
R4: change to white, sc around (18)
R5: sc around (18)
R6: sc around (18)
R7: (sc, dec) x6 (12)
R8: sc around (12)
R9: sc around (12)
R10: sc around (12)
Stuff the foot firmly and the upper section lightly.
Fasten off. Leave 25 cm tail.
Ears (Make 2)
Yarn: white — Rows, photo-based proportions
Ch 7.
Row 1: sc 6 (6)
Row 2: ch 1, turn, dec, sc 2, dec (4)
Row 3: ch 1, turn, sc 4 (4)
Row 4: ch 1, turn, dec, sc, dec (3)
Row 5: ch 1, turn, sc 3 (3)
Row 6: ch 1, turn, dec, sc (2)
Row 7: ch 1, turn, sc 2 (2)
Fold the lower edge slightly before sewing so the ear opens upward.
Fasten off. Leave 20 cm tail.
Inner Ears (Make 2)
Yarn: pale blue — Rows, photo-based proportions
Ch 5.
Row 1: sc 4 (4)
Row 2: ch 1, turn, dec, sc, dec (3)
Row 3: ch 1, turn, sc 3 (3)
Row 4: ch 1, turn, dec, sc (2)
Sew one inner ear to each white ear, centered and slightly low to leave a white border.
Fasten off. Leave 15 cm tail.
Horns (Make 2)
Yarn: pale blue — Standard amigurumi math
R1: 6 sc in MR (6)
R2: sc around (6)
R3: (sc 2, inc) x2 (8)
R4: sc around (8)
R5: (sc 3, inc) x2 (10)
R6: sc around (10)
R7: (sc 4, inc) x2 (12)
R8: sc around (12)
Stuff lightly or add a narrow strip of stuffing only at the base. The tip should stay narrow.
Fasten off. Leave 20 cm tail.
Wings (Make 2)
Yarn: white outer wing + pale blue membrane — Rows, photo-based proportions
Outer wing — white
Ch 10.
Row 1: sc 9 (9)
Row 2: ch 1, turn, dec, sc 5, dec (7)
Row 3: ch 1, turn, sc 7 (7)
Row 4: ch 1, turn, dec, sc 3, dec (5)
Row 5: ch 1, turn, sc 5 (5)
Row 6: ch 1, turn, dec, sc, dec (3)
Row 7: ch 1, turn, sc 3 (3)
Inner membrane — pale blue
Ch 8.
Row 1: sc 7 (7)
Row 2: ch 1, turn, dec, sc 3, dec (5)
Row 3: ch 1, turn, sc 5 (5)
Row 4: ch 1, turn, dec, sc, dec (3)
Row 5: ch 1, turn, sc 3 (3)
Sew the blue membrane onto the white wing, leaving a narrow white frame around the edge.
Fasten off. Leave 25 cm tail on the white outer wing.
Tail (Make 1)
Yarn: white — Standard amigurumi math
R1: 6 sc in MR (6)
R2: inc x6 (12)
R3: (sc, inc) x6 (18)
R4: (sc 2, inc) x6 (24)
R5: sc around (24)
R6: sc around (24)
R7: sc around (24)
R8: sc around (24)
R9: sc around (24)
R10: sc around (24)
R11: sc around (24)
Stuff lightly. The tail should bend, not stand straight.
Fasten off. Leave 35 cm tail.
Spine Spikes (Make 7)
Yarn: pale blue — Rows, photo-based proportions
Ch 4.
Row 1: sc 3 (3)
Row 2: ch 1, turn, dec, sc (2)
Row 3: ch 1, turn, dec (1)
Make 7 identical spikes for the back of head, neck, and tail.
Fasten off. Leave 12 cm tail each.
Belly Panel (Make 1)
Yarn: pale blue — Rows, photo-based proportions
Ch 6.
Row 1: sc 5 (5)
Row 2: ch 1, turn, inc, sc 3, inc (7)
Row 3: ch 1, turn, sc 7 (7)
Row 4: ch 1, turn, inc, sc 5, inc (9)
Row 5: ch 1, turn, sc 9 (9)
Row 6: ch 1, turn, inc, sc 7, inc (11)
Row 7: ch 1, turn, sc 11 (11)
Stretch gently while sewing so it reads as a vertical belly strip rather than a short patch.
Fasten off. Leave 25 cm tail.
Cheek Patches (Make 2)
Yarn: soft pink — Standard amigurumi math
R1: 6 sc in MR (6)
R2: inc x6 (12)
Keep these flat. Do not stuff.
Fasten off. Leave 12 cm tail.
Forehead Curls (Make 3)
Yarn: white — Standard amigurumi math
R1: 6 sc in MR (6)
R2: inc x6 (12)
R3: sc around (12)
R4: dec x6 (6)
Stuff very lightly, just enough to keep each curl round.
Fasten off. Leave 15 cm tail.
Assembly
- Sew the body to the head, centering the 18-st opening of the body under the head so the dragon tips slightly back when seated.
- Sew the muzzle to the lower half of the head, centered below the eyes.
- Attach the cheek patches low on the face, one round below the outer corners of the eyes.
- Sew the ears to the upper sides of the head, then angle them outward by about 15 degrees.
- Attach the front arms high on the torso, just below the head seam.
- Sew the back legs to the lower sides of the body in a seated position so both feet project forward evenly.
- Attach the tail at the back base of the body, aiming it slightly to one side for balance.
- Sew the wings one round below the head seam and three to four stitches behind the arm line.
- Attach the horns behind the forehead area, then add the three curls between and in front of them.
- Sew the spine spikes from the crown to the tail, embroider the nostrils and smile, and weave in every tail securely.
The finished dragon should sit on its own once the back legs and tail share the load.
7 Technical Tips
- Stitch marker drift: Mark the first stitch of every round and add a second marker at each increase round change. Lose one round on the head, and the ear line can shift by 3 to 4 mm.
- Stuffing firmness: Pack the head until it feels distinctly firmer than the body. Match those densities, and the neck seam starts to collapse forward.
- Invisible decrease: Use invisible decreases on all visible shaping rounds, especially the head and body closures. Standard decreases leave a slanted notch that shows fast on white yarn.
- Eye placement timing: Install the eyes before the final third of head closure, not after. On this 42-stitch head, placing them between R12 and R13 and 10 stitches apart keeps the face juvenile rather than wide-set.
- Velvet substitution: Do not copy the 3.5 mm hook blindly if you switch to velvet or chenille. Test at least one swatch in the 4.0 to 4.5 mm range, because compressed plush yarn can distort the wing membrane and shrink the horn base.
- Pinning sequence: Pin the ears first, then the wings, then the horns. That order keeps the top silhouette readable and stops the horn base from pushing the ears backward.
- Tail weaving: Split the tail yarn and weave each half through at least five stitches in opposite directions. One straight pass works loose fast when the plush is picked up by the tail.
Conclusion
This build turns the photo into a seated plush with clear structural logic: oversized head, medium body, framed wings, short horns, and a visible tail ridge. Next step, swatch your white yarn with the blue accent and check eye size against two head rounds before starting the full piece. Save a front, side, and back photo set to Pinterest, then post the same trio on Instagram with #WinterCloudDragon so the horn spacing and wing angle stay visible. This baby dragon amigurumi crochet pattern also leaves room for color swaps. Would you keep the forehead curls soft, or replace them with sharper ice spines?









