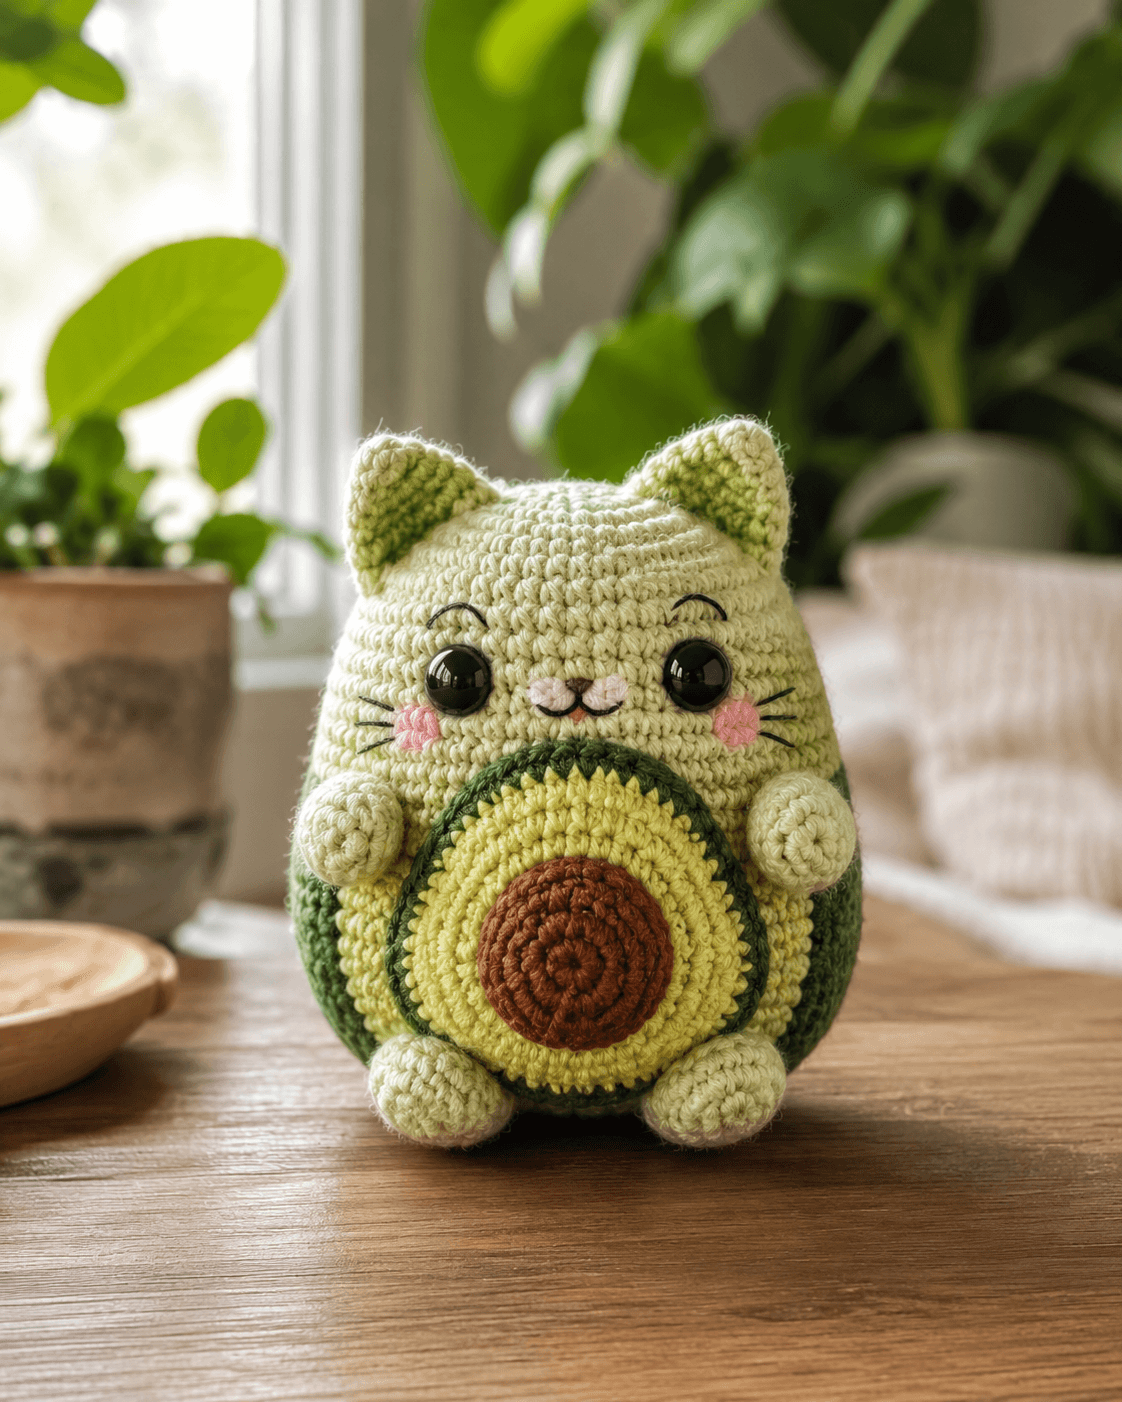
An avocado has a pit line and a cat has a muzzle line; forcing both onto one face is the first structural problem. This avocado cat amigurumi crochet pattern builds a medium plush in worsted yarn with a 3.25 to 3.5 mm hook, roughly 18 to 20 cm tall, at an easy-intermediate level. The payoff is practical: it reads clearly in photos, so it works well for gift stock or craft-fair display.
The Design: What Makes This Avocado Cat Different
You are not shaping a standard kitten. You are shaping a loaf body with produce geometry on the front. That changes the build order. First, the head stays broad rather than tall, because the photo shows a face spread across the upper third instead of projecting forward. Second, the belly applique carries most of the avocado identity, which means the body can remain structurally simple while the front disc handles color contrast. Third, the ears need a short, wide triangle so they do not overpower the round silhouette.
A common mistake with this character type is pushing the eyes too low once the avocado belly is attached. Then the face collapses into the middle zone and loses the cat expression. In avocado cat free crochet pattern listings and avocato crochet pattern pages, designers often solve that with a flatter face, compact limbs, and strong front contrast.
Project Info at a Glance
| Skill Level | Time | Finished Size | Hook | Best For |
|---|---|---|---|---|
| Easy-intermediate | 4–6 hours | 18–20 cm target for this adaptation | 3.25–3.5 mm | Gifts, shelf decor, market plush |
Materials and Tools
Yarn
- Pale green — worsted / medium 4 — small amount — paintbox cotton, YarnArt Jeans held to gauge, or any smooth cotton blend
- Dark green — worsted / medium 4 — small amount — for rind edge and ear inner contrast
- Yellow-green — worsted / medium 4 — small amount — avocado flesh circle
- Brown — worsted / medium 4 — very small amount — pit
- Pink — worsted / medium 4 — very small amount — cheeks
- Black embroidery floss — whiskers, brows, mouth line
- Cream or pale pink — tiny amount — snout
Tools
- Hook 3.25 mm or 3.5 mm
- Safety eyes — 6 mm is verified for smaller public builds; for the photographed plush look, 10–12 mm gives a closer visual scale
- Stuffing
- Yarn needle
- Stitch markers
- Pins
Abbreviations
MR = magic ring; sc = single crochet; inc = increase; dec = invisible decrease; sl st = slip stitch; ch = chain; BLO = back loop only.
Invisible decrease matters here because the face is light colored and front-facing; standard decreases leave holes that show shadow on the muzzle line.
Pattern — Step by Step
Continuous spiral unless noted. This is an original, photo-based pattern draft built with standard amigurumi math, not a copy of any paid PDF.
Head (Make 1)
Yarn: pale green — Source: standard amigurumi math adapted to the photo
R1: 6 sc in MR (6)
R2: inc x6 (12)
R3: (sc, inc) x6 (18)
R4: (2 sc, inc) x6 (24)
R5: (3 sc, inc) x6 (30)
R6: (4 sc, inc) x6 (36)
R7: 36 sc (36)
R8: 36 sc (36)
R9: 36 sc (36)
R10: 36 sc (36)
R11: 36 sc (36)
R12: 36 sc (36)
Place eyes between R8 and R9, about 8 stitches apart. Insert before closing.
R13: (4 sc, dec) x6 (30)
R14: (3 sc, dec) x6 (24)
R15: (2 sc, dec) x6 (18)
Stuff firmly at crown, lightly at lower face.
R16: (sc, dec) x6 (12)
R17: dec x6 (6)
Fasten off. Leave a 20 cm tail.
Body (Make 1)
Yarn: pale green — Source: standard amigurumi math adapted to the photo
R1: 6 sc in MR (6)
R2: inc x6 (12)
R3: (sc, inc) x6 (18)
R4: (2 sc, inc) x6 (24)
R5: (3 sc, inc) x6 (30)
R6: (4 sc, inc) x6 (36)
R7: 36 sc (36)
R8: 36 sc (36)
R9: 36 sc (36)
R10: 36 sc (36)
R11: 36 sc (36)
R12: 36 sc (36)
R13: (4 sc, dec) x6 (30)
R14: (3 sc, dec) x6 (24)
R15: (2 sc, dec) x6 (18)
Stuff body harder at the base than at the top so it sits flat.
R16: (sc, dec) x6 (12)
R17: dec x6 (6)
Fasten off. Leave a 20 cm tail.
Arms / Front Legs (Make 2)
Yarn: pale green — Source: standard amigurumi math
R1: 6 sc in MR (6)
R2: inc x6 (12)
R3: 12 sc (12)
R4: 12 sc (12)
R5: 12 sc (12)
Light stuffing only in lower half.
Fasten off. Leave a 15 cm tail.
Back Legs / Feet (Make 2)
Yarn: pale green — Source: standard amigurumi math
R1: 6 sc in MR (6)
R2: inc x6 (12)
R3: 12 sc (12)
R4: 12 sc (12)
Fasten off. Leave a 15 cm tail.
Ears (Make 2)
Yarn: pale green with dark green inner detail optional — Source: standard shaping math
Row 1: 4 sc in MR (4)
Row 2: ch 1, turn, inc, 2 sc, inc (6)
Row 3: ch 1, turn, inc, 4 sc, inc (8)
Row 4: ch 1, turn, 8 sc (8)
Fasten off. Leave an 18 cm tail.
Fold base lightly before sewing for the rounded upright look.
Snout (Make 1)
Yarn: cream or pale pink — Source: standard applique math
Ch 5.
R1: Starting in 2nd ch from hook, sc 3, 3 sc in last ch, working across opposite side sc 2, inc (10)
R2: inc, 2 sc, inc x3, 2 sc, inc x2 (16)
Fasten off. Leave a 15 cm tail.
Cheek Patches (Make 2)
Yarn: pink — Source: standard flat circle math
R1: 6 sc in MR (6)
R2: inc x6 (12)
Fasten off. Leave a 10 cm tail.
Avocado Belly Outer Flesh (Make 1)
Yarn: yellow-green — Source: standard flat circle math
R1: 6 sc in MR (6)
R2: inc x6 (12)
R3: (sc, inc) x6 (18)
R4: (2 sc, inc) x6 (24)
R5: (3 sc, inc) x6 (30)
R6: (4 sc, inc) x6 (36)
Fasten off.
Avocado Rind Border (Add to Outer Flesh)
Yarn: dark green — Source: standard edging math
Join dark green to back loop of R6.
R7: 36 sc BLO (36)
Fasten off. Leave a 20 cm tail for sewing.
Pit (Make 1)
Yarn: brown — Source: standard flat circle math
R1: 6 sc in MR (6)
R2: inc x6 (12)
R3: (sc, inc) x6 (18)
R4: 18 sc (18)
Fasten off. Leave a 20 cm tail.
Brow Arches and Whiskers
Yarn: black embroidery floss — Source: photo adaptation
Embroider short curved brows above each eye. Add three whisker lines per cheek.
Assembly
- Sew the head to the body with the face centered above the avocado-belly placement area.
- Pin the snout between the eyes and stitch it in place.
- Embroider the nose and short smiling mouth over the snout.
- Sew the cheek patches level with the lower outside edge of each eye.
- Attach the ears on the upper head, angled slightly outward.
- Sew the arms to the body sides so they overlap the top edge of the belly applique.
- Sew the back legs low on the body front so the plush sits with a forward-facing base.
- Stitch the brown pit to the center of the avocado flesh circle.
- Sew the full avocado belly applique to the body front, then tuck the arm bases slightly over it.
- Steam-shape lightly if needed and weave in all tails through dense stitch paths.
The finished plush should sit upright with the belly centered below the face.
7 Technical Tips
- Mark the first stitch of every round. Losing one stitch in a 36-stitch plateau throws the decrease line off-center by the time you close the head.
- Stuff the body firmer at the bottom than the top. A soft lower half makes the plush roll backward once the belly applique adds front weight.
- Use invisible decreases on the light green head. Standard decreases leave darker pinholes that show around the muzzle and eye area.
- Insert eyes before R13 on the head. Waiting until the opening is under 24 stitches makes spacing less accurate and can stretch the face fabric.
- Pin the avocado belly before sewing. A tilted circle is obvious on this design because the pit acts like a visual target.
- Keep the cheek circles at 12 stitches total. Larger cheeks start to crowd the whisker line and flatten the muzzle area.
- Weave tails through at least 5 cm of internal stitching path. Short tail burying slips faster on small rounded limbs that get handled often.
Conclusion
This build works because the silhouette stays cat-like while the front disc carries the avocado read. That balance is what most quick summaries skip. For a cleaner result, make the head and body first, pin the belly circle before sewing anything permanent, and check eye height against the top edge of the applique. This avocado cat amigurumi crochet pattern also photographs well, which matters for listing images and social posts. Share the finished plush on Pinterest and Instagram with #AvocadoCatPlush. One question remains useful for revisions: did you place the pit exactly on center, or did your cat start leaning to one side?









