Introduction
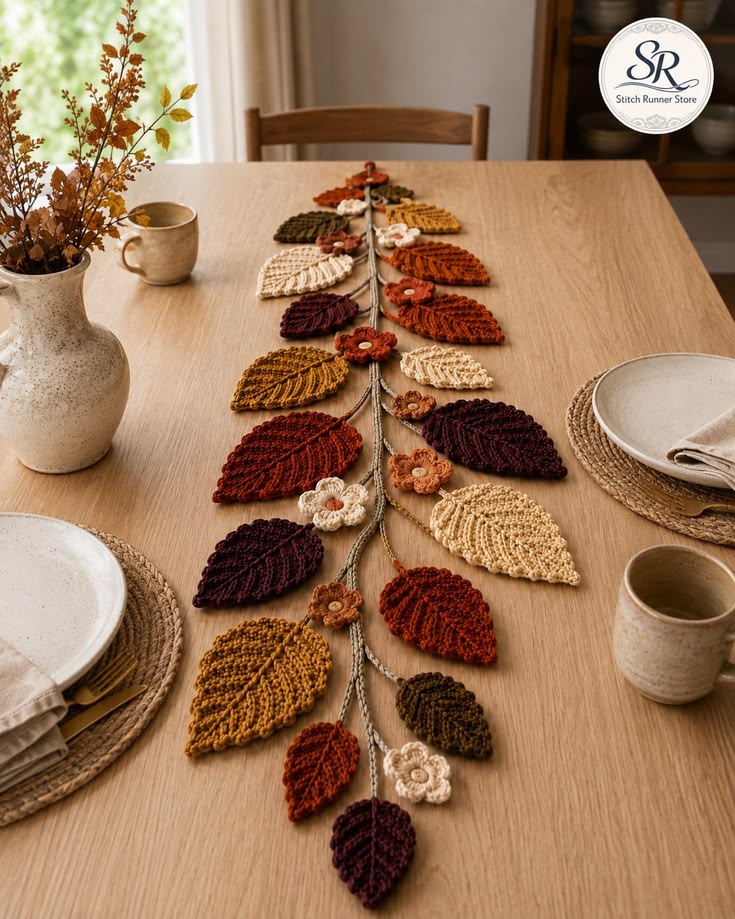
A single taupe branch must support more than twenty pointed autumn leaves without turning into a solid strip of crochet. This autumn crochet leaf branch table runner pattern uses DK cotton, a 3.5 mm hook, individually worked leaves, small flowers, and branching cords. The intermediate reconstruction targets approximately 30 × 150 cm, making a narrow centerpiece that leaves most place-setting space uncovered.
The instructions below are an original photo-inspired reconstruction based on visible structure; published patterns cited later are used only for sizing, gauge, and material benchmarks.
The Design: What Makes This Leaf Runner Different
The reference has no conventional rectangular foundation. Instead, a narrow central branch carries alternating side stems, allowing the wooden tabletop to remain visible between motifs. Large leaves supply most of the width, while smaller leaves near the ends taper the composition naturally. Raised center veins give each leaf enough structure to read independently in cream, mustard, rust, olive, and burgundy. Small five-petal flowers occupy selected branch junctions rather than forming a continuous floral border. This crochet autumn leaf table runner therefore uses far less background fabric than a filet runner of similar length. A frequent construction error is attaching leaves before the complete branch network is measured; accumulated stem length can then create bends or crowded sections instead of the long controlled line shown in the photograph.
Project Info at a Glance
| Skill Level | Time | Finished Size | Hook | Best For |
|---|---|---|---|---|
| Intermediate | Approx. 14–20 hours | Reconstruction target: approx. 30 × 150 cm | 3.5 mm | Dining tables, consoles, Thanksgiving centerpieces |
The 30 × 150 cm dimensions are reconstruction targets inferred from the photographed runner rather than measurements of an identified pattern. Published autumn runners vary widely: Karin Burkart’s Autumn Leaf Table Runner measures approximately 20 × 100 cm, while Sweet Potato 3 publishes a worsted Fall Leaves Table Runner at 11 inches / 28 cm wide with selectable lengths of 27, 55, 81, or 108 inches.
Materials and Tools
Yarn
- Taupe / mushroom brown — DK #3 cotton or cotton blend — approximately 70–90 g
- Burnt orange / rust — DK #3 — approximately 55–70 g
- Dark burgundy / plum — DK #3 — approximately 45–55 g
- Mustard / ochre — DK #3 — approximately 45–55 g
- Dark olive — DK #3 — approximately 45–55 g
- Warm cream — DK #3 — approximately 35–45 g
- Terracotta flower accent — DK #3 — approximately 20–25 g
Plan approximately 315–395 g total. These quantities are reconstruction estimates because the photographed runner consists of separately assembled motifs. A smooth cotton or cotton blend gives the pointed leaves more stability than highly elastic yarn.
Tools
- 3.5 mm crochet hook
- 3 mm hook — optional for firmer branch cords
- Tapestry needle
- Locking stitch markers
- Blocking mats
- Rust-resistant pins
- Scissors
- Measuring tape
Abbreviations
- MR — magic ring
- ch — chain
- sl st — slip stitch
- sc — single crochet
- hdc — half double crochet
- dc — double crochet
- tr — treble crochet
- BLO — back loop only
- st/sts — stitch/stitches
An invisible decrease is not required because the runner is assembled from flat motifs and cords rather than closed amigurumi forms.
Motif Plan
The photographed runner appears to contain approximately two dozen prominent leaves plus several smaller terminal leaves. For a balanced 150 cm reconstruction, make:
- 10 large leaves — approximately 13–14 cm long
- 10 medium leaves — approximately 10–11 cm long
- 6 small leaves — approximately 7–8 cm long
- 7 five-petal flowers — approximately 4–5 cm across
- 1 main branch — approximately 140 cm before assembly
- 14 side branches — approximately 8–18 cm each
Color placement should remain irregular. Avoid assigning one color to each side because the reference distributes rust, burgundy, mustard, olive, and cream along the entire branch.
Pattern — Step by Step
Main Branch Cord — Make 1
Yarn: taupe / mushroom brown.
Ch 285.
Starting in second chain from hook, sl st in every chain. (284 sl sts)
Turn the cord so the foundation-chain edge faces upward.
Work a second line of surface sl stitches along the opposite side of the chain.
Fasten off with a 40 cm tail.
Do not block the branch completely straight. The photograph uses a subtle organic curve, but the completed cord should measure approximately 135–145 cm before terminal motifs are added.
Side Branch — Make 14
Yarn: taupe.
For short branches, ch 18.
For medium branches, ch 25.
For long branches, ch 32.
Starting in second chain from hook, sl st in every chain.
Fasten off with a 25 cm sewing tail.
Make approximately four short, six medium, and four long branches. Varying their lengths prevents the runner from forming a rigid ladder shape.
Large Pointed Leaf — Make 10
Use burgundy, rust, mustard, olive, and cream.
Ch 22.
Starting in second chain from hook:
Sl st in next ch, sc in next 2 ch, hdc in next 3 ch, dc in next 4 ch, tr in next 7 ch, dc in next 2 ch, hdc in next ch, sc in final ch.
Work 3 sc in the final chain to turn around the foundation.
Working along the opposite side: sc in next ch, hdc in next ch, dc in next 2 ch, tr in next 7 ch, dc in next 4 ch, hdc in next 3 ch, sc in next 2 ch, sl st in final ch.
Join at the base.
Do not fasten off.
Large Leaf Textured Edge
Ch 1.
Work sc around the complete leaf.
At the tip work sc, ch 2, sc in the center turning stitch.
Along each side, work ch 2, sl st in next st approximately every fourth stitch to create the subtle serrated edge visible in the reference.
At the base, ch 5 and sl st back through all five chains to create the leaf stem.
Fasten off with a 25 cm tail.
Large Leaf Raised Center Vein
Join matching yarn at the leaf base.
Surface sl st directly along the original foundation chain from base to tip.
Fasten off at the tip and weave the tail down the wrong side.
The surface line should remain slightly raised. Do not pull it tight enough to fold the leaf lengthwise.
Medium Pointed Leaf — Make 10
Ch 17.
Starting in second chain: sl st, sc in next 2 ch, hdc in next 2 ch, dc in next 3 ch, tr in next 5 ch, dc in next 2 ch, hdc in final ch.
Work 3 sc in the final chain.
Mirror the stitch sequence along the opposite side:
Hdc, dc in next 2 ch, tr in next 5 ch, dc in next 3 ch, hdc in next 2 ch, sc in next 2 ch, sl st.
Work one sc edging round.
At the tip work sc, ch 2, sc.
Ch 4 for the stem and sl st back through the chain.
Fasten off.
Add a raised surface-slip-stitch vein from base to tip.
Small Terminal Leaf — Make 6
Ch 12.
Starting in second chain: sl st, sc, hdc in next 2 ch, dc in next 2 ch, tr in next 3 ch, dc, hdc.
Work 3 sc into the final chain.
Mirror the sequence down the opposite side.
At the tip work sc, ch 2, sc.
Ch 3 for the stem and sl st back to the base.
Fasten off with a sewing tail.
Blocking the Leaves
Block every leaf before assembly.
Pin the stem and tip first.
Next, straighten the center vein.
Shape the two sides symmetrically without stretching the stitches enough to create gaps.
Published worsted crochet-leaf benchmarks demonstrate the range available from hook and yarn changes: Melissa Hassler’s leaf pattern uses worsted yarn and a 4 mm hook and produces small, medium, and large leaves of approximately 3, 3.75, and 4.5 inches.
Terracotta Five-Petal Flower — Make 4
Yarn: terracotta with taupe or mustard center.
R1: With center color, 6 sc in MR. (6)
R2: Inc ×6. (12)
Fasten off center yarn.
R3: Join terracotta in any stitch. *Sl st in current st, ch 3, work 3 dc in next st, ch 3, sl st in next st.* Repeat around while distributing five petals evenly around the 12-stitch center.
Join and fasten off with a 20 cm tail.
Cream Five-Petal Flower — Make 3
Repeat the terracotta flower construction using warm cream for the petals and taupe for the center.
Target approximately 4–5 cm diameter.
Optional Small Bud — Make 6
The reference contains several tiny warm accents around flower junctions.
With rust or terracotta yarn, make MR.
R1: 6 sc in MR. (6)
R2: Sc around. (6)
Fasten off and draw the tail through all six stitches.
Do not stuff.
Flatten the small ball slightly and sew it directly beside a flower or branch junction.
Branch Layout
Place the 140 cm main branch down the table before attaching any motifs.
Mark its midpoint.
Position seven side branches on each side, alternating their angles.
Space major branch junctions approximately 15–20 cm apart.
Some branches should angle upward along the runner; others should extend nearly perpendicular to the center line.
The total composition should remain close to 30 cm wide.
Attaching Side Branches
Overlap each side branch with the main cord by approximately 2 cm.
Using taupe yarn, sew through both cords every 4–5 mm across the overlap.
Return through the junction once more.
Knot on the wrong side.
Do not sew branches to one another except where the photographed composition requires a deliberate fork.
Positioning the Large Leaves
Place the ten large leaves first.
Alternate sides of the branch.
Keep the widest leaves near the central two-thirds of the runner.
Allow approximately 2–5 cm between neighboring leaf edges so the tabletop remains visible.
Rotate some leaves 15–30 degrees away from the side branch rather than pointing every leaf at a perfect right angle.
Positioning Medium and Small Leaves
Use medium leaves to fill secondary branches.
Place the six small leaves toward the two ends and at narrow branch tips.
The reduction in motif size creates the tapered silhouette visible in the reference.
Avoid placing two cream leaves directly opposite each other because the pale pair can visually divide the runner into a horizontal stripe.
Attaching Leaves
Sew each leaf stem completely to its branch.
Add one concealed stitch approximately 1.5–2 cm up the center vein.
Leave the remaining leaf body unattached.
This attachment method keeps the motifs flat enough for table use while retaining slight dimensional lift at the edges.
Positioning the Flowers
Distribute seven flowers irregularly.
Place the largest visual concentration near the central third.
Use terracotta flowers beside cream or olive leaves.
Position cream flowers near burgundy and rust leaves for stronger contrast.
Do not place a flower at every branch junction. Empty junctions are part of the reference’s open composition.
Attaching Flowers
Pass the sewing tail through the flower center and around the branch cord.
Make three or four secure passes.
Add one small stitch beneath two neighboring petals.
Leave the remaining petals free.
Attach optional buds immediately beside selected flowers or along short side stems.
Assembly
- Crochet the taupe main branch to approximately 135–145 cm and lay it flat without permanently stretching out its slight natural curve.
- Make fourteen side branches in three lengths, then position seven on each side with major junctions approximately 15–20 cm apart.
- Sew every branch junction across a 2 cm overlap and check that the complete bare framework remains close to the 150 cm reconstruction target.
- Crochet ten large, ten medium, and six small pointed leaves in burgundy, rust, mustard, olive, and cream, adding a raised center vein to each motif.
- Block all twenty-six leaves individually, setting the large leaves near 13–14 cm, medium leaves near 10–11 cm, and small leaves near 7–8 cm.
- Position the ten large leaves through the middle two-thirds of the runner and sew each stem plus the first 1.5–2 cm of its center vein to the branch.
- Add medium leaves along secondary stems and place the six small leaves primarily at the two ends so the runner tapers rather than ending abruptly.
- Crochet four terracotta and three cream five-petal flowers, then attach them irregularly at selected branch junctions without covering the complete central cord.
- Add optional flattened buds beside several flowers, then adjust any overlapping leaves until approximately 2–5 cm of open tabletop remains between neighboring motifs.
- Weave every tail through at least 6 cm of matching crochet, lightly reshape the complete runner to approximately 30 × 150 cm, and verify that no leaf or flower projects into a plate position.
The completed runner should form one narrow branching stem with twenty-six autumn leaves, seven small flowers, optional buds, visible tabletop between motifs, and tapered foliage at both ends.
7 Technical Tips
- The runner develops a permanent bend: measure the bare branch framework before attaching any leaves and keep its total length within approximately 5 cm of the 150 cm target. A side branch sewn under tension can pull the lightweight central cord sideways once larger leaves are added.
- The leaves curl into tubes: compare the stitch tension on both sides of the foundation chain before blocking. A difference of more than approximately 5 mm between corresponding edges can twist a 13 cm leaf even after it is pinned.
- The pointed tips become rounded: keep the ch-2 point at the exact leaf apex and pin that chain space separately while blocking. Pulling the complete edge instead of the apex spreads the tip sideways.
- The center vein puckers the leaf: work surface slip stitches loosely enough to match the uncompressed foundation-chain length. A vein shortened by even 5–8 mm can fold the entire motif lengthwise.
- The runner becomes too wide for place settings: keep the widest opposing leaves within an approximately 30 cm envelope. Rotate oversized leaves along the branch direction rather than trimming or folding their outer tips.
- The branch junctions rotate after handling: overlap the two cords by approximately 2 cm and stitch across the entire overlap. A single attachment stitch acts as a pivot and allows a heavy leaf to turn its side branch downward.
- The flower petals collapse against the table: attach only the center and at most two petal bases. Sewing all five petals flat removes the raised flower profile and can distort the branch beneath it.
Published Autumn Runner Benchmarks
Raine Eimre’s Fall Leaves Table Runner is a filet-crochet interpretation rather than a motif branch. The published pattern uses size 10 cotton thread, a 1.75 mm hook, and approximately 350 yards / 320 m. Its documented gauge is 10 stitches × 4 rows per inch.
The difference is useful: thread filet produces a continuous fabric, while the photo-inspired reconstruction replaces that background with open space and individually blocked motifs.
Adjustable-Length Runner Benchmark
Sweet Potato 3’s Fall Leaves Table Runner uses medium yarn and lists 5.5 and 6.5 mm hooks. Its published width is 11 inches / approximately 28 cm, close to this reconstruction’s 30 cm target.
Published lengths are 27, 55, 81, and 108 inches, with listed yarn requirements ranging from approximately 631 to 2524 m. The pattern uses colorwork rather than separate motifs, but it demonstrates how an autumn runner can maintain a constant width while adapting to very different table lengths.
Published 20 × 100 cm Benchmark
Karin Burkart’s Autumn Leaf Table Runner has a published finished size of approximately 20 × 100 cm. It is worked in filet crochet and can be adjusted lengthwise.
That compact size suits consoles and smaller tables. The photographed branch arrangement is visibly longer and wider, so the reconstruction expands to approximately 30 × 150 cm.
Published Individual Leaf Benchmark
Melissa Hassler’s free Leaf pattern specifies worsted-weight yarn and a 4 mm hook. The published sizes are approximately 3 inches, 3.75 inches, and 4.5 inches for small, medium, and large leaves.
Those dimensions support using multiple leaf sizes in one table arrangement. This reconstruction uses DK yarn and a smaller 3.5 mm hook but increases the foundation lengths for the elongated leaves visible in the photograph.
Published Autumn Leaf Size Benchmark
A separate Crochet Autumn Leaf Pattern using worsted cotton and a 2.5 mm hook reports a finished leaf around 6 cm wide × 11 cm long including the stem.
That measurement sits close to the medium motif used here. The large reconstruction leaves are intentionally extended to 13–14 cm so a relatively small number of motifs can establish the runner’s width.
Why the Runner Has No Background
The tabletop functions as negative space.
A rectangular crochet base would change the reference substantially because the isolated leaves would become appliqués rather than the structural body of the runner.
The branch method also reduces bulk beneath plates and serving pieces.
Only the narrow cord occupies the longitudinal center when no leaf crosses a particular area.
Why DK Cotton Works Well
Fine thread would make the large leaves too light unless additional rounds were added.
Bulky yarn would make the branch thick and reduce the open spaces between motifs.
DK cotton occupies a useful middle range. It provides enough stiffness for the 13–14 cm leaves while keeping the main branch relatively flat.
A cotton-acrylic blend can substitute if pure cotton feels too rigid.
Color Distribution
Use burgundy and rust as the darkest anchors.
Place mustard between dark motifs to prevent the center line from becoming visually heavy.
Olive provides a neutral botanical transition, while cream should appear only occasionally.
A practical distribution for 26 leaves is:
- 6 rust
- 5 burgundy
- 5 mustard
- 6 olive
- 4 cream
Do not arrange those colors in a repeating sequence. Shuffle them before placement and correct any obvious color clusters before sewing.
Making a Shorter Runner
For a runner around 100 cm long, reduce the main cord proportionally and use approximately 16–18 leaves.
Make six large, six medium, and four to six small leaves.
Use four or five flowers.
Maintain the same approximate 30 cm maximum width unless the table itself is narrow.
Making a Longer Runner
For a runner around 200 cm long, extend the branch before assembly and add approximately eight to ten leaves for every additional 50 cm.
Do not simply increase the gaps between existing motifs.
Large empty sections break the visual continuity of the branching vine.
Add side branches at approximately the same 15–20 cm rhythm used in the original reconstruction.
Making a Narrow Console Runner
Use only medium and small leaves.
Keep opposing leaf tips within approximately 20–22 cm.
Rotate the largest motifs toward the runner ends rather than directly sideways.
This adaptation preserves the branch structure while fitting a narrow shelf or console.
Making a Garland
The same branch can be used as a hanging garland.
Reduce the number of cream leaves because pale motifs may disappear against light walls.
Sew every leaf farther up its center vein—approximately 3–4 cm—to reduce drooping when the branch hangs vertically.
Add hanging loops to both ends of the main cord.
Making Matching Placemats
Use one 35–40 cm branch with three leaves and one flower.
Keep all motifs on the outer third of the placemat area so plates do not rest directly on dimensional crochet.
Make each branch arrangement as a mirror pair for opposite table settings.
Repeat the same five-color palette for visual continuity.
Adding Maple Leaves
The reference leaves are primarily pointed ovals rather than highly lobed maples, but a few maple motifs can increase the autumn character.
A current StitchRunnerStore listing specifically describes a cotton maple-leaf table runner with adjustable length and joined motifs.
Use lobed maple leaves sparingly so the overall silhouette remains close to the photographed branch arrangement.
Adding Acorns
Small crochet acorns can replace several buds.
Keep each finished acorn below approximately 3 cm long.
Attach them beside flowers or smaller leaves rather than at the widest branch points.
Large stuffed acorns can make the runner uneven beneath serving dishes.
Making the Leaves More Textured
Work the center vein as surface crochet after blocking.
For stronger ribbing, add two diagonal surface-slip-stitch veins on each side of the main vein.
Stop those secondary veins approximately 1 cm from the outer edge.
Too many raised lines can make the leaf rigid and cause the sides to curl.
Making Flatter Leaves
Omit the final serrated edging.
Work the center vein with embroidery-style backstitch rather than surface slip stitch.
Block the leaf beneath a light towel while damp.
This version is better when plates or serving pieces may overlap the runner.
Correcting a Crooked Main Branch
Lay the bare branch beside a measuring tape.
Pin the two ends first and position the midpoint exactly halfway between them.
Then adjust the intermediate sections.
Do this before side branches are attached. Trying to straighten a completed runner can pull the leaves away from their intended angles.
Correcting Uneven Leaf Sizes
Measure each motif after blocking.
Sort them into large, medium, and small groups rather than relying on the row label alone.
Move any undersized large leaf into the medium group.
Consistent visual grading matters more than assigning a motif to its originally intended category.
Correcting Crowded Motifs
Remove flowers and buds first.
If the area remains dense, rotate one leaf along the branch direction.
Only after those adjustments should a leaf be removed entirely.
The reference relies on overlapping stems but preserves visible table surface around the majority of leaf edges.
Correcting Branches That Lift Off the Table
Check the side-branch overlap.
A junction sewn only at its center can twist upward.
Flatten the cords and resew across approximately 2 cm.
Steam should not be used as a substitute for structural correction unless the selected yarn manufacturer specifically permits it.
Correcting Flower Placement
Flowers should interrupt the leaf rhythm rather than create their own evenly spaced line.
If three flowers appear equidistant, move the middle flower to a neighboring branch junction.
Keep at least one flower in the central third and one toward each end.
Leave several major junctions without flowers.
Yarn Quantity Planning
Make and weigh one large leaf, one medium leaf, one flower, and a 20 cm branch sample.
Multiply those weights by the planned motif counts.
Add approximately 15% for sewing tails, blocking differences, and replacement motifs.
This direct method is more accurate than comparing gram totals with solid table runners because most of this project is open tabletop rather than crochet fabric.
Blocking the Completed Runner
Individual blocking before assembly does most of the shaping work.
After assembly, lay the runner on a flat surface and pin only the branch ends and any leaves that shifted during sewing.
Do not stretch the complete 150 cm branch under heavy tension.
The final arrangement should retain a slight botanical curve instead of becoming a perfectly rigid line.
Care and Storage
Follow the yarn manufacturer’s washing instructions.
Hand washing gives the separate motifs more protection than unrestricted machine agitation.
Support the runner when lifting it wet so the leaf stems do not carry the weight of neighboring motifs.
For storage, roll the runner loosely around a fabric-covered tube. Folding directly through blocked leaves can create permanent creases along their raised center veins.
Sources
Ravelry — Fall Leaves Table Runner by Raine Eimre — size-10 cotton thread, 1.75 mm hook, 350 yards / 320 m, and published filet-crochet gauge.
Ravelry — Fall Leaves Table Runner by Sweet Potato 3 — worsted/DK-compatible yarn references, 5.5 and 6.5 mm hooks, 11-inch width, and adjustable 27-, 55-, 81-, and 108-inch lengths.
Ravelry — Autumn Leaf Table Runner by Karin Burkart — crochet filet runner measuring approximately 20 × 100 cm with adjustable length.
Ravelry — Leaf by Melissa Hassler — worsted yarn, 4 mm hook, and published small, medium, and large leaf sizes of approximately 3, 3.75, and 4.5 inches.
Crochet Autumn Leaf Pattern — worsted cotton, 2.5 mm hook, back-loop texture, and a published leaf size of approximately 6 × 11 cm including stem.
StitchRunnerStore — Crochet Maple Leaf Table Runner Pattern — cotton-yarn motif runner reference with individually joined maple leaves and adjustable length.
Conclusion
The branch framework determines the success of this runner, so complete and measure it before sewing on a single leaf. Build outward from the midpoint, reserve the largest 13–14 cm motifs for the central two-thirds, and taper both ends with smaller leaves. Your next step is to crochet one large rust leaf and one medium olive leaf, block both, and confirm their scale against a 30 cm target width. Save this autumn crochet leaf branch table runner pattern to Pinterest or share the finished arrangement on Instagram with #AutumnLeafBranchRunner. Would you keep the photographed burgundy leaves, or replace that darkest shade with chocolate brown?









