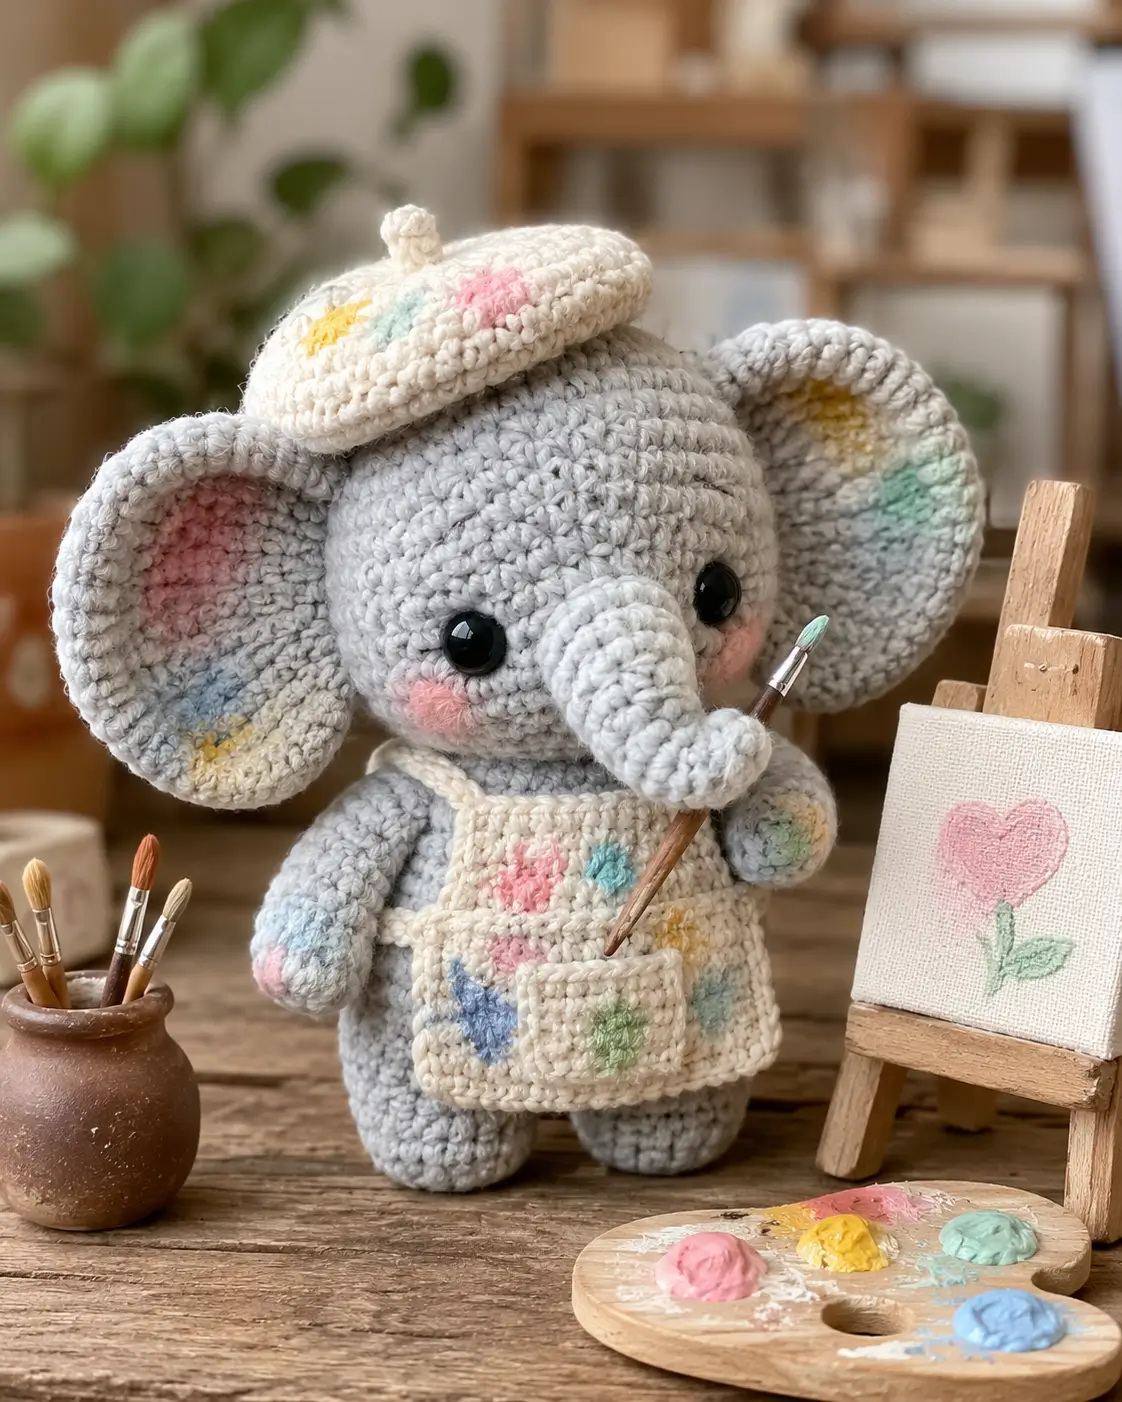
An elephant trunk has to curl around a paintbrush without covering the face. This elephant amigurumi crochet pattern builds that shape with a 3.5 mm hook, worsted-weight yarn, 12 mm safety eyes, and a finished size near 19 cm. You will make separate ears, trunk, beret, apron, and brush at intermediate-beginner skill level; the finished piece sits flat enough for a craft-room shelf or market table.
The Design: What Makes This Artist Elephant Different
You need the head larger than the body because the ears and trunk carry the character. The maker builds a 42-stitch head, then holds the body to 36 stitches so the apron stays visible instead of sinking under the chin. Oversized flat ears are made as single discs, not stuffed cones, because a crochet elephant with beret needs side width without extra weight. The trunk is a narrow tube that widens only at the base, which leaves room for the paintbrush and cheek patches. A common error in an artist elephant crochet pattern is placing the trunk after the eyes are locked too low; that pushes the brush into the apron and gives the face a crowded center. Mark the trunk line before closing the head.
Project Info at a Glance
Comparable elephant patterns support a 3.5 mm hook, worsted or DK yarn, 12 mm eyes, and an 18–19 cm finished scale for this version. Larger and smaller elephant patterns vary widely, so this table follows the closest size range for the photo-based design.
| Skill Level | Time | Finished Size | Hook | Best For |
|---|---|---|---|---|
| Intermediate-beginner | 6–8 hr editorial build estimate | 18–19 cm | 3.5 mm | Shelf display, craft-market sample, art-room gift |
Materials and Tools
Yarn
- Soft gray — worsted #4 — 90–100 g — Lion Brand Naptime-style chenille, Paintbox Simply Aran, or similar smooth gray yarn
- Cream — worsted #4 — 25 g — beret, apron, pocket
- Blush pink — worsted #4 scrap — 5 g — cheeks, paint marks
- Mint green — worsted #4 scrap — 5 g — paint marks and brush tip
- Pale yellow — worsted #4 scrap — 5 g — paint marks
- Pale blue — worsted #4 scrap — 5 g — paint marks
- Brown — worsted #4 scrap — 3 g — paintbrush handle
Tools
- Hook 3.5 mm
- 12 mm black safety eyes
- Polyester stuffing
- Yarn needle
- Locking stitch markers
- Pins
- Small scissors
- Blush yarn or embroidery thread
- Optional thin wooden skewer for display-only brush shaping
Do not place a skewer or any rigid insert in a toy for a child under 3.
Abbreviations
MR = magic ring
sc = single crochet
inc = increase, 2 sc in one stitch
dec = invisible decrease
sl st = slip stitch
ch = chain
BLO = back loop only
FLO = front loop only
R = round
Row = worked flat in turned rows
Invisible decrease is worked through the front loops of the next two stitches so the closing line stays flatter.
Pattern — Step by Step
Continuous spiral unless noted. Counts appear in brackets at the end of every round or row.
Head
Yarn: soft gray — Source: Standard amigurumi math; comparable elephant head shaping checked against published elephant stitch progressions.
R1: 6 sc in MR (6)
R2: inc ×6 (12)
R3: (sc, inc) ×6 (18)
R4: (2 sc, inc) ×6 (24)
R5: (3 sc, inc) ×6 (30)
R6: (4 sc, inc) ×6 (36)
R7: (5 sc, inc) ×6 (42)
R8–R15: sc around (42)
Insert safety eyes between R12 and R13, 10 stitches apart. Place the trunk center between the eyes before locking the washers.
R16: (5 sc, dec) ×6 (36)
R17: sc around (36)
R18: (4 sc, dec) ×6 (30)
R19: sc around (30)
R20: (3 sc, dec) ×6 (24)
R21: (2 sc, dec) ×6 (18)
Stuff firmly at the forehead and lightly around the lower face.
R22: (sc, dec) ×6 (12)
R23: dec ×6 (6)
Fasten off. Close the opening with the front loops and hide the tail.
Body
Yarn: soft gray — Source: Standard amigurumi math; comparable elephant body shaping checked against published elephant stitch progressions.
R1: 6 sc in MR (6)
R2: inc ×6 (12)
R3: (sc, inc) ×6 (18)
R4: (2 sc, inc) ×6 (24)
R5: (3 sc, inc) ×6 (30)
R6: (4 sc, inc) ×6 (36)
R7–R13: sc around (36)
R14: (4 sc, dec) ×6 (30)
R15–R16: sc around (30)
R17: (3 sc, dec) ×6 (24)
R18: sc around (24)
R19: (2 sc, dec) ×6 (18)
R20: sc around (18)
Stuff the lower body firmly so the elephant can sit without leaning forward.
R21: (sc, dec) ×6 (12)
R22: dec ×6 (6)
Fasten off. Close the top and leave a 25 cm tail for attaching the head.
Arms / Front Legs
Make 2. Yarn: soft gray with optional paint-color end — Source: Standard amigurumi math.
R1: 6 sc in MR (6)
R2: inc ×6 (12)
R3: BLO sc around (12)
R4–R7: sc around (12)
For the painted paw, change to pale blue or blush pink for R7 on one arm only.
R8: dec ×6 (6)
Fasten off. Stuff only the lower half. Leave a 20 cm tail.
Back Legs
Make 2. Yarn: soft gray — Source: Standard amigurumi math.
R1: 6 sc in MR (6)
R2: inc ×6 (12)
R3: (sc, inc) ×6 (18)
R4: BLO sc around (18)
R5–R7: sc around (18)
R8: (sc, dec) ×6 (12)
R9: dec ×6 (6)
Fasten off. Stuff firmly. Leave a 25 cm tail.
Ears
Make 2. Yarn: soft gray — Source: Standard amigurumi math; separate elephant ear construction confirmed in comparable patterns.
R1: 6 sc in MR (6)
R2: inc ×6 (12)
R3: (sc, inc) ×6 (18)
R4: (2 sc, inc) ×6 (24)
R5: (3 sc, inc) ×6 (30)
R6: (4 sc, inc) ×6 (36)
R7: sc around (36)
R8: sl st around loosely (36)
Fasten off. Do not stuff. Leave a 35 cm tail for sewing. Shape each ear into a shallow cup while pinning.
Trunk
Yarn: soft gray — Source: Standard amigurumi math; separate trunk construction confirmed in comparable elephant patterns.
R1: 6 sc in MR (6)
R2–R5: sc around (6)
R6: inc ×6 (12)
R7–R9: sc around (12)
Stuff only R6–R9. Leave the tip unstuffed so it can curve toward the brush.
Fasten off. Leave a 30 cm tail.
Cheek Patches
Make 2. Yarn: blush pink — Source: Standard amigurumi math.
R1: 6 sc in MR (6)
R2: inc ×6 (12)
R3: sl st around loosely (12)
Fasten off. Leave a 15 cm tail. Flatten with fingers before sewing.
Beret Base
Yarn: cream — Source: Standard amigurumi math.
R1: 6 sc in MR (6)
R2: inc ×6 (12)
R3: (sc, inc) ×6 (18)
R4: (2 sc, inc) ×6 (24)
R5: (3 sc, inc) ×6 (30)
R6: (4 sc, inc) ×6 (36)
R7: (5 sc, inc) ×6 (42)
R8: BLO sc around (42)
R9: (5 sc, dec) ×6 (36)
R10: (4 sc, dec) ×6 (30)
R11: sl st around loosely (30)
Fasten off. Leave a 40 cm tail. The beret should sit tilted, not centered.
Beret Knob
Yarn: cream — Source: Standard amigurumi math.
R1: 6 sc in MR (6)
R2–R3: sc around (6)
Fasten off. Close the top with the tail and sew to the center of the beret.
Apron Bib and Skirt
Yarn: cream — Source: Standard row-based crochet math.
Ch 19.
Row1: sc in 2nd ch from hook and across (18)
Row2–Row5: ch 1, turn, sc across (18)
Row6: ch 1, turn, 2 sc in first st, sc 16, 2 sc in last st (20)
Row7–Row10: ch 1, turn, sc across (20)
Row11: ch 1, turn, 2 sc in first st, sc 18, 2 sc in last st (22)
Row12–Row13: ch 1, turn, sc across (22)
Row14: ch 1, turn, sl st across (22)
Fasten off. Leave a 35 cm tail for sewing the top corners to the body.
Apron Pocket
Yarn: cream — Source: Standard row-based crochet math.
Ch 13.
Row1: sc in 2nd ch from hook and across (12)
Row2–Row4: ch 1, turn, sc across (12)
Row5: ch 1, turn, sl st across (12)
Fasten off. Leave a 25 cm tail. Sew sides and bottom only so the brush can sit inside.
Apron Straps
Yarn: cream — Source: Standard chain construction.
Neck strap: ch 26, turn, sl st in 2nd ch from hook and across (25)
Waist tie 1: ch 31, turn, sl st in 2nd ch from hook and across (30)
Waist tie 2: ch 31, turn, sl st in 2nd ch from hook and across (30)
Fasten off each strap. Leave 10 cm tails for sewing to the apron corners.
Paintbrush Handle
Yarn: brown — Source: Standard narrow accessory construction.
Ch 19.
Row1: sl st in 2nd ch from hook and across (18)
Row2: ch 1, turn, sl st across (18)
Fasten off. Leave a 12 cm tail. Roll the strip lengthwise and stitch through the edge to make a slim handle.
Paintbrush Tip
Yarn: mint green — Source: Standard amigurumi math.
R1: 6 sc in MR (6)
R2: sc around (6)
R3: sc around (6)
Fasten off. Flatten the piece and sew to one end of the brown handle.
Paint Daubs
Make 9. Yarn: blush pink, mint, yellow, pale blue — Source: Standard amigurumi math.
R1: 6 sc in MR (6)
R2: sl st around loosely (6)
Fasten off. Leave short tails. Sew three daubs to the beret, three to the apron, and one or two to each ear.
Optional Mini Canvas Patch
Yarn: cream with blush pink and mint embroidery — Source: Standard row-based crochet math.
Ch 12.
Row1: sc in 2nd ch from hook and across (11)
Row2–Row7: ch 1, turn, sc across (11)
Row8: ch 1, turn, sl st across (11)
Fasten off. Embroider a small flower or heart with pink and mint. Sew it to the apron pocket only if the apron still lies flat.
Assembly
- Pin the head to the closed top of the body with the eye line facing forward. Sew twice around the neck seam.
- Set the body on a flat table and adjust the head angle until the trunk space points slightly downward. Add two hidden stitches at the back neck if the head tips forward.
- Sew the cheek patches below the eyes, one round lower than the eye line. Keep 2 stitches of gray space between each cheek and the trunk base.
- Pin the ears from R6 of the head down to R15. Sew the inner third only, leaving the outer edge loose enough to cup.
- Sew the trunk centered between the eyes and cheeks. Curve the tip to the elephant’s right side with two small tacking stitches.
- Attach the back legs at the lower front of the body, 4 stitches apart. The flat BLO edge should touch the table.
- Sew the arms at the side body between R8 and R12. Angle the right arm toward the apron pocket if it will hold the brush.
- Place the beret at a diagonal, with the lower edge touching one ear. Sew around R10 of the beret, then add the knob.
- Sew the apron neck strap behind the head, then stitch the apron top to the upper body. Add waist ties at the sides and attach the pocket.
- Slide the paintbrush through the pocket or tack it to the trunk with two brown stitches. Add paint daubs last, then weave every tail through stuffed sections.
The artist elephant is complete when it sits without back support and the brush clears both cheeks.
7 Technical Tips
- Stitch marker drift: If the marker shifts more than 2 stitches across the head by R12, the eye line will rotate. Move the marker at the start of the next round and note the shift before placing safety eyes.
- Stuffing firmness: A soft lower body will collapse under the oversized head. Pack the body to firm resistance at R18, then add only small tufts near R21.
- Invisible decrease ridge: A visible ridge across the face usually means both loops were caught during decreases. Work each dec through front loops only on R16, R18, R20, R21, R22, and R23.
- Eye placement timing: Locking the eyes after R17 leaves too little hand space inside the head. Set 12 mm eyes between R12 and R13 before the first decrease round tightens the opening.
- Ear weight: Heavy ears pull the head sideways if the full circle is sewn down. Stitch only the inner third of each ear and leave the rim free, with 36 stitches around the disc.
- Beret tilt: A centered beret hides the elephant silhouette. Pin the beret so one edge touches the left ear and the opposite edge sits 2 rounds above the right eye.
- Tail weaving: Short accessory tails can pop out through the cream apron. Weave every paint-daub tail under at least 5 stitches, then split the yarn tail before trimming.
Conclusion
Check the head, trunk, and brush alignment before sewing the apron pocket closed. That pocket sets the painter theme, but the trunk sets the elephant shape. For the next step, make one test ear in scrap yarn and compare its 36-stitch disc against the side of the head; scale the beret only after the ears are pinned. Save this elephant amigurumi crochet pattern to Pinterest, then post the finished artist elephant on Instagram with the brush angled toward the trunk. Use hashtag #ArtistElephant. Which paint color should appear on the left ear: blush pink, mint green, pale yellow, or pale blue?









