Introduction
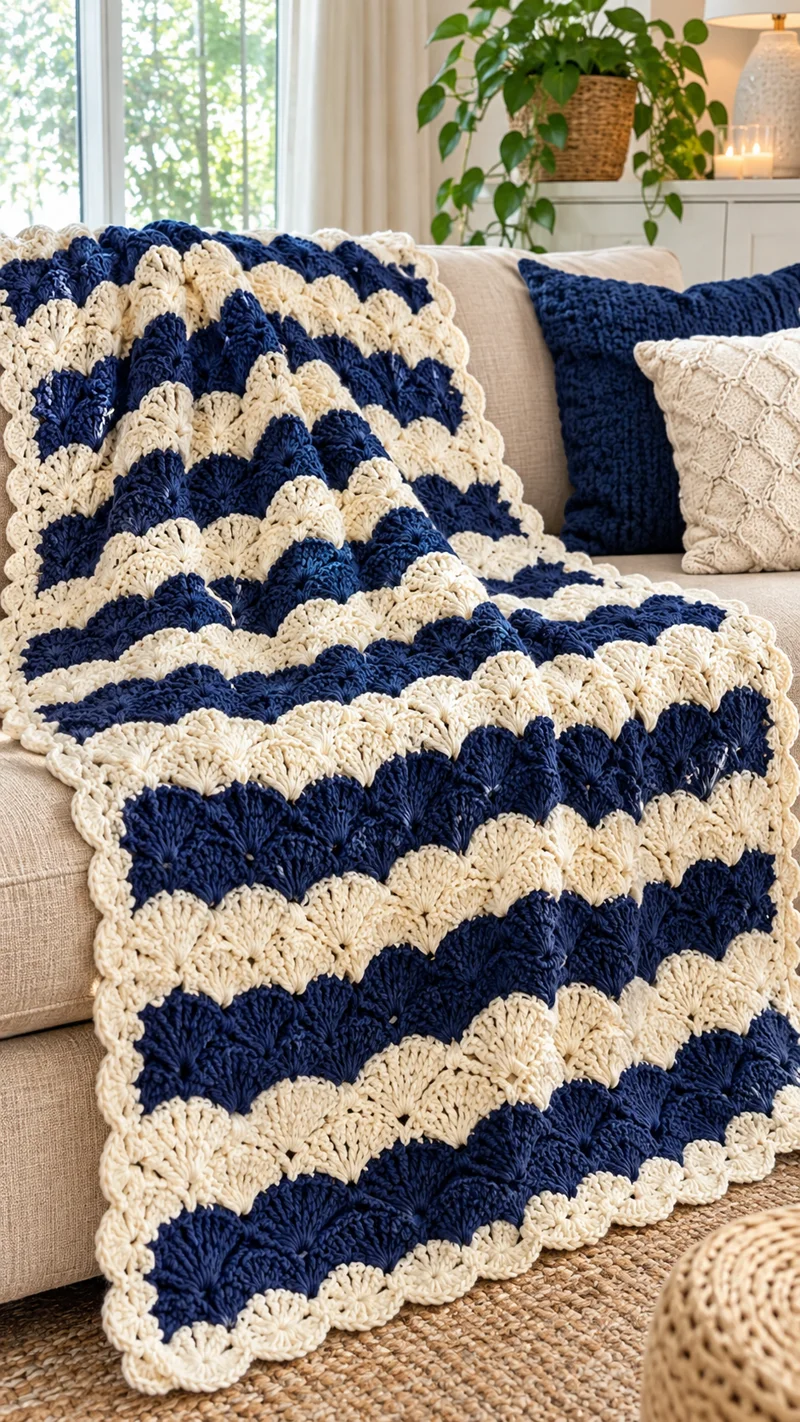
Five double crochets packed into one anchor stitch create the navy-and-cream fans that define this blanket. This shell stitch crochet blanket uses worsted yarn, an adjustable 6-stitch repeat, and a scalloped border, with 123 × 162.5 cm as the reference throw size. The skill level is advanced beginner. Its two-row stripe system also makes yarn quantities and color changes easier to track.
The Design: What Makes This Navy Shell Blanket Different
The photographed blanket depends on three structural choices. First, each shell contains five double crochets, giving the fabric a pronounced fan rather than a shallow wave. Second, navy and cream are changed in complete repeat sections, so the striped crochet blanket retains a clean horizontal rhythm instead of breaking color through individual shells. Third, the outer edge repeats the curved geometry of the main fabric rather than covering it with a square border.
The most common error in a two-color crochet blanket of this type is losing an anchor stitch at the row edge. One misplaced single crochet shifts every later shell and makes the sides progressively narrower. Count shell centers rather than relying only on the apparent width. The maker sees curves; structurally, the blanket is still a rectangular grid.
Project Info at a Glance
| Skill Level | Time | Finished Size | Hook | Best For |
|---|---|---|---|---|
| Advanced beginner | Approx. 25–40 hours | 123 × 162.5 cm reference size | 4.0 mm reference | Sofa throw / bed accent |
The 123 × 162.5 cm dimensions and 4.0 mm hook are reference specifications for a worsted-weight shell-stitch blanket. Gauge and yarn choice can change the finished dimensions substantially.
Materials and Tools
Yarn
For a reference throw around 123 × 162.5 cm:
- Navy: worsted-weight yarn — approximately 700–750 g.
- Cream/ivory: worsted-weight yarn — approximately 550–600 g.
- Total planning quantity: approximately 1,300 g.
The navy-and-cream quantities are planning estimates for this photographed color arrangement. Actual yarn consumption depends on gauge, fiber, hook size, border depth, and finished dimensions.
A washable worsted acrylic or wool/acrylic blend is practical for a frequently used throw. The photographed fabric appears heavier than standard worsted, so bulky yarn can also be substituted for a thicker result. Make a swatch before calculating the final dimensions.
Tools
- 4.0 mm crochet hook for the worsted-weight reference
- Tapestry needle
- Locking stitch markers
- Scissors
- Tape measure
- Kitchen scale, optional but useful for dividing the two colors
A larger hook may be needed if your shells become stiff. The hook should produce distinct fans without making the anchor single crochets difficult to enter.
Abbreviations
- ch — chain
- sc — single crochet
- dc — double crochet
- sl st — slip stitch
- st/sts — stitch/stitches
- sk — skip
- rep — repeat
- RS — right side
- WS — wrong side
Shell: Work 5 dc into the same stitch.
Gauge and Sizing Math
A useful starting gauge for worsted yarn and a 4.0 mm hook is approximately four shells across 19 cm and eight rows over 11 cm. Treat this as a reference rather than a required gauge.
Make a swatch containing at least four complete shells before calculating the blanket foundation.
The standard solid shell stitch is based on a multiple of 6 + 1 stitches, with an additional turning or base chain where required by the chosen foundation method.
For a custom blanket, make the foundation long enough to reach the required width while keeping the shell repeat intact.
- 61 stitches = 6 × 10 + 1
- 91 stitches = 6 × 15 + 1
- 121 stitches = 6 × 20 + 1
- 145 stitches = 6 × 24 + 1
For a larger throw, continue adding groups of six until the foundation reaches the required width.
Shell Stitch Crochet Blanket Pattern
This blanket is worked flat in rows.
Foundation
Use navy yarn.
Chain a multiple of 6 + 1, then add the turning or base chain required by your preferred foundation method.
For a custom-sized blanket, stop chaining when the relaxed foundation reaches the target width. Do not stretch the chain against the tape measure.
Place a stitch marker every 30 chains. This makes a long foundation easier to count before Row 1.
Row 1 — Establish the Shells
Sc in the second chain from the hook.
Repeat: Skip 2 ch, work 5 dc in the next ch, skip 2 ch, sc in the next ch.
Repeat across.
Turn.
Each five-dc group forms one complete shell. Check the entire row before continuing. Every shell needs a single-crochet anchor between it and the next shell.
Row 2 — Offset the Shells
Ch 3. This functions as the first dc.
Work 2 dc into the first stitch to form a half shell at the edge.
Repeat: Skip 2 dc, sc into the center dc of the next five-dc shell, skip 2 dc, work 5 dc into the next sc.
Repeat across.
Finish with the corresponding half shell at the opposite edge.
Turn.
The new shells now sit over the single-crochet anchors from the previous row. This offset creates the stacked scale appearance visible in the blanket.
Row 3 — Return to Full Edge Anchors
Ch 1.
Sc in the first stitch.
Repeat: Skip 2 dc, work 5 dc into the next sc, skip 2 dc, sc into the center dc of the next shell.
Repeat across.
Finish with sc at the edge.
Turn.
Rows 2 and 3 form the main pattern repeat.
Navy Stripe Section
Work Rows 2 and 3 in navy.
For a broad stripe similar to the photographed blanket, repeat the pair once more if required:
Row 4: Repeat Row 2.
Row 5: Repeat Row 3.
The exact stripe depth can be adjusted, but make color changes at an edge rather than halfway through a row.
Cream Stripe Section
On the final yarn-over of the last stitch of the navy section, drop navy and pull through with cream.
Work the same shell repeat in cream.
For wider cream bands, work four rows before changing back to navy.
Keep both stripe depths consistent across the blanket unless you deliberately want an irregular stripe sequence.
Main Blanket Repeat
Continue alternating navy and cream shell sections.
A practical photo-inspired sequence is:
4 rows navy → 4 rows cream → repeat
Continue until the main rectangle is approximately 156–158 cm long if targeting a finished length near 162.5 cm. Reserve several centimeters for the border.
Measure with the blanket resting flat. Shell fabric can appear shorter when bunched or hanging over furniture.
Final Main Row
Finish after a complete Row 3-style repeat so both long edges retain the same shell structure.
Do not cut the cream yarn if cream will be used for the border.
If the last stripe is navy, fasten off navy and join cream at a corner.
Crochet the Scalloped Border
Border Round 1 — Single Crochet Setup
Use cream yarn.
Work sc evenly around the entire blanket.
Across the top and bottom, place one sc into each available stitch position.
Along the vertical sides, distribute stitches evenly across the row ends. Avoid automatically placing the same number of stitches into every row end if that causes rippling.
At each corner, work 3 sc into the corner position.
Join with sl st.
This round creates a controlled foundation for the decorative shells.
Border Round 2 — Scalloped Shell Edge
Ch 1.
Sc in the first stitch.
Repeat: Skip 2 sts, work 5 dc in the next st, skip 2 sts, sc in the next st.
Repeat around each side.
At the corners, adjust the spacing by one stitch where required so a shell sits cleanly around the turn rather than becoming compressed against it.
Join with sl st.
Fasten off, leaving approximately a 15 cm tail.
The finished edge repeats the five-dc fan used throughout the main blanket and creates the cream scalloped outline visible in the reference design.
How to Change Colors Without Extra Bulk
Change color during the final yarn-over of the last stitch before the new stripe begins. The old color remains behind the work while the new color completes that stitch.
For four-row stripes, cutting the yarn at every change creates many tails. Carrying yarn loosely up one side is faster when the border will later cover that edge.
Do not pull the carried strand tight. A strand shorter than the stripe section beside it can contract the edge and produce a curved blanket after several repeats.
The cream setup border can later cover the carried strands.
How to Adjust the Blanket Size
Shell stitch responds well to width changes because the repeat is mathematical.
Add or subtract six foundation stitches at a time. Do not add an arbitrary three or four stitches simply to reach a measurement because that breaks the placement of the following shells.
Length adjustment is simpler. Continue repeating Rows 2 and 3 until the rectangle reaches the target measurement minus the expected border depth.
For a smaller blanket, approximately 85 × 96.5 cm is a useful reference size. A medium sofa throw can measure approximately 123 × 162.5 cm. A large blanket can extend beyond 200 × 218 cm.
Yarn consumption does not increase linearly when both dimensions change. Doubling both width and length produces approximately four times the fabric area.
Assembly and Finishing
- Complete the final full shell repeat before starting the border.
- Lay the blanket flat and check all four sides for visible contraction.
- Join cream yarn at a corner if it is not already active.
- Crochet the single-crochet setup round around the full perimeter.
- Place three single crochets at each corner.
- Count the available border stitches and mark each corner.
- Work five-dc shells around the perimeter with single-crochet anchors.
- Join the final border stitch with a slip stitch.
- Weave each yarn tail through at least 5 cm of similarly colored fabric, reverse direction, and weave again.
- Block to the planned rectangular dimensions without stretching the shell fans flat.
The completed blanket has alternating navy and cream shell rows surrounded by a cream scalloped perimeter.
7 Technical Tips for a Cleaner Shell Stitch Blanket
- Mark the first and last anchor stitches. Missing one edge anchor causes the blanket to lose approximately one repeat over successive rows and creates a diagonal side.
- Check every shell for exactly five double crochets. A four-dc shell contracts locally, while a six-dc shell pushes excess fabric into a visible bulge.
- Measure after at least 10 cm of fabric. A foundation chain alone is a poor width measurement because its tension differs from completed shell fabric.
- Keep carried yarn relaxed along the stripe edge. If the carried strand is shorter than the four-row section beside it, that side can curl inward.
- Place the color change in the final yarn-over. Changing after completing the last stitch leaves a contrasting segment at the row edge.
- Pin the blanket at all four corners before judging the border. If the border waves while the main fabric lies flat, too many stitches were placed along the side edges.
- Leave at least a 15 cm tail after the final shell border. Short tails can pull free from open double-crochet fabric after washing, so weave them through denser single-crochet sections where possible.
Conclusion
Before beginning the full throw, crochet a four-shell swatch and measure both shell width and row height. That measurement determines the foundation length more reliably than copying another maker’s chain count. After sizing is confirmed, calculate the number of two-row repeats required for the target length and divide the planned yarn between navy and cream. The resulting shell stitch crochet blanket can then be scaled without changing its core stitch structure. Save the finished version to Pinterest or share the stripe layout on Instagram with #NavyCreamShellBlanket. For this specific design, would you keep the photographed four-row navy-and-cream rhythm, or make the navy bands twice as deep as the cream bands?









