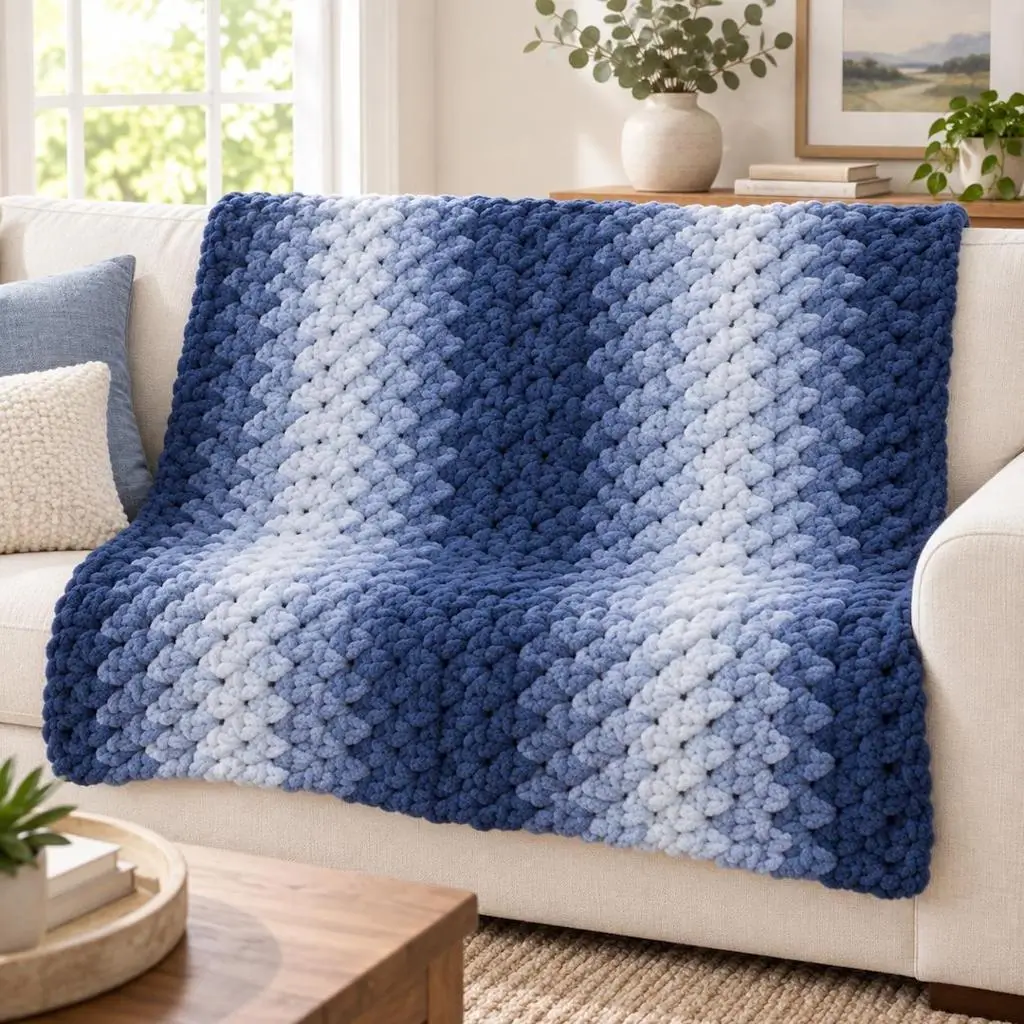
Three blue columns change this blanket more than a complicated stitch pattern would. This blue chenille crochet blanket pattern uses navy, medium blue and pale blue in broad vertical stripes, while thick textured stitches create the dense surface visible in the reference. Worked with super-bulky chenille-style yarn and an 8 mm hook, it is designed as a substantial sofa throw with simple construction and controlled color placement.
The Design: What Makes This Blanket Different
The reference depends on scale. Instead of narrow repeating stripes, the colors form wide vertical panels, with dark navy framing lighter blue sections. That arrangement makes the blanket look longer and prevents the pale sections from dominating the surface. A compact stitch is also important. Large open crochet stitches would expose gaps between the thick chenille strands, while dense single crochet or half double crochet produces the rounded, clustered texture seen in the image. The final structural decision is the edge: the blanket has no elaborate lace border. A narrow dark-blue perimeter keeps the rectangular silhouette stable and lets the color blocks remain the main feature.
Project Information at a Glance
| Skill Level | Construction | Target Size | Hook | Best For |
|---|---|---|---|---|
| Easy–Intermediate | One-piece striped rectangle | Approx. 120 × 150 cm | 8 mm | Sofa throw, lap blanket, bed-end throw |
Materials and Tools
Yarn
- Dark Navy — #6 super bulky chenille-style yarn — approximately 900–1200 g
- Medium Denim Blue — #6 super bulky chenille-style yarn — approximately 600–900 g
- Pale Blue — #6 super bulky chenille-style yarn — approximately 600–900 g
The quantities above are planning estimates. Actual consumption depends heavily on finished dimensions, stitch density and the meterage of the selected chenille yarn.
A useful reference yarn is a #6 super-bulky polyester chenille with roughly 200 meters per 300 g ball. Make the gauge swatch with the exact yarn intended for the blanket before purchasing the final quantity.
Tools
- 8 mm crochet hook
- Large-eye yarn needle
- Scissors
- Locking stitch markers
- Flexible measuring tape
Abbreviations
- ch — chain
- sc — single crochet
- hdc — half double crochet
- sl st — slip stitch
- BLO — back loop only
- st/sts — stitch/stitches
- RS — right side
- WS — wrong side
Gauge
Make a swatch measuring at least 15 × 15 cm before calculating the foundation.
For a typical #6 chenille blanket yarn with an 8 mm hook, a reasonable starting reference is approximately 7 single crochet stitches across 10 cm. Your own swatch controls the pattern.
Measure the central 10 cm rather than the edges. Chenille stitches compress easily, so place the swatch flat without stretching it before counting.
Recommended Finished Size
For the sofa-throw proportions shown in the reference, target approximately:
120 cm wide × 150 cm long.
Because the pattern is based on measurements rather than a fixed stitch count, it can be resized without changing the stripe system.
Blanket Size Options
| Size | Approximate Width | Approximate Length |
|---|---|---|
| Baby Blanket | 75 cm | 95 cm |
| Lap Blanket | 90 cm | 120 cm |
| Sofa Throw | 120 cm | 150 cm |
| Large Throw | 140 cm | 180 cm |
Understanding the Stripe Layout
The photographed blanket reads as a sequence of broad vertical bands rather than horizontal color changes.
A practical layout for a 120 cm blanket is:
| Panel | Color | Approximate Width |
|---|---|---|
| 1 | Dark Navy | 18 cm |
| 2 | Medium Blue | 15 cm |
| 3 | Pale Blue | 15 cm |
| 4 | Medium Blue | 15 cm |
| 5 | Dark Navy | 24 cm |
| 6 | Medium Blue | 15 cm |
| 7 | Pale Blue | 15 cm |
| 8 | Dark Navy | 18 cm |
Treat those widths as visual targets rather than mandatory measurements. The reference has soft transitions created by the plush yarn, so a difference of one stitch at a color boundary will not materially change the design.
Construction Method
The easiest way to produce genuine vertical stripes is to crochet the blanket from one long side to the other.
That means the foundation chain determines the length of the finished blanket. Rows determine its width.
This construction avoids carrying several colors across every row and creates clean uninterrupted columns.
Foundation Chain
First determine the number of stitches required for the desired blanket length.
If your measured gauge is 7 sc per 10 cm and you want a 150 cm blanket:
150 ÷ 10 = 15
15 × 7 = 105 stitches
Start with approximately 106 chains for a 105-stitch single-crochet row.
This is only an example calculation. Replace 7 with the stitch count from your own swatch.
Main Blanket Pattern
Dark Navy Panel 1
With dark navy, chain the calculated number required for the desired blanket length.
Row 1: Sc in second ch from hook and in every ch across. Ch 1, turn.
Row 2: Sc in every st across. Ch 1, turn.
Repeat Row 2 until the dark navy panel measures approximately 18 cm wide.
Do not rely only on row count. Measure the actual fabric because chenille can compress differently from one skein to another.
Medium Blue Panel
Change to medium blue at the end of the final navy row.
Continue:
Every row: Sc in every st across. Ch 1, turn.
Work until the medium-blue section measures approximately 15 cm.
Pale Blue Panel
Change to pale blue.
Continue working one sc in every stitch until the pale-blue section measures approximately 15 cm.
Second Medium Blue Panel
Change back to medium blue.
Work another section approximately 15 cm wide.
Wide Center Navy Panel
Change to dark navy.
Work approximately 20–24 cm.
This wider center section acts as a visual anchor. If all bands have identical widths, the blanket can look more like a standard striped throw than the broad color-block design in the reference.
Second Light-Blue Sequence
After the central navy section, repeat the gradient:
Medium Blue → Pale Blue → Medium Blue.
Keep each section close to 15 cm, adjusting slightly if necessary to reach the planned total width.
Final Navy Panel
Finish with dark navy.
Continue until the blanket reaches the required total width.
Fasten off only after measuring both the top and bottom edges.
Alternative Half Double Crochet Version
For a slightly taller stitch and faster construction, substitute hdc for sc.
Chain to the required length.
Row 1: Hdc in second ch from hook and across. Ch 1, turn.
Row 2: Hdc in every stitch across. Ch 1, turn.
Repeat while following the same measured stripe widths.
Half double crochet produces a little more drape. Single crochet creates the denser surface that is closer to the compact appearance of the photographed blanket.
Textured Version
If plain sc looks too flat with the selected yarn, alternate standard and back-loop rows.
Row A: Sc in every stitch.
Row B: Sc BLO in every stitch.
Repeat Rows A and B.
The BLO rows create shallow horizontal ridges running along each vertical color panel. With chenille, these ridges remain subtle rather than sharply ribbed.
Changing Colors Cleanly
Stop before completing the final stitch of the old color.
Insert the hook into the final stitch and pull up a loop. Instead of completing the stitch with the old color, yarn over with the new color and pull it through the remaining loops.
Turn and begin the next row with the new shade.
This positions the color change directly on the row boundary.
Managing Chenille Yarn Ends
Chenille yarn ends can work loose more easily than tightly spun yarn because the plush outer fibers do not grip each other strongly.
Leave a tail of approximately 15–20 cm at every color change.
Thread the tail through a large-eye needle and weave it through several stitches in one direction. Reverse direction and pass through a second section.
A short tail hidden under only two or three stitches is more likely to escape during washing.
Keeping the Long Edges Straight
Place a stitch marker in the first and last stitch of every row.
Chenille can hide the final stitch. Missing one stitch repeatedly causes the blanket to narrow gradually, while accidentally working twice into an edge stitch produces a flare.
Count the stitches every 5–10 rows rather than waiting until an entire stripe is complete.
Optional Border
The photographed design has a restrained edge, so the border should remain narrow.
Border Round 1
Join dark navy at one corner.
Work sc evenly around all four sides.
At each corner, work:
(sc, ch 1, sc).
On the row-end sides, distribute stitches by measurement rather than forcing one stitch into every visible chenille loop.
Border Round 2
Work one sc in every stitch around.
At each corner ch-1 space, work:
(sc, ch 1, sc).
Join with sl st.
Fasten off.
Border Adjustment Test
After working approximately 30 cm of the first border round, place that section flat.
If the edge waves, too many stitches are being added.
If the blanket pulls inward, the border contains too few stitches.
Correct the spacing before continuing around the entire perimeter.
Estimating Yarn Requirements
Chenille blankets consume substantial yarn, and brand-to-brand meterage varies enough that weight alone should not determine the purchase.
The most reliable calculation is based on a swatch.
- Crochet a 20 × 20 cm swatch in the planned stitch.
- Weigh the finished swatch.
- Calculate its area: 20 × 20 = 400 cm².
- Calculate the blanket area. A 120 × 150 cm throw equals 18,000 cm².
- Divide 18,000 by 400 = 45.
- Multiply the swatch weight by 45.
- Add approximately 10–15% for the border, color changes and gauge variation.
For example, if the 20 × 20 cm swatch weighs 55 g:
55 × 45 = 2475 g.
Adding 10% gives approximately 2725 g.
This is a calculation example, not a fixed requirement for the photographed blanket.
Color Distribution
For a three-color version, a practical starting allocation is:
- Dark Navy: approximately 40–45% of total yarn
- Medium Blue: approximately 30–35%
- Pale Blue: approximately 20–25%
Purchase additional dark navy if the border will also use that shade.
Making the Gradient Softer
The reference uses three clearly related blue values. The transition works because the middle blue visually bridges navy and pale blue.
For another palette, keep the same value structure:
- Charcoal → medium gray → pearl gray
- Forest green → sage → cream
- Chocolate → camel → ivory
- Plum → dusty mauve → blush
- Teal → aqua → pale mint
A dark-medium-light sequence preserves the broad gradient effect even when the colors change.
Adjusting the Blanket Width
Because the blanket is worked sideways, changing its width requires only more or fewer rows.
For a narrow lap blanket, reduce the outer navy sections and the central band while keeping both pale-blue bands visible.
For a larger bed throw, widen each color panel proportionally rather than adding many narrow stripes.
The broad panels are an important part of the design.
Adjusting the Blanket Length
The foundation chain controls length.
Use your gauge to calculate the new stitch count:
Desired length in cm ÷ 10 × stitches per 10 cm = required stitches.
Round to the nearest whole stitch, then add the turning chain required by the chosen stitch.
Assembly and Finishing
- Make and measure a chenille gauge swatch using the intended hook.
- Calculate the foundation chain from the desired finished blanket length.
- Work the first dark navy panel to its measured width.
- Add medium blue and pale blue sections without changing the row stitch count.
- Work the wider dark navy center panel.
- Repeat the medium and pale-blue sequence on the opposite side.
- Finish with the final navy section and measure both ends of the blanket.
- Weave every color-change tail through at least two directions on the wrong side.
- Add one or two narrow dark navy border rounds, correcting stitch spacing if the edge waves.
- Lay the finished blanket flat and shape the corners and stripe boundaries before its first use.
The finished blanket should form a stable rectangle with uninterrupted vertical blue bands and no visible narrowing at the row ends.
7 Technical Tips
- The blanket becomes narrower: the final stitch of a row is probably being missed inside the chenille pile. Keep locking markers in both edge stitches and verify the stitch count every 5–10 rows.
- The color boundary looks stepped: the new yarn was introduced after completing the final stitch. Change colors during the last pull-through of the previous row so the new shade begins directly at the edge.
- The fabric feels excessively stiff: the hook is too small for the yarn and personal tension. Increase the hook by 0.5–1 mm and compare a second 15 cm swatch before continuing.
- Large holes appear between stitches: the hook is too large or the stitch is too tall. Switch from hdc to sc or reduce the hook by approximately 0.5 mm.
- The border waves: too many stitches have been placed along the row-end edges. Remove stitches gradually until a 30 cm test section lies flat without stretching.
- Chenille tails escape: the woven section is too short. Leave 15–20 cm tails and weave each one in two directions rather than trimming immediately beside the color change.
- One stripe becomes wider at the opposite edge: row gauge changed during construction. Measure each stripe at the top, center and bottom before changing colors; keep the difference within approximately 1 cm.
Care and Washing
Follow the care instructions printed on the selected yarn label. Many polyester blanket-style chenille yarns are designed for machine washing, but temperature and drying instructions differ between products.
Secure all ends before the first wash. Large wet chenille blankets become heavy, so support the entire fabric when moving it rather than lifting the blanket from one corner.
Aggressive heat can alter synthetic fibers. Use the yarn manufacturer’s recommended washing and drying settings.
Conclusion
The main control point in this blue chenille crochet blanket pattern is stripe proportion, not complicated stitch work. Begin with a measured swatch, calculate the foundation from the required blanket length, then work sideways so navy, medium blue and pale blue form uninterrupted vertical columns. Make the central navy panel slightly wider to reproduce the strong visual anchor seen in the reference. Before buying the full yarn quantity, weigh one 20 × 20 cm swatch and calculate consumption from its area. Share the finished blanket on Pinterest or Instagram with #BlueChenilleStripeBlanket. Would you keep the navy center stripe wide, or make all three blue sections equal in width?









