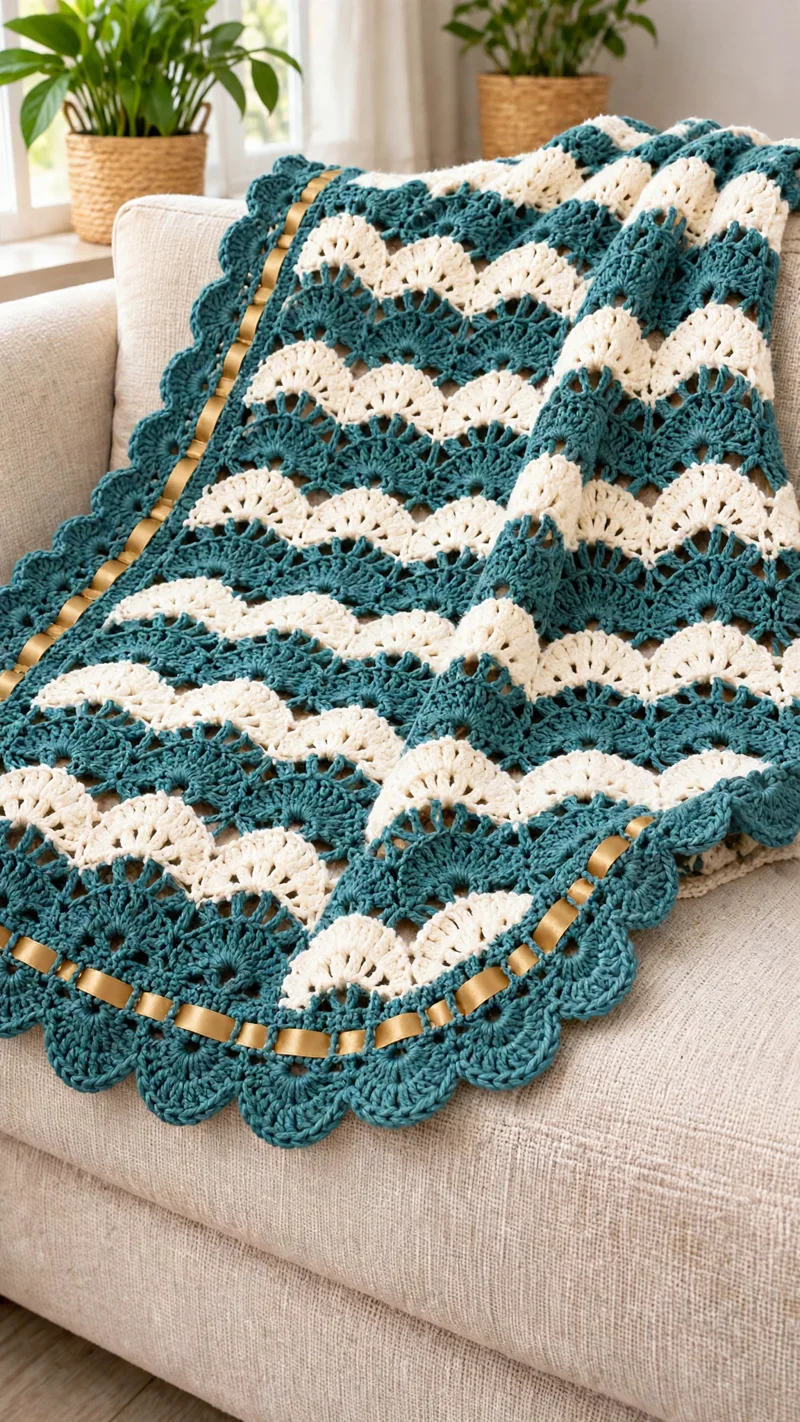
A shell-shaped crochet fan needs room to spread without pulling the fabric inward. This teal and ivory crochet shell stitch blanket uses alternating fan rows, an openwork texture, a scalloped border, and gold satin ribbon to create a decorative throw. The project is designed for intermediate crocheters familiar with double crochet, stitch repeats, and working along blanket edges. The instructions below provide an adaptable version inspired by the photographed blanket.
The Design: What Makes This Shell Stitch Blanket Different
The defining feature is the arrangement of rounded shell motifs in alternating teal and ivory bands. Instead of a solid crochet surface, the blanket uses groups of double crochet stitches separated by small anchoring stitches. These create repeated fan shapes and visible spaces between the rows.
The second structural detail is the contrast between the central fabric and the edging. The body is relatively open, while the teal border frames the blanket with larger scallops. This helps distinguish the outer perimeter from the repeating shell pattern.
Gold satin ribbon provides a third decorative element. It passes through an eyelet round near the border rather than being crocheted into the main fabric.
One common mistake when making a two-color crochet shell blanket is changing colors before completing the final stitch of a row. This can leave visible color interruptions. Consistent row transitions and controlled tension produce a more regular pattern.
Project Information at a Glance
| Feature | Details |
|---|---|
| Project | Shell stitch crochet blanket |
| Skill level | Intermediate |
| Suggested size | Approximately 100 × 130 cm (39 × 51 inches) |
| Yarn weight | DK / Light Worsted, Category 3 |
| Suggested hook | 5 mm (H/8) |
| Construction | Flat rows with a worked border |
| Colors | Deep teal and warm ivory |
| Decorative finish | Gold satin ribbon |
| Estimated time | 20–35 hours, depending on speed and gauge |
Measurements, time, and yarn amounts are planning estimates for this adaptation, not verified specifications of the photographed blanket. Make a gauge swatch before committing to the full project.
Materials and Tools
Yarn
- Deep teal DK yarn — approximately 650 g: Choose a smooth acrylic, cotton blend, or washable yarn suitable for blankets.
- Warm ivory DK yarn — approximately 550 g: Use the same yarn line and weight as the teal for consistent stitch height.
- Optional additional teal yarn — 100 g: Reserve extra yarn for the decorative scalloped border if the blanket is enlarged.
Suitable yarn families include Paintbox Yarns Simply DK and Stylecraft Special DK. Check the yarn label for fiber content, washing instructions, and yardage. These are material suggestions rather than confirmed products used in the photograph.
Tools
- 5 mm crochet hook, or the size required to achieve your preferred fabric.
- Stitch markers for marking shell repeats and corners.
- Tapestry needle for weaving in yarn ends.
- Scissors for trimming yarn and ribbon.
- Measuring tape for checking width and length.
- Gold satin ribbon, 10–15 mm wide, approximately 5–6 meters for a blanket of the suggested dimensions.
- Blocking mats and rust-resistant pins, if suitable for the chosen yarn.
Crochet Abbreviations
The pattern uses US crochet terminology.
- ch: Chain
- sc: Single crochet
- dc: Double crochet
- sl st: Slip stitch
- st: Stitch
- sp: Space
- sk: Skip
- rep: Repeat
- RS: Right side
- WS: Wrong side
Shell stitch: Work 5 dc into the same indicated stitch.
Half shell: Work 3 dc into the indicated stitch or turning position.
Note: This blanket is worked in turned rows, not continuous rounds. Turning chains are not counted as stitches unless stated otherwise.
How to Crochet the Teal and Ivory Shell Stitch Blanket
Step 1: Make a Gauge Swatch
Before starting the full blanket, make a swatch using the shell-stitch instructions below. Work at least four complete pattern rows in each color and measure the fabric after resting it flat.
The shell stitch creates a wider fabric than a simple single-crochet foundation might suggest. Its final width depends on the yarn thickness, hook size, and spacing between the fans.
If the fabric is too stiff, increase the hook size by 0.5 mm. If the shell openings appear excessively loose, try a smaller hook. Keep the same hook throughout the main blanket unless you deliberately change tension for the border.
Step 2: Crochet the Foundation Chain
Yarn: Deep teal.
For this adapted pattern, use a foundation chain that is a multiple of 6 plus 2.
Begin with ch 146. This gives 24 complete six-chain repeats plus 2 additional chains.
Do not assume the chain will produce an exact 100 cm width. Measure the first several rows and adjust the foundation chain by increments of six if necessary.
Keep the foundation chain loose enough that the lower edge does not contract. A tight foundation causes the first shell row to curve even when subsequent rows have correct stitch counts.
Step 3: Work the First Shell Row
Row 1 — Teal: Sc in the second ch from the hook. *Sk 2 ch, work 5 dc in the next ch, sk 2 ch, sc in the next ch.* Repeat from * to * across.
The row creates a sequence of raised fans separated by single-crochet anchors. With a starting chain of 146, this construction gives 24 full shells, with the last sc worked in the final foundation chain.
Check that every shell contains exactly five double crochet stitches. A missing double crochet will make one fan narrower than the others, while an extra stitch can create localized rippling.
Turn the work after completing the final sc.
Step 4: Work the Second Shell Row
Row 2 — Ivory: Join ivory yarn at the beginning of the row. Ch 3, then work 2 dc into the first sc to form a beginning half shell.
*Sc into the center dc of the next five-dc shell, then work 5 dc into the next sc anchor.* Repeat across the row, ending with sc in the center dc of the final full shell and 3 dc into the last sc.
Turn.
This row shifts the shell positions so that the ivory fans sit between the teal fans below. The half shells at the ends help maintain a more balanced edge.
Keep the center sc snug, but do not pull it tightly enough to compress the fan beneath it.
Step 5: Work the Third Shell Row
Row 3 — Teal: Join teal yarn. Ch 1 and sc in the first stitch.
*Work 5 dc into the next sc between shells, then sc into the center dc of the next five-dc shell.* Repeat the established alternating shell sequence across, placing the final sc into the top of the ending turning position.
Turn.
Before continuing, lay the fabric flat and inspect the edges. The two outer sides should remain reasonably straight, even though the shells themselves create a slightly textured outline.
If the row begins to widen, check for extra shell groups or misplaced anchors. If it narrows, inspect the first and last stitch positions.
Step 6: Repeat the Two-Row Pattern
Continue alternating Rows 2 and 3, working the shells into the single-crochet anchors and placing single crochets into the center double crochet of the opposite shells.
For the photographed color arrangement, use alternating bands of ivory and teal. A practical sequence is:
- Foundation and Row 1: Teal
- Row 2: Ivory
- Row 3: Teal
- Row 4: Ivory
- Row 5: Teal
- Continue alternating the two colors.
Change color at the start of each new row. Fasten off the previous yarn with enough length to weave securely into the corresponding color section.
For a cleaner edge, complete the last yarn-over of the final stitch with the new color whenever the stitch structure allows it.
Work until the blanket body reaches the desired length, allowing additional space for the border.
For a target finished length of approximately 130 cm, stop the main shell fabric several centimeters short and measure the border separately.
How to Make the Decorative Scalloped Border
The border is a major feature of the pictured blanket. Its teal scallops are larger than the individual shell motifs in the center, creating a defined outer frame.
This adaptation uses a foundation round, an eyelet round for ribbon, and a final scalloped edging.
Border Round 1: Stabilizing Edge
Yarn: Deep teal.
Join the teal yarn at a corner.
Work sc stitches evenly along the first side, placing stitches into suitable row-end spaces rather than forcing one stitch into every visible strand.
At each corner, work 3 sc into the same corner position.
Continue around all four sides and join with a sl st to the first sc.
On the long sides, the correct spacing depends on the height of the shell rows. Work enough stitches to keep the edge flat without gathering or flaring.
Before starting the next round, count the stitches between corner groups and adjust the spacing to accommodate the eyelet repeat.
Border Round 2: Gold Ribbon Eyelets
Ch 3, counting as the first dc for this round.
Work a repeating sequence of dc, ch 1, sk 1 around each straight edge, adjusting the final repeat near the corners if necessary.
At each corner, work a group such as (2 dc, ch 2, 2 dc) into the corner space.
Continue around the blanket and join with a sl st.
The chain-one openings form the ribbon channel. Check the spacing with a short piece of satin ribbon before proceeding.
A 10 mm ribbon should pass through the openings without pulling the crochet stitches out of alignment. If the ribbon is wider, enlarge the eyelets or choose a narrower ribbon.
Border Round 3: Scalloped Shell Edging
Join teal yarn at the beginning of a straight side.
Work the following sequence along each side:
*Sc in the next suitable stitch or space, sk 2 stitches, work 7 dc in the next stitch, sk 2 stitches.*
Repeat to the corner, adjusting the spacing of the final repeat so that the last scallop does not crowd the corner.
At each corner, work a larger fan of approximately 9 dc into the corner space. Anchor it with sc on either side as needed.
Continue around the remaining sides.
Join with a sl st and fasten off.
The stitch counts for this border depend on the number of stitches picked up in the foundation round. Test the repeat on one side before completing the full perimeter. The goal is an evenly spaced border that lies flat.
Adding the Gold Satin Ribbon
The ribbon in the reference image is positioned close to the outer scalloped edge. It runs through the teal border and creates a narrow gold line around the blanket.
- Measure the completed blanket perimeter after the border is finished.
- Cut the ribbon slightly longer than the measured perimeter to allow for handling and finishing.
- Seal the ribbon ends according to the manufacturer’s instructions.
- Beginning near a corner, pass the ribbon over the first eyelet bar and under the next.
- Continue the over-under sequence around the blanket.
- Keep the ribbon flat so that its shiny face remains visible.
- Adjust the ribbon gently around each corner.
- Distribute any excess length evenly rather than pulling it tight.
- Join or secure the ends discreetly on the reverse side.
- Check that the ribbon does not gather the crocheted border.
The decorative ribbon should remain independent of the main structural stitches. This allows the crochet fabric to move naturally.
If the blanket is intended for a baby or young child, omit the ribbon or use a securely attached, age-appropriate finish without loose lengths or loops.
Finishing and Blocking the Blanket
After completing the border, inspect the entire blanket for loose ends, missed stitches, and uneven shell groups.
Use a tapestry needle to weave yarn ends through several stitches of the same color. Change direction at least once to help prevent the ends from working loose during use.
Avoid cutting yarn tails immediately beside the final stitch. Leave enough woven length to resist movement during washing.
Lay the blanket on a clean flat surface and measure its width at the top, middle, and bottom.
If the edges differ significantly, check whether the border is pulling inward or stretching outward. A few minor variations may settle after appropriate blocking.
For washable acrylic yarn, follow the care instructions on the yarn label. For cotton or suitable natural-fiber blends, gentle wet blocking may help open the shell shapes.
Do not apply direct high heat to acrylic yarn or synthetic satin ribbon. Excessive heat can permanently alter their appearance and structure.
Arrange the scallops into even curves while the blanket dries. Allow the fabric to dry completely before folding or storing it.
7 Technical Tips for Better Shell Stitch Results
- Mark the shell repeats. Place a stitch marker after every sixth foundation chain while preparing the first row. A missed chain can shift the remaining shells and leave an incomplete repeat at the opposite edge.
- Maintain consistent fan tension. Every standard shell contains five double crochet stitches worked into one anchor. If the central stitch is tighter than the surrounding stitches, the fan can lean sideways.
- Check the row edges. Count the shell groups after every four rows. An extra anchor at the end of a row may gradually increase the blanket width.
- Control color-change tails. Leave approximately 12–15 cm of yarn at each color transition for weaving. Short tails may work loose after repeated handling or washing.
- Test the ribbon channel. Pass a 10 mm sample ribbon through several eyelets before completing the border. Openings that are too small can distort the double crochet stitches.
- Pin the scallops before blocking. Arrange the seven-double-crochet fans at regular intervals. Uneven pin placement can make an otherwise consistent border appear irregular.
- Check border tension at the corners. Corner shells need enough space to turn through approximately 90 degrees. If the corners curl upward, reassess the number and placement of stitches rather than pulling the fabric flat by force.
How to Adjust the Blanket Size
The blanket can be made narrower or wider by changing the foundation chain in multiples of six while retaining the two additional chains.
For example, a foundation of 122 chains produces 20 shell repeats, while 170 chains produces 28 shell repeats using the same first-row construction.
To change the length, continue the alternating shell rows until the desired measurement is reached.
Because the border adds width and length, measure the main fabric before beginning the edging. A wide scalloped border can add several centimeters to the finished dimensions.
For a larger sofa throw, calculate additional yarn based on a completed swatch. Weigh the swatch and compare its area with the planned blanket area, then add an allowance for the border.
Keep both yarn colors in the same weight category. Mixing DK and worsted yarn without adjusting the hook can create uneven rows and inconsistent shell heights.
Care Instructions
Wash the completed blanket according to the most delicate material used in the project.
If the yarn is machine washable but the ribbon is not, remove the ribbon before washing whenever its construction permits.
Place the blanket in a laundry bag to reduce snagging and friction. Select a gentle cycle and a suitable water temperature based on the yarn label.
Avoid bleach unless the manufacturer explicitly permits it. Strong cleaning agents may affect the contrast between the teal and ivory yarn.
Dry the blanket flat when recommended for the chosen fiber. Hanging a wet, openwork crochet blanket may stretch the shells and change its dimensions.
Store it loosely folded in a dry location. Avoid compressing the scalloped border beneath heavy objects for extended periods.
Common Shell Stitch Problems and Fixes
Why Is the Blanket Getting Wider?
The most likely cause is an extra shell group or an incorrectly placed edge stitch. Compare the number of complete shells with the first row and inspect the final stitches on each side.
Why Are the Shells Not Lining Up?
Each new shell should be worked into the appropriate single-crochet anchor from the preceding row. Placing a shell into the center of another shell changes the alignment and interrupts the staggered pattern.
Why Is the Scalloped Border Curling?
A curling border may have too few stitches, overly tight tension, or insufficient room around the corners. Make a short test section and adjust the spacing before working the entire border.
Can This Blanket Be Made Without Ribbon?
Yes. The gold satin ribbon is decorative rather than structural. The blanket remains functional without it, and the eyelet round can be retained as an openwork detail or replaced with a solid round.
Can I Use Worsted Weight Yarn?
Yes, but the fabric will usually be thicker and the finished dimensions may change. Make a new gauge swatch and select a hook appropriate for the yarn.
Conclusion
This teal and ivory crochet shell stitch blanket combines a repeatable fan construction with a contrasting scalloped border and an optional satin ribbon finish. The main technical priorities are consistent five-double-crochet shells, accurate anchor placement, controlled color changes, and an evenly spaced border. Before making the full-size version, complete a swatch and confirm the width produced by your chosen yarn and hook. Save the finished blanket to Pinterest or share your version on Instagram with the hashtag #TealIvoryShellBlanket. When adapting the design, consider one final detail: should the gold ribbon follow the entire perimeter or appear only along two opposite edges?
Pattern note: This is an independently written, photo-inspired adaptation. The exact stitches, original designer, yarn quantities, and dimensions of the photographed blanket have not been established. Test the instructions and gauge before publication as a fully tested pattern.









