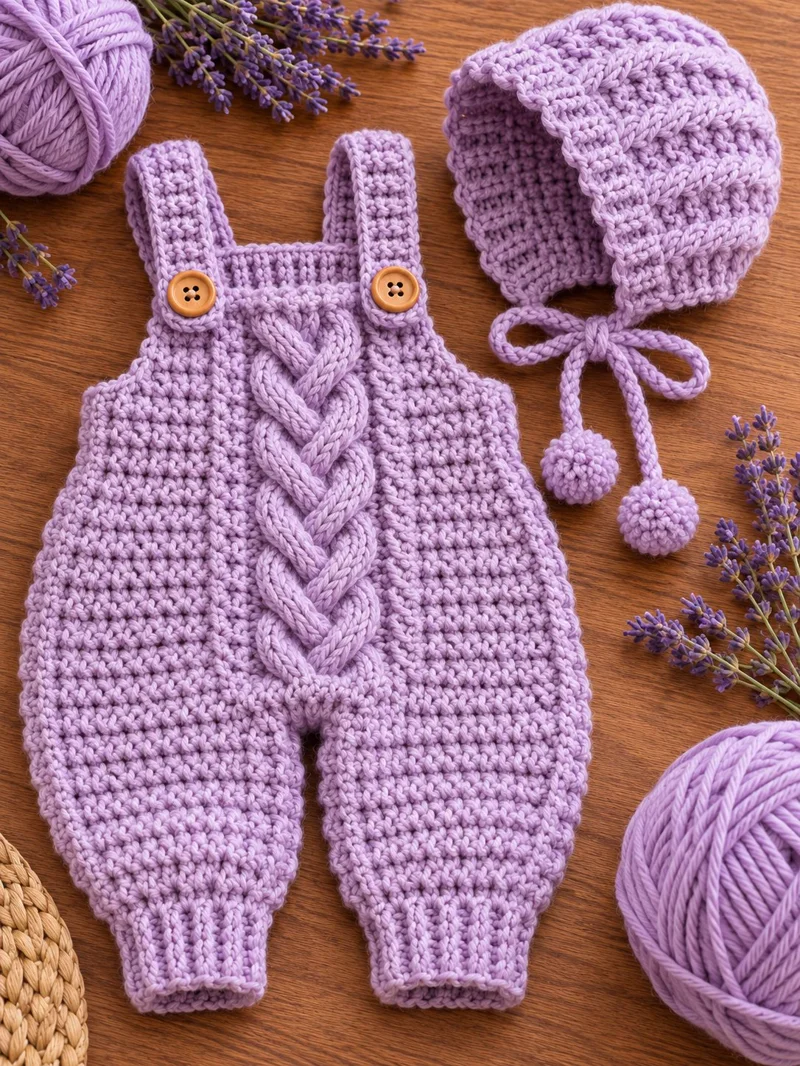
The raised cable running down the center of these lavender baby overalls creates a distinctive feature that must remain aligned as the garment widens around the hips. This crochet baby overalls pattern includes a textured romper, adjustable shoulder straps, ribbed ankle cuffs, and a matching bonnet with decorative pom-pom ties. Designed for intermediate crocheters, the set uses DK cotton-blend yarn and a 4 mm crochet hook. The approximate finished size is 0–3 months.
The Design: What Makes This Baby Outfit Different
This lavender baby outfit combines three structural elements: a central cable-style braid, a shaped romper body, and a fitted bonnet. Each component serves a different purpose. The raised braid creates a vertical focal point, while the wider lower section provides room for a diaper. The ribbed ankle cuffs help the trouser legs retain their shape.
Unlike a basic crochet baby romper pattern, this design requires attention to symmetry. The shoulder straps must sit at equal distances from the center panel, and both leg openings should have matching circumferences.
The matching crochet baby bonnet pattern uses a rounded crown and a ribbed face opening. Two crocheted cords finish the bonnet, with small decorative pom-poms at their ends.
A frequent construction error is positioning the cable decoration before checking the finished body width. For this version, the braid is worked separately and attached after the romper has been assembled.
Project Information at a Glance
| Feature | Details |
|---|---|
| Skill level | Intermediate |
| Estimated time | 12–16 hours |
| Suggested size | 0–3 months |
| Estimated romper length | Approximately 35 cm |
| Estimated chest circumference | Approximately 44 cm |
| Suggested hook | 4 mm |
| Yarn weight | DK / Light Worsted |
| Construction | Flat panels, joined seams, and circular crochet |
| Terminology | US crochet terms |
Important: These measurements are design targets, not measurements verified from the photograph. Crochet a gauge swatch before beginning. Baby sizing varies between manufacturers, so compare the finished garment with a well-fitting baby outfit.
Materials and Tools
Yarn
- Pastel lavender DK cotton-blend yarn: approximately 180–220 g for the romper and bonnet combined.
- Matching lavender yarn: reserve approximately 20 g from the total for the decorative braid, bonnet cords, and pom-poms.
Choose a smooth, machine-washable yarn with good stitch definition. Cotton-acrylic blends are practical for garments that need regular washing. The photographed outfit appears to use a smooth, multi-ply yarn rather than velvet or chenille.
Tools
- 4 mm crochet hook
- 3.5 mm crochet hook for firmer decorative details, if needed
- Two flat wooden-style buttons, approximately 15 mm, securely attached
- Stitch markers
- Blunt tapestry needle
- Measuring tape
- Scissors
- Rustproof pins
Baby safety: Buttons and pom-poms can detach, while bonnet ties can create a strangulation hazard. This photographed design is best treated as a supervised photo outfit, not sleepwear. Remove the bonnet before sleep and whenever the baby is unattended. Inspect every attachment before use.
Gauge and Measurements
For the instructions below, the target gauge is approximately 18 single crochet stitches and 20 rows per 10 cm using a 4 mm hook. This gauge is an assumption for the original draft and has not been established through a physical sample.
Work a swatch of at least 12 × 12 cm, then measure the central 10 cm without stretching the fabric. If the stitch count is too high, try a larger hook. If it is too low, try a smaller hook.
The target chest circumference is approximately 44 cm, with a front and back panel width of about 22 cm each. The final width may change after seaming and washing.
Crochet Abbreviations
- MR: Magic ring
- ch: Chain
- sc: Single crochet
- hdc: Half double crochet
- dc: Double crochet
- sl st: Slip stitch
- inc: Two stitches in one stitch
- dec: Single crochet two stitches together
- BLO: Back loop only
- FLO: Front loop only
- st: Stitch
- sts: Stitches
- RS: Right side
- WS: Wrong side
When a decrease is required in a circular section, an invisible decrease can reduce the visible gap by working through the front loops of the next two stitches.
Free Crochet Baby Overalls Pattern – Step by Step
The romper is constructed from front and back panels with separate leg sections. The decorative braid is attached afterward. Work flat sections in turning rows and circular sections in continuous rounds unless another method is specified.
Part 1: Front Body Panel
Yarn: Pastel lavender DK. Use the 4 mm hook.
Chain 41.
Row 1: Sc in the second chain from the hook and across. Ch 1, turn. (40)
Rows 2–8: Sc across. Ch 1, turn. (40)
Row 9: Inc, sc 38, inc. Ch 1, turn. (42)
Rows 10–14: Sc across. Ch 1, turn. (42)
Row 15: Inc, sc 40, inc. Ch 1, turn. (44)
Rows 16–22: Sc across. Ch 1, turn. (44)
Row 23: Dec, sc 40, dec. Ch 1, turn. (42)
Rows 24–28: Sc across. Ch 1, turn. (42)
Row 29: Dec, sc 38, dec. Ch 1, turn. (40)
Rows 30–38: Sc across. Ch 1, turn. (40)
Fasten off, leaving a 25 cm yarn tail for assembly.
Construction note: The 44-stitch widest section is intended to create additional room around the lower torso. The upper edge remains 40 stitches wide.
Part 2: Back Body Panel
Make one panel using the same instructions as the front body panel.
Keep the final yarn tail long enough to sew the side seams. Check that both panels have the same number of rows before joining them.
Part 3: Shoulder Straps (Make 2)
Yarn: Pastel lavender DK.
Chain 9.
Row 1: Sc in the second chain from the hook and across. Ch 1, turn. (8)
Rows 2–30: Sc across. Ch 1, turn. (8)
Fasten off, leaving a 20 cm tail.
Each strap should measure approximately 4.5 cm wide at the suggested gauge. Adjust the number of rows to suit the required shoulder length.
For a buttonhole, replace Row 28 with: sc 3, ch 2, skip 2 sts, sc 3. (8 positions)
Row 29: Sc 3, work 2 sc into the chain-2 space, sc 3. Ch 1, turn. (8)
Row 30: Sc across. (8)
Make the second strap with an identical buttonhole.
Part 4: Left and Right Trouser Legs
Make 2. Yarn: Pastel lavender DK.
Chain 33.
Row 1: Sc in the second chain from the hook and across. Ch 1, turn. (32)
Rows 2–5: Sc across. Ch 1, turn. (32)
Row 6: Inc, sc 30, inc. Ch 1, turn. (34)
Rows 7–10: Sc across. Ch 1, turn. (34)
Row 11: Inc, sc 32, inc. Ch 1, turn. (36)
Rows 12–18: Sc across. Ch 1, turn. (36)
Row 19: Dec, sc 32, dec. Ch 1, turn. (34)
Rows 20–23: Sc across. Ch 1, turn. (34)
Row 24: Dec, sc 30, dec. Ch 1, turn. (32)
Rows 25–28: Sc across. Ch 1, turn. (32)
Fasten off with a 30 cm tail.
Fold each leg section lengthwise with right sides facing. Sew the long edges together, leaving the upper opening available for attachment to the body.
Fit note: The leg panels are drafted as separate tubes. Their upper edges and the body-panel lower edges must be measured and adjusted during assembly; the draft does not establish a fully graded crotch gusset.
Part 5: Ribbed Ankle Cuffs (Make 2)
Yarn: Pastel lavender DK.
Chain 9.
Row 1: Sc in the second chain from the hook and across. Ch 1, turn. (8)
Rows 2–32: Sc in BLO across. Ch 1, turn. (8)
Fasten off, leaving a long sewing tail.
Join the first and last rows to create a ribbed ring. Attach the ring evenly around the bottom of the trouser leg, distributing the 32 cuff rows across the 32-stitch opening.
Repeat for the second cuff. Check that neither cuff is tight around the baby’s ankle.
Part 6: Decorative Front Braid
The photograph features a wide, interlaced cable running vertically down the front. A true crocheted cable can be produced with front-post stitches, but the following detachable braid offers a simpler way to reproduce the raised appearance.
Yarn: Pastel lavender DK. Make 3 cords.
For each cord, chain approximately 65 stitches or enough to produce a cord measuring 1.5 times the intended finished braid length.
Row 1: Sl st into the second chain from the hook and every remaining chain. (64)
Fasten off, leaving a 20 cm tail.
Place the three cords side by side and secure their upper ends temporarily. Cross the right cord over the center cord, then the left cord over the new center cord. Repeat until the braid reaches the desired length.
Pin the braid along the center of the front panel, starting just below the upper edge and ending above the crotch area. Sew through the underside of the cords at intervals of approximately 2 cm.
Important: This produces an applied braid rather than the integrated post-stitch cable visible in the photograph. For a closer replica, the central cable must be incorporated into the front-panel stitch structure.
Part 7: Bonnet Crown
Yarn: Pastel lavender DK. Use a 4 mm hook.
Work in continuous rounds and mark the first stitch of each round.
R1: 6 sc in MR. (6)
R2: Inc × 6. (12)
R3: (Sc 1, inc) × 6. (18)
R4: (Sc 2, inc) × 6. (24)
R5: (Sc 3, inc) × 6. (30)
R6: (Sc 4, inc) × 6. (36)
R7: (Sc 5, inc) × 6. (42)
R8: (Sc 6, inc) × 6. (48)
R9: (Sc 7, inc) × 6. (54)
R10: (Sc 8, inc) × 6. (60)
R11: (Sc 9, inc) × 6. (66)
R12: (Sc 10, inc) × 6. (72)
Measure the crown diameter. At the assumed gauge, the finished diameter may differ from the desired baby head size, so do not continue solely on the basis of the round count.
R13–23: Sc around. (72)
Fasten off.
This section creates a rounded cap foundation. The photographed bonnet has a more open face shape, so the lower and front edges require additional shaping rather than simply adding rounds.
Part 8: Bonnet Face Opening and Ribbed Edge
Mark a central opening across approximately 24 stitches at the front of the bonnet. Work the remaining 48 stitches in turning rows to extend the back and sides.
Row 1: Join yarn at the first marked edge, sc across 48 stitches. Ch 1, turn. (48)
Rows 2–6: Sc across. Ch 1, turn. (48)
Fasten off.
For the ribbed edging, chain 7.
Row 1: Sc in the second chain from the hook and across. Ch 1, turn. (6)
Rows 2 onward: Sc in BLO across, ch 1 and turn. (6)
Continue until the ribbed strip matches the measured face-opening perimeter without stretching. Sew it around the opening, keeping the seam on the inside.
Work one row of sc along the lower bonnet edge to stabilize the shape.
Part 9: Bonnet Ties (Make 2)
Chain 55.
Sl st in the second chain from the hook and across. (54)
Fasten off, leaving a 15 cm tail.
Attach one cord to each lower corner of the bonnet. The photograph shows long decorative ties, but loose cords must never be left around an unsupervised infant.
Part 10: Crochet Pom-Poms (Make 2)
Yarn: Pastel lavender DK.
R1: 6 sc in MR. (6)
R2: Inc × 6. (12)
R3: (Sc 1, inc) × 6. (18)
R4–5: Sc around. (18)
R6: (Sc 1, dec) × 6. (12)
R7: Dec × 6. (6)
Insert a small amount of washable fiberfill before closing. Fasten off and weave the yarn tail through the remaining six stitches.
Sew a pom-pom to the end of each bonnet cord using several secure passes. Because the pom-poms are detachable components, this version should be used only for supervised photography or display.
Assembly Instructions
- Prepare the body panels. Lay the front and back sections flat with the right sides facing outward. Compare their width and height before sewing.
- Join the side seams. Sew the corresponding sides together, leaving suitable openings for the arms and upper body. The final upper edge should remain comfortable around the chest.
- Shape the lower body. Mark the center front and back. Check the crotch depth against a garment of the intended size before attaching the legs.
- Attach the trouser legs. Position the two leg tubes symmetrically and sew around the openings. Add a shaped gusset if the crotch area pulls or restricts movement.
- Attach the ankle cuffs. Match the cuff seams with the inner leg seams and sew evenly around each opening.
- Position the shoulder straps. Pin both straps to the back upper edge at equal distances from the center. Check the strap length before sewing.
- Attach the buttons. Mark the corresponding positions on the front bib and sew the buttons through a reinforced fabric area. Do not use loose or poorly anchored buttons on baby clothing.
- Add the decorative braid. Center the raised braid on the front and secure it without pulling the surrounding stitches.
- Finish the bonnet. Attach the ribbed edging and decorative cords, then check the crown depth and face-opening width.
- Complete the finishing. Weave in all ends, inspect seams, remove temporary markers, and measure the garment after gentle washing and drying.
The completed set consists of one lavender romper with shoulder straps and a central braid, plus one matching textured bonnet.
7 Technical Tips for Better Results
- Track the increase rows. Place stitch markers at Rows 9 and 15 of the body panels. Missing either increase row produces unequal front and back widths.
- Measure the gauge after washing. A difference of two stitches per 10 cm can noticeably change the chest circumference. Measure the dried swatch before deciding whether to change hook size.
- Keep both trouser legs symmetrical. Count all 28 rows before joining each leg. A two-row difference can create visibly uneven ankle lengths.
- Check the braid placement. Pin the decorative braid to the center of the front panel before sewing. A deviation of even 1 cm can make the cable appear off-center.
- Check bonnet crown dimensions. Do not assume that 72 stitches produce the correct head circumference with every DK yarn. Measure the finished crown against the intended head measurement.
- Avoid tight ribbing. Test the ankle cuffs without stretching the fabric excessively. A cuff that contracts too much may leave pressure marks on the baby’s skin.
- Inspect attached details. Check the buttons, cords, and pom-poms before each supervised use. Loose components and long ties present hazards for infants.
How to Adjust the Size
The stitch counts above are drafted around an estimated 0–3 month size. They are not a tested multi-size grading system. To make a larger version, begin by measuring the baby’s chest, torso length, crotch depth, upper-leg circumference, and ankle circumference.
For example, at a gauge of 18 stitches per 10 cm, a panel width of 24 cm requires approximately 43 stitches before any seam allowance. Calculate each panel separately, then compare the planned garment circumference with the desired wearing ease.
Increase the leg length by adding rows in the straight sections rather than adding stitches around the ankle. For the bonnet, use the actual head circumference and crown depth as the primary measurements.
Record every adjustment. This allows the second leg, shoulder straps, and bonnet sides to match the modified dimensions.
Choosing the Best Yarn for Baby Overalls
DK cotton-blend yarn is a practical starting point because it provides visible stitch definition for the textured body and decorative cable. The smooth yarn also helps the ribbed cuffs maintain their shape.
Pure cotton may produce a heavier garment with less recovery, especially around the straps. Acrylic blends often have more elasticity but vary in softness, warmth, and washing performance.
Choose yarn that is suitable for baby garments and follow the manufacturer’s laundering instructions. Avoid heavily shedding fibers, loose decorative strands, and embellishments that can be pulled free.
Washing and Garment Care
Wash the completed crochet baby outfit according to the yarn label. Use a gentle cycle if machine washing is permitted, preferably inside a mesh laundry bag.
Lay the garment flat to dry and reshape the body panels, leg cuffs, and bonnet opening while damp. Hanging a wet cotton garment can stretch the shoulder straps and distort the center braid.
After washing, inspect the seams and any attached buttons. Decorative bonnet cords and pom-poms require particular attention because repeated laundering can weaken their attachment points.
Frequently Asked Questions
Is this crochet baby overalls pattern suitable for beginners?
The individual single crochet sections are accessible to crocheters familiar with basic stitches. However, the garment requires accurate measurements, shaping, seaming, and fitting adjustments. Intermediate experience is recommended.
Can I use worsted-weight yarn instead of DK yarn?
Yes, but a thicker yarn changes the stitch gauge and finished measurements. Make a new swatch and recalculate the panel widths before following the row instructions.
Can the romper be made without the decorative braid?
Yes. The braid is an applied embellishment and does not support the garment structurally. Omitting it produces a simpler textured baby romper.
How do I make the bonnet fit correctly?
Measure the baby’s head circumference and compare it with the bonnet opening. The crown must provide adequate depth without slipping over the face or applying excessive pressure.
Can this outfit be worn for sleeping?
No. The photographed design includes buttons, long bonnet ties, and decorative pom-poms. The bonnet and its accessories should not be used during sleep or while the baby is unattended.
Conclusion
This lavender crochet baby overalls pattern combines a textured body, shaped trouser legs, ribbed cuffs, shoulder straps, and a raised decorative braid. The matching bonnet completes the two-piece design, with ribbed edging and optional decorative ties for supervised photography.
Before making the full garment, crochet a gauge swatch and compare the proposed dimensions with a correctly sized baby outfit. Record any changes to the chest width, leg length, crotch depth, and bonnet circumference.
After completing a tested version, share a photograph on Pinterest or Instagram using #LavenderBabyOveralls. Which front-braid width gives the best proportion between the shoulder straps and the lower romper section?









