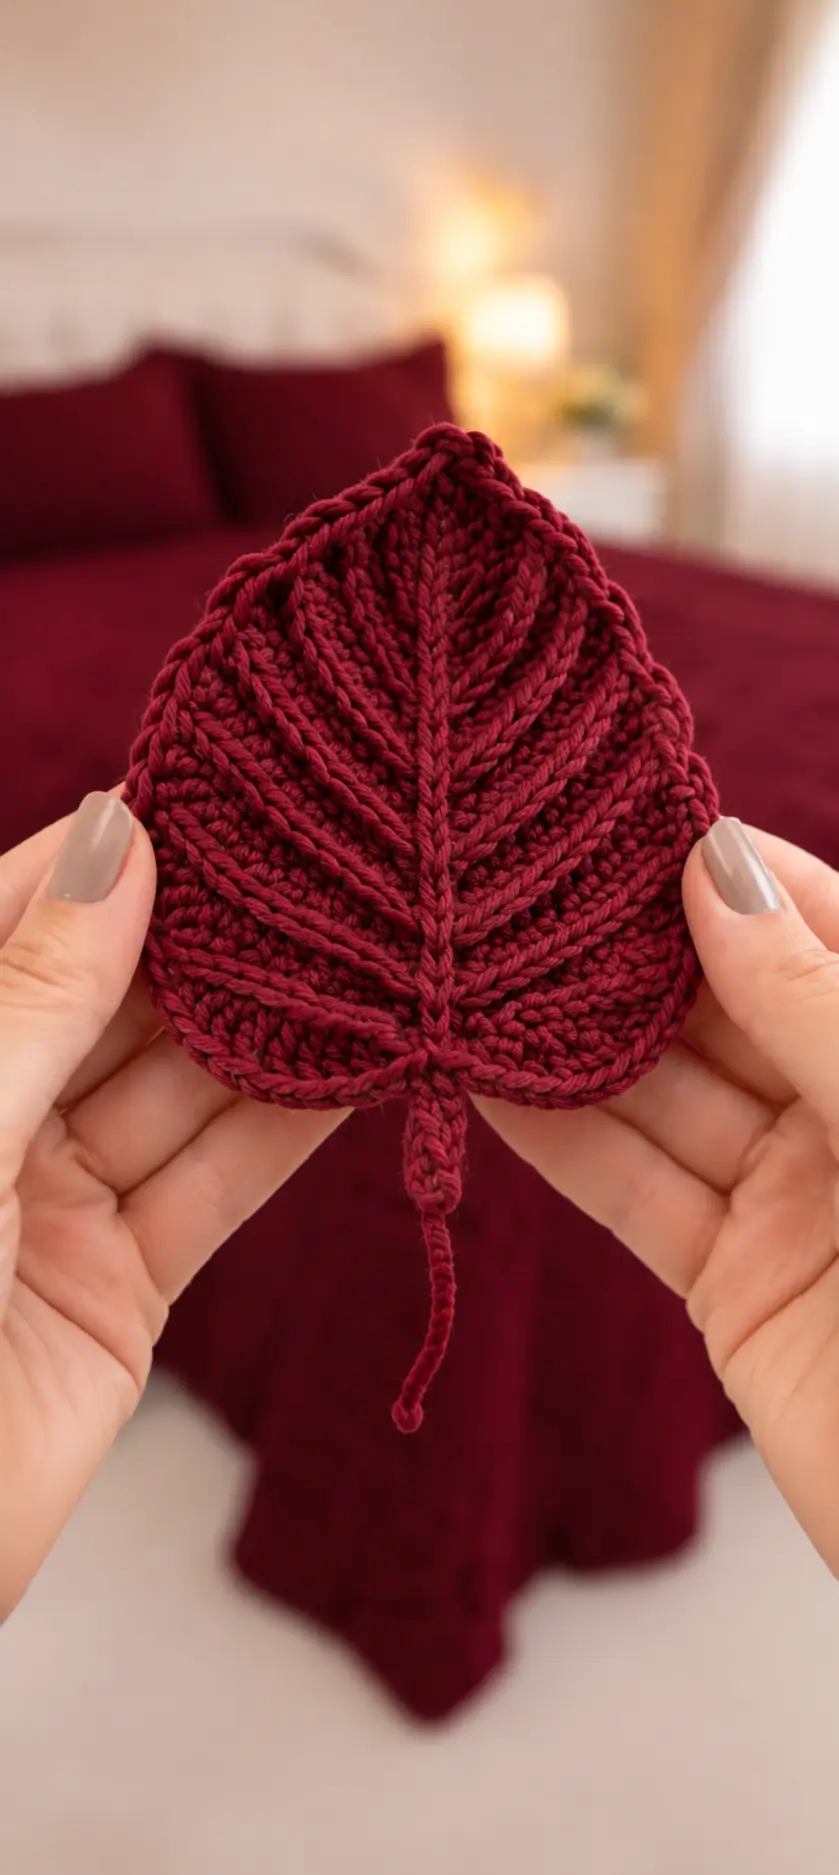
A leaf looks convincing only when its veins control the direction of the fabric. This burgundy crochet leaf pattern uses a pointed oval silhouette, a strong raised center vein, angled side veins and a narrow stem to reproduce the structured appearance shown in the reference. The motif works well as an appliqué for hats, scarves, bags, blankets, table decorations and autumn accessories.
The Design: What Makes This Crochet Leaf Different
The defining feature is not the outer edge. It is the internal vein structure. A central spine runs from the stem almost to the pointed tip, while raised diagonal lines divide both sides into narrow sections. Those lines visually lengthen the leaf and give a simple one-color motif considerably more definition.
The shape is widest below the midpoint and then decreases progressively toward the tip. A short lower curve forms two rounded shoulders beside the stem. Burgundy yarn makes the relief particularly visible because shadows collect beside each raised line.
The construction below treats the leaf as a flat decorative motif. No stuffing is required, and the finished dimensions can be changed by altering the foundation length and yarn weight.
Project Information at a Glance
| Skill Level | Construction | Target Size | Hook | Best For |
|---|---|---|---|---|
| Intermediate | Flat leaf with surface veins | Approximately 14–17 cm plus stem | 3.5–4.0 mm | Appliqués, décor, accessories |
Materials and Tools
Yarn
- Burgundy — DK or light worsted yarn — approximately 15–25 g per leaf
A smooth yarn with clear stitch definition is preferable. Highly fuzzy fibers can hide the narrow raised veins.
Tools
- 3.5–4.0 mm crochet hook
- Yarn needle
- Scissors
- Stitch markers
- Blocking mat
- Rust-resistant pins
Abbreviations
- ch — chain
- sl st — slip stitch
- sc — single crochet
- hdc — half double crochet
- dc — double crochet
- tr — treble crochet
- BLO — back loop only
- FLO — front loop only
- st/sts — stitch/stitches
Finished Measurements
With DK or light worsted yarn and a 3.5–4.0 mm hook, aim for a leaf approximately 14–17 cm long and 10–13 cm across its widest point. The narrow stem can add another 4–7 cm.
These are project targets rather than fixed measurements. Make a larger motif with worsted yarn and a larger hook, or reduce both yarn and hook size for appliqué work.
Construction Overview
The motif is made in four stages:
- Create a central foundation that establishes the leaf length.
- Work around both sides of that foundation to form the pointed oval body.
- Add a stabilizing outer edge.
- Surface crochet the central and diagonal veins before adding the stem.
Keeping the body and decorative veins separate makes the geometry easier to control.
Leaf Body
Foundation
With burgundy yarn, ch 24.
Mark the first chain and the final chain. The foundation chain becomes the visual center line of the leaf, so avoid twisting it.
First Side
Beginning in the second chain from the hook:
1 sc, 2 hdc, 3 dc, 5 tr, 5 tr, 3 dc, 2 hdc, 1 sc.
Distribute the stitches gradually along the foundation rather than forcing the tallest stitches into a short section. The goal is a continuous increase in height toward the broad middle area followed by a controlled reduction toward the upper tip.
Work 3 sc into the final chain to turn around the tip.
Second Side
Work down the opposite side of the foundation chain, mirroring the stitch heights:
1 sc, 2 hdc, 3 dc, 5 tr, 5 tr, 3 dc, 2 hdc, 1 sc.
Join at the lower center with sl st.
Do not fasten off yet.
Shaping the Pointed Tip
The top of the reference leaf forms a distinct point rather than a round oval.
When working the next edging round, place:
(sc, ch 2, sc) into the center stitch at the tip.
The ch-2 space creates a small structural point. It should project only slightly beyond the body.
If the point curls backward, reduce the corner to ch 1. If it disappears after blocking, use ch 3.
Outer Shaping Round
Work sc around the entire leaf.
Along the lower third, work one sc in each available stitch.
Across the broad middle section, add a few increases at evenly spaced positions:
2 sc in one stitch approximately every 6–8 stitches.
Reduce the frequency of increases as you approach the upper third.
At the tip, work (sc, ch 2, sc).
Mirror the placement of the increases on the second side.
The finished outline should remain flat. A ruffled perimeter indicates too many increases.
Lower Leaf Shoulders
The base of the leaf has two rounded sections on either side of the stem.
Near the lower left side, work:
sc, hdc, 2 dc in next st, hdc, sc.
Repeat symmetrically on the lower right side.
These compact increases broaden the base without making the whole leaf circular.
Final Edge
Work one round of sl st loosely around the perimeter.
This produces the corded outline visible around the reference motif.
Do not pull the slip stitches tight. A tight final edge will cup the leaf and prevent it from lying flat.
Raised Central Vein
The center vein is the main structural detail.
Lay the leaf flat with the right side facing upward.
Join burgundy yarn at the lower center immediately above the stem position.
Surface sl st directly over the original foundation line, moving toward the tip.
Continue until approximately 1 cm before the pointed end.
Fasten off on the wrong side.
The line should sit visibly above the leaf surface without drawing the two sides together.
Alternative Raised Center Vein
For a thicker central vein, surface crochet with sc instead of slip stitches.
Insert the hook from the front through the fabric, pull up a loop and work a compact sc along the center line.
This version produces stronger relief but also adds stiffness. Use it when the leaf will be attached to a bag, cushion or table decoration rather than a soft garment.
Diagonal Side Veins
The reference uses several narrow diagonal veins branching from the central spine toward the edge.
Mark four or five points along each side of the center vein.
Space the marks approximately 1.5–2 cm apart.
Each side vein should angle upward toward the outer edge rather than extending horizontally.
First Vein
Join yarn near the lower third of the central vein.
Surface sl st diagonally toward the outer edge.
Stop approximately one stitch before the perimeter.
Fasten off.
Remaining Veins
Repeat the same process higher on the leaf.
Make the lower veins longer and gradually shorten each vein toward the pointed tip.
Mirror the general placement on the opposite side.
Exact symmetry is not necessary, but both halves should carry similar visual weight.
Continuous Vein Method
If you prefer fewer yarn tails, several veins can be worked with one strand.
Complete one surface-crochet vein, then move the yarn across the wrong side to the next starting point. Bring the hook back through the fabric and crochet the next line.
Keep the floats on the back loose. Tight floats will gather the leaf after blocking.
Creating the Stem
Join burgundy yarn at the bottom center.
Ch 14–20, depending on the required stem length.
Starting in the second chain from the hook, sl st back along every chain.
Join to the base of the leaf with another sl st.
Fasten off.
This creates a thin flexible stem similar to the one shown in the reference.
Thicker Stem Option
For table decorations or garlands, a slightly thicker stem can hold its shape better.
Ch 16.
Work one sc into each chain back toward the leaf.
For additional firmness, work a second row of slip stitches along the stem.
Avoid making the stem as thick as the central vein. The transition should narrow visibly below the leaf.
Defining the Lower Center
The two sides of the leaf should meet in a shallow V directly above the stem.
If the lower edge is too rounded, use the yarn needle to make one small anchoring stitch between the two lower shoulders.
Pull only until the V becomes visible. Excessive tension will fold the entire motif vertically.
Blocking the Leaf
Blocking is particularly important for this design because the surface veins can distort the base fabric.
Dampen the finished leaf according to the yarn fiber.
Pin the center vein first so it remains straight.
Next pin the pointed tip and both lower shoulders.
Spread the widest part of the leaf evenly, then position the side edges.
Allow the motif to dry completely before removing the pins.
Size Variations
| Version | Yarn | Hook | Approximate Leaf Length |
|---|---|---|---|
| Small Appliqué | Sport / #2 | 2.5–3.0 mm | 8–11 cm |
| Medium Leaf | DK / #3 | 3.5 mm | 12–15 cm |
| Large Decorative Leaf | Light Worsted / #4 | 4.0–4.5 mm | 15–19 cm |
| Oversized Leaf | Bulky / #5 | 5.5–6.5 mm | 20–26 cm |
Using the Leaf as an Appliqué
For a hat or cardigan, sew the motif through the central vein and several points around the outer edge.
Do not stitch every millimeter of the perimeter. Leaving small sections free preserves the raised structure.
When attaching the motif to stretchy fabric, stretch the base fabric slightly before sewing. Otherwise the appliqué may restrict the garment when worn.
Making a Crochet Leaf Garland
Make 7–11 leaves in burgundy, rust, mustard, olive and warm brown.
Leave each stem intact.
Crochet a long chain and attach the stems approximately 10–15 cm apart.
Rotate neighboring leaves slightly so the points do not all face in the same direction.
For a more structured garland, add small crocheted berries between groups of leaves.
Turning the Motif into a Table Decoration
Use cotton or a cotton-blend yarn and increase the leaf to approximately 18–22 cm.
Make several motifs and overlap their edges slightly along the center of a table.
The raised veins remain visible even in a single-color arrangement, so the runner does not require complicated color changes.
For a connected version, join neighboring leaves at two or three outer-edge points with small chain bridges.
Two-Color Version
The leaf can also be worked with contrasting veins.
Make the body in burgundy and use cream, blush, gold or muted olive for the central and side veins.
Keep the outer edging in the body color to preserve the silhouette.
A contrasting central vein produces a more graphic motif, while same-color surface crochet gives the subtler embossed effect shown in the reference.
Assembly
- Crochet the central foundation chain to establish the total leaf length.
- Work graduated stitch heights along the first side to build the lower shoulder, broad middle and upper taper.
- Turn around the tip and mirror the stitch heights along the second side.
- Add controlled increases around the broad sections and form a defined point at the top.
- Shape the two lower shoulders symmetrically around the stem position.
- Work the loose slip-stitch perimeter and check that the motif remains flat.
- Surface crochet the raised central vein from the lower center toward the tip.
- Add four or five angled side veins on each half, shortening them progressively near the top.
- Crochet the narrow stem from the lower center and weave all yarn tails into the wrong side.
- Block the leaf with the central vein straight, the tip sharp and both sides evenly spread.
The completed motif should have a pointed oval outline, a narrow lower stem and clearly visible raised veins without puckering between the vein lines.
7 Technical Tips
- Leaf curls into a bowl: the outer round is too tight or contains too few increases. Add one increase every 6–8 stitches across the widest areas while leaving the upper taper comparatively firm.
- Edge begins to ruffle: too many stitches were added around the perimeter. Remove increases first from the upper third because that section needs to narrow toward the point.
- Center vein puckers the fabric: surface slip stitches are shorter than the underlying leaf. Pull each surface loop to the natural height of the base stitch before making the next one.
- Side veins look horizontal: their outer endpoints are positioned too low. Move each endpoint approximately 1–2 cm toward the tip to create the upward branching angle.
- Point becomes rounded: the tip lacks a defined chain space. Use a compact (sc, ch 2, sc) at the top and pin that chain space during blocking.
- Stem twists: slip stitches were worked too tightly along the return chain. Use a hook 0.5 mm larger for the stem or switch to single crochet for a flatter result.
- Finished leaf becomes asymmetrical: one side has different stitch-height placement. Place markers at the widest point and upper taper before working the second side so the shaping can be mirrored accurately.
Care and Finishing
Weave tails through several stitches on the wrong side without crossing open areas. Trim only after the motif has been blocked and checked for loose ends.
Cotton leaves can usually tolerate firmer wet blocking. Acrylic motifs respond better to gentle steam held above the fabric rather than direct heat.
Store finished appliqués flat. Folding through the central vein can create a permanent ridge that changes the intended shape.
Conclusion
The defining detail of this burgundy crochet leaf pattern is the relationship between the raised center spine and the progressively shorter diagonal veins. Crochet the flat body first, check that both halves match, then add the surface details only after the outline is stable. For the next step, make one test leaf and block it to its final dimensions before producing a full set for a garland, table runner or garment appliqué. Finished versions can be shared on Pinterest or Instagram with #BurgundyRaisedVeinLeaf. Would you use the same burgundy yarn for the veins, or make the center and side veins in a contrasting cream?









