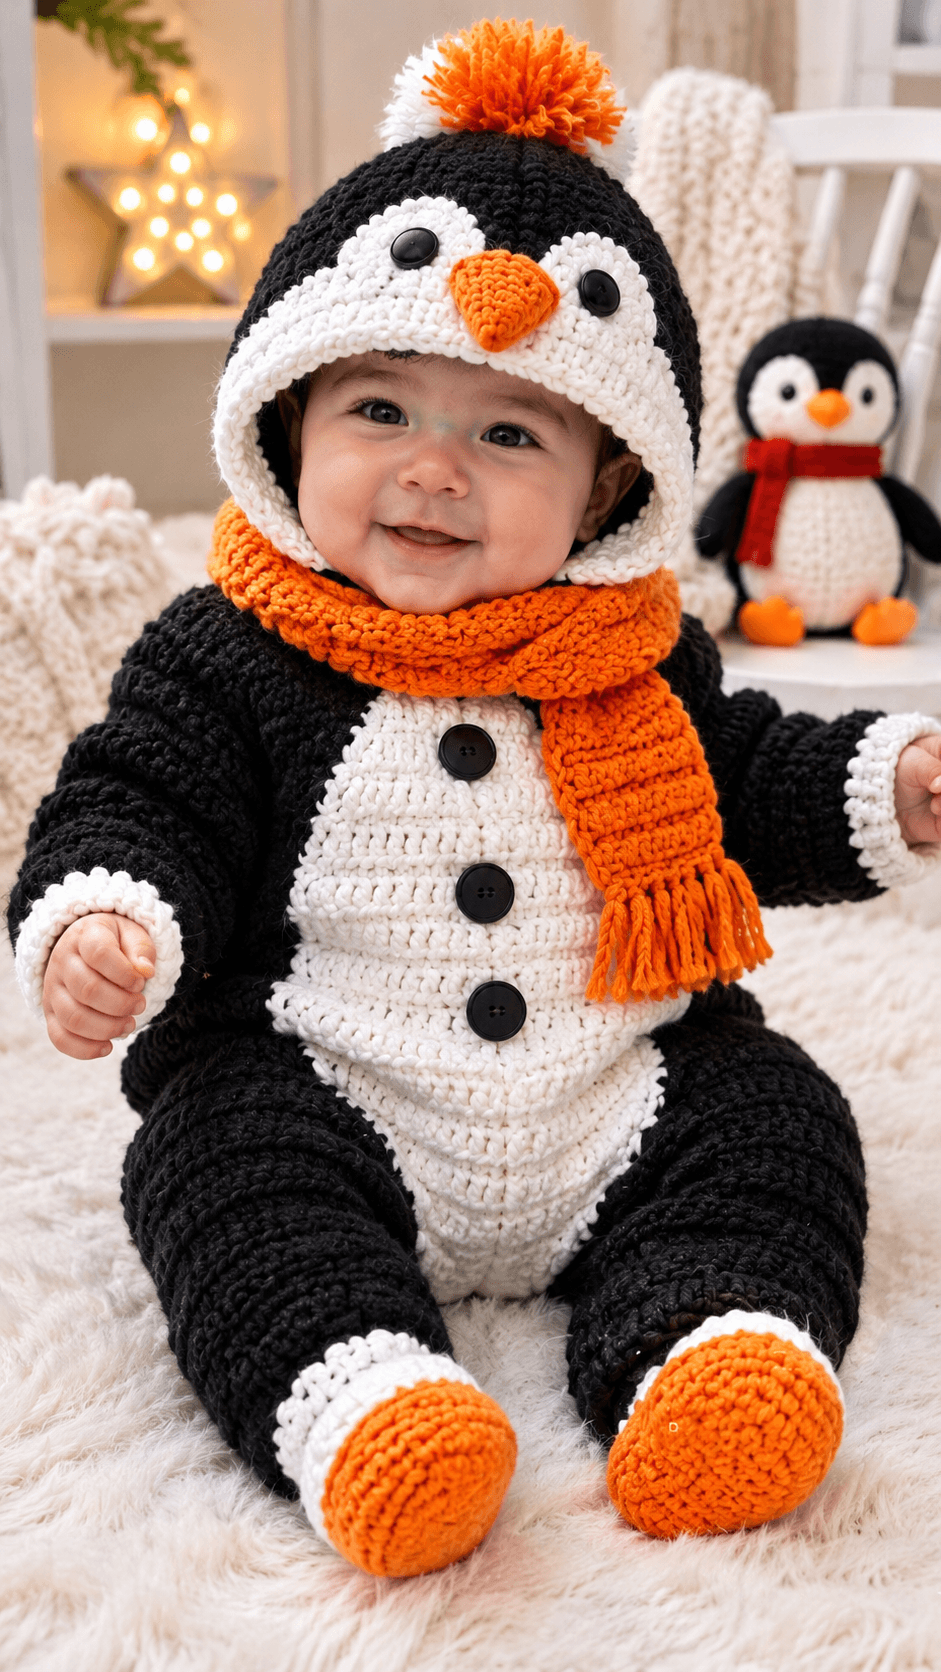
A penguin costume depends on one unmistakable proportion: the white belly must sit inside a much darker body while the orange beak stays centered above it. This baby penguin crochet costume pattern recreates that structure as a soft black-and-white romper with a penguin hood, orange scarf, contrasting cuffs and rounded orange foot covers. The construction below is photo-inspired and designed to be adjusted from the baby’s actual measurements.
The Design: What Makes This Penguin Costume Different
The costume combines clothing construction with character details rather than treating the penguin as a flat appliqué. A black outer body forms the silhouette, while a large cream belly panel breaks up the front. The hood carries two white eye patches and a dimensional orange beak, creating the penguin face without adding complicated shaping to the romper itself.
The legs remain roomy for sitting and crawling, and the orange foot sections provide the strongest color contrast. An orange scarf repeats the beak and foot color near the face.
For an infant garment, removable or securely attached decorative components require particular attention. Small buttons and other detachable pieces can present a choking hazard, so embroidered or crocheted alternatives are preferable for babies who may pull objects toward their mouths.
Project Information at a Glance
| Skill Level | Construction | Yarn | Suggested Hook | Fit Method |
|---|---|---|---|---|
| Intermediate | Romper + hood + scarf + appliqués | Worsted #4 | 4.5–5.0 mm | Baby measurements |
Materials and Tools
Yarn
- Black — worsted #4 — main body, sleeves, legs and hood
- Warm White / Cream — worsted #4 — belly, hood face, cuffs and ankle bands
- Bright Orange — worsted #4 — beak, scarf, pom-pom and feet
- Small amount of black — embroidery for facial details if required
Tools
- 4.5–5.0 mm crochet hook
- Yarn needle
- Stitch markers
- Scissors
- Measuring tape
- Pom-pom maker or cardboard template
Important Baby-Safety Note
For a costume intended for an infant, avoid loose buttons, beads, safety eyes, long cords and other detachable decorations. Crochet or embroider the hood eyes instead of using hard plastic pieces. Keep the scarf short enough that it cannot wrap repeatedly around the neck, and use the costume only with normal adult supervision.
Abbreviations
- ch — chain
- sc — single crochet
- hdc — half double crochet
- dc — double crochet
- inc — 2 stitches in the same stitch
- dec — decrease
- sl st — slip stitch
- BLO — back loop only
- st/sts — stitch/stitches
- RS — right side
- WS — wrong side
Measurements Before You Crochet
Baby clothing should be sized from measurements rather than age alone. Record the chest circumference, shoulder-to-crotch length, shoulder-to-wrist length, thigh circumference, inseam and head circumference.
Add approximately 5–8 cm of positive ease to the chest for a relaxed costume fit. The finished crotch should also have enough depth for a diaper without pulling the neckline downward.
Make a 12 × 12 cm gauge swatch in hdc. Wash and dry it as the finished costume will be treated, then measure the central 10 cm.
Main Penguin Romper
Upper Body
With black yarn, chain enough stitches to reach approximately half of the planned chest circumference plus ease.
Row 1: Hdc in the second chain from the hook and in each chain across. Turn.
Row 2: Ch 1, hdc in each st across. Turn.
Repeat Row 2 until the panel reaches from the shoulder line to approximately the upper waist.
Make a matching back panel.
For a pullover version, leave an appropriate neckline opening. For easier dressing, divide the back or front opening and add a secure closure positioned where the baby cannot easily reach it.
Armholes
Mark the required armhole depth on both sides of the front and back.
Join the shoulder sections first. Then join the side seams from the lower edge upward, stopping at the armhole markers.
Measure both openings before starting the sleeves. They should match closely.
White Penguin Belly Panel
The belly is worked separately so the black garment remains structurally simple.
With cream yarn, chain a foundation approximately 40–45% of the finished chest width.
Row 1: Hdc across.
Rows 2–4: Ch 1, hdc across.
Begin shaping the lower belly by increasing one stitch near both ends every second or third row.
Continue until the panel reaches its maximum width.
Work even through the central section.
Near the upper chest, decrease gradually at both sides to create a rounded top.
Fasten off with a long sewing tail.
Pin the panel to the black front before sewing. The bottom can extend toward the crotch, while the upper edge should stop below the neckline.
Attaching the Belly
Sew around the outer edge using small, flexible stitches.
Do not stretch the cream panel while attaching it. A stretched appliqué will cause the black body fabric to gather after washing.
Check the garment from the inside and remove any loose loops or long floats.
Lower Romper and Crotch
Continue the body downward in black or construct the lower section separately and seam it to the upper body.
Increase gradually at the sides as required for the diaper area.
When the body reaches the crotch, divide the stitches approximately in half for the two legs.
Place a marker at the center front and center back.
Work each leg separately.
Black Legs
Join black yarn to the first leg opening.
Round 1: Hdc evenly around. Join with sl st.
Rounds 2 onward: Ch 1, hdc around.
Decrease only when needed to follow the leg measurement. The costume should remain loose through the thigh and knee.
Stop the black section above the ankle.
White Ankle Bands
Change to cream.
Round 1: Sc evenly around.
Round 2: Hdc around.
Round 3: Hdc around or work BLO hdc for a subtle ridge.
Fasten off if the orange feet will be made separately.
Orange Penguin Foot Covers
The orange sections should resemble rounded penguin feet rather than tightly fitted baby shoes.
Sole
With orange, chain to approximately 1–1.5 cm shorter than the measured foot length.
Work around both sides of the foundation chain.
Place several hdc stitches into each end to create an oval.
Continue for another round, increasing at both rounded ends until the sole lies flat.
Upper Foot
Work one round in BLO to turn the fabric upward.
Continue with sc or hdc.
Decrease gradually across the toe section while keeping the heel relatively straight.
Stop when the opening fits comfortably around the ankle.
Attach the orange foot section securely to the cream ankle band if it is intended to be part of the costume.
Sleeves
With black yarn, join at the underarm.
Round 1: Hdc evenly around the armhole.
Continue in joined or continuous rounds.
Decrease gradually as required until the sleeve reaches the wrist measurement.
Do not make the sleeve tight at the forearm.
White Wrist Cuffs
Change to cream approximately 3–4 cm before the required sleeve length.
Work 2–4 rounds of sc or hdc.
For a slightly ribbed cuff, work the final rounds in BLO.
Fasten off and repeat for the second sleeve.
Penguin Hood
The hood is worked mainly in black and should be large enough to sit around the head without pulling against the neck.
Hood Rectangle Method
Measure from the base of one side of the neck, over the crown, to the opposite side.
Use approximately half that measurement as the starting width for a folded hood panel, adjusting according to gauge.
With black yarn, chain the required width.
Work hdc rows until the panel reaches from the forehead to the back neckline.
Fold the panel and seam the back edge.
Attach the lower edge around the neckline while leaving the front open.
White Hood Face Band
Join cream around the front hood opening.
Work 2–4 rounds of sc or hdc, depending on the desired width.
The cream section can be slightly wider across the forehead to imitate the white face of a penguin.
Keep the opening clear of the eyes and mouth.
White Eye Patches — Make 2
With cream yarn, make a small oval.
Round 1: Ch 5. Work sc in the second ch and next 2 chains, 3 sc in the last chain. Continue along the opposite side, sc in next 2 chains, 2 sc in the final chain.
Round 2: Increase around both curved ends while working one sc in the straight-side stitches.
Fasten off with a long tail.
Make the second patch the same size.
Safe Eye Detail
Embroider a black circular pupil directly onto each cream patch using black yarn.
Fill the center densely enough that the cream yarn does not show through.
Sew both eye patches to the hood before attaching the beak.
Measure from the hood centerline so the eyes are positioned symmetrically.
Orange Penguin Beak
With orange yarn, ch 2.
Row 1: 2 sc in second ch. Turn. (2)
Row 2: Ch 1, inc in first st, sc in next st. (3)
Row 3: Ch 1, inc, sc, inc. (5)
Row 4: Ch 1, sc across. (5)
Row 5: Inc at both ends. (7)
Fasten off.
Make a second matching triangle if a thicker dimensional beak is wanted.
Place the two pieces together and sc around the edges, leaving the upper edge available for attachment.
Sew the beak between and slightly below the eye patches.
Orange Hood Pom-Pom
Make a medium orange pom-pom approximately 6–8 cm in diameter for the visual effect shown in the reference.
For a costume worn by a very young infant, a flat crocheted pom-pom substitute is a safer option because strands cannot be pulled free as easily.
To make the flat version, crochet several small orange loops into a circular base and stitch the entire base firmly to the crown.
Orange Scarf
The scarf is decorative, so keep it substantially shorter than an adult scarf.
With orange yarn, chain to the desired width.
Row 1: Hdc across.
Rows 2 onward: Ch 1, hdc across.
Continue until the scarf reaches the planned length.
Finish both ends with sc.
For older children, short fringe can be added. For infants, omit loose fringe and long cords.
Optional Crochet Belly Dots
The reference costume uses dark circular details down the white belly. Instead of detachable buttons, crochet flat black circles.
With black yarn:
Round 1: 6 sc in MR. (6)
Round 2: Inc ×6. (12)
Fasten off with a long tail.
Make 2–3 circles.
Sew each circle around its complete circumference to the cream belly panel.
Fit Adjustments
| Area | Recommended Check |
|---|---|
| Chest | Add approximately 5–8 cm positive ease |
| Crotch | Allow additional diaper depth |
| Armhole | Should not pull when the arms move forward |
| Leg | Loose enough for sitting and bending |
| Hood | Must not pull backward against the neck |
| Wrist | Cuff should slide over the hand without force |
Assembly
- Block the front and back body sections lightly and confirm the chest, torso and crotch measurements.
- Join the shoulders and body sides, leaving accurately measured armholes.
- Attach the cream belly panel to the front without stretching either layer.
- Complete the lower body, divide for the legs and crochet both black leg sections.
- Add the cream ankle bands and orange foot covers, checking that the feet are not restrictive.
- Crochet and attach both black sleeves, then add matching cream wrist cuffs.
- Construct the black hood, add its cream face band, and attach it evenly around the neckline.
- Sew on the cream eye patches, embroider the pupils, and attach the orange crochet beak.
- Add the securely constructed crown decoration and crochet the short orange scarf.
- Weave every yarn tail into the WS, inspect all appliqués and seams, then wash according to the yarn instructions before the first wear.
The completed costume should remain loose through the torso and diaper area while the hood and appliqués provide the recognizable penguin shape.
7 Technical Tips
- Crotch pulling downward: insufficient diaper depth is the usual cause. Measure shoulder-to-crotch while the baby is wearing a diaper and add approximately 2–3 cm of movement allowance before finalizing the body length.
- White belly buckling: the appliqué was probably stretched during sewing. Pin the center top, center bottom and both sides first, then distribute the remaining edge without tension.
- Hood sliding backward: excessive hood depth places too much fabric behind the crown. Compare the hood depth with the forehead-to-back-neck measurement before seaming.
- Eye patches appearing uneven: do not position them by eye alone. Mark the hood centerline and measure equal distances to the left and right before sewing.
- Beak folding sideways: a single loose triangle lacks enough structure. Use two matching layers or add a tight sc edging before attachment.
- Sleeves restricting movement: the upper-arm circumference is too close to the body measurement. Include several centimeters of ease and check the armhole before finishing the cuff.
- Appliqué edges lifting: sewing only at a few anchor points leaves sections that small fingers can catch. Stitch around the complete perimeter of every flat decorative component.
Care Instructions
Use a washable yarn suitable for baby garments. Before the first wear, wash the completed costume according to the yarn label and dry it completely.
Inspect the eyes, beak, belly decorations and crown detail after every wash. Repair loose stitching before the garment is worn again.
Lay the costume flat to dry when possible. Shape the hood, white belly and orange feet while damp rather than stretching them after drying.
Conclusion
The defining structure of this baby penguin crochet costume pattern comes from the black silhouette, broad cream belly, penguin-face hood and concentrated orange accents. Start by making a gauge swatch and recording the baby’s chest, torso, head and foot measurements; those numbers should determine the garment dimensions rather than age alone. Crochet the body first, then test the proportions before adding the hood, belly and character details. For infant use, replace hard eyes and removable buttons with securely stitched crochet or embroidered versions. Share your finished costume on Pinterest or Instagram with #BabyPenguinCrochetCostume. Would you make the scarf bright orange like the beak and feet, or use red for a more traditional winter penguin?









