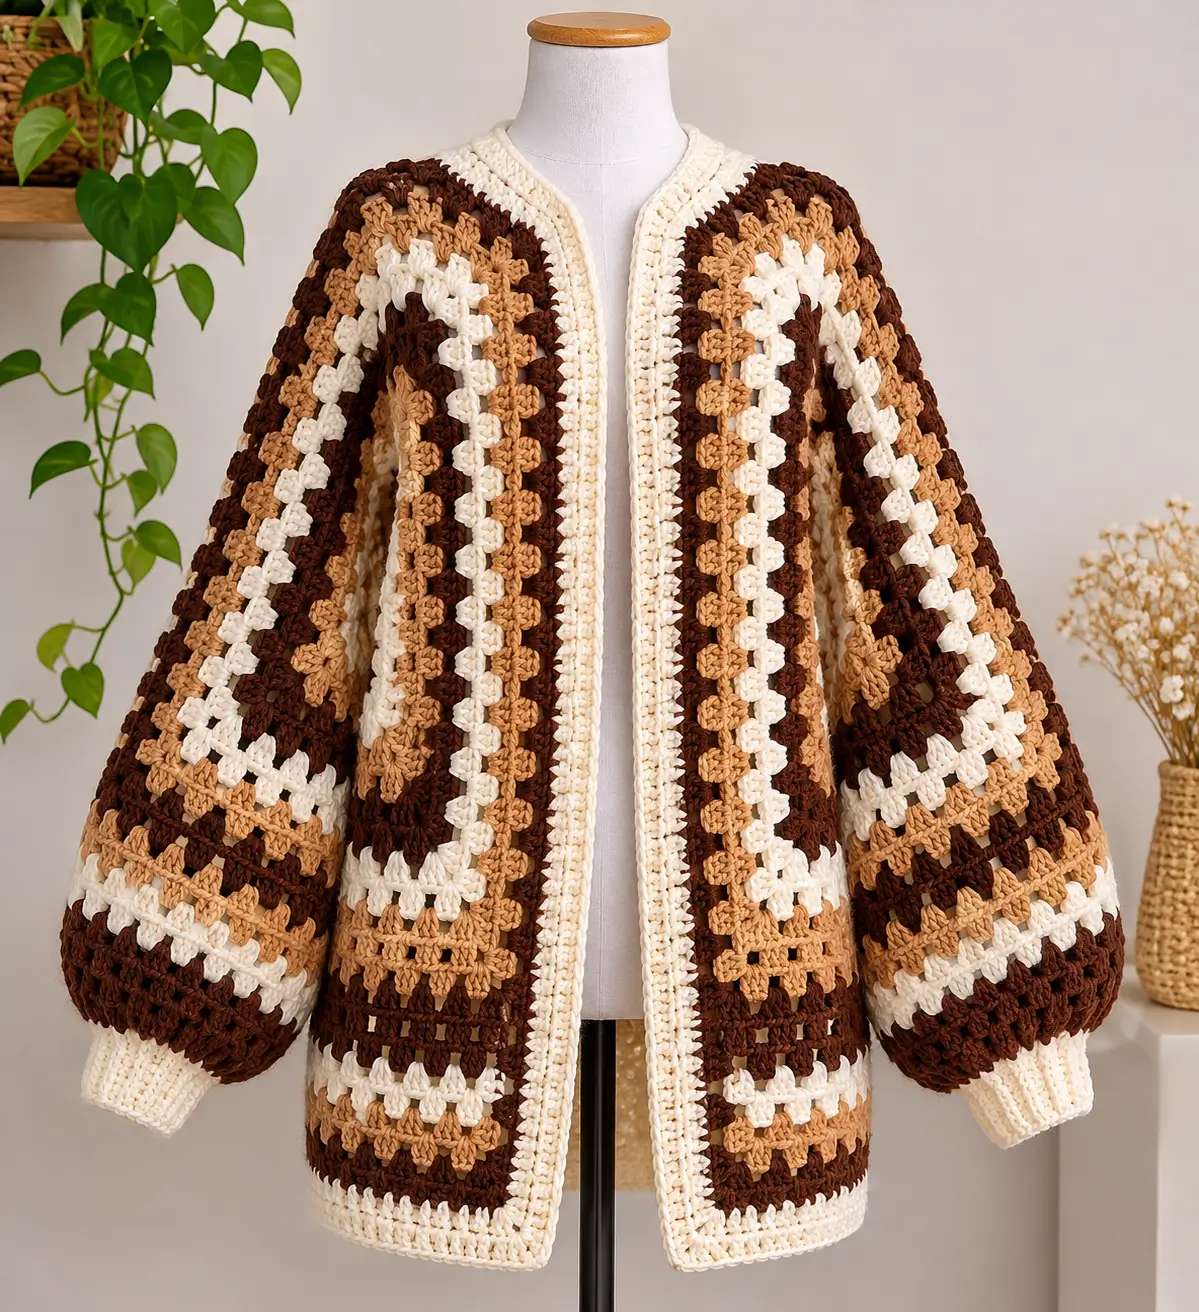
The alternating chocolate, caramel, and cream granny rows run from the shoulders into oversized balloon sleeves, so the color sequence has to remain balanced when the garment is assembled. This granny stitch crochet cardigan pattern creates a relaxed open-front cardigan with dropped shoulders, roomy sleeves, deep cream cuffs, and a structured cream border. It is worked from simple panels and adjusted from gauge rather than relying on one fixed stitch count.
The Design: What Makes This Granny Cardigan Different
The cardigan uses traditional granny-style clusters as the main fabric, but its proportions are closer to an oversized jacket than a classic fitted crochet cardigan. Broad body panels create the dropped shoulder line, while generous sleeve width produces the rounded balloon shape visible in the design.
Three neutral shades control the visual structure. Dark brown creates strong horizontal divisions, caramel softens the contrast, and cream opens the fabric and connects it to the front edging and cuffs.
The front border is deliberately denser than the granny fabric. This helps stabilize an open cardigan that would otherwise stretch vertically along the front edges. The same principle is used at the cuffs, where compact ribbing controls the much wider sleeve circumference.
Project Information at a Glance
| Skill Level | Construction | Suggested Yarn | Hook | Fit |
|---|---|---|---|---|
| Intermediate | Back + 2 fronts + 2 sleeves | Worsted #4 | 5.0–5.5 mm | Relaxed / oversized |
Materials and Tools
Yarn
- Cream — worsted #4 — borders, cuffs, and stripe sections
- Caramel — worsted #4 — main stripe color
- Chocolate Brown — worsted #4 — contrast stripe color
Use yarns from the same range when possible. Different fiber compositions can produce noticeably different row heights even when their labels list the same yarn weight.
Tools
- 5.0–5.5 mm crochet hook
- Stitch markers
- Measuring tape
- Yarn needle
- Scissors
- Blocking mats or a flat blocking surface
Abbreviations
- ch — chain
- sc — single crochet
- hdc — half double crochet
- dc — double crochet
- sl st — slip stitch
- sp — space
- st/sts — stitch/stitches
- BLO — back loop only
- RS — right side
- WS — wrong side
Granny Cluster Used in This Pattern
The basic cluster is:
3 dc in the same chain space.
Clusters are separated by ch 1.
On the following row, each new 3-dc cluster is worked into the ch-1 space between the clusters below.
This creates the small vertical openings visible throughout the cardigan.
Gauge and Sizing
Make a swatch at least 15 × 15 cm using the granny-cluster pattern. Wash and dry it before measuring.
Measure the number of complete granny clusters across 10 cm and the number of rows vertically across 10 cm.
For an oversized cardigan, measure the wearer’s bust and add approximately 20–30 cm of positive ease.
Example:
Bust measurement = 100 cm
Desired positive ease = 24 cm
Finished cardigan circumference = approximately 124 cm
Each half of the garment therefore needs to measure approximately 62 cm across when laid flat.
The back can use approximately half the total circumference, while the two front panels divide the remaining width with allowance for the open center front.
Suggested Finished Length
| Style | Approximate Length |
|---|---|
| Waist length | 50–55 cm |
| Hip length | 60–70 cm |
| Long hip length | 70–80 cm |
The cardigan in the reference design finishes around the lower hip. Measure from the shoulder to the desired hem before calculating the number of rows.
Color Sequence
A repeating stripe sequence keeps the three colors distributed across the garment.
One practical sequence is:
- 2 rows cream
- 2 rows caramel
- 2 rows chocolate brown
- 2 rows caramel
- 2 rows cream
- 2 rows chocolate brown
Repeat while occasionally changing the order of the neutral bands if you want the less rigid patchwork appearance shown in the design.
Record every row on the back panel. Use that record when making both fronts and sleeves.
Back Panel
With the first color, chain to the calculated back width.
The foundation should accommodate complete granny repeats plus the turning stitches required by your edge treatment.
Row 1
Work 3 dc in the appropriate foundation chain, ch 1, skip the required foundation stitches, then work the next 3-dc cluster.
Continue across.
Row 2
Turn.
Work the edge stitches, then work:
3 dc in next ch-1 sp, ch 1.
Repeat across, ending with the matching edge stitch.
Rows 3 onward
Repeat Row 2 while following the selected color sequence.
Continue until the back reaches the desired cardigan length.
For the relaxed dropped-shoulder construction, the back can remain rectangular. Extensive armhole shaping is not required.
Left Front Panel
Calculate approximately half of the required front width, excluding the final cream front band.
Chain to this width.
Work the same granny-cluster pattern used for the back.
Follow the back-panel color sequence so the major stripes align at the side seam.
Continue until the panel matches the back length.
Right Front Panel
Make a second panel that mirrors the left front.
Place both fronts beside the back before joining.
Check that the stripe heights match at the shoulders and side seams.
A difference of one row can become very visible when dark brown and cream stripes meet.
Shoulder Assembly
Place the front panels against the back panel with right sides facing.
Align the outer shoulder edges.
Leave the center section open for the back neckline.
Join each shoulder using slip stitches, single crochet, or mattress stitch.
Do not pull the shoulder seam tighter than the granny fabric.
Creating the Dropped Shoulder
The oversized silhouette depends on body width rather than a heavily shaped armhole.
Lay the joined body flat.
Measure downward from each shoulder edge to mark the sleeve opening.
A relaxed adult cardigan may need an armhole depth of approximately 20–28 cm, depending on size and intended ease.
Mark the same distance on both sides.
Join the side seams from the hem upward, stopping at these markers.
Balloon Sleeves
The sleeves are intentionally wider than the wrists. Their excess circumference is gathered into the ribbed cuffs.
You can work each sleeve as a separate rectangle or crochet directly around the armhole.
Directly Attached Sleeve Method
Join yarn at the underarm.
Work granny clusters evenly around the armhole.
Count the clusters before beginning the second sleeve.
Join the round and turn if you want the texture to resemble back-and-forth granny rows.
Next Sleeve Round
Work one 3-dc cluster in each ch-1 space with ch 1 between clusters.
Continue around.
Repeat until the sleeve reaches approximately 5–8 cm above the desired wrist position.
Sleeve Shaping
Keep most of the sleeve width through the upper and middle sections. The photograph shows substantial volume close to the cuff.
If the sleeve becomes excessively wide, reduce a small number of granny spaces gradually rather than making one abrupt decrease round.
Stop the granny section before the cuff begins.
Preparing the Sleeve for the Cuff
Switch to cream.
Work one round of sc around the sleeve opening.
Decrease evenly across this round until the circumference approaches the intended wrist size.
A balloon sleeve may require a significant reduction.
Do not place all decreases in one section. Spread them evenly around the entire opening.
Work another round of sc if additional stability is required.
Cream Ribbed Cuffs
The deep cuffs are worked perpendicular to the sleeve edge.
With cream, ch approximately 10–14 stitches depending on the desired cuff depth.
Row 1
Sc in second ch from hook and across.
Row 2
Ch 1, turn.
Sc in BLO across.
Following Rows
Repeat Row 2 until the ribbing comfortably fits around the wrist.
Join the short edges.
Sew or crochet the cuff to the gathered sleeve opening.
Repeat for the second sleeve.
Alternative Attached Ribbing Method
Attach cream yarn directly to the sleeve edge.
Ch the required cuff depth.
Work back along the chain in BLO sc.
Attach the ribbing to the sleeve with one or two slip stitches.
Turn and work BLO sc back across the rib.
Continue until the ribbing travels completely around the sleeve.
Join the first and last ribbing rows.
Cream Front Border
The cream border frames both front edges and the neckline.
Join cream at the lower corner of the right front.
Border Row 1
Work sc evenly up the right front, around the back neckline, and down the left front.
Count stitches or mark equal sections so one front edge does not receive more stitches than the other.
Border Row 2
Ch 1 and work hdc in each stitch.
Border Row 3
Work sc in BLO across the entire border.
Border Row 4
Work hdc or sc across.
Repeat additional rows until the band measures approximately 3–5 cm wide.
The finished border should lie flat without rolling toward the body.
Hem Border
Join cream at one lower front corner.
Work sc evenly across the entire lower edge.
Work a second row of hdc.
Finish with one row of sc.
If the granny fabric stretches noticeably, use a slightly smaller hook for the final hem row.
Maintaining the Stripe Pattern
Lay the cardigan flat every 10–12 rows.
Check that the major cream and dark-brown sections remain visually balanced.
The stripes do not need to match perfectly across every component, but the two fronts should remain symmetrical.
The sleeves can use the same colors in a different sequence, provided both sleeves follow the same sequence.
How to Calculate Yarn Quantity
Because this cardigan contains substantial positive ease and wide sleeves, yarn requirements can vary considerably.
The most reliable method is to make and wash a gauge swatch, then weigh it.
For example, if a 20 × 20 cm swatch weighs 25 g, its area is 400 cm².
Estimate the combined area of the back, fronts, and sleeves, then calculate the approximate weight proportionally.
Add yarn for the cuffs, front border, hem, seams, and swatching.
Keep an additional 10–15% available, particularly when making a long or highly oversized version.
Customizing the Cardigan Length
For a cropped version, stop the front and back panels around the waist.
For the hip-length appearance shown here, continue until the panel covers the upper or lower hip.
A longer coat-style version can extend toward mid-thigh, but extra length increases garment weight.
When adding significant length, check the washed gauge carefully because granny fabric can stretch vertically after blocking.
Changing the Sleeve Style
Less Volume
Begin with fewer clusters around the armhole and make gradual decreases toward the wrist.
Full Balloon Sleeve
Maintain almost the entire upper-arm circumference until the final 5–8 cm, then gather the fabric into the cuff.
Straight Sleeve
Reduce gradually every several rounds until the sleeve reaches the desired wrist circumference, then add a shallower cuff.
Alternative Neutral Color Combinations
Mocha Palette
Combine dark espresso, mocha, oatmeal, and ivory.
Soft Natural Palette
Use cream, beige, mushroom, and taupe.
Autumn Palette
Replace caramel with burnt orange while keeping chocolate brown and cream.
Cool Neutral Palette
Use charcoal, medium gray, pale gray, and ivory.
Adding Pockets
Two patch pockets can be added to the lower fronts.
Make two identical granny rectangles approximately 15–20 cm wide, depending on garment size.
Add a compact sc border around each pocket.
Pin them at equal heights on the front panels.
Sew around both sides and the lower edge while leaving the upper edge open.
Keep pockets at least several centimeters away from the front band so they do not distort the cardigan opening.
Finishing the Underarms
Inspect the point where the sleeve meets the side seam.
This area carries more stress than most granny spaces.
If a visible hole remains at the underarm, use the matching yarn to close it with several controlled mattress stitches.
Do not pull the yarn tightly enough to create a hard knot in the fabric.
Blocking
Wash or dampen the cardigan according to the yarn label.
Lay it flat.
Arrange the front edges parallel to each other.
Match the sleeve lengths and shoulder widths.
Shape the cream front band while damp so it lies flat.
Do not stretch the granny spaces aggressively. Excessive blocking can make the garment longer and narrower.
Assembly
- Block the back and both front panels to their planned measurements before joining them.
- Place the two front panels against the back and join both shoulder seams while leaving the center back neckline open.
- Measure and mark identical armhole depths on the two side edges.
- Join the body side seams from the hem to the armhole markers.
- Crochet or attach both balloon sleeves and compare their length and cluster counts before adding cuffs.
- Gather each sleeve opening evenly and attach the cream BLO ribbed cuffs.
- Work the cream front band continuously from one lower corner, around the neckline, and down the opposite front.
- Add the lower hem border and reinforce the two underarm junctions if necessary.
- Weave every yarn tail into matching-color sections and inspect the color-change points for loose ends.
- Wash and block the completed cardigan flat, aligning the front bands, hem, shoulders, and cuffs before drying.
The finished cardigan should have parallel front edges, matching sleeve lengths, an even hem, and enough cuff tension to control the balloon sleeves without restricting the wrists.
7 Technical Tips
- Front panels becoming different widths: count complete granny clusters rather than judging width by eye. Both fronts should contain the same number of repeats before the cream edging is added.
- Side seams looking broken: major color bands that differ by more than one row become obvious after seaming. Place the panels together every 8–10 rows and compare stripe heights.
- Balloon sleeve losing its volume: beginning wrist decreases too early produces a tapered sleeve. Keep most of the circumference until approximately 5–8 cm before the cuff.
- Cuff becoming too loose: measure the wrist ribbing without stretching it aggressively. BLO sc ribbing should fit close to the wrist because the crochet fabric relaxes during wear.
- Front border rippling: too many stitches along the vertical front edges create waves. If the first border row ripples while lying flat, remove stitches before adding subsequent rows.
- Underarm holes forming: granny clusters can leave an opening where the sleeve, side seam, and armhole meet. Reinforce that junction with 2–4 matching mattress stitches after assembly.
- Finished cardigan growing too long: granny fabric can lengthen after washing. Measure row gauge from a washed swatch and block the panels before calculating the final sleeve and body lengths.
Care Instructions
Follow the washing instructions printed on the yarn label.
For a large handmade cardigan, washing in a garment bag can reduce unnecessary stretching and friction.
Support the full weight of the cardigan when wet.
Reshape it on a flat surface, paying particular attention to the shoulders, cuffs, hem, and front band.
Store folded rather than hanging for long periods. A heavy crochet cardigan can stretch at the shoulders when left on a hanger.
Conclusion
This brown and cream granny stitch crochet cardigan pattern is built around three measurements: blocked granny-cluster gauge, finished body circumference, and armhole depth. Make the back first, record its stripe sequence, and use it as the reference for both fronts before constructing the balloon sleeves. The cream cuffs and front border should be added only after the main garment dimensions have been checked, since these denser sections stabilize the more flexible granny fabric. Save the construction idea on Pinterest or share your finished neutral cardigan on Instagram with #NeutralGrannyCardigan. For your first customization decision, would you keep the chocolate-caramel-cream palette or replace caramel with an autumn rust shade?









