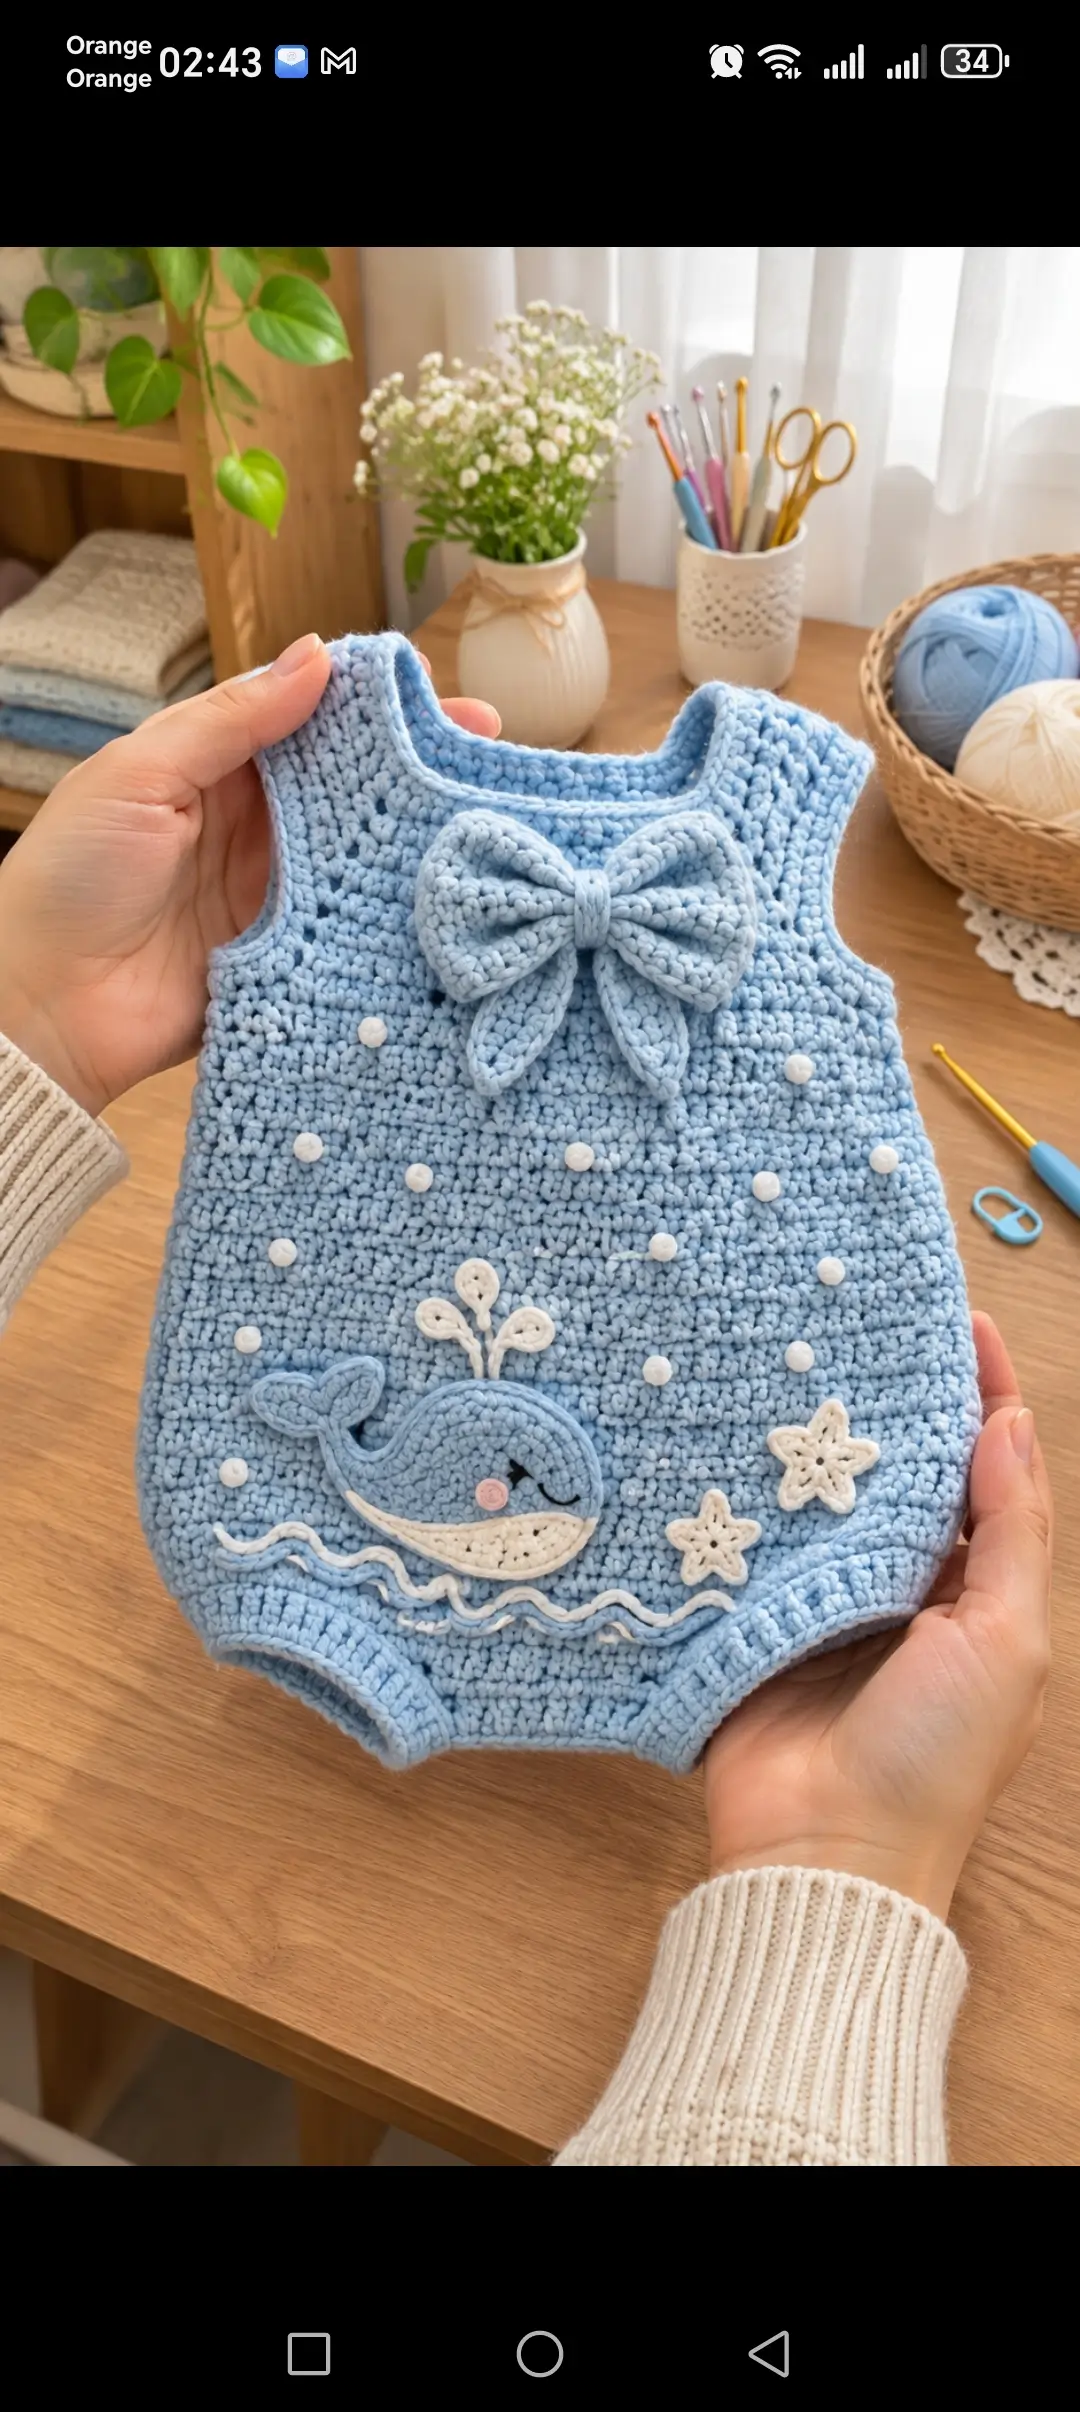
The whale sits low on the romper so the large bow can remain the visual center of the upper body without crowding the neckline. This blue whale baby crochet romper pattern uses a light-blue sleeveless body, shaped leg openings, a dimensional bow, white bubble details, a whale appliqué, small stars, and embroidered waves. The construction is designed as a photo-inspired project rather than an exact reproduction, and sizing should be adjusted from the baby’s measurements.
The Design: What Makes This Baby Romper Different
The romper combines a practical garment base with separate decorative crochet pieces. The main body stays relatively flat so it can sit comfortably against clothing or a diaper, while the bow and ocean motifs are added afterward. That separation matters: attaching bulky appliqués while shaping the garment can distort the body width.
The whale is positioned above the lower edge rather than directly on it, leaving enough space for the wave embroidery and leg shaping. Small white bobbles create the bubble effect without requiring large three-dimensional pieces.
The most important construction issue is the crotch and leg-opening fit. Decorative details can be adjusted freely, but the romper body must be measured before the final leg borders are added.
Project Information at a Glance
| Skill Level | Construction | Suggested Yarn | Hook | Best For |
|---|---|---|---|---|
| Intermediate | Flat panels + shaping + appliqués | DK #3 cotton or cotton blend | 3.5–4.0 mm | Baby romper / photo outfit |
Materials and Tools
Yarn
- Baby Blue — DK #3 — main romper, bow, and whale
- White — DK #3 — whale belly, bubbles, stars, and waves
- Black — small quantity — whale eye and mouth
- Soft Pink — small quantity — optional whale cheek
Tools
- 3.5–4.0 mm crochet hook
- Yarn needle
- Stitch markers
- Scissors
- Measuring tape
- Optional small buttons or snaps for the crotch
For baby clothing, use washable yarn with a smooth surface. Avoid loose beads, hard decorative pieces, or poorly secured embellishments.
Abbreviations
- ch — chain
- sc — single crochet
- hdc — half double crochet
- dc — double crochet
- inc — 2 stitches in the same stitch
- dec — crochet 2 stitches together
- sl st — slip stitch
- st/sts — stitch/stitches
- RS — right side
- WS — wrong side
Sizing Before You Crochet
Baby sizing varies considerably, so use body measurements rather than relying only on an age label. Measure the chest circumference, shoulder-to-crotch length, desired body width, and upper-leg circumference.
| Size | Approximate Chest Target | Approximate Shoulder-to-Crotch Length |
|---|---|---|
| 0–3 months | 43–46 cm | 34–38 cm |
| 3–6 months | 46–49 cm | 38–41 cm |
| 6–12 months | 49–52 cm | 41–45 cm |
These are working targets, not universal baby measurements. Compare the crochet fabric with a well-fitting romper whenever possible.
Gauge Swatch
Make a swatch at least 12 × 12 cm using the main blue yarn.
Work several rows of sc or hdc, wash the swatch as the finished garment will be washed, dry it flat, and measure the center 10 cm.
Calculate the starting stitch count with:
required width in cm × stitches per cm = starting stitches
This method keeps the pattern adaptable when yarn thickness or hook size differs.
Main Romper Body
The body can be constructed from a front and back panel. This approach makes the crotch and armhole shaping easier to control.
Front Panel — Lower Section
With baby blue, chain enough stitches to match the required lower front width.
Row 1: Sc in second ch from hook and across. Turn.
Row 2: Ch 1, sc across. Turn.
Row 3: Ch 1, hdc across. Turn.
Row 4: Ch 1, sc across. Turn.
Repeat Rows 3–4 until the lower body reaches the point where the leg openings need to begin.
Alternating sc and hdc creates the compact, slightly textured surface visible in the photograph.
Shaping the Leg Openings
Mark the center crotch section before decreasing either side.
Work the first side until the required leg opening begins.
Decrease one stitch at the leg edge on the following row.
Continue decreasing at that edge every row or every second row until the curve follows the intended leg opening.
Repeat symmetrically on the opposite side.
The exact number of decreases depends on gauge and baby size. Measure both openings after every few rows instead of forcing a fixed decrease count.
Front Upper Body
After completing the lower shaping, continue upward with the established sc/hdc texture.
Keep the sides straight through most of the torso.
Stop when the work reaches the lower armhole position.
Armhole Shaping
At the beginning of the next two rows, leave approximately 1.5–2.5 cm of stitches unworked or use a series of decreases to create a smooth curve.
Continue decreasing one stitch at each armhole edge for several rows if additional shaping is needed.
Once the required chest width is reached, work straight toward the neckline.
Front Neckline
Mark the center stitches.
Work one shoulder separately.
Decrease gradually at the neck edge while keeping the outer shoulder edge straight.
Fasten off when the required shoulder height is reached.
Join yarn to the opposite side and mirror the shaping.
The neckline in the photograph is broad and softly rounded rather than deep.
Back Panel
Make the back using the same width and lower shaping as the front.
Match the leg openings carefully.
Continue upward using the same textured stitch pattern.
Shape the armholes to match the front.
The back neckline can be approximately 2–4 cm higher than the front neckline.
If easier dressing is required, create a short center-back opening and finish it later with a button loop.
Crotch Opening Option
A baby romper is more practical when the crotch can open.
Instead of permanently sewing the entire crotch seam, add a narrow button or snap band.
Work several rows of sc across the front crotch tab.
Make a matching back tab.
Add securely attached snaps or properly sized buttonholes.
Any closure used on baby clothing must be attached firmly and inspected regularly.
Joining the Main Body
Place the front and back panels with right sides together.
Join the shoulder seams first.
Next join the side seams from the lower armhole to the beginning of each leg opening.
Turn the garment right side out.
Check that both armholes and both leg openings are symmetrical before adding borders.
Neckline Border
Join blue yarn at the back neckline.
Round 1
Work sc evenly around the neckline.
Do not place too many stitches around curved areas.
Round 2
Work one sc in each stitch.
If the neckline flares outward, decrease several stitches evenly around this round.
Fasten off.
Armhole Borders
Join blue yarn at the underarm.
Round 1: Sc evenly around.
Round 2: Sc in each stitch.
Repeat for the second armhole.
Measure both finished openings. Their circumferences should be nearly identical.
Leg Borders
Join blue at the inner leg.
Work one round of sc evenly around the complete opening.
For a slightly firmer edge, work a second round of sc with a hook 0.25–0.5 mm smaller.
Repeat on the opposite leg.
The edge should lie flat against the garment without pulling the opening inward.
Large Blue Bow
The oversized bow is the main upper-body decoration.
Bow Rectangle
With blue, chain enough stitches for a rectangle approximately 16–20 cm wide for a small baby romper.
Row 1: Sc across.
Row 2: Ch 1, hdc across.
Repeat these two rows until the rectangle measures approximately 7–9 cm high.
Fasten off.
Shape the Bow
Fold both short edges slightly toward the center.
Pinch the exact middle into several accordion folds.
Wrap blue yarn tightly around the center several times.
Secure on the back.
Bow Center Band
Ch 5–7 depending on yarn thickness.
Work sc rows until the strip wraps around the center of the bow.
Wrap the strip around the pinched center and sew the ends together on the back.
Bow Tails
Make two.
Ch enough stitches for approximately 8–10 cm.
Work sc across.
Continue for 3–4 rows.
Decrease at the final end to create a tapered point, or fold the lower edge into a soft V.
Attach both tails behind the main bow.
Sew the completed bow securely to the upper front of the romper.
Whale Appliqué
The whale is made separately and sewn onto the lower front.
Whale Body
With blue yarn, ch 12.
Round 1: Beginning in second ch from hook, sc across. Work 3 sc in the final chain. Continue along the opposite side of the foundation chain and work 2 sc in the first chain. Join.
Round 2: Increase around both curved ends while working one sc across the straighter sections.
Round 3: Continue increasing only around the ends until an oval body forms.
Do not add increases across the center section.
Whale Head
At one end of the oval, work several hdc and dc stitches to increase the height of the head.
Use sc toward the lower edge to maintain the rounded whale silhouette.
Fasten off.
Whale Tail
Join blue yarn at the narrow rear end.
Ch 5.
Work back along the chain:
sl st, sc, hdc, dc.
Join to the body.
Repeat in the opposite direction to make the second tail fluke.
Shape both flukes with the yarn needle when sewing the appliqué down.
White Whale Belly
With white yarn, crochet a narrow curved strip approximately the length of the lower whale body.
Begin with a chain.
Work sc across, using hdc or dc near the center if extra depth is needed.
Pin the strip along the lower part of the whale.
Sew around its perimeter with small stitches.
Whale Face
Embroider the closed eye with black yarn.
Use a short curved line for the eye and a second curved stitch for the mouth if desired.
A tiny pink crocheted circle can be used for the cheek, but it must be sewn down completely around its circumference.
Do not use a loose plastic safety eye on a baby garment.
Water Spout
Use white yarn.
Embroider a short vertical stem above the whale’s head.
For each water droplet, ch 4.
Work 2–3 hdc into one chain space and taper with sc or sl st.
Make three small droplets and sew them above the whale.
White Bubble Details
The small white dots across the blue body can be crocheted as tiny flat bobbles.
Make an MR.
Work 6 sc into the ring.
Pull the center closed tightly.
Join and leave a sewing tail.
For very small bubbles, use only this single round.
Make approximately 10–16 bubbles, depending on garment size.
Arrange them irregularly rather than in straight rows.
Crochet Star Appliqué
Make two or three stars with white yarn.
Begin with an MR.
Work 10 sc into the ring and join.
For each point work:
ch 4, sl st in second ch from hook, sc in next ch, hdc in next ch, skip one base stitch, sl st in next base stitch.
Repeat until five points are formed.
Fasten off and lightly shape the points.
Ocean Waves
The waves can be embroidered directly onto the romper rather than crocheted as heavy separate pieces.
Thread the yarn needle with white yarn.
Create a loose wavy line below the whale using repeated curved surface stitches.
Add a second blue wave slightly above or below the white line.
Keep the stitches flexible so they do not pull the romper fabric inward.
Decorative Placement
Lay the finished romper flat before sewing any appliqués permanently.
Place the bow below the neckline.
Position the whale in the lower center or slightly to one side.
Place the two stars around the whale while leaving enough room for the wave lines.
Scatter the white bubbles from the lower body toward the chest.
Pin everything first.
Check that no appliqué crosses a leg opening, side seam, crotch closure, or armhole.
Optional Back Opening
If the neckline does not stretch comfortably over the baby’s head, create a small back opening.
Leave approximately 5–7 cm of the upper center-back seam open.
Work sc evenly around the opening.
At one upper corner, make a small chain loop.
Attach a securely sewn button to the opposite side.
Alternatively, use a baby-garment snap instead of a button.
Adjusting the Pattern for Different Sizes
Do not enlarge the romper simply by using a larger hook. That changes fabric density as well as dimensions.
Instead, calculate the required panel width from the blocked gauge.
For example, if the gauge is 2 stitches per cm and the required flat front width is 24 cm:
24 × 2 = 48 stitches.
Add only the stitches required by your chosen edge or seam construction.
Use the same calculation for body length. Compare the work against actual measurements while crocheting.
Yarn Quantity
Yarn consumption depends heavily on size, gauge, and yarn construction. For the most accurate estimate, make and weigh a gauge swatch.
Record the swatch area and weight.
Estimate the garment’s total fabric area, then calculate the approximate yarn requirement proportionally.
Add separate allowances for the bow and appliqués, followed by approximately 10–15% extra for swatching, seams, and adjustments.
Alternative Colorways
Ocean Blue
Use navy for the body, pale blue for the whale, and cream for the stars and bubbles.
Mint and Cream
Make the romper pale mint with an ivory whale and sage-green details.
Lavender Sea
Use soft lavender for the body, white for the whale belly and stars, and dusty purple for the bow.
Neutral Version
Use oatmeal for the romper, warm cream for the ocean details, and muted blue for the whale.
Assembly
- Block the front and back romper panels lightly and compare their total length, armholes, and leg shaping.
- Join the shoulder seams, then sew the side seams without stretching the fabric.
- Complete the neckline, armhole, leg, and crotch borders before adding decorative pieces.
- Make the large blue bow, center band, and two bow tails, then attach them securely below the neckline.
- Crochet the whale body, tail, white belly, and water droplets, then embroider the face.
- Pin the whale to the lower front and sew completely around the appliqué so no edge can lift.
- Make the white stars and position them around the whale without overlapping the leg openings.
- Make the small white bubbles and distribute them irregularly across the front panel.
- Embroider the white and blue ocean waves below the whale and weave all yarn tails into the wrong side.
- Inspect every appliqué, closure, seam, and decorative element before washing and laying the romper flat to dry.
The completed garment should remain flat through the torso, with symmetrical leg openings and securely attached decorative elements.
7 Technical Tips
- Leg openings curling inward: too few border stitches will pull the opening smaller. Lay each leg flat after the first edging round and add stitches where the curve begins to cup.
- Armholes stretching: work the final sc border with a hook approximately 0.25–0.5 mm smaller than the body hook. Stop if the smaller hook begins pulling the shoulder fabric into wrinkles.
- Bow collapsing: a bow rectangle that is too narrow will not hold the broad folds shown in the design. Aim for a height of approximately 7–9 cm before pinching the center.
- Whale appliqué buckling: pin the whale at the head, tail, upper edge, and belly before sewing. If its perimeter is larger than the space underneath it, reshape or block the appliqué instead of forcing it flat.
- Bubble decorations becoming loose: sew each small circle around several points of its perimeter rather than securing it with one center stitch. Check every decoration by gently pulling it before the garment is worn.
- Side seams becoming different lengths: count rows on both front and back panels before joining. A difference of even 2–3 rows can make one leg opening sit higher than the other.
- Neckline flaring: remove approximately 5–8% of the stitches on the second edging round if the border stands away from the fabric. Spread those decreases evenly instead of placing them all at the shoulders.
Baby Garment Safety
Every decorative element should be sewn firmly to the garment. Avoid beads, loose buttons used only as decoration, long cords, and removable pieces.
The bow should be stitched through multiple points across its back rather than attached only through the center band.
Check the whale, bubbles, stars, and closures before each use. Replace or repair any piece that begins to loosen.
The finished romper should allow comfortable movement through the chest, hips, crotch, and upper legs.
Care Instructions
Follow the washing instructions for the selected yarn. A washable cotton or cotton-blend yarn is practical for this project.
Place the garment in a laundry bag if machine washing is permitted by the yarn label.
After washing, reshape the bow, whale, neckline, and leg openings while damp.
Lay flat to dry. Hanging a wet crochet romper can stretch the shoulder area and change the body length.
Conclusion
This blue whale baby crochet romper pattern works best when the garment is completed and fitted before any decorative pieces are attached. Start with a washed gauge swatch, calculate the body width from actual measurements, and check the leg openings before finishing their borders. Add the bow only after the neckline is stable, then position the whale, bubbles, stars, and waves on the finished front panel. For your next step, measure a well-fitting baby romper and record its chest width and shoulder-to-crotch length before choosing the starting chain. Save the idea on Pinterest or share the finished project on Instagram with #BlueWhaleBabyRomper. Would you keep the whale centered or move it toward one side as shown in the ocean scene?









