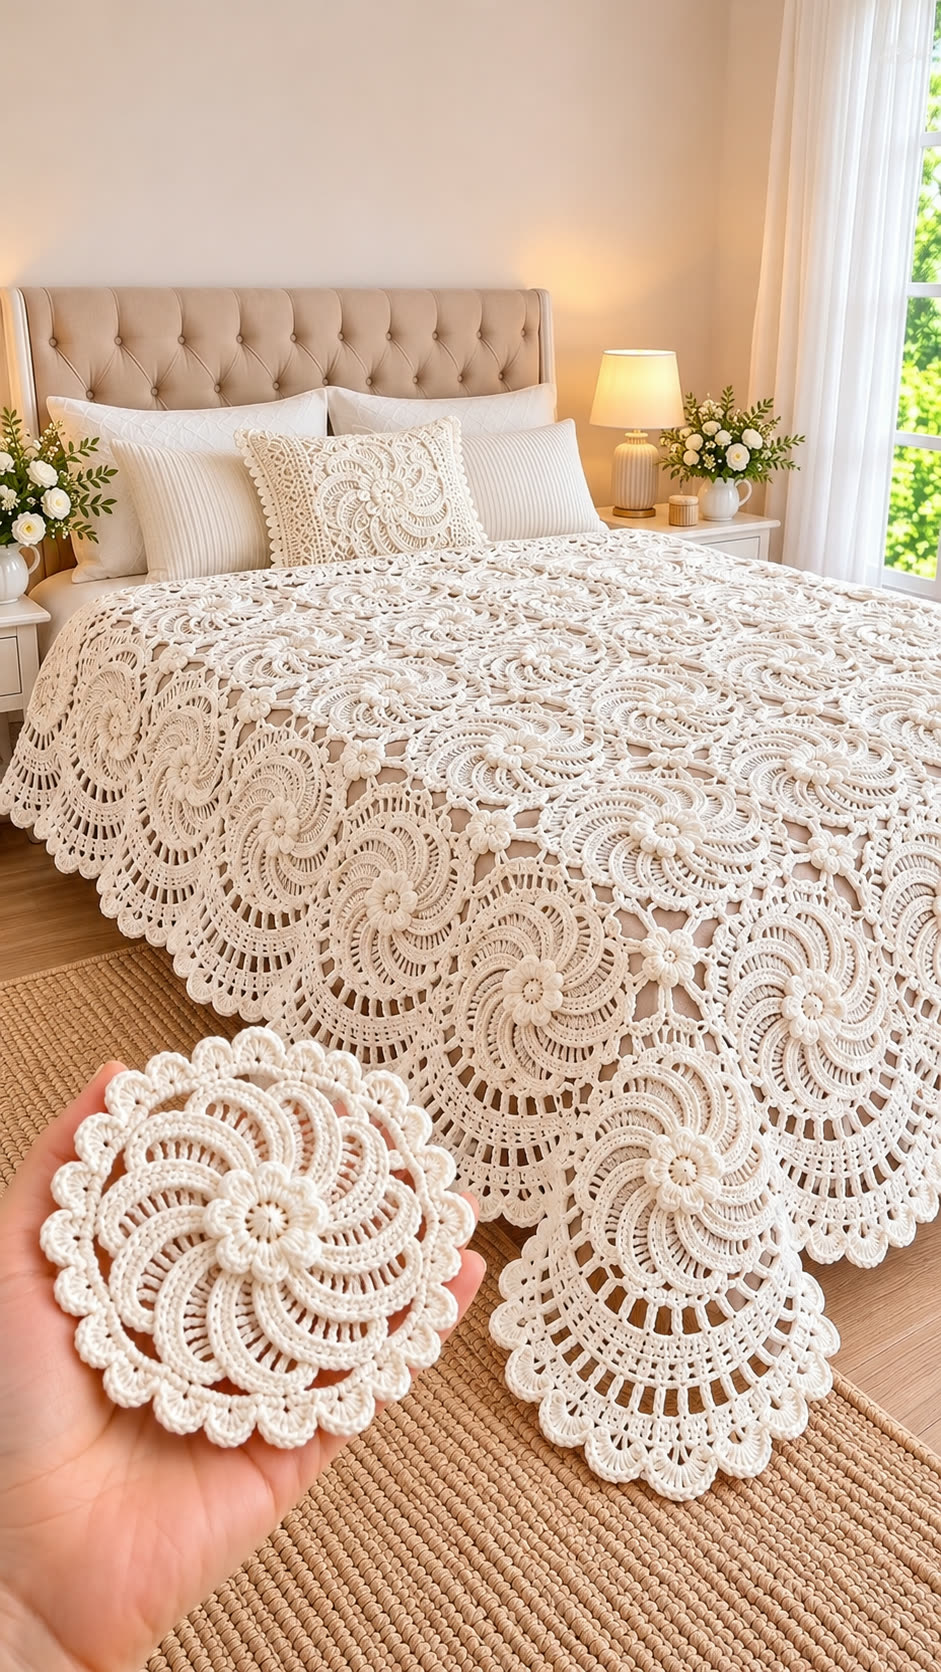
Crochet Flower Bedspread Pattern: Ivory Spiral Lace Motifs and Scalloped Edging
Introduction
The raised flower at the center of each ivory lace medallion creates the structural challenge in this crochet flower bedspread pattern: maintaining a flat outer ring around a dimensional center. Designed for DK cotton and a 3.5 mm hook, this intermediate-to-advanced project targets approximately 210 × 240 cm. Repeating motifs allow the maker to adjust the bed cover’s width, length, and decorative drop.
The Design: What Makes This Ivory Floral Bedspread Different
Three structural choices define this floral crochet bedspread. First, a compact six-stitch center expands into a circular foundation, supporting raised petals without requiring a separate stuffed element. Second, twelve evenly spaced chain arches create the openwork needed for a lightweight crochet lace bedspread. The arches distribute tension around the central flower and provide predictable locations for joining.
Third, the scalloped outer treatment softens the transition between circular motifs. Rather than forcing every flower into a dense square, the proposed layout connects motifs at selected points and leaves controlled openings between them.
A frequent mistake with circular floral designs is adding too many stitches to the outer rounds. The center then lies flat while the perimeter ripples. This version limits increases before changing to chain-space construction. The resulting motif is intended to retain its circular outline after blocking.
Project Info at a Glance
| Project Detail | Specification |
|---|---|
| Skill level | Intermediate–advanced |
| Estimated time | 80–140 hours, planning estimate |
| Finished size | Target 210 × 240 cm |
| Crochet hook | 3.5 mm |
| Yarn | DK cotton |
| Main color | Ivory |
| Construction | Individual floral medallions |
| Joining | Chain bridges and sewn anchor points |
| Border | Scalloped edging |
| Best for | Decorative bed cover, lace coverlet |
| Terminology | US crochet terms |
The finished dimensions and time estimate require confirmation from a completed sample. For comparison, Sara Huntington’s Motif Bedspread uses DK cotton, a 3.5 mm hook, and a finished measurement of 132 × 198 cm.
Materials and Tools
Yarn
- Ivory DK cotton yarn — preliminary allowance of 2,000–3,000 g for a large bedspread; calculate the final quantity from a weighed sample.
- Optional matching ivory cotton — approximately 100–200 g reserved within the total allowance for additional flowers, connectors, or repairs.
- Suggested yarn family — smooth, tightly spun DK cotton with consistent yardage and minimal surface fuzz.
Use the same yarn weight and preferably the same dye lot throughout. The sample in the reference photograph appears monochromatic, so contrasting yarn is not necessary.
A comparable published bedspread uses Phildar Phil Coton 4, a DK 100% cotton yarn. This is a useful material reference, not proof of the yarn used in the image. Source.
Tools
- 3.5 mm crochet hook
- 3.0 mm hook, optional for firmer flower centers
- Tapestry needle with a blunt tip
- Locking stitch markers, at least 12
- Measuring tape marked in centimeters
- Digital kitchen scale with 1 g resolution
- Blocking mats and rustproof pins
- Sharp scissors
- Notebook for recording motif measurements and yarn usage
No stuffing, safety eyes, or amigurumi assembly materials are needed.
Abbreviations and Stitch Guide
| Abbreviation | Meaning |
|---|---|
| MR | Magic ring |
| sc | Single crochet |
| inc | Two single crochets in one stitch |
| dec | Single crochet decrease |
| sl st | Slip stitch |
| ch | Chain |
| hdc | Half double crochet |
| dc | Double crochet |
| tr | Treble crochet |
| BLO | Back loop only |
| sp | Space |
| st | Stitch |
| rep | Repeat |
| FO | Fasten off |
An invisible decrease is worked through the front loops of two adjacent stitches, but this decorative lace design does not require decreases in its principal motif.
Important Pattern Notes
The flower foundation uses continuous spiral rounds. Later lace rounds are joined with slip stitches, because their chain arches require clearly defined starting points.
Numbers in parentheses indicate the number of completed stitches, arches, or petal groups. Chain spaces are counted separately from ordinary stitches.
Pattern testing disclosure: The following is an original design proposal. Its arithmetic has been checked, but the motif’s finished geometry, joining tension, and final bedspread dimensions have not been validated by crocheting a physical sample.
Pattern — Step by Step
Part 1: Circular Flower Foundation (Make One Per Motif)
Yarn: Ivory DK cotton. Construction basis: standard six-stitch circular increase mathematics.
R1: Work 6 sc into MR. (6)
R2: Inc in every stitch. (12)
R3: Repeat [1 sc, inc] six times. (18)
R4: Repeat [2 sc, inc] six times. (24)
R5: Repeat [3 sc, inc] six times. (30)
R6: Repeat [4 sc, inc] six times. (36)
Sl st into the next stitch to level the spiral. Do not fasten off.
Place a removable marker at the beginning of each round. The foundation should form a relatively flat disc.
If the disc develops a pronounced bowl shape, inspect the increase placement before changing hook size. If it ruffles, confirm that no increase has been repeated accidentally.
Part 2: Raised Central Flower (Make One Per Motif)
Yarn: Ivory. Worked directly onto the 36-stitch foundation.
R7: Repeat [sl st in next stitch, ch 3, 3 dc in next stitch, ch 3, sl st in next stitch] twelve times. (12 petal groups; 36 foundation stitches used)
Each repeat consumes three foundation stitches. The chain loops form the sides of the petal, while the three double crochets create the raised center.
Fasten off, leaving a 15 cm tail.
The flower should remain centered on the circular base. Its outer petals are decorative rather than structural; the surrounding lace will be attached separately.
Part 3: Openwork Lace Ring (Make One Per Motif)
Yarn: Ivory. Join a new strand to the unused rear loop area near the outer edge of the foundation.
R8: Repeat [sc in the next available foundation position, ch 5, skip two foundation positions] twelve times. Join with sl st to the first sc. (12 sc anchors, 12 ch-5 arches)
For this round, treat the 36 foundation positions as equally spaced attachment locations. Work behind the raised flower, not into its decorative petal stitches.
R9: Sl st into the first ch-5 arch. Work [sc, hdc, 3 dc, hdc, sc] into each arch around. (12 scallop groups; 84 stitches)
R10: Join new yarn at the center dc of any scallop. Repeat [sc in the center dc of the next scallop, ch 7] around, joining the final chain to the first sc. (12 sc anchors, 12 ch-7 arches)
Fasten off. Leave a 20 cm tail.
The twelve outer arches form the principal joining locations. Mark every third arch to identify four evenly spaced connection points.
Part 4: Optional Raised Spiral Ribs (Make One Set Per Motif)
Yarn: Ivory. Surface decoration.
The photographed medallions have pronounced curved ribs that appear to spiral away from the central flowers. Exact reproduction would require the original stitch diagram or a carefully tested reconstruction.
For a simpler raised effect, work surface slip stitches along selected lines between the flower and the outer lace. Use twelve evenly spaced starting positions, keeping each line approximately the same length.
Do not pull the surface stitches tight. A shortened surface line will draw the lace inward and distort the medallion.
Fasten off each line and weave its ends into the reverse side.
This optional treatment creates texture, but it is not a verified recreation of the photograph’s distinctive spiral geometry.
Part 5: Small Connector Flowers (Make as Needed)
Yarn: Ivory. Used in selected openings between larger motifs.
R1: 6 sc in MR. (6)
R2: Inc in every stitch. (12)
R3: Repeat [sl st in next stitch, ch 3, 3 dc in next stitch] six times. (6 petal groups, using 12 foundation stitches)
Fasten off with a 20 cm sewing tail.
Position these small flowers only after the main motifs have been joined. The photograph contains small floral connectors, but their precise placement and quantity cannot be determined reliably from the image.
Part 6: Joining the Large Floral Motifs
Lay four completed motifs on a flat surface in a two-by-two arrangement. Position the four marked cardinal arches of each motif toward the neighboring motifs.
For each adjacent pair, bring the corresponding outer chain arches together and sew through the central chain of both arches using matching yarn. Add two further securing stitches at nearby chain positions if needed.
Leave the unjoined arches open. These spaces are part of the lace structure, not defects.
Work outward from the central group, adding motifs in rows. Avoid pulling the connections tight enough to overlap neighboring scallops.
Important structural limitation: Four-point joining of circular motifs creates an open lattice, not a solid rectangular fabric. The exact horizontal and vertical pitch must be measured from a joined sample. If the gaps are too large or the panel twists, additional connector chains or revised attachment points will be necessary before scaling up.
Part 7: Decorative Scalloped Outer Border
Yarn: Ivory. Worked around the completed panel.
First, establish a continuous foundation along the exposed outer arches. Attach yarn at a stable joining point and work sc stitches into the outer chain spaces, using enough stitches to keep the edge flat.
At large gaps, bridge between adjacent motif edges with chain stitches and secure the chains at the next stable anchor.
After completing the foundation, work the following decorative repeat where the stitch count permits:
R1: Repeat [skip 2 stitches, 5 dc in next stitch, skip 2 stitches, sc in next stitch] around. (One scallop per six foundation stitches)
At corners, use additional stitches or a wider chain bridge to prevent pulling. Do not force a six-stitch repeat across a corner if it causes distortion.
R2, optional: Work one round of slip stitches along the edge, placing loose stitches around each scallop.
Fasten off with a 20 cm tail.
The final border count depends on the completed panel’s perimeter. Record the foundation count before starting the scallop round.
How Many Motifs Do You Need?
The motif count depends on the effective spacing between joined centers, not simply the diameter of an individual unjoined flower.
For planning, suppose a blocked and joined motif occupies approximately 20 cm horizontally and vertically.
| Planning measurement | Example |
|---|---|
| Target width | 210 cm |
| Target length | 240 cm |
| Motif pitch | 20 cm |
| Motifs across | 11 |
| Motifs down | 12 |
| Total main motifs | 132 |
A 210 × 240 cm target with a 20 cm pitch produces a planning grid of 11 motifs across and 12 down, or 132 motifs. This is a calculation, not a verified motif count for the photographed bedspread. Actual size must be confirmed by blocking and measuring a joined sample. A partial edge motif or border adjustment may be needed.
Yarn Quantity: Calculate Before Buying
A large crochet bedspread requires substantially more yarn than a decorative throw. The openwork reduces yarn consumption compared with dense crochet, while raised flowers and scalloped borders add material.
Use a digital scale to weigh one complete, blocked motif. Include its flower and surface decoration.
For example, if one motif weighs 18 g and the planned bedspread requires 132 motifs:
- Main motifs: 132 × 18 g = 2,376 g
- Joining and edging allowance: 250 g
- Subtotal: 2,626 g
- With a 10% reserve: approximately 2,889 g
This is an illustrative estimate. A real motif could weigh considerably more or less.
The published Motif Bedspread by Sara Huntington specifies 1,600 g of main-color yarn and 150 g of contrast yarn for a different 132 × 198 cm design. Its quantity demonstrates why weight comparisons must account for the particular stitch structure and dimensions.
Assembly — 10 Steps
- Block the first motif. Record its diameter, effective joining pitch, and dry weight.
- Confirm the layout. Calculate the number of motifs required for the desired width and length.
- Make the main motifs. Complete their centers, raised petals, lace rings, and optional surface decoration.
- Arrange the panel. Place all motifs right side up and align the marked connection points.
- Join the center section. Connect a small group first, then measure it for distortion.
- Extend the rows. Add motifs from the center outward while maintaining consistent spacing.
- Attach small flowers. Sew optional connector flowers into selected open spaces.
- Prepare the perimeter. Add foundation stitches or chain bridges along the outside edge.
- Work the scalloped border. Complete the decorative edging and weave in remaining tails.
- Block the finished bedspread. Shape it to its measured dimensions and allow it to dry completely.
The finished panel consists of joined floral motifs, optional connectors, and a continuous outer border.
7 Technical Tips for a Professional Finish
- 1. Prevent missed increases. Place a stitch marker at the beginning of every foundation round. The sixth round must contain exactly 36 stitches before the raised flower is added.
- 2. Control flower-center tension. A loose magic ring can leave a visible hole larger than 5 mm. Tighten the ring before securing the yarn tail through several stitches on the reverse side.
- 3. Avoid distorted lace arches. Each R8 chain arch contains exactly five chains, while each R10 arch contains seven. Inconsistent chain lengths create unequal joining distances and visible waves across the panel.
- 4. Check the attachment points. Mark every third outer arch to create four cardinal joining locations. A one-arch alignment error can rotate the motif and cause diagonal tension across the bedspread.
- 5. Test the yarn’s behavior. Cotton can change dimensions after washing and blocking. Wash and dry a sample of at least four joined motifs before calculating the final bedspread dimensions.
- 6. Pin before sewing. Pin a two-by-two group on a blocking mat and measure both diagonals. If the diagonals differ noticeably, adjust the join tension before repeating that method across the full bedspread.
- 7. Secure yarn tails properly. Leave approximately 15–20 cm for finishing and weave each tail through several stitch paths in different directions. A single straight pass can work loose during laundering, particularly around open lace arches.
Care and Maintenance
Cotton lace can become heavy when wet, especially in a large bedspread. Check the yarn manufacturer’s washing instructions before cleaning.
For a delicate, highly textured coverlet, handwashing in cool water is a conservative option. Support the wet fabric when lifting it, avoid twisting, and dry it flat where practical.
Do not hang a saturated bedspread by one edge. The combined weight of the yarn and water can stretch the motifs and weaken their joining points.
Store the bedspread folded in a dry, ventilated location. Avoid prolonged direct sunlight, which may discolor ivory yarn over time.
Frequently Asked Questions
Can beginners make this crochet bedspread?
The foundation circles are accessible to crocheters familiar with basic increases. However, the raised flowers, openwork joining, large-scale measurements, and border adjustments require more experience. Practice with four motifs before attempting a full bedspread.
What yarn is best for a floral lace bedspread?
Smooth cotton yarn is a practical choice because its stitch definition makes the flower centers and chain arches visible. DK cotton produces a more substantial coverlet than fine crochet thread. The final selection depends on the desired drape, weight, and care requirements.
Can I make the bedspread larger?
Yes. Add more motifs across the width or along the length. Measure the effective pitch of a joined sample rather than multiplying the diameter of a loose motif.
Is this the exact pattern from the photograph?
No. The instructions are an original interpretation of the photographed design. The image does not reveal enough information to reconstruct every spiral rib, joining stitch, or edge treatment accurately.
How do I keep the bedspread flat?
Start with correct stitch counts, use consistent chain tension, and block a small joined sample. If the sample ripples or pulls inward, correct the problem before making the remaining motifs.
Conclusion
This crochet flower bedspread pattern uses raised floral centers, circular lace rings, and selected joining points to create a modular ivory coverlet. The construction can be adapted to different bed dimensions, provided the maker measures the actual joined motif spacing before committing to a full layout. Begin by crocheting four motifs, joining them, and recording their finished dimensions and yarn weight. Use those measurements to refine the material estimate and border treatment. Save the project to Pinterest or share a completed sample on Instagram with #IvorySpiralLaceBedspread. When arranging the raised flowers, do you prefer their spiral details aligned in the same direction or alternated between neighboring medallions?









